Tools for laying laminate flooring are simple, inexpensive and can be found in the collection of almost any home craftsman. Of course, there are specialized tools for laying flooring, such as special tools for laying linoleum. However, a home master can get by with a more modest set. Therefore, it is worth listing the most necessary things that may be needed for laying flooring.
Roulette
Laminate flooring cannot be laid without taking various types of measurements. It is necessary to have confidence in their correctness, since mistakes made can slow down the work and may entail additional financial costs.
The tape measure is the most important measuring tool for laminate flooring. It is necessary at every stage, including for determining the total area of the room and the length of the lamellas:
- The recommended length of the tool is 5 meters;
- the tip should easily cling to the edge of the panels and not slip off;
- It is optimal to use a product of an ergonomic shape with a rubberized body, since such properties guarantee ease of use and fixation of the tool in the hand.
Marking tools
Marking tools include the usual tape measure or a steel carpenter's meter. It is important to choose a device that not only fits comfortably in your hands, but also does not have any drawbacks that could affect the accuracy of the measurement. Cutting lamellas without errors is the key to quality installation.
A metal ruler of considerable length can act as a marking tool. However, it is worth noting: during the work, you will also have to measure the room. Therefore, it is recommended to use a high-quality tape measure with a length of 5 meters or more.
A construction or carpenter's angle is used to draw cut lines. Do not use a hard pencil. It may leave scratches on the slats. It is convenient to use a water-soluble thin marker or a soft pencil. If you still damaged the laminate, then read on how to repair laminate.
Important! Each instrument has its own error. Therefore, all lengths need to be measured with only one device. Changing tape measures is not recommended. Good results are obtained with metal rulers and meters of instrumental class, with a permissible error of 0.5 mm per meter. Using this meter you can evaluate the accuracy of the tape measure.
Markup tools
Square
Another laminate tool to ensure the panels are cut correctly is a square. When filing lamellas, it is necessary to accurately apply the markings. The cutting line should be perpendicular to the border. The square makes it possible to draw it strictly at a right angle.
A tool with a length of 25 to 35 cm is optimally suited for work. It is advisable to choose a product with a special stop, as it increases the convenience of work. It is recommended to purchase the option with the ability to change the angle if you need to get an accurate measurement of the adjacent walls and transfer it to the panel.
Tapping laminate flooring against a wall using special tools
Outline template and protractor
When talking about what tools are needed for installing laminate flooring, we cannot ignore these tools. With their help, you can accurately transfer the bends of pipe structures, communications and various objects for precise cutting.
The contour template consists of several touching plates that can be moved in parallel. As a result of using the tool, it is possible to ensure a perfect fit of the laminate to the pipes.
A protractor will be needed if it is necessary to cut panels diagonally. Using the tool, you can easily draw lines at right angles, which ensures precise cutting of the lamellas.
Measuring and marking tool
An old proverb says: “Measure twice, cut once.” This applies to any type of construction work, and laying a finished floor is no exception. So, before starting to install laminate or parquet boards, the master must be sure how many boards he will need, how many whole elements and what needs to be trimmed. For these purposes, an elementary universal tool is used.
Rice. 3. Marking laminated boards
Roulette
This measuring device is sold in every hardware store, has a basic structure, and differs only in the quality of the body and the length of the steel tape. For ease of measurement, the length of the tape measure should be greater than the longest dimension of the room. In this case, the master can measure the length of the floor in one pass, which eliminates errors.
Rice. 4. Working with a tape measure
Professionals often use laser tape measures, which are much more expensive than regular tape measures, but at the same time convenient to use, and the built-in calculator allows you to store the results obtained as a result of measurements and calculate the coverage area.
Construction pencil or marker
In order to prepare the laminate for installation, it is necessary to mark it before further trimming. The most convenient tool for this is a construction pencil with a soft oval lead or a permanent marker. With the help of these simple office supplies, 2 tasks are solved at once:
- The starting point for positioning the first floor element is in accordance with the mark fixed on the substrate.
- Trimming laminate flooring where necessary.
Rice. 5. Construction pencil
It is worth remembering that permanent marker is very difficult to remove from the surface, and it is best to apply markings on boards from the back side.
Square
A faithful companion for an apartment renovation specialist, because with the help of this simple tool you can perform the following manipulations:
- Draw a perpendicular, straight line for trimming any element.
- Check all the corners in the room and the correct installation of the laminate after installing several planks.
Rice. 6. Working with a professional square
It is better to purchase a square in a construction store rather than a stationery store, since a professional tool has a high degree of accuracy and is made of high-quality steel for reliable and long-term operation.
Steel ruler
The last tool. Necessary for marking the floor. In many cases, a tape measure can replace this, but using a durable, high-quality metal ruler, 30 to 100 mm long, is best suited for preparing floor elements for installation, for example, when longitudinal trimming is required.
Rice. 7. Steel ruler 1000 mm
Stationery or construction knife
A stationery knife is considered a universal type of tool for flooring, as it is suitable for cutting various materials:
- Usually it is used to cut the substrate and remove excess.
- It is convenient for them to open packages containing building materials.
- Sometimes a construction knife is used to cut the laminate, ensuring precise cutting several times along the marking line.
It is acceptable to leave a few millimeters of thickness, carefully breaking the lamella.
Preparatory work
Laying the laminate begins with determining the direction of installation.
There is a general rule for flooring, according to which laying is done along the windows. Although this is not a dogma, for example, layout features or diagonal laying are a logical deviation from the rules.
Installation is carried out either from the corner farthest from the entrance, or from the door. First of all, the number of boards by width is calculated.
If the width of the last row is less than 5 cm, then it will be necessary to cut the boards of the first and last rows, preferably symmetrically.
Scotch
When talking about what tools are needed for laminate flooring, we must not forget about such an absolutely necessary thing as adhesive tape. Separate sheets of backing are glued together using tape.
As a result, there is no slipping during installation, which can lead to deterioration in the quality of the coating. It is recommended to choose thick tape with a good adhesive composition.
If it turns out to be excessively hard, then various rustling sounds may occur when walking on the floor in the future, so this point must be checked in advance.
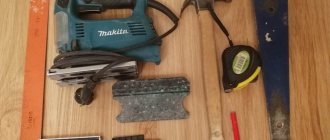
Jigsaw
Equipment for installing and replacing laminate must include a jigsaw or hacksaw. Using a jigsaw, panels are cut, holes are cut and various bends are formed.
Working with such a tool is simple and convenient, as it allows you to create neat and straight cuts.
It is optimal to choose a tool with a power of 500 W, giving preference to the middle price segment. A cheap option can quickly break due to the load. You definitely need to purchase a set of files.
Drill
Using a drill, holes are formed for self-tapping screws in a situation where the base is planned to be formed from plywood sheets. This tool will come in handy when installing skirting boards and thresholds.
When laying and replacing flooring with your own hands, a drill is often used to form neat holes for pipe structures and communications. It is optimal to use feather drills and a crown attachment.
It must be remembered that the hole formed for the pipe should be 4-7 mm larger than the diameter of the element.
What can laminate flooring be laid on?
Preparatory work includes not only calculating the material and purchasing tools, but also preparing the foundation. A surface whose height differences exceed 2 mm/m needs adjustment. Laminate flooring is laid on uneven floors using underlays. They can compensate for slight unevenness in the base. If the differences exceed the capabilities of the substrates, more effective methods are used:
- surface grinding;
- filling with self-leveling compounds;
- leveling with plywood sheets, fiberboard.
Laying laminate flooring on a wooden floor
There are simple instructions on how to lay laminate flooring with your own hands on a wooden floor:
- The old floor joists are reinforced with self-tapping screws and dies to prevent squeaking.
- A cement-bonded particle board (CPB) is attached on top of the old boards.
- The surface is cleaned, cellophane is glued to the walls.
- The surface of the DSP is primed.
- A thin-layer self-leveling floor is poured and leveled with a rubber roller.
- After drying, the floor is primed.
- The backing is laid, the joints are fixed with tape.
- The planks of the first row are joined to each other with the narrow side - at an angle and downwards. Wedges are inserted between the boards and the wall.
- Further rows are placed in the same way - the planks interlock with the previous row and with each other. The last dies are pressed using a pry bar.
- The last thing to adjust is the threshold.
https://youtube.com/watch?v=ss1NZGHgrH0%250D
Laying laminate flooring on a concrete floor
If the base is made of slabs, then the technology of laying laminate on a concrete floor is used:
- Preparing the base. It is necessary to remove the old coating and clean the concrete slab from dust and debris. The self-leveling mixture is diluted with water and poured onto the floor.
- The solution is leveled with a spatula and rolled with a roller with rubberized spikes (to make the surface smooth, without air bubbles).
- The mixture hardens quickly, and you can begin finishing after a few hours.
- A backing is laid on a flat floor, the joints are secured with tape.
- The first row of lamellas is laid out from left to right. A wedge is inserted between the plank and the wall.
- Row after row the entire floor is covered with slats.
https://youtube.com/watch?v=Rig8gcAq5QU%250D
Laying laminate on linoleum
Old linoleum can be an excellent substrate for laminated flooring. It will provide additional heat and sound insulation. Laying laminate on linoleum yourself is carried out as follows:
- A flat floor is important; linoleum must be firmly attached to the base, intact (not dilapidated), and dry.
- A substrate is required when laying laminate flooring on linoleum. It will act as a shock absorber and protect the boards from cracks in the future. Before starting work, the surface must be thoroughly cleaned.
- Sheets of backing are laid out and glued together with tape.
- The laminate is laid shifting in rows, the boards are fastened together with locks.
https://youtube.com/watch?v=8gNmAFAjpKw%250D
Rubber hammer
To ensure reliable installation, the slats are equipped with a locking system. When laying and replacing laminate flooring, gaps sometimes remain, and a mallet or hammer is used to eliminate them. Manipulations must be carried out carefully, as there is always a risk of breaking the locking mechanism. For these purposes, use a tool weighing no more than 500 grams.
With a suitable set of tools, laying laminate flooring is easy
Preparing consumables
The consumable is not a tool. However, without it it will not be possible to lay either laminate or parquet boards. The list of consumables includes the following:
- plastic film or vapor barrier material;
- self-leveling mixture;
- paper tape;
- glue or sealant for laminate flooring.
Before you begin laying laminate flooring, you need to level the floor surface. If the base of the floor is concrete, a self-leveling mixture is used. Wood floors are leveled by covering the boards with plywood.
The film acts as a barrier, preventing moisture from penetrating the substrate. It is covered with a concrete base. Wooden floors are covered with vapor barrier material.
Paper tape is required to connect the joints formed when laying the substrate. If the substrate has a metallized coating, it is glued with tape and aluminum foil.
Adhesive or sealant is used to seal small cracks and crevices.
Spacer wedges
Laminate flooring is commonly referred to as a “floating” floor, as it can expand and contract depending on the humidity and temperature in the room. To eliminate the risk of deformation, a gap is left between the panels and places of contact with the wall, pipes and other structures, which ensures freedom of movement.
Wedges can have a thickness from 8 to 15 mm. Upon completion of the work, they are removed, and the remaining gaps are covered with plinth or other type of decorative element. Sometimes devices come in a set with laminate.
What's included in the kit
To install the coating, in addition to generally accepted and widespread tools, you will need specialized devices that are not used anywhere else. They are not mandatory, it is quite possible to do without them, but for people who lay large volumes of material, they are simply necessary.
Let's take a closer look at them.
Wedges
The laminate is laid in compliance with the thermal gap. In order to ensure this, point stops are required, since walls often have an uneven surface, which is why the smooth edge of the laminate panels is located at different distances from the walls.
The simplest and most convenient way to ensure a straight line of the first row and at the same time that each panel rests against the wall is mounting wedges. Quite a lot of them are required, since the wedges are inserted along both walls, to which the covering faces with the sides of the panels. In addition, wedges allow you to compact the canvas, reducing gaps and cracks between the panels.
Tamping block
During installation, the panels should be fitted to each other as tightly as possible. You can't do this with simple manual effort; you need to carefully tap the joints with a hammer. The block used for this must have a profile that allows the locking part of the panels to be kept intact, otherwise they will be damaged.
Laminate staples
This is a very simple device, but without it it is impossible to qualitatively join the last row of panels with the already laid canvas. There is no way to place a tamping block in the gap between the laminate and the wall, or hit it with a hammer.
The design of the bracket is a strip bent at the ends by 90° in opposite directions, with one bend being about 1 cm, and the second larger, about 4-5 cm. A small bend is inserted into the gap, and a large bend, located at a sufficient distance from the wall, You can hit it with a hammer to press the panels tightly against the main covering.
IMPORTANT! These three types of devices are included in the small set for laying laminate flooring. For specialists who deal with this on a professional basis, there are more solid things.
Laminate cutting machine
This device is a kind of photographic cutter. There is a sharp arc-shaped knife on the lever, which allows you to make a uniform cut. The panel is placed in a special slot, moved left and right to select the length, after which pressure on the lever is used to quickly and accurately cut it.
The device is very convenient, since in each row it is necessary to cut the outer panels to length. The only drawback is that this device does not cut in the longitudinal direction.
Clamps for laminate
These clamps are modified open-arm carpentry clamps. The length of this arm is long enough to allow multiple rows of panels to be pulled together
Provides tight adhesion, absence of cracks and gaps, which is very important for laminate
The composition of the laminate installation kit sold in stores may vary. It depends on how important the set manufacturer considered certain devices.
Most often, the composition contains the most specific and necessary tools - staples, bars and wedges, but there are sets with expanded configurations, which also include other necessary tools.
NOTE! Any kit does not contain a complete list of tools required for installation. Some of them will have to be purchased separately if they are not found among home appliances
Usually these are commonly used tools - a hammer, pliers, drill, etc.
Mounting bracket
The tool looks like a metal plate with bends at the ends at an angle of 90 degrees. Outwardly, it resembles the letter “Z”, and one of the ends is wider. The total thickness of the product usually varies within 5 mm.
The mounting bracket is necessary to tamp the last row, which is adjacent to the wall. Usually there is little space left between the vertical surface and the slats, which prevents the operation from being carried out in the usual way.
The bracket plays the role of a grip, with the help of which the board is held and the mallet is struck at the narrow end.
Laminate installation tool
Tools you will need:
- roulette,
- pencil,
- hammer,
- wedges,
- mounting bracket or wooden block,
- saw.
Since laminate is a fairly hard material, it is better to use a jigsaw with an appropriate file.