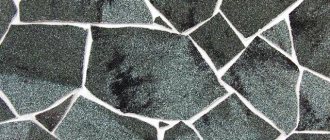
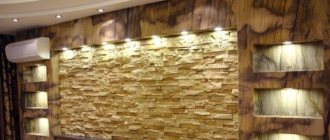
Decorating walls with artificial stone is fashionable, prestigious and aesthetically pleasing. You can't argue with this statement. This material is too good to refuse to use it, but too expensive to choose it without hesitation.
You can make a batch of material for a home decorative panel with your own hands. Fortunately, our users are ready to share their work in this area completely free of charge. There are several technological solutions that can be used at home with equal success. And today we will look at one of them: one that is based on the use of homemade silicone molds.
From the article you will learn:
- What materials are needed to make silicone molds for decorative artificial stone.
- All about making silicone molds yourself.
- Everything about pouring technology and the composition of mixtures for making artificial stone.
Why silicone
In fact, the molds (matrices) intended for the manufacture of artificial stone at home are made from various materials, natural and synthetic (wood, rubber, silicone, polyurethane, etc.). Each material has its own advantages and disadvantages:
- rubber molds - products are durable and easy to handle, but they are very difficult to make at home;
- polyurethane forms are elastic (which is their undeniable advantage), but difficult to manufacture;
- Silicone molds are quite durable, elastic and easy to make.
dronduletus FORUMHOUSE user
I mainly made the molds from sealant (silicone). It is better: this form conveys the relief better, and it is easier to remove the finished casting from it. If you cast a stone from plaster, such a mold can withstand up to 200 castings.
Gypsum casting process
The gypsum casting process consists of several stages. Casting into plaster molds itself takes minutes; much more time is spent on preparatory and final operations. Preparatory ones include:
- Making a product model.
- Design and production of a mold, or flask.
- Preparation of materials for casting and lubrication of the mold.
Gypsum casting process
Check that all necessary materials, equipment and tools are at hand, washed and cleaned from the last time. When casting, minutes count.
Immediately before casting into plaster, the molding box should be lubricated and the casting solution should be mixed. The raster should be poured into the hole in a thin stream, making sure to allow the air to escape. After pouring, the mold must be rotated and shaken slightly to achieve maximum adherence of the solution to the small details of the relief.
The final steps are no less important. They also determine the quality of the product. These include
- Drying (at natural temperature or on a radiator). Drying too quickly can cause the casting to crack.
- Disassembling the form. If it does not come away from the product well, you can lightly tap it with a wooden or rubber mallet.
- Removing sprues and reworking parts of the finished product.
- Cleaning the flask (if one or more castings are planned).
Casting in plaster molds is slightly different from casting in silicone molds. Silicone does not require lubrication, it is elastic and it is easier to remove the casting from it, and it also gives more opportunities for working out details.
Samples for making molds
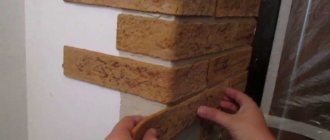
The first thing you will need to make silicone molds is samples of stones that you plan to produce at home. It is recommended to use several samples of the same type (master forms) at once, which differ in relief and texture.
This greatly enhances the richness of shapes and textures. The number of initial samples depends on your wishes and the area of the formwork that will be used to make the form. One form can be designed for one or ten different cells - it all depends on your needs and scope. You can start your “experiments” by making a mold for pouring one stone. To produce stones of the same type, it is better to make several identical shapes.
dronduletus
It is better to make 3-4 molds for 1 type of stone. This way it’s faster to pour stones, and the molds will last longer.
Initial samples are purchased on the construction market; they are widely represented in Moscow and other cities and regions.
Master molds for matrix production must have the highest quality surface possible. The surface of the samples should not be full of all kinds of cavities, open pores of concrete and other defects.
LiveInternetLiveInternet
Quote from message lj_master_klass
Read in full In your quotation book or community!
master class on making molds for ceramics and the subsequent production of such. I will try to tell you a little about how to make models for vases and much more. With the subsequent production of the vases themselves. In this post I made bodies for clay drums (darbuks)
First you need to make a small device - a frame for unscrewing blanks. It should be strong, nothing should be loose, especially the axle. And attach to it a template cut from tin calculated according to the sketch. I usually do this in Photoshop
then I tightly twist the reinforcing wires onto the axis (ordinary aluminum wire can be used)
Then we mix the plaster and dip old rags into it and wrap it between the reinforcing wires, constantly turning the axis so that the rags do not get out of the template
Then, when the gypsum has risen, we begin sequentially, portion by portion, throwing gypsum onto the growing workpiece. Each time waiting for the previous portion to set and all the time scrolling the axis in the same direction towards the template
ъ Soon the excess plaster will begin to be cut off with a template - it can be returned to the model. Gradually, as if by magic, the contours of the future model will begin to appear. We leave those parts that are completely filled
In the beginning, you can use poor grades of gypsum, mix it coarser, and you can also mix in hardened waste. Towards the end, the gypsum should be of higher quality, more liquid. And at the end we have such a product. We finish it over the entire surface with very thin plaster. Let's dry it. Sanding. All. The model is ready!
The axle can be removed with little effort. making a mold from the previously obtained model; the finished model is dried. Making a form
varnish a couple of times (nitro)
put the template back. And we cut out another one. We fill in large irregularities and blemishes with plasticine and cover them with a creamy household solution. soap
dilute and apply plaster. It is advisable to mix the gypsum in the required quantity at once or there will be differences in density at the joints
the first half is ready, cut holes for the locks and grease both the model and the first half of the mold at the junction with soap (carefully)
To be honest, I was afraid. I didn't make such big shapes. The weight of the entire assembled structure is 30 kilograms. But it must be manipulated... UV! latest actions here. In the morning I sculpted the second half of the form.
and then the most dangerous operation (considering the weight) is separating the halves. I had to tinker, but the model jumped out of the halves under its own weight! (with light tapping)
and now - it’s done! Now dry (I put a bottle for scale)
On Saturday I poured slip into the mold. First, I tightly tightened the halves of the mold with rubber and prepared a bucket of slip (clay diluted to the state of liquid sour cream)
And... it started to flood. It leaked a little in one place, but we overcame it by plugging it with our finger... every 10 minutes we had to add clay - the plaster absorbed water.
And an hour later the clay was poured out. The plaster absorbed some of the moisture and a layer of clay remained on the walls of the mold, which will become the product in the future.
We are waiting for the results. the clay should dry and shrink - then it can be easily taken out. Now it’s Monday, but it’s still too early to take it out - the clay is still too soft and the product will simply fold under its own weight. And now this giant oyster is open and inside... It worked!
Now let it sit a little longer and let it dry out, then we’ll get it out of the other half. My mistake in the first castings was that I kept the slip in the mold for a long time and when the remaining slip was poured out, the clay that had stuck to the walls of the mold became damp and fell off, well, it came out!
I cut off the bottom because it will be a drum, but no, it would be an excellent vase
The left one is already ready and will soon go into the oven
Firing and finished body
And now it’s almost 1000 degrees
These are our stoves
the workshop is not at all the place where it should be clean
And here it is, ready and ringing! Hooray! now pack and ship
https://community.livejournal.com/master_klass/185814.html
Formwork design for the mold
Having prepared several suitable stones as samples, you can begin to create the formwork. Considering that the chemical compounds that make up molding silicone (namely, it is best to cast a matrix for artificial stone from it) are quite strong reagents, it is very important to choose the right material for making formwork. To achieve our goals, sheet material with a smooth and chemically neutral surface is ideal: plywood, plastic, etc.
dronduletus
Silicone is a chemically active material. It easily corrodes some surfaces and quickly sticks to them. For formwork it is better to use PVC panels or some kind of plastic. Possibly plexiglass. Personally, I made the edge of the formwork from mayonnaise buckets.
To make the formwork, we need a chemically neutral base and four smooth walls (made of wooden slats).
The height of the slats should be selected so that the layer of poured silicone is at least 1–2 cm above the top point of the master mold.
The thicker the bottom of the silicone mold, the longer it will last. But making molds that are too thick results in wasted silicone. Therefore, when deciding on this parameter, everyone is looking for a “golden mean” for themselves.
Materials for making molds
At the very beginning, you need to understand what you can make molds from yourself. The most popular material is silicone-based sealant.
It has many advantages - these are:
- Reusable;
- Sold at any hardware store;
- The shape is clear;
- Dries quickly.
Some needlewomen do not make the mold from pure sealant, but dilute it with starch, the proportion is 1:1. Since some types of silicone are sticky and difficult to work with. The mixture needs to be mixed well, you should get a thick consistency, and then start making the product.
You can also make molds from polymer clay. This material is easy to use, ideal for beginner craftswomen.
Its consistency is plastic and viscous, and takes the shape of any object well. Dries quickly and can be used repeatedly.
Formwork assembly
Before assembling the formwork, the prepared master forms should be glued to the surface of the base. The distance between adjacent samples, as well as between samples and the walls of the formwork, must be at least 1 cm.
Ideally, the molds should be glued to the base of the matrix with hot glue (using a special gun).
If such equipment is not available, you can use regular silicone sealant. The sealant is applied to the underside of the master mold along its entire perimeter, after which the original sample is glued to the surface of the base.
It is very important to apply sealant (adhesive) along the entire perimeter. This will help avoid the formation of gaps between the master molds and the base. If any gaps remain, silicone will easily fill them. As a result, the finished silicone mold cannot be removed from the formwork.
Excess glue that is squeezed out beyond the outer contour of the master mold should be removed with a regular breadboard tool.
Once again making sure that there are no gaps left between the stones and the base, you can install the formwork walls. The formwork is attached to the base with self-tapping screws (it is better to drill holes for the self-tapping screws in advance). It is advisable to glue sealant tape between the walls of the formwork and the base, as well as on the ends of the walls.
This will reliably protect the formwork from silicone leaks.
Applying a separator
A separator is a composition that is applied to the inner surface of the formwork, as well as to the samples used. The separator prevents the silicone from sticking to the surface, so the finished form can be easily removed from the formwork after hardening.
It is customary to use a soap solution as a separator. Laundry or toilet soap is diluted in a container until a thick foam is obtained (the consistency is approximately like shaving foam), after which it is carefully applied to the surface of the stones and formwork with a paint brush.
Soap suds have proven to be quite effective separators. But for any good remedy there is always a worthy alternative. If you don’t mind the additional costs, then you can purchase anti-adhesive aerosol lubricant on the construction market. Here's what one of our users recommends using.
dronduletus
Oils are absorbed and evaporated, so the silicone can stick. Conclusion: you need to separate with grease. Before coming to my results, I read a lot on the Internet and tried a bunch of options in practice.
Silicone filling
After the formwork has dried, you can begin pouring silicone. For work, it is recommended to use two-component liquid silicone, which is designed specifically for the manufacture of decorative forms.
Silicone (compound + hardener) is diluted in accordance with the manufacturer’s recommendations and poured into the formwork in a thin stream.
Before pouring, the formwork should be aligned exactly to the horizontal level.
After waiting the time required for the silicone to harden (the time is indicated by the solution manufacturer), you can remove the form from the formwork. If the separator was applied in a continuous layer, the silicone mold will easily move away from the surface of the formwork and decorative stone samples.
Silicone molds are durable: the finished matrix can withstand 200 pours of gypsum and 50 pours of concrete mixtures.
How to make a plaster figurine - preparing and pouring the solution into the mold
We use architectural gypsum G16. Its packaging is in the photo.
This grade of gypsum is the highest. The cast gypsum product is very durable. There is no need to add any additives to its composition to improve the characteristics of the casting.
In our case, we measure 18 grams on the scales. plaster and take 8 ml of water with a syringe.
It is also advisable to maintain these proportions if your workpiece is of a different size. Gypsum should be poured into water in small portions, and not vice versa.
In this case, you need to wait until it completely absorbs the water, and then the mixture is completely stirred.
First add 1 drop of some detergent to the water instead of a plasticizer.
All these actions will help the mixture be more fluid and not harden longer. This time is needed in order to have time to vibrate the mixture to release air bubbles.
Since the shape is small, an electric toothbrush was used as a vibrator. She did a great job.
So the plaster is poured, the bubbles are released, we wait for it to harden and get stronger.
After an hour, remove the plaster figurine from the mold and use a knife (while it is cutting well) to trim the base. You may also have to remove seam marks if necessary.
After processing and drying, we cover the plaster figurine with one layer of water-based varnish (you can even use PVA). Let it dry thoroughly. To speed up this procedure, use a hairdryer.
Next, dilute color paste in water or use liquid pigment. We select the color as desired. To get a dark chocolate shade, mix black and brown dye.
After this, quickly wipe the painted surface with a dry porous cloth. The paint will be erased on the raised areas, but will remain in the depressions. That's all.
Good luck to everyone in your work and see you again on the pages
Video: how to make a silicone mold
Making stone
In most cases, cement or gypsum mortar is used to make artificial stone. For finishing the façade, a stone based on sand and cement is best suited (such material is better protected from the harmful effects of atmospheric factors). Gypsum stone is most often used when it is necessary to decorate the interior. It is these principles that should be followed by those who do not yet have enough experience in the manufacture of artificial stone.
Dronduietus
Regarding gypsum: many do not recommend using gypsum stone for facade work. But it is mainly not recommended by those involved in the production of stone: it is more profitable, more expensive and easier to sell concrete; and plaster needs high-quality protection. Gypsum tiles must be strengthened with various additives, so few people dare to experiment. Although there are people whose plaster sculptures and stucco moldings stand on the street for 10 years, and nothing happens to the material.
Application area of silicone for pouring
Casting molds have received many functions. They are used:
- when working with clay, mastic or gypsum;
- Food Industry;
- as a tool for soap production.
Such molds are made from silicone, which is characterized by heat resistance. The material is completely safe for health. Therefore, the molds can be used for baking in the oven.
One small set of molds costs from three hundred rubles and more. Many people think that creating them is not easy. But this is not true if you know the exact algorithm of operation. Therefore, craftsmen who make figurines and jewelry make pouring molds themselves. Often this grows from a simple hobby into a profitable business.
Try to prepare several different casting models so as not to spend money on buying material again. After all, after opening the package (even with proper storage), silicone for filling molds remains suitable on average for no more than a month. Then it dries up. This forces you to spend money on re-purchasing the product.