Features of metal casting
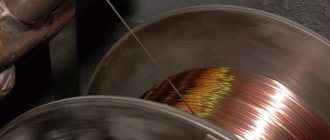
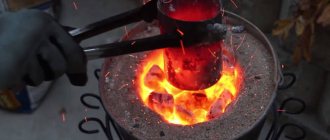
Compared to other materials, such as wax or plaster, metal casting differs in several ways. The first of them is the high temperature of transition from solid to liquid state. Wax, plaster and cement harden at room temperature. The melting point of metals is much higher - from 231 °C for tin to 1531 °C for iron. Before you can start casting the metal, it must be melted. And if tin can be melted in a clay bowl on a simple fire made from nearby branches, then to melt copper, not to mention iron, you will need a specially equipped furnace and prepared fuel.
Tin
Lead
Tin and lead - the softest and most fusible metals - can even be cast into wooden dies.
For casting more refractory metals, molds made from a mixture of sand and clay will be required. Some metals, such as titanium, require metal molds for casting.
After pouring, the product needs to cool. Reusable dies are disassembled, disposable molds are destroyed, and the casting is ready for further machining or use.
LiveInternetLiveInternet
For casting miniatures from metal, the classic one is a collapsible two-part mold - plaster or silicone. Experience with this type of mold allows us to list its disadvantages: a relatively large amount of silicone is required for the manufacture of each of the two halves, the time for silicone vulcanization is 8-12 hours for each layer of silicone at room temperature, and when there are three such layers, then the manufacture of two halves Silicone mold takes two days. And the main drawback is flash - metal that gets into the gap between the two halves of the mold. Anyone who cast knows how difficult it can sometimes be to get a casting on which the flash line is invisible and exactly matches. The method of making the mold that I want to demonstrate successfully overcomes all three difficulties and allows you to obtain high-quality molds and, therefore, high-quality figurines at home.
Part one. Preparing the model.
Photo 1. As an example, we take a 28 mm master model of an elf for the Blood Bowl game, made of Quick-Wood epoxy patty.
Before starting to make the mold, you need to prepare the model itself. First, place the model on the sprue and the fence. The models that I sculpt myself have a wire frame of legs, and I use the ends of the wire to make a sprue (a piece of such wire is clearly visible in the first photo). So, the sprue has a conical shape, there is only one protrusion, not too thick, to the other leg. If it is difficult to install the sprue and the support separately, then sometimes you can do without the support at all. Next, the entire structure is installed and glued to a cardboard base. Secondly, in order to easily separate the model from the silicone later, I paint the model with a thin layer of metallic acrylic or some kind of nitro aerosol. If your master model is metal, then I recommend tinting it with nitro, and if it is plastic, epoxy or green stuff, then acrylic metallic is quite suitable.
Why metallic? From experience, it comes off most easily and can be applied in a fairly thin layer. It is necessary to pay attention to the fact that all undercuts are covered with paint (in other literature the names “undercuts” or “negative angles” are found). The third step - optional, but highly recommended - is to draw an imaginary line dividing the halves of the form with a felt-tip pen - this will greatly help to subsequently make an accurate cut of the silicone shell.
In the photo, the model is prepared for the start of manufacturing the mold itself. The sprue and the projection are visible, and the cut line is visible, at least on the legs. Don't look for it on your head - it's not there. The cut will only reach the fingertips of the left hand and the top pole of the ball. The entire model is mounted on a base.
Second part. Silicone cocoon and stone coffin.
We begin to apply silicone layer by layer. The first layer requires a lot of attention and patience. The task is to introduce silicone into all the cracks, crevices and depressions. Silicone is a rather capricious material and will not fit in there of its own accord, so I take a small drop of silicone and put it in there, indentation by indentation, checking again and again to see if I have forgotten any other crack.
The already applied silicone can be pressed down with a damp finger. Another reason I prefer to work with clear silicone is that you can see if any air bubbles are forming under the silicone layer. At the end of this stage of work, our model should be completely covered with a thin, preferably less than a millimeter, layer of silicone.
In the picture: like this, drop by drop, silicone is applied to all “problem” areas.
Next we need to let the silicone dry. Drying time may vary for different types of silicones, but in most cases the next layer of silicone can be applied after about eight hours. And never apply the next layer until the previous one has dried! After the first layer of silicone has dried, carefully inspect the “cocoon” again; if there are no bald spots in the silicone layer, then move on! If there is, then fill the gaps with silicone and move on anyway! And then - the second, third and further, as needed. These layers should tightly wrap the model in a single cocoon without any undercuts. How thick should it be? Let's just say that an extra layer of silicone will not harm it, but too thin a layer can lead to deformations during casting, especially in the area where the mold is cut. On the model shown here, silicone was applied in four layers and in some places I added an additional fifth layer. When the application of silicone is completed, the excess cardboard of the stand is cut off.
Now we have a silicone mummy from which our model is barely visible. It's time to build a "stone coffin". I make formwork from Lego parts, spread plaster and pour the first half of the coffin, half-burse the cocoon in the plaster, and wait.
Pay attention to the rubber cup for diluting the plaster. An extremely easy-to-use item, a veteran of production. Initially, it is a dental instrument, but can also be made from half a rubber ball. Working with the same container for diluting plaster, over time you learn to dose water and plaster “by eye” so that there is not too much waste, and after work, clean off the hardened plaster by simply turning it inside out.
When the plaster hardens, which is determined by its heating, I move the formwork higher, but under no circumstances remove the cocoon from the plaster! Then you must remember to lubricate the surface of the plaster with some cham, so that you can then separate the halves of the plaster. No special mixtures! Dishwashing liquid or liquid soap will do. We dilute the second portion of gypsum and pour it into the formwork. Again, wait until the plaster heats up. When the plaster has hardened, remove the formwork, separate the halves of the “coffin” and take out the mummy.
Part three. Surgical.
At this point we already have a fully manufactured injection mold. Now all that’s left to do is take the model out of the mold and graphite the casting surface. In fact, opening the silicone and removing the model is the most important operation, so it must be taken very seriously. Swinging a knife is not like smearing silicone. First, I highly recommend getting a brand new scalpel blade. Secondly, take your time, examine the mummy and remember or try to carefully find the cut line that we drew when preparing the model. And only after thinking about how the cut should go, start. You need to cut slowly, little by little, but with a “steady hand.” Start making cuts, your guideline is the line, it’s not for nothing that we drew it, meanwhile, gradually and very carefully separate the silicone from the model. Although silicone is very elastic, tearing a piece from it or cutting off anything extra with a scalpel is not so difficult, so no use of force or haste. The final task of this operation is to twist the silicone shell so that the model can be pulled out, but at the same time leave the shell intact, so that when it is released it will again take its original shape.
When removing the mold from complex-shaped models, you can make additional cuts to remove individual parts from the silicone, but do not cut off anything completely. As if we wanted to peel the whole orange. This is the meaning of the method. We succeeded! Now the surgeon can take off his mask and gloves, brew coffee and light a tired cigarette.
Before casting, the internal surfaces of the mold must be thoroughly treated with graphite powder (I use the insides of batteries as a source of graphite, although it could be the graphite lead of a pencil), the excess graphite must be blown off and the entire mold must be reassembled. The mold is completely ready for casting. The clamp is simple and incredibly convenient - two sticks and two elastic bands.
Of course, it would be nice to give the plaster time to dry, at least a couple of days, but who can resist the pleasure of making a couple of test castings when I already have a completely finished mold? I can’t resist either...
Time consumption.
Preparing the model: making sprues - half an hour, painting and applying a dividing line - let it be another half an hour (of course, this is the maximum time spent, all this can be done even faster). Applying the first layer of silicone takes about twenty minutes. Subsequent layers are operations that do not require super precision, so they take 5-15 minutes of time. Drying each layer of silicone, as I already said, takes about eight hours, but there is a little trick here. If you put the model in a warm place, probably 60-80 degrees, it’s hard for me to say for sure without a thermometer, the silicone will vulcanize in an hour. I put it in the electric oven. Disadvantages: unpleasant smell in the oven and throughout the kitchen. If the smell is very unpleasant, try lowering the temperature. You can, of course, turn on the hood, if anyone has one. A total of five layers will harden in six hours. I prefer to take my time and leave the outermost layer (it's the thickest anyway) overnight at room temperature. The next day: to make a plaster coffin - about 20 minutes for each half. Trick: dilute gypsum in salted water. Salt is a catalyst for the crystallization of gypsum. In total, it took an hour to do everything, including cleaning. Without cleaning - 40 minutes and my wife would be very angry. The operation of opening the “cocoon” took me 15 minutes, timed by the clock. It took another fifteen minutes to graphite the surfaces of the mold and assemble everything in full combat readiness. So: yesterday at 11 am I started making the mold, today at 1 pm I was already holding the cast figures in my hands.
Method capabilities.
I have been making molds this way for two years now, and I have seen from experience that there is a significant saving of silicone and time compared to other methods of making molds. Now I make molds from two silicone parts only for completely flat parts, and everything else - arms, bodies, heads - just like that. The quality has improved, especially in terms of flash and accuracy of alignment of the halves of the mold. This method can be successfully used to make molds for figures of any shape and complexity. I used it equally successfully for casting 28 mm 54 and even 75 mm figures.
In conclusion, I want to say a few words about silicones. Finding the right material for the job is not easy. I have to try a lot of varieties. To save money, do not look for dental silicones and jewelry (they are proudly called “liquid rubber”) for casting metals - they are not heat-resistant. There are probably exceptions, but as a rule they are also expensive.
I use the most common construction silicone, Silirub, from the Belgian company Soudal. Syringe 330 g. You can hardly smell the vinegar from it. It comes in three types: black, white and transparent. The first and last temperature of tin casting, i.e. Holds 300-400 degrees well. After several pours, white becomes covered with cracks and a “burning” crust. After repeated pouring, it practically does not deform. All that remains is to wish good luck to all those who like to smear themselves in silicone.
The material is printed with the permission of the author
DrLutz
Metals for pouring
Black metals
In the metallurgical industry, a distinction is made between non-ferrous and ferrous metals. Blacks include iron, manganese, chromium and alloys based on them. This includes all steels, cast irons and ferroalloys. Ferrous metals account for more than 90% of the world's consumption of metal alloys. Steel is used to produce hulls and parts of vehicles from scooters to supertankers, building structures, household appliances, machine tools and other industrial equipment.
Cast iron
Cast iron is an excellent metal for casting large, strong, durable structures that are not subject to bending or twisting stresses.
Non-ferrous metals, in turn, depending on their physical properties, and above all, specific gravity, are divided into two large groups
Light non-ferrous metals
This group includes aluminum, titanium, magnesium. These metals are less common than iron and are more expensive. They are used in those industries where it is necessary to reduce the weight of a product - the aerospace industry, the production of high-tech weapons, the production of computing and telecommunications equipment, smartphones and small household appliances.
Titanium
Titanium, due to its excellent interaction with the tissues of the human body, is widely used for prosthetics of bones, joints and teeth.
Heavy non-ferrous metals
These include copper, tin, lead, zinc and nickel. They are used in the chemical industry, production of electrical materials, electronics, transport - wherever sufficiently strong, elastic and corrosion-resistant alloys are required.
Copper
Zinc
Nickel and its alloys
Noble metals
This group includes gold, silver, platinum, as well as rarer ruthenium, rhodium, palladium, osmium, and iridium.
The first three have been known to man since prehistoric times. They were rarely (relative to copper and iron) found in nature and therefore served as a means of payment, material for valuable jewelry and ritual objects.
Gold and platinum
With the development of civilization, gold and platinum retained their role as a means of accumulating wealth, but they became very widely used in industry and medicine due to their unique physical and chemical properties.
Process costs
To reduce the unprofitability of the process, conventional casting methods for disposable models have been modernized to create high-strength polymer compositions. To do this, they began to cast into shell containers made of thermosetting powdered polymer. When exposed to temperature, it turns into a solid shell, forming a liquid alloy.
This method is used to cast water and steam heating radiators, assemblies of automobiles, machine tools, aircraft, and other types of high-tech mechanisms. This technology makes it possible to produce large-sized parts and any complex modifications.
Chill casting is considered traditional when a durable mold is used.
The part is pulled out of it after the metal has hardened. In this way, simple steel products of small size are produced. Most often, copper and aluminum alloys with low casting temperatures are cast into the chill mold.
The model for them is made of heat-resistant steel or cast iron, which have a higher melting point than copper or aluminum.
The advantages of this technology include:
- low cost of the production process and the possibility of its inexpensive automation;
- ease of execution;
- safety of casting molds that are used repeatedly;
- accuracy of parameters of manufactured products;
- high-quality metal structure, in which there will be no non-metallic particles;
- smooth surface of the product, which is obtained using this casting method.
Traditional lost wax casting technology has now been improved by the advent of new materials.
If previously the model for pouring the alloy was made of wood or other organic matter, which could be destroyed by high temperatures during burning, today low-melting materials such as paraffin and stearin are used.
Lost wax casting is used when casting artistic products with complex configurations. This is a costly casting technology that is used to create monuments or other artistic products.
The steel container for such pouring is made on the basis of models made of fusible materials, it has precise dimensions, and its surface is carefully polished.
Metal casting methods
The main metal casting methods are as follows:
Traditional method
The metal enters the mold under the influence of gravity. Sand-clay or metal matrices are used. The disadvantage of the method is the high labor intensity of making molds and other operations, difficult working conditions and low environmental friendliness
Low pressure casting
The essence of the method is that a crucible with metal and matrices for castings are located in a sealed chamber. A metal wire made of titanium alloy is lowered from the mold into the molten metal. At this time, low excess pressure of air or inert gas is supplied to the chamber. The metal enters the matrix under pressure, the flow rate is very high and at the same time regulated. The form is filled completely and evenly.
The method makes it possible to obtain high-quality castings, including especially thin-walled ones. The surface quality is also superior to castings produced by the traditional method. Foundry gases are removed through an exhaust pipeline into the cleaning system, from where they enter the atmosphere. The method is characterized by highly automated operations, improved working conditions for personnel and high environmental friendliness. In addition, with such casting, both materials and energy consumption are significantly saved.
High pressure casting
The method is used in both ferrous and non-ferrous metallurgy and allows one to obtain the most accurate and uniform castings. Metal under high pressure enters the matrix at a speed of up to 120 m/s and instantly fills it.
Parts obtained by this method require virtually no finishing machining. Using this method, you can cast parts of almost any configuration, with thin walls, with ready-made holes and even with ready-made threads.
Injection casting
The injection method differs from conventional injection molding in that the metal enters the matrix in the form of a powder mixed with a binder. The molds are made from high-strength steels.
The high fluidity of the mixture allows you to fill the smallest relief details of forms of the most complex configuration, including internal cavities. The advantage of this method is the high precision of the surface, making additional mechanical processing unnecessary or reducing it to a minimum. Another advantage is the highest physico-chemical homogeneity of the casting.
There are other methods of casting parts that have niche applications.
Titanium production
To produce high-strength alloys from titanium and steel, vacuum casting is used to reduce the gas content in the metal. In this way, a denser structure of a metal alloy is created by melting in a vacuum. The hot metal is then poured into multiple containers in which it cools.
When introducing injection molding technology, special equipment is used to fill molds with liquid metal. It is supplied under high pressure in the range of 7–700 MPa.
This production method is carried out by hot or cold pressing machines.
This technology is used for pouring aluminum, copper, zinc and tin-lead alloys. All these metals have a low melting point, which increases the technological characteristics of products made from them.
Cold and hot injection molding methods make it possible to obtain a product with perfectly accurate dimensions and a smooth surface, which does not require additional processing after completion of the process.
This technology allows you to increase labor productivity. It also reduces the time of the entire technological cycle and simplifies the production of metal products. It also has disadvantages, which include the inability to produce products of complex configurations, since they can become deformed when removed from the mold. This method produces only metal products with a small diameter.
Centrifugal casting uses special molds rotating in a horizontal or vertical plane.
The action of centrifugal forces ensures uniform filling of all cavities in the casting mold. This casting technology is being introduced in the production of pipes, bushings or metal disks. It is also used in the casting of openwork jewelry.
Basic methods of metal casting
Casting into the ground
Traditional way. A simple or composite model is made from wood or other modeling materials, then a matrix is made from a sand-clay mixture based on the model. Read more about this method in the corresponding article.
Earth casting technology
The model is removed from the mold, its parts are assembled together, and a gating system is created. The form is pricked with thin sharp needles to ensure gas removal. They make a casting, wait for it to cool,
Metal casting
A split mold, called a mold, is made from metal parts. Matrix parts are produced by casting or, if high surface quality and dimensional accuracy are required, by milling. The molds are lubricated with non-stick compounds and filled.
Metal casting
After cooling, the molds are disassembled, the castings are removed and cleaned. The metal matrix can withstand up to 300 operating cycles.
Casting using gasified models
The model is made not of wood or wax, but of a low-melting and gasifying material, mainly polystyrene. The model remains in the mold and evaporates when the metal is poured.
Casting using gasified models
Advantages of the method:
- the model does not need to be extracted from the matrix;
- you can make models of as complex castings as you like; complex and composite molds are not needed;
- The complexity of modeling and molding has been significantly reduced.
Gasification casting is becoming increasingly popular in modern metallurgical industries.
Methods for casting products from metal alloys
Modern foundry production, in addition to the traditional technology of pouring liquid metal into sand molds, also uses other high-tech, productive casting methods:
- vacuum;
- centrifugal;
- under pressure;
- centrifugal;
- shell;
- multiple;
- mercury;
- by lost wax models;
- electroslag.
High-tech types of casting have made it possible to create metal products with certain qualities with high labor productivity and minimal defects.
The following production technologies are most often used on an industrial scale today:
- in metal forms (cocol);
- static casting;
- injection molding;
- into shell forms;
- into lost wax models.
When performing static pouring, stationary molds are used into which liquid metal is poured. Finished products are taken out after they have cooled in a stationary model.
Casting molds
The most ancient type of molds are those made from sand-clay molding mixture, or “earth.” Historically, centers of metallurgy arose near the deposits of sands that were ready in their composition for casting, for example, near the world famous Kasli iron plant. Mixtures are divided into coating and filling mixtures.
molds made from sand-clay molding mixture
To construct any matrix, a model is required - a life-size mock-up of the future product, but somewhat larger in size - equal to the amount of casting shrinkage.
The model is placed in the center of the formwork, or flask, and a layer of coating mixture is applied to it - heat-resistant and plastic. Then they begin to fill the flask layer by layer, carefully tamping each layer, with the filling mixture. The requirements for filling mixtures are much lower than for coating mixtures - they must withstand the pressure of the poured metal, maintaining the configuration of the casting, and ensure the release of melting gases. Afterwards, the model is removed from the mold and the melt is poured in its place.
For castings of complex configurations, with intricate details and internal cavities, composite models and molds made of several parts are used.
Metal molds
Casting is also carried out in metal molds. They are used for large runs of cast parts, in cases where high dimensional accuracy and low surface roughness of the casting are required, as well as for some metals that are active in a heated state. The melting temperature of the mold material must be significantly higher than the temperature of the melt being cast.
General information
During the production process, molten material is poured into special molds. After cooling, it takes the desired shape and is subjected to subsequent processing. Such products are used in various sectors of the economy:
- automotive industry;
- aviation industry;
- mechanical engineering;
- dentistry;
- orthopedics;
- jewelry production.
For different types of alloys, a certain casting technology is used to achieve the desired qualities in the finished product and avoid defects. There are different types of components used in foundry production. They have a high fluidity index. This property of the alloy is determined by:
- chemical composition;
- metal alloy structure;
- melting temperature.
The most in demand in industry are metals with a low melting point, since their production is less expensive. The lower the melting point of a material, the easier it is to cast.
Types of casting molds
For casting metals, different containers are used, which are divided into sand containers, used only once during casting, and multiple containers. Reusable casting containers are made from different materials:
- cast iron;
- heat-resistant steel;
- refractory ceramics;
- graphite
Graphite casting mold
Cast iron chill molds and molds are widely used. When manufacturing products from aluminum, copper and other non-ferrous alloys, metal molds are made of cast iron, copper and brass.
This decision was made a long time ago; it makes it easy to prepare materials for the main process. The process itself does not last long, the models come out of high quality. When implementing this technology, the involvement of a large number of workers is not required.
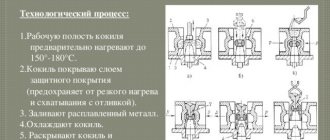
Metal casting containers can be open or closed. Open ones are molds, and closed ones are chill molds. Closed containers have a cavity that follows the dimensions of the part being melted. Liquid metal is poured into them through a special hole.
Shell casting containers are used for pouring alloys of non-ferrous and precious metals, as well as steel products. For casting non-ferrous metal alloys, they are made from powdered silicon dioxide or gypsum.
When making products from gold, platinum and silver, the mold is made of a low-melting material, which is filled with mercury, paraffin or plastic, which allows you to create a product of complex configuration and small thickness.
Such meticulous work requires high precision and qualifications from all personnel. Each stage of production is carried out in optimal conditions, conducive to the output of only high-quality products.
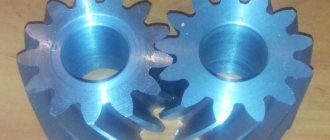
Centrifugal casting
Used in the production of products that have a rotational shape - bushings, gears, etc. Casting is carried out in a metal matrix rotating at high speed.
Centrifugal casting
Centrifugal force presses the liquid metal against the outer wall, where it crystallizes. The method allows obtaining extremely homogeneous castings. It is also possible to create multilayer parts. The layers are poured one after another.
Molds for metal
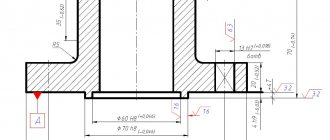
Serial production of metal elements is often carried out using special stamps. The melted products are fixed under pressure, and after solidification they acquire the required geometric parameters. Molds for metal are complex structures; many requirements are placed on their quality and resistance to the effects of compounds. In addition, the casting process varies in its characteristics - the material of the dies, the technical parameters of production, drawings, and so on depend on this. A mold for casting metal in appearance resembles a split box; it is easy to buy (universal models), but often you need to order an individual design - the price, accordingly, will be different. The finished product template is created using 3D modeling, complex drawings, and the dimensions must be carefully observed when working. The type of metal is also important - there are models for steel, lead, and various alloys.
Standardized dies consist of packages that are needed for assembly, and blocks designed to secure them and align parts. The moving element is the punch, the static element is the matrix. Manufacturing metal molds is a complex and responsible process. The better the qualifications of the workers and the higher the level of technology, the better the quality of the finished products. In the process of work, methods of vapor deposition, sputtering, electroplating, dipping and others are used. Master models must withstand high temperatures, pressure, and their strong and rapid changes.
Read also: Mini paint sprayer
Making casting molds using a Roland Modela milling machine
A FabLab student tells how she made a casting mold on a Roland Modela milling machine, and cast metal and plastic into the mold.
Task: To develop an arbitrary figure or product that we could repeat several times by making a casting mold for it.
I decided to download the figure model from Thingiverse and personalize it in my own way in Rhinoceros. I wanted to try working with hard materials such as metal or hard plastic, so the mold itself had to be soft. We made the countermold from modeling wax using a Roland Modela milling machine, and for the mold itself we used heat-resistant silicone.
General recommendations when making a mold and countermold: 1) Calculate the diameter of the cutter used. Make sure you leave enough space between your piece and the countermold wall. 2) Leave an opening large enough for material to pour in, as well as an additional vent for air to escape. 3) The walls of the counterform should be slightly inclined. 4) If you are making a mold in two parts, be sure to make tongues and grooves to fit the halves together exactly. 5) Remember that casting hard products requires soft molds. 6) Pay attention to the ratio of mixed casting materials.
Manufacturing process
I tried changing the shape of the skull in two different ways to get a double-sided mold for casting. Since I will be casting from metal, and the product will be hard, the form itself must be soft. I prepared a 3D model of the countermold in Rhinoceros, which I will cut from a block of modeling wax measuring 7.0 X 14.1 X 3.5 cm. I also took into account and left the necessary holes for pouring metal and ventilation holes.
After I finished making the 3D model, I began to cut out a countershape from a block of modeling wax using a Roland Modela milling machine. For roughing I used a 2-flute end mill with a diameter of 3 mm, for finishing I used a ball end mill with a diameter of 1.5 mm. I walked through the finishing area only in one direction (hu), since in my opinion this was quite enough, and there was no need for additional processing, and time was saved. Roughing and finishing took a total of approximately 3 hours and 20 minutes.
Once the countermold was cut out, I began making the actual mold itself from heat-resistant silicone. As I mentioned earlier, the mold needed to be not only soft, but also very heat resistant, so I used Mold MAX® 60 High Temperature Silicone. The procedure for making our casting mold: 1) Apply some all-purpose release agent spray and let it dry for 3 minutes. 2) Make a mixture for silicone: components A and B are mixed in a mass ratio of 100A:3B (or according to the instructions for the silicone you are using). 3) Pour the mixture into the countermold, making sure that no air bubbles get inside. 4) Just in case, carefully tap the mold until all air bubbles come to the surface. 5) Allow the silicone to harden overnight.
Unfortunately, in my case it turned out that after a day the silicone was still not hardened. It turned out that the scales were damaged, showed the wrong result, and I mixed in the wrong proportion! After cleaning the counter mold with soap and water, I tried to get it right.
Even though it was the second time, it worked!
Now everything is ready for the long-awaited casting. In order to cast metal products, I took the following steps: 1) Add talc to the mold. 2) Heat the stove or vessel in which you will melt the metal, wait until your workpieces melt. Follow safety precautions and wear gloves! 3) Fold both parts of the form and, aligning them, compress them in some way convenient for you. The mold parts must be well compressed to prevent leakage. 4) Carefully and slowly pour in the molten metal. 5) Immediately plunge the mold into cold water to cool. Leave the mold in the water until it is cool enough to handle. 6) Remove the mold and take out your product.
Read also: Screw compressors for painting
The skulls came out very well, with good detail. I polished one of them, and left the second without treatment (see pictures).
After completing the work with metal, I tried to do the same with plastic. The process was simpler since the mixture proportion for the material is 1:1. Plastic is also easier to handle, it is not hot and it is easier to cast from it. Result in the picture:
The mold manufacturing process is an expensive and labor-intensive endeavor that involves designing and manufacturing the molds itself.
In the process of making molds, tool steel is used, depending on the material from which the workpiece is made and the requirements for the design. In addition, German steel can be used, which makes it possible to produce casting molds with high durability and at a low price.
The production process includes several stages and, depending on the complexity, takes from 2 to 12 weeks.
Production stages:
1) Analysis of technical specifications
The customer submits the technical specifications for the mold. The technical specifications must contain: the necessary conditions for operation, material, volume of casting products and other requirements. Taking these requirements into account, our engineers will calculate the optimal shape parameters.
2) Product drawing
The Customer must provide a drawing of the product or a sample that needs to be cast. The Customer provides a drawing of the product or a sample of the casting for which a mold must be made.
3) Creation of a 3D model and design documentation
During this stage, a 3D model of the product is designed, clearly showing the appearance of the required product that will be obtained at the output. Our company also develops design documentation for you.
4) Sample and mold testing
The customer receives a sample of products produced using the required mold. You provide your comments and, if necessary, we modify the form.
5) Manufacturing the required number of molds
We produce the required number of molds, which is specified in the technical specifications.
Our advantages:
Own production
We have our own equipment and a staff of 5 engineers
High speed of order fulfillment
We carry out a full technological cycle including the creation of master models and castings within our company.
Reasonable prices
We do not outsource the work to contractors, but do it ourselves. Due to this we offer competitive prices
Decent product quality
All our engineers are trained and certified. This ensures that your products are free from defects.
To determine the cost and production time of molds, send your request via the form or by email:
The request must include the following information:
1. Photo of the object
2. Object dimensions (length, width, height in mm)
3. Any additional information required