Interesting ideas for tool repositories
In addition to the basic, most popular designs, we suggest that you familiarize yourself with more “advanced” versions of tool organizers.
This sliding model is made of bent metal sheet, reinforced with welding and rivets for tight joints. Thanks to this design, the organizer is very compact and at the same time roomy, and you can easily get to any of the compartments.
Such a folding “book” product can be done even by inexperienced craftsmen, since it has a very simple layout. The main thing here is to correctly place the tool mounts and choose a sufficiently durable material.
If you need to store a large number of items and transport the entire storage unit around the house or area, it makes sense to make it in the form of a chest of drawers on wheels. The upper part of such a chest of drawers is successfully used for installing compact machines or other equipment
It is important to take care of the high strength of the structure and its resistance to vibrations
Ready-made models of tool boxes on wheels
A multi-section tool box or cabinet on wheels can be purchased ready-made in a store or made independently. The dimensions and configuration of this mobile device may vary, so the consumer is given the opportunity to choose the appropriate model that is most convenient for use in the existing conditions.
To begin with, it makes sense to consider the boxes offered in specialized stores or departments. Perhaps someone will immediately settle on one of the ready-made options, especially since manufacturers, as a rule, carefully consider the convenient location in their models of everything necessary to perform basic construction or repair tasks.
How to choose a tool box on wheels
This section of the publication will present a small selection of mobile tool boxes made by different manufacturers and available for purchase. For each model, the main parameters that characterize it in general terms will be given.
What is the tool box made of?
In addition to the design features, when purchasing, it is important to pay attention to what modular tool boxes are made of. After all, the material has very specific requirements:
- It must be rigid and durable, able to withstand the full weight of the contents.
- Deformation or cracking of the walls after filling, breakage of handles or wheels for moving the box is unacceptable.
- Protect fillings from moisture and dust, withstand temperature changes.
- Be resistant to chemicals, because work is often carried out using special compounds, especially when repairing a car.
Due to the increased requirements for the strength, quality and durability of containers, they are made mainly only from the following materials:
- wood;
- reinforced plastic;
- metal;
- combinations of metal and plastic elements.
Wooden tool box
Before the active use of plastic in all spheres of human life, wood was one of the main materials from which tool boxes were made. The advantages of wood include:
- Lower weight than metal varieties.
- Environmentally friendly.
- Aesthetic appearance.
However, a toolbox made of plywood or wood also has a number of significant disadvantages:
- It is significantly heavier than its plastic counterpart.
- Requires special treatment to prevent mold growth and insect activity.
- It can ignite, which can be mitigated with special treatment.
- May crack if impacted or dropped.
Nowadays wood is used less and less to create cases. It is used in the production of trays for hand carpentry or carpentry tools. Among such professional craftsmen, antique-style tool boxes with carvings are considered an expensive gift. From wood and plywood, you can independently make the desired container according to your dimensions and drawings.
Metal tool box
In specialized stores you can also find a metal box for various tools made of steel or aluminum. Although the popularity of such a product is much lower. Among the advantages of an aluminum tool box, professionals note:
- Increased mechanical strength.
- Durability.
- Resistant to fire and chemicals.
However, metal also has a number of disadvantages:
- Heavy weight. An empty medium-sized container weighs at least 1.5-3 kg, and if it is filled with heavy equipment, constant transportation becomes difficult.
- Susceptibility to corrosion. When used in conditions of high humidity, the container must be painted or galvanized.
- High cost compared to plastic and wood.
Plastic tool box
More often than other modifications, you can find a plastic tool box among professionals and simply zealous owners. Its advantages include:
- Low weight even for specimens with thick, durable walls.
- Flexibility in processing, which makes it possible to make cases of various shapes.
- Reasonable price.
- The ability to produce transparent compartments, which simplifies the search for the necessary elements.
- Resistant to moisture and ultraviolet radiation.
- Low thermal conductivity, making the container convenient to carry in your hands during the warm season.
Metal-plastic tool box
For professional use, craftsmen often purchase a folding tool box with a metal frame and plastic containers. Such products combine the convenience and lightness of plastic with the increased mechanical strength of metal. The metal-plastic sliding tool box has reinforced steel components of the folding mechanism, which are constantly subject to friction and mechanical stress, and the containers themselves are made of plastic to make the design lighter and cheaper.
DIY metal box
Many beginners are wondering how to make a tool box out of metal with their own hands. This process is much more complicated than making a wooden box. However, the durability of the metal compensates for the effort expended.
To produce a metal organizer you will need:
- Metal sheet. Typically aluminum or tin is used;
- riveting tool;
- scissors for cutting metal;
- loops; lever;
- locks.
The metal tool box consists of the following elements:
- side parts;
- bottom;
- lid.
The manufacturing process is as follows:
- make markings on a metal sheet. It is necessary to take into account an allowance of 1-1.15 cm;
- Using scissors, cut out the elements;
- Fold the allowances along the edges;
- Using a riveter, rivet the joints;
- Connect the compartments with strips;
- Attach the handle and locks.
- The product is ready!
Metal box for tools
This option is most suitable for experienced locksmiths who have the necessary equipment and material. Factory-made metal tool boxes are made from lightweight metals such as aluminum. As a result, the product is as light and durable as possible. But working with aluminum at home is much more difficult.
Even a beginner can make this version of a metal box. After all, the most ordinary box and special partitions will be made of metal. Initially, you need to prepare the main material - galvanized steel (0.4 mm thick). Tools you need to prepare:
- Marking caliper.
- Metal square.
- Ruler.
- Hammer.
- Pliers.
- File.
- Sharpened core or marker.
- Anvil.
Next, drawings and markings are made. You only need to mark those places that will later need to be deleted. Now you can start cutting using metal scissors. After trimming all the excess, you should get a kind of geometric figure (winged rectangle).
Next you need to use an anvil. Tapping with a hammer, gradually bend the edges of the workpiece. It is better not to work in a chaotic manner; all actions must be consistent. First one side is bent, and then the other. To wrap protruding parts, pliers are used.
After these manipulations, you need to go over the entire structure with a hammer to level it. In this case, you will get a small metal box for storing tools. In the future, you can experiment not only with the sizes, but also with the shapes of such boxes.
Almost every home has some kind of tool. When there are too many of them, you can make your own multifunctional box to store them. Experienced craftsmen believe that this type of box is considered an essential attribute for storing various devices. Such boxes can be stored in the workshop and even taken with you on a long journey.
Master's advice
If the thickness of the plywood differs from the standard one. Have you ever cut plywood pieces to specific dimensions and then discovered they couldn't be assembled correctly? The reason for this is that the actual thickness of the plywood does not correspond to the standard, which usually indicates the nominal thickness, so it is necessary to change the dimensions of some parts so that problems do not arise during assembly. Follow these tips to help you identify significant details and determine their exact dimensions ■ Never cut all the plywood parts of a project in advance, as some dimensions may need to be altered. ■ Carefully review all illustrations, diagrams, and drawings to identify parts that may require dimensional adjustments. First of all, pay attention to parts that are installed between other parts, such as shelves, partitions and drawers, as well as those whose length or width depend on the dimensions of previously assembled parts of the project. Circle, underline, or highlight any dimensions that need clarification, as we did in the pictures and Materials List, to serve as a reminder before assembly. ■ Only cut parts that have the exact length and width specified. After assembling them, check the dependent dimensions of the remaining parts (it is better to first carry out a test assembly without glue).
4. To determine the width of large partitions D, measure the distance from the front of the A-pillar A to the rebate of the rear pillar. Cut the partitions to this width and saw them to a length of 572 mm. Then cut out shelf E of the same width and length 864 mm. (Before doing this, measure the distance between the sides to determine the length of the shelf.) Now install the shelf (photo B).
Using the large partitions D as spacers to install shelf E, drive screws through the side panels B into the ends of the shelf.
Using spacers, align the large partitions D in the cabinet and secure with screws, screwing them through the bottom C and shelf E.
5. Cut out four spacers measuring 51x305 mm from plywood scraps to accommodate large partitions D in the body (Fig. 1). Secure the partition with screws (photo C). Then, also using spacers, install the second partition.
Quick tip! Be sure to use spacers - they will ensure that the partitions are placed neatly, and the drawers will slide out easily without getting stuck.
Measure the distance from the top of panel B to shelf E to find out the exact width of the small partition F.
6. Determine the length of the small partition F (photo D ). width should be the same as for large partitions D. Place the partition in the middle of shelf E and secure it with screws from below.
7. Place the bottom cover C on the body and align it. the middle of the edges of the side panels A/B and the small partition F. Screw in the screws. Then line up the second cover C and screw it to the bottom one. (Drill screw holes along the front and back edges of the cover at a slight angle.)
Quick tip! Do not glue the top cover to the bottom cover so that it can be easily replaced if damaged. And if you screw in the screws from below, then on top there will be a smooth working surface without traces of fasteners.
G from 6 mm birch plywood , adjusting its dimensions to the distance between the folds of the sidewalls. Although the dimensions should be as specified, make sure using a tape measure. Once you have cut out the back wall, set it aside.
How to make an open box: step-by-step instructions with drawings, dimensions and photos
The simplest tool organizer is a box-shaped design with a handle. You can arrange several compartments inside, and attach “pockets” of various capacities to the outside.
For a medium sized box you will need:
- plywood, board, MDF or other wood sheet material that can be easily fastened with self-tapping screws;
- fasteners;
- electric jigsaw;
- screwdriver;
- pencil, ruler;
- linseed oil for wood processing.
Mark the details:
- A - bottom of the box 35x20 cm;
- B - 2 side parts 22x22 cm;
- C - 2 long side elements 35x10 cm.
A handle 35 cm long is prepared from the block with a small margin. Then you can adjust the dimensions accordingly. You can use steel or aluminum tubes, scraps of smooth fittings.
Cut out the marked parts with a jigsaw. The bottom and sides are alternately connected using self-tapping screws, which are screwed through the part into the end of the other element. The approximate step for installing hardware is 7-10 cm. You can additionally glue all joints with wood glue.
To avoid misalignment during fastening or hardware breakage, self-tapping screws must be installed correctly:
- do not screw into places with knots and other wood defects;
- install fasteners perpendicular to the surface;
- the axes of the screwdriver and the self-tapping screw must strictly coincide;
- increase the twisting speed smoothly, without jerking.
Some craftsmen recommend pre-rubbing the screws with soap. After this they enter the wood very easily.
The handle block is sanded until smooth. When attaching it to the sidewalls, you first need to drill a hole through the part, and then screw in the self-tapping screw.
The handle can be made folding - cut holes in the sides, thread a strong cord and tie a block to it. The box is carried in the usual way, then the handle is placed to the side. In this form, it does not interfere with access to tools.
For small parts, side pockets are made of plywood or fiberboard. The plates are cut out to appropriate sizes and screwed to the sidewalls through narrow linings.
Partitions are cut out for internal compartments. They are secured using overlays or inserted into pre-cut grooves.
Under the containers to be removed, stops made of bars or scraps of plywood are installed inside the box. You can make removable containers yourself from sheet plastic, tin, wood, or take ready-made ones of a suitable size.
After assembly, the organizer is coated with linseed oil. You can paint the wood with acrylic varnish for external work or treat it with stain or antiseptic impregnation.
First the body is made
1. From 19 mm plywood, cut out pillars A and panels B of the sidewalls according to the dimensions specified in the “List of Materials”. To enhance the appearance of the entire project, we used premium grade plywood that has no defects on the edges.
cutter with a bearing into the router collet, select 10x6 mm rebates along the rear edges of the posts A on the inside for inserting the plywood wall G. Glue the racks to panels B , placing the folds as shown in Fig. 1.
Glue the sides A/B to the bottom C, secure with clamps and screw in the screws. The mounting square will help avoid distortions.
3. Read the “Expert Tip” below. Then determine the width of the two lids and bottom C by measuring the width of the assembled sides A/B . Saw the lids and bottom to the required width and saw to a length of 1016 mm. Attach the sides to the bottom (Photo A, Fig. 1).
Quick tip! To ensure that the plywood around the screw heads does not split and the surfaces are smooth, the mounting and guide holes for the screws must be countersinked.
Materials and sizes
For tool boxes, wood, plywood, metal, plastic, and galvanized metal-plastic are used. Boxes are also produced on a fabric basis, but based on the structure of the material, they are better classified as bags.
Tree
Before plastic appeared in our lives, tool boxes were made from wood and metal. Wood is an environmentally friendly, pliable material; craftsmen use it to assemble a box with their own hands. The product is made from inexpensive deciduous trees or pine. This material does not react well to moisture and may deteriorate over time if stored in damp areas. Therefore, before making a box, it is treated with special solutions and then painted or varnished.
They are most often used for hand tools, carpentry, and carpentry. As for hardware, it is better for them to get into such boxes packaged in small closed containers.
The average product dimensions are usually 12 by 19 inches. If the length of the box exceeds 50 cm, then together with the tool it will represent a rather heavy burden. At the same time, a width of less than 30 centimeters will not allow you to fill it with many useful things. If the tool is not too heavy, you can use 8-10 cm thick plywood to create a box instead of a board. It makes good organizers for hardware or shallow drawers for light tools.
In the photographs you can see how diverse structures are made from wood.
- Two-section drawers for hand tools and small items.
- The product is assembled with your own hands. The configuration of the elements is similar to modern plastic models.
- Antique tool boxes for small items.
Metal
Metal boxes are made of steel and aluminum, their average weight is 1.5-3 kg. They are stable, strong, durable, and have a rigid structure. Steel products are galvanized or painted to avoid corrosion. The disadvantages of this model include heavy weight. Powerful volumetric boxes are used to store large electromechanical devices. Metal products are poorly represented on the market. But aluminum products always find their buyer. They are strong, reliable, do not corrode, have a rigid shape and are light in weight. The only disadvantage is their cost.
The photo shows different types of metal products.
A folding metal box, structurally repeating products from Soviet times.
Plastic
Plastic boxes are unrivaled. They are light, beautiful, multifunctional, and are available in many models. Today they are made from particularly impact-resistant plastic. Unfortunately, in severe frost it can be fragile and should be protected from mechanical stress. For use in winter, frost-resistant polypropylene products have been developed that respond well to temperature changes.
The designs are mostly multi-sectional, some are supplemented with transparent organizers for small fasteners. The plastic box can have a significant volume or be so small that it can fit into a regular backpack. The variety of plastic products is presented in the photographs:
the design with a large, comfortable handle has a spacious tool box and an upper organizer for hardware;
Lightweight, stylish organizer with a transparent plastic lid.
Metal-plastic
Galvanized metal-plastic box is an ideal symbiosis of lightness and strength. Capacious structures can withstand loads comparable to metal products, but at the same time they are beautiful, modern and light.
- The box has several deep sections and a small portable tray for small items.
- The Zubr box is light, roomy, looks impressive and representative.
Top popular organizer boxes
JetTools JT1602318 34×32.5×14 cm
A high-quality model that is suitable for storing electrical appliances. Made entirely of plastic. For greater security, there are special locks that can easily withstand exposure to negative temperatures. Number of compartments – 12 pieces.
Average cost: 400 rubles.
JetTools JT1602318 34×32.5×14 cm
Advantages:
- Low price;
- Frost-resistant locks;
- 12 compartments.
Flaws:
Not found.
Sibrteh 90805 43×23.5×25 cm 18"
A good model from a domestic manufacturer that will help store most of the tools and fasteners. High-quality plastic was used for manufacturing, which can withstand a load of up to 50 kg, which is an excellent solution in the budget segment.
The average price is 1,000 rubles.
Sibrteh 90805 43×23.5×25 cm 18"
Advantages:
- Capacity;
- Strength;
- Withstands high loads.
Flaws:
Not detected.
Stels 90713 56x28x23.5 cm 22"
Popular model with a removable tray. The box easily accommodates all the necessary equipment for repair operations. High-quality handles can withstand loads of up to 20 kilograms, which is suitable for storing most tools. Capacity is average, which is the standard for budget solutions.
Stels 90713 56x28x23.5 cm 22"
Advantages:
- Metal lock;
- Removable tray;
- Strength;
- Universal use.
Flaws:
Not detected.
Wooden box
Wooden boxes are well suited for storing various equipment. They are distinguished by reliability, durability and solid appearance.
Required tools and materials
In order to put together such a box, you will need the following:
- boards;
- wood glue;
- pen;
- 2 furniture hinges or 1 piano hinge;
- hacksaw;
- drill;
- sandpaper;
- 8 corner metal plates;
- self-tapping screws;
- 2 latches;
- measuring tool;
- clamps.
Step-by-step manufacturing instructions
To mark the boards, it is recommended to use a straightedge and a carpenter's pencil. The lining is carried out in accordance with the dimensional values indicated below.
The box is assembled according to the following algorithm:
- The lids and housings of the box are connected to each other. In order to simplify this work, corner ties and clamps are used.
- All parts are fixed using a special glue used for carpentry.
- When it dries, drill holes, countersink them, and carry out additional fixation using self-tapping screws.
- After this, the retractable tray is assembled using the same principle, partitions are formed and everything is connected again using self-tapping screws.
- Inside the case, two strips on shortened walls are attached to the box. In this case, you need to retreat about 30 cm from the top edge.
- The instrument box is carefully passed with crushed abrasive paper. This is necessary in order to get rid of even small burrs.
- The entire structure is coated with a special protective compound and given time to dry.
- If, after this, raised wood fibers are discovered, the box is re-processed with sandpaper, and then the finishing is repeated.
- The final stage of assembling the box is the connection of the lid and the body, which is carried out using screws and hinges. A handle with latches-locks is attached to the box.
- All corners are equipped with metal protective caps. After this, the box is completely ready for its intended use.
For inexperienced people, a simpler option is suitable, which usually does not have a lid. There will be a handle at the top of the box that makes it easy to carry. In order to assemble such a box, use the following materials and tools:
- board;
- self-tapping screws;
- hacksaw or drill;
- wood glue;
- screwdriver;
- long back and front walls;
- thick board for the bottom;
- high narrow sides;
- pen.
You can use a round or square block. As an alternative, it is allowed to use chrome, galvanized or aluminum tubes.
All parts must be connected into a common structure using self-tapping screws and wood glue
Particular attention is paid to the reliability of the handle. The box can be equipped with fixed or removable internal partitions
If desired, you can make a lid, but it is necessary that it is convenient and does not interfere with carrying the box.
As a variation of a wooden box, you can build a tool organizer. It will require the same materials as for previous designs. Markings are drawn on a sheet of plywood and parts are cut out in accordance with it. It is also necessary to make grooves, which will give the organizer strength and allow the parts to be held together more reliably. Each cut must be sanded.
The parts of the box are connected to each other using glue. Their fastening begins with the frame. To make this job easier, you can use rubber rings or clamps. Most often, the handle is made from MDF, but it is possible to remove it from an old suitcase or case. Inside the box there are small compartments for each tool.
Universal case made from a plastic canister
If you want to make a tool box with your own hands, but do not have a sheet of plywood, then you can use a regular plastic canister. To work you will need:
- Hacksaw.
- Plastic container.
- Fastening elements.
The canister used must be rectangular in shape with a comfortable handle, which should be located in the center. In addition, it should be equipped with a screw cap that will be used as a lock.
The process of making the box itself is quite simple. Using a hacksaw, you need to make cuts in the canister. The first cut should fall on the center of the neck and the handle of the container, it is best to remove the stopper and saw through the top wall. The second cut is made exclusively in the horizontal direction. It is best if it is located in the upper part of the canister, on the end sides. The plastic container itself must be cut from the top wall at a distance of 4 cm, and on the sides at a distance of 3 cm.
When all the cuts are made, the canister can be opened. To do this, you need to bend all the side parts of the top cover with the halves of the handle. In such a box you can store various materials for fastening: nails, bolts, screws, nuts. The upper part must be closed by folding the handles together. This device is secured with a screw cap.
To make the box as strong as possible, additional gaps must be made on the end walls. Small holes are drilled in the lid itself or in the walls into which hooks are inserted, as well as bolts and nuts.
About the problem of storing tools
It is impossible to master all the instruments existing in the world, and it is not necessary. A person must realistically imagine what he is ready and able to do, and what tools he will need for this. In a city apartment it’s one thing, in a rural area it’s another. By the way, the set of tools depends not only on the place of residence, but also on the date on the calendar. For example, during the Great Patriotic War, almost every Moscow family had a saw and an ax - they had to prepare firewood for their stove. But now these tools are only available at dachas, and even then not at every one.
Many people have hobbies related to handicrafts. This word in this context means not only and not so much knitting or cross-stitching, but the need to do various interesting things with your own hands. It is clear that each type of work requires its own set of tools.
Tools must always be available. Like all things in the house, they should have their rightful place. The owner should be comfortable, and they should not disturb the rest of the family and spoil the design of the apartment PHOTO: 4.bp.blogspot.com
It’s good when a DIY craftsman has his own workspace at home. Then the tools can be placed in a stationary storage. And if there is no such place, or you have to work in different places, then you need to have an easily portable package of the most necessary tool.
Related article:
Flower box for balcony
The general principle of making a flower box from wood with your own hands remains unchanged, but the specifics of use force you to take into account a number of nuances.
Depth is of particular importance. Experienced gardeners do not recommend making walls more than 20 centimeters high. Flowers need to be watered regularly, and wet soil significantly increases the weight of the structure.
Balcony boxes need to be placed on a solid base to prevent them from falling down. For these purposes, metal frames welded from reinforcement bars are usually used. The advantage of this method of fastening is that the outdoor box can be easily removed and brought into the house for the winter.
Note! If painting is planned, it is better to give preference to natural and neutral tones. Bright colors not only fade quickly in the sun, but also hide the natural beauty of plants.
To save on decoration costs, it is recommended to plant flowers in two rows. In the foreground there will be climbing plants that will disguise the wooden container. The flowers of the main composition are planted in the background.
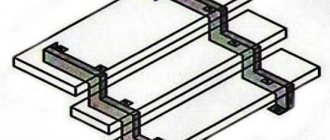
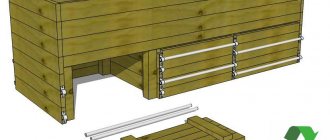
Portable box with drawer
This is almost a mini-version of a workshop. The top panel can be used to work with various equipment; inside is an excellent place to store tools, accessories and consumables. If you put the organizer on wheels, you get a mobile Toolbox.
The interior of the box has a compartment for large tools and pull-out compartments for small items. Additionally, you can install a panel for rulers, screwdrivers, knives, etc.
The structure is made of plywood, connecting the parts with glue and self-tapping screws. For strength, you can fasten the organizer with stiffening ribs from a 50x50 mm bar.
There is nothing complicated about assembling the box itself. The drawer design requires the most attention. It is expected to be loaded, so if it is not positioned correctly it can bind when moving and slip out of its mounts.
To install a retractable compartment, you will need guides, which can be roller or ball. The sliding of the runner occurs due to the torsion of the rollers in the grooves or the movement of the guide parts themselves relative to each other in special tracks.
Roller mechanisms are inexpensive, but less reliable. Ball ones are stronger and more durable, they move silently and allow you to open the drawer all the way. You can use reinforced versions of products that can withstand heavy loads.
To install a drawer, mark the fastening line of the guide on the wall, and the mating part on the side element of the compartment
Here it is important not to make a mistake and to connect the structures correctly in height so that the box fits tightly, but there is a small gap left for free movement. Even the slightest misalignment between parallel sides should not be allowed
Assembly sequence:
- Cut out parts from plywood and sand.
- Assemble the frame and box using self-tapping screws and glue.
- Let it stand until it gains strength.
- Mark the guide lines on the internal side posts and sides of the drawer.
- Secure the runners with self-tapping screws.
- Insert the compartment until it clicks, slightly lifting the edge. After this, the box should move freely along the guides.
- Arrange the organizer space as you wish.
- Attach carrying handles.
- Carry out final protective and decorative treatment.
If desired, you can make several drawers of the same or different sizes. This will allow you to make maximum use of the organizer’s space.
Option with shoulder strap
Varieties and materials
There are many types of organizers:
- The simplest designs where all the tools and small accessories available in the house are stored. If the work is performed periodically, this is a completely convenient option.
- For storing a certain tool, for example, an angle grinder or a drill, especially if the device is not included in the factory configuration.
- Spacious and versatile, with numerous compartments and even wheels for easy movement.
- With advanced features, including workplace organization. For example, the structure unfolds and transforms into a small table with equipment attached to its surface.
Each craftsman can make a tool box “for himself”. If you don’t have to do repairs too often, then limit yourself to a simple drawer with a handle. It is advisable to provide several compartments or external “pockets” in which all the necessary items would be placed.
When there is a lot of equipment and you have to use it regularly, you will need a professional organizer. The location of compartments, cells or containers in this case must be carefully thought out in order to quickly find what you need.
When making a tool box organizer, the following are used:
- Metal - sheet aluminum, stainless steel, galvanized steel. Structures made from them are resistant to mechanical stress and corrosion, reliable, and durable.
- Wood - plywood, chipboard, fiberboard, MDF, bars, boards. The material is easy to process; you can use any scraps remaining from the repair.
- Plastic - for storing and carrying heavy tools, it is better to use impact-resistant polypropylene. It is not as fragile as other types of polymers, can withstand fairly high loads and is not afraid of frost. To keep small items of light weight in order, you can use any sheet of plastic.
Devices are often made in combination - a body made of durable metal or plywood, plastic filling, fiberboard. Small containers, containers, and cuttings of polymer pipes are suitable for small items.
To make materials last longer, you need to use protective equipment. Wooden parts are painted or impregnated with linseed oil. Aluminum, stainless steel, galvanized steel or plastic are themselves resistant to moisture and corrosion, so they do not require additional processing.
Rating of standard boxes
STANLEY Expert Cantilever 1-94-738 45×20.8×20.8 cm
A high-quality but expensive design with an upward-opening lid that allows you to store various hand tools. Made from durable metal that can withstand high loads. For greater convenience there are 5 compartments.
The average price is 2,600 rubles.
STANLEY Expert Cantilever 1-94-738 45×20.8×20.8 cm
Advantages:
- Strength;
- Withstands high weight;
- Easy maintenance;
- Convenient storage.
Flaws:
DeWALT DS150 Tough System
A product that is designed for transporting and storing a large number of tools. The body is made of durable materials that can withstand heavy loads and not break. The handles are made of durable plastic. Therefore, the chance of their failure is minimal. The weight of the complete structure is 4 kg.
DeWALT DS150 Tough System
Advantages:
- Capacity;
- Strength;
- Several handles for transportation;
- Stylish appearance.
Flaws:
BOSCH Toolbox PRO 42.7×23.2×19.5 cm
Standard budget version, suitable for home use
The box is completely universal, which will allow you to store all the tools that will fit inside, but it is important to remember the order. Therefore, the sorting must be careful
Withstands loads up to 20 kg.
BOSCH Toolbox PRO 42.7×23.2×19.5 cm
Advantages:
- Low price;
- Comfortable handle;
- Strength;
- Good fasteners.
Flaws:
Stool box: drawings and description
This is a carpentry product of a more complex level of manufacture than a simple box. For a stool on which you can sit or stand, a durable frame is built from a bar. The interior space is used to store tools.
You will need:
- board 20 mm thick;
- block 50x50;
- plywood 8-10 mm;
- wood glue;
- cutting tool;
- screwdriver or drill;
- block, fine sandpaper or sander;
- hinges, handles, lock.
First prepare a drawing with dimensions
Now you need to assemble the stool:
- Trim the blanks to size.
- Connect the bars with tongue-and-groove fastenings and dowels.
- Cut out the bottom and sides from plywood.
- Sand all the details.
- Lubricate the contacting surfaces with glue.
- Insert dowels and connect the elements, remove excess lei
- Tighten with clamps for 24 hours.
Aging in clamps
While the glue is setting, a seat is made from the board. The parts are polished and the edges are rounded. Glued to the frame and connected with an “oblique” screw.
The sides and bottom are fixed to the stool. The opening part is secured with overhead hinges. To prevent the lid from opening spontaneously, install a latch. The functional box-stool is ready.
For seedlings
The size and shape of wooden planting boxes will depend on how you grow your flowers. Bulky items take up a lot of space and spoil the overall interior of the apartment. Therefore, if you plan to grow cucumbers and tomatoes on a windowsill, it is better to limit yourself to small wooden plywood boxes.
A garden plot offers more opportunities for the DIYer. So, a large and functional box for seedlings can be made from an old pallet. In fact, a pallet initially represents a finished product. The gardener can only make the bottom and walls from pieces of multi-layer plywood. To do this you will need decorative nails and a hammer. After this, the internal space is filled with earth, the seeds are sown between the top rows of boards.
Tool Chest Ideas
In the hands of a true craftsman, any thing that has outlived its useful life can become a useful and functional device. Various ideas that are implemented from improvised means arouse interest and become an impetus for one’s own creativity:
- A tool box made from cable ducts and sofa springs is an economical lightweight device for storing small accessories.
- Plastic canisters are record holders for generating various ideas. If you cut out a window in the upper part, such a container can be used to store screws, nails, drills and anything else that may be useful in your work.
A shopping cart, if obtained legally, can be transformed into a convenient Tool-box through some transformations. It is enough to arrange compartments or shelves, and the handle and wheels are already there. Old "diplomacy" bags are strong and durable, and reliable locks have worked properly for more than 20 years. Inside the case you can arrange small pockets for storing small items, and the suitcase itself can easily withstand the weight of a drill or screwdriver.
Required materials and tools
The tool box can be made from various materials.
- Wood is the most affordable option in the price range, which is easy and convenient to work with. To make a box with your own hands, you can take a board or a durable sheet of plywood with a thickness of 10 to 18 mm. It is possible to independently regulate the height and width of the structure, as well as its internal structure.
- Metal – steel or metal sheets are often used. The disadvantage of such products is their weight; the boxes are heavy, but they are much more reliable and durable than wooden ones, which is their advantage. If you want to make a durable container for storing tools, but lighter, you should use aluminum.
- Plastic is the lightest material for tool boxes, which are difficult to make yourself, but can be purchased at any hardware store. A variety of shapes, sizes, colors, and designs allows you to choose exactly the option that will be most convenient.
The process of creating any structure requires the availability of materials and tools for its creation.
As already noted, among the main materials from which a box can be made are:
- plywood of the required thickness, at least 10 mm;
- board, mainly made of pine;
- metal – steel, aluminum;
- plastic.
Depending on the chosen material, you need to have with you a set of certain tools to create the desired design. Among the most popular are:
- cutting tools - saw, hacksaw, grinder, knife;
- drill with a set of drills;
- metal scissors;
- hammer with nails;
- chisels of different sizes;
- manual frezer;
- ruler with pencil;
- roulette;
- screwdrivers or screwdriver with self-tapping screws;
- clamps;
- waterproof glue.
If the box has a simple design, then it is worth making a lock in it that will prevent the container from suddenly opening. For this, a miniature snap metal lock can be used that snaps onto two metal ears connecting the base of the structure and the lid. You can use plastic latches - they are more convenient to use, but they must be installed correctly and used carefully.
It is important to think about the design of the product itself. It can be made in the form of a spacious box, inside which the tool will be placed, or have a more complex structure with additional containers
Manufacturing and assembly of the case
How to make a body: detailing and dimensions (open the drawing in large size)
- The side walls (A), the lid (B) and the bottom (B) are cut out of plywood 20 mm thick according to the dimensions indicated in the drawing. Other materials can be used to construct the frame, but it is the 20mm plywood that ensures optimal strength for the quarter joints used in this project.
Homework: How to choose plywood and not make a mistake
- Markings are made on the inside of the sidewalls (A) and blind holes are drilled (diameter 6 mm; depth 10 mm) for the pins supporting the shelves.
- On the sidewalls (A) grooves (quarters) 20 mm wide and 10 mm deep are milled at the top and bottom.
- On the side walls (A), top cover (B) and bottom (B) select a groove in which the rear wall of the cabinet will be fixed. The groove width is 6 mm, the depth is 10 mm, the distance from the rear edge of each part is 20 mm.
- From a sheet of perforated hardboard or plywood 6 mm thick, cut out the back wall of the box (C) - a square with sides of 800 mm.
- Having checked the strict perpendicularity of all joints and the accuracy of the fit of the connections, they begin to assemble the body - connecting parts A, B and C. The screed is carried out with screws through pre-drilled holes, which will prevent cracking of the plywood.
- According to the dimensions indicated in the diagram, cut out the shelf (D), and use screws to fix it at a height of 140 mm.
- The shelves (H) are cut out according to the dimensions from the drawing. They are located on insertion pins and are removable. The number and configuration of shelves is chosen at your discretion, depending on what will be stored in the box.