An efficient nitrogen cycle is the key to successful aquarium maintenance. In aquatic ecosystems, living creatures such as fish, amphibians, arthropods and many others produce large amounts of organic waste, which is further processed by various microorganisms into simpler elements - this is how biological balance is achieved - which is waste for some, food for others. One of the end products of organic decomposition is free nitrogen, the dominant component of the Earth's atmosphere. Unfortunately for aquarists, two intermediate products in this process, ammonia and nitrites, are quite toxic to tropical fish and other aquatic animals. These poisons tend to accumulate in the closed ecosystem of the aquarium and once their concentration exceeds a certain level, mass mortality will inevitably occur.
Perhaps the aquarist's most powerful ally in the fight against toxic waste (ammonia and nitrites) is a biological filter. A large colony of nitrifying bacteria ensures the rapid conversion of ammonia into nitrites, which in turn are oxidized to nitrates, the latter considered relatively harmless. However, it should be borne in mind that even the most productive biological filter does not eliminate the need to regularly clean the soil from organic waste (remains of feed, excrement, etc.) and replace part of the water with fresh water.
Often the term "biological filtration" is used as a synonym for bottom filter. Such an identification can be found especially often in Europe and North America, where since the early 1960s, a new type of filter at that time was actively advertised and widely implemented in practice. The bottom filter really does a good job of biological purification, but in fairness it is worth noting that there are much more effective and practical devices. The bottom filter has a number of disadvantages, in particular, its performance strongly depends on the size of the particles and the depth of the soil, on how dense the root system of the plants is and how much surface area of the substrate is occupied by the design elements. All this can completely stop or greatly impede the circulation of water in such a filter and, as a result, negate biological treatment.
In this article we will talk about one of the alternative methods of biological filtration, namely a simple airlift filter with a sponge-shaped filter material (Sponge Filters) - perhaps the cheapest, most versatile, simplest in design and at the same time extremely effective.
The main role is played by a synthetic sponge, which serves as the basis for the development of a colony of nitrifying bacteria. The internal porous structure of this material provides huge areas for colonization. For example, a sponge cylinder 5 cm in diameter and 15 cm long provides bacteria with a “living” area equivalent to 1 m² of soil area at the bottom filter.
The simplest version uses a hollow tube with perforations, onto which a sponge is placed. Air flow from the compressor is supplied through an additional hole. Traction is created due to rising bubbles that carry water with them and thereby draw it through the sponge. Similar filters are available in large quantities at any pet store and online stores. In addition, you can find many instructions and videos online on how to make it at home. However, a strong argument in favor of a purchased airlift filter is the optimal ratio of the thickness and porosity of the sponge, derived by the manufacturers during special calculations.
Obviously, a large sponge will become home to an extensive colony of nitrifying bacteria, and small pores will only increase the effective area for their colonization. But there is also a downside - all this greatly reduces the speed of water passage, and as the outer layer becomes clogged with various debris, suspended matter and algae, the flow may stop altogether, which will lead to the death of the bacteria living inside due to a lack of organic matter and oxygen. It is almost impossible to take into account the traction force generated by air bubbles and select acceptable proportions of the size, thickness and porosity of the sponge on your own, so a homemade airlift filter in most cases is significantly inferior in performance to its commercial counterparts.
Structure and principle of operation
Although the name of this filter may seem unfamiliar to an inexperienced person, many are familiar with it. Typically, such a filtration system consists of a sponge and plastic pipes attached to it for air circulation. The principle of operation of an aerofilter is quite simple - pipes for supplying and pumping out air are connected to a compressor, which, in addition to air, also draws water into them. Subsequently, the water is filtered through the sponge and poured back into the aquarium, leaving dirt and harmful bacteria in the sponge. Such filters are not only cheap, but also easy to manufacture and install.
If you use them correctly and clean them in a timely manner, they will become good protectors of your aquarium.
Not long ago, new generation airlift filters appeared in specialized stores; they have a different structure, but work in the same way. The filter is a small plastic container in which various filtration materials are arranged in several layers. Most often, these containers are made of a corner type, which saves space as much as possible , and therefore is suitable for small aquariums. The principle of operation is still the same, but the presence of several filtration materials allows the airlift filter to work as a full-fledged biological one.
In addition, this system allows you not only to purify water, but also to saturate it with air, which makes it possible to do without an additional compressor with oxygen.
Manual pressure control
In filtration systems, the aquarist, for his own purposes, can change the water pressure. In particular, this is done to regulate the speed of water, but only towards a decrease. To change the pressure, you need to know the location of the pump - whether it is located before or after the filter. This works mainly with external canister filters, which are equipped with several control valves. Depending on its location relative to the filter, the pump will create in it a pressure equal to its pressure, or a vacuum also equal to the pressure. Pressure is created by the pump if it is located before the filter, and vacuum is created if the pump is located after the filtration system.
If we close the inlet valve, this will reduce the amount of water passing through the pump and reduce the vacuum (negative pressure). As a result, the water pressure at the outlet of the filtration system will drop and the pressure will decrease. If we use the outlet valve and close it, we will achieve an increase in pressure at the outlet of the pump (not the filtration system). The amount of water passing through the filter will decrease, and as a result, the magnitude of the vacuum modulus will also decrease.
It should be remembered that the use of undocumented modes may result in overheating or failure of the pump. Long-term operation of the pump in such modes leads to overheating of the stator, which entails overheating of the windings, with all the ensuing consequences.
Advantages and disadvantages
An airlift filter is a very good tool for cleaning an aquarium, if you do not take into account such minor disadvantages as:
- fragility;
- not suitable for very large aquariums, as it will not provide complete filtration;
- may not be able to cope with excess contamination.
However, the airlift filter has the following advantages:
- it is practically silent, if you do not take into account some minor sounds of air bubbles;
- if the sponge fits well into the holes of the tubes, then the filter will be completely safe for small fish, shrimp, and so on;
- the filter saves a lot of space;
- With the right approach and hard work, you can make a design that will look good in the interior of an aquarium.
Summary
An airlift filter with a filter material in the form of a sponge will be an excellent option for the biological cleaning of a small amateur aquarium inhabited by fish such as small cyprinids, viviparous fish, characins and killifish. In addition, it can serve as a real lifesaver when creating spawning or quarantine aquariums, as well as quickly restore biological balance after using medications. Therefore, many experienced aquarists always keep a small working sponge filter somewhere in the corner, just in case.
Source
DIY making
To make it you will need the following items and tools:
- air compressor for aquarium;
- plastic bottle;
- sponge or foam rubber;
- hose with sprayer;
- scissors or knife.
To design the filter, you need to make a chamber from a non-toxic and inert material; an ordinary plastic bottle will also work well . It must be cut into two halves and many small holes must be made in the upper half. Then you need to lay the filter material, insert the top part of the bottle into the bottom. You need to insert a hose with a sprayer attached to the compressor into the neck.
The only drawback of such a filter will be that it is not aesthetically pleasing; the filter will look ugly in the aquarium; you can pick up a green bottle and disguise it with vegetation.
The design may be different, it all depends on the required size, functionality and performance. In some cases, the filter material is used without the main structure. To make such a filter you need to prepare the following:
- air compressor;
- 90 degree square;
- sponge or other filter material;
- supply tube;
- the rising tube with a diameter several times larger than the supply tube;
- suction cup compatible with one of the tubes.
Production is carried out as follows:
- in the lower part of the lifting tube you need to make a hole with the diameter of the supply tube and insert it;
- a sponge is fixed to the lifting tube;
- you need to attach a square to the top of the rising tube; it will direct the rising water in the right direction;
- use a suction cup to attach everything to the wall of the aquarium;
- The sponge should not touch the ground.
The upper part of any filter can be decorated with aquarium soil. Over time, beneficial bacteria will settle on the edges of its grains of sand, feeding on substances harmful to fish and plants. This way you can maintain complete balance in your aquarium.
Maintaining a home aquarium is not an easy task. When keeping fish or shellfish in your apartment, you need to understand that they require constant care. You need to regularly monitor the cleanliness of the aquarium; an airlift filter, which you can easily make with your own hands, can help you with this. With a responsible approach to this matter, you will get the perfect aquarium with a beautiful design that will fit into your interior.
For an overview of airlift filters, see the following video.
Source: https://vplate.ru/akvarium/filtry/aerliftnyj/
biofiltration in an aquarium
Click on the photo to find out what discus fish do.
An airlift filter for an aquarium is not at all difficult to make with your own hands. If you fill it with zeolite, then at first it will be a device for removing ammonia from the aquarium by absorbing it with zeolite, and over time you will get a super-efficient biofilter that can be installed anywhere: in a nursery, in a quarantine aquarium, in a decorative aquarium. It will reliably insure aquarium fish from unexpected ammonia poisoning.
The soil in an aquarium is its biochemical kitchen. It is in it, and even on the filter material of the filter, that beneficial nitrifying bacteria settle, without which the fish quickly die, poisoned by ammonia and/or nitrites. But the problem is that in many cases the aquarium ends up without soil, or there is too little soil there. For example, there is often no or little soil in nursery aquariums, quarantine hygienic aquariums, in commercial aquariums of pet stores and wholesale centers that keep fish, in aquariums where discus and angelfish are bred. It is also not always possible to equip these containers with external filters, and the small sponges of the internal filters have to be washed too often, thereby washing away nitrifying bacteria. So it turns out that nitrifying bacteria simply have nowhere to live in such “banks”, and therefore it is difficult to maintain the basic parameters of aquarium water at an acceptable level. In fact, many amateur aquariums with soil, but too small internal filters, also periodically suffer from ammonia “strikes” (peak ammonia concentrations) due to overfeeding or unsuccessful water changes combined with a soil siphon. The problem is especially aggravated in spring and autumn, and even in summer, when there is heavy rain and the quality of tap water drops. What can I do to avoid problems with ammonia and nitrites?
Purpose and principle of operation
Ammonia and nitrites, toxic to aquatic life, gradually accumulate in a closed ecosystem. If a certain concentration threshold is exceeded, living creatures in the aquarium may die. Therefore, it is necessary to pay great attention to the purification of the aquatic environment from fish waste products.
Airlift filters for aquariums perform several functions at once:
- enrich the aquatic environment with an air mixture;
- ensure circulation of water flows inside the container;
- filter water from mechanical impurities.
The system includes elements such as a compressor, a sponge and a tube for air and water.
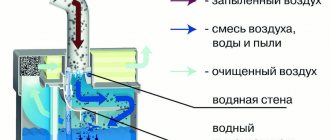
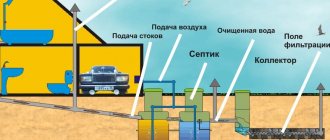
The air filter works simply. Tubes for supplying and pumping air are connected to the compressor. The air flow from the compressor is supplied to the bottom of the filter, where it unfolds and naturally rushes to the surface. Due to the created backdraft, water is sucked into the sponge, and along with it dirt. From the outside it looks like the movement of an elevator, hence the name. The water passes through the filter sponge, is retained and returned purified back to the aquarium. The air compressor is located outside, thereby saving space inside the aquarium.
New airlift filters have a more complex structure, but will work on the same principle. The filter looks like a plastic container with various filtration materials, which are arranged in layers. Corner containers save space. They are suitable for small sized aquariums. Such sophisticated airlift devices perfectly maintain the biological balance of the aquatic ecosystem and saturate it with oxygen.
Advantages and disadvantages
Aerofilters have many advantages:
- They operate silently, with only the sounds of running air bubbles;
- The sponge, which fits well to the tubes, is absolutely safe not only for large, but also for small inhabitants (shrimps, snails, fry);
- Compact device effectively saves space;
- the filter part is easy to disguise among stones and algae;
- the device can be easily transferred from one tank to another;
- energy and space are saved by using an additional water aerator device;
- if desired, you can make a design that will look beautiful in the interior of the aquarium;
- an airlift can be made independently with a minimum of investment and labor costs.
DIY making
To make an airlift filter with your own hands, you will need:
- 1.5 l plastic bottle;
- sharp knife;
- a piece of padding polyester that will act as a sponge;
- a handful of pebbles.
Attention! It is also necessary to have an air compressor that will act as a pump.
Manufacturing process step by step:
- Using a sharp knife, cut off the bottom of the bottle at a height of approximately 10 cm.
- We cut off the top part of the bottle at a height half as large as the bowl, and we get an “umbrella”.
- Remove the cap and ring from the neck (you will need another one from another bottle in the process).
- We cut the remaining middle part of the bottle lengthwise and roll it into a tube, securing it with rings. The tube will unfold itself to the desired diameter.
- We put the tube on the neck of the “umbrella” and firmly fix it with one ring like a clamp.
- Place a handful of stones, preferably porous ones, in the lower cut bowl.
- Place the umbrella in the bowl with the tube facing up. It should stand tightly and not wobble.
- We wrap a large piece of padding polyester around the tube inside the bowl. It must be taken into account that when wet it will shrink.
- We insert the hose from the compressor inside the tube. The air filter is ready.
Such a device behaves stably at the bottom of the aquarium, filters the water and enriches it with oxygen. About once every 5 days, the padding polyester is removed, washed or replaced with a new one. To preserve beneficial microorganisms in the washed sponge, you should rinse it with water from the aquarium after cleaning.
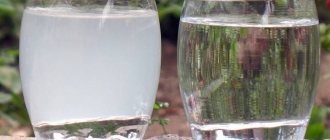
A homemade device works no worse than a purchased one. The bottle can be transparent, green or red. The pebbles at the bottom of the bowl not only play the role of an anchor, but also quickly become overgrown with microorganisms beneficial to the aquatic environment.
Additional accessories
Large-pored sponges from the manufacturer do not deform and do not lose their appearance even after a year of constant use. However, the filtration efficiency drops significantly at this point. To keep your aquarium clean, you need to change the filter fiber twice a year.
To maintain high-quality filtration, you need to regularly change the filter fiber
Rubber loses its elasticity when exposed to water, and the suction cups no longer adhere tightly to the glass. The deeper the aquarium, the greater the trouble that will result from neglecting the replacement of this element. New suction cups are installed as they wear out , usually annually. For shock absorption of more powerful models, special rubber mounts are produced that reduce vibration.
The effect of a waterfall and the murmur of water can be created using a flute. The sprinkler head also enhances the enrichment of oxygen in the liquid. Flutes for all filter models help the purified water to be distributed evenly.
The miniature Mini UV sterilizer exposes water to short-wave ultraviolet irradiation, which leads to the death of pathogenic bacteria and tiny algae. There is no need to keep the device turned on all the time. The sterilization procedure is carried out only a few hours on one day of the week. If necessary, you can do this more often. For example, if the fish began to get sick or a slight cloudiness appeared caused by the activity of bacteria. The sterilizer is installed on the filter outlet nozzle. There are four UV LEDs inside the device. Given the lack of need for additional maintenance and the presence of autonomous power supply, this is an ideal choice for Micro, Mini and 1 models.
For larger filters – models 2 and 3 – the Multi UV sterilizer is more suitable. The size and design are much simpler. A three-watt light bulb is inserted into one of the included modules; the choice depends on the filter model used. The resulting connection is placed between the filter head and the glass with the sponge. No additional maintenance is required for the sterilizer. The light bulb will have to be changed only after its service life has expired (5 thousand hours).
Need for a filter
No matter how crystal clear water you put into the aquarium, in any case, sooner or later it will become polluted. This happens because small particles of dust or debris get into the aquarium, and some vegetation also dies off.
We will not make an airlift filter for an aquarium with our own hands, because it has low productivity.
But a high-quality external filter can be made using improvised means; it will perform the following functions:
- Create water circulation.
- Remove organic and inorganic particles from water.
- Filter water from chemicals, for example, you used preparations for fish.
- Saturate water with oxygen.
Aggressive environment. Recommendations for materials
Although today the market provides the aquarist with a wide range of products to choose from for his hobby, there is often a desire or need to either customize some equipment to suit your needs, or make a filter system yourself, from scrap materials, the list of which will be limited. Recommended materials for equipment that comes into contact with aquarium water are glass and ceramics, and most but not all types of plastics. Metal, if necessary, must simultaneously meet several stringent requirements. In addition to strength, a necessary condition for its structural suitability, it must also be chemically resistant. The reason for this is not only that a part exposed to metal corrosion will quickly fail, but also that for fish living in an aquarium, most metal compounds that can enter the water due to corrosion are poisonous. And here it would be useful to remind you that aquarium water is an aggressive environment. There are many different factors that make it this way, although water itself is a solvent. Many substances that can interact chemically with water can form acid or alkali as a result, thereby changing its pH. An example is carbon dioxide, a by-product inherent in aerobic respiration. All living beings that use oxygen for breathing produce carbon dioxide, which is easily soluble in water, which reacts with it to form unstable, weak carbonic acid. It is constantly present in water, due to its instability, breaking down back into carbon dioxide and water and forming again.
Decaying remains of food, plants and the excrement of the fish themselves are a source of nitrogen compounds (nitrates, nitrites, ammonia, etc.), phosphorus and sulfur. They are also chemically reactive and can cause corrosion. By entering into chemical reactions with water, gases dissolved in it, and aquarium sludge, they can form organic and inorganic compounds (including acids) contributing to the destruction of parts, both metal and some types of plastic.
Bacteria, which inevitably inhabit any, even the most seemingly clean, aquarium, are the main “suppliers” of hydrogen sulfide, which is a by-product of their vital activity. When it gets into water it also forms acid and is poisonous. The role of bacteria in the destruction and premature wear of aquarium equipment is also great. They settle in the pores of filter substances, reducing their efficiency and, over time, rendering them completely unusable. They form bacterial deposits on all parts of the aquarium submerged in water and simply on wet surfaces; such growths in hoses and other parts of existing filter systems are the main reason for the decrease in their efficiency. In any case, if you are a novice aquarist and are not sure of the chosen material , refer to ready-made designs and time-tested designs and materials, examples of which can be found in printed publications or on the Internet. —— based on materials: www.aqa.ru/filtraciya_akvariumnie_filtri
Filter types
Currently, there are three main types of filters based on their operating principle:
Chemical. They mostly remove contaminants that appear from the activity of fish and various vegetation.
Phosphates and nitrates are perfectly removed from water; for continued excellent performance, filter elements should be replaced regularly.
Mechanical. This type of filter is mainly used for rough cleaning, for example, if debris gets into it. If you notice that the stream of water coming out of the filter has weakened, this indicates that it needs to be cleaned immediately.
Absorption-chemical. This filter is designed to clean the aquarium from waste products of living organisms.
The main part of this filter is considered to be special bacteria, so the filter can only be washed with running water.
It is strictly forbidden to dry it, as bacteria may die. Unfortunately, it is impossible to make such a homemade filter for an aquarium, unless you can’t get these bacteria.
How to create a filter yourself?
You can make a filter from anything, for example, many people make a filter from a bottle for an aquarium with their own hands, and it works well.
Now we will tell you in detail how to build a filter. For this we need:
- Sucker.
- A piece of sponge.
- 2 syringes of 20 milliliters.
- Compressor (aquarium)
- Rubber tube.
Process of creation:
- Take 2 syringes and remove the pistons from them, which squeeze out the medicine.
- Then, using a gas torch, heat the places where you pulled out the piston, and then quickly connect them to each other, they are securely soldered.
- Next, using a utility knife, cut off the noses for the needle, as a result we will get a long plastic tube.
- After this, cut off the syringe at one end, as a result we have access to the cavity of the tube.
- Finally, insert the sponge into our homemade filter and pull the tube over this edge, and then attach it to the compressor.
All that remains is to attach a suction cup to our filter and fix it on the wall in the aquarium. A do-it-yourself external filter for an aquarium is made using the same principle.
It will work as follows: the aquarium compressor will capture water from the aquarium, then drive it through the filter and release it again to the fish.
The simplest airlift filter
Having a compressor available, it is quite easy to organize biofiltration in an aquarium. What do we need for this? It turns out there aren't that many materials. For the filter itself:
- sponge;
- spray;
- a piece of hose.
True, such a filter will float on the surface of the water. Therefore, we use two more items:
- “control” ring from a 5 liter plastic bottle;
- any silicone suction cup.
With their help we will fix our filter in the right place in the aquarium.
Please note that the diameter of the internal cavity in the sponge corresponds to the diameter of the sprayer.
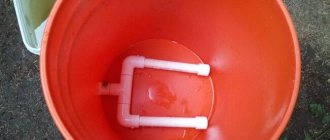
Thanks to this correspondence, the filter is simply assembled from the materials listed above: we put a hose on the connecting end of the sprayer, lower the hose with the sprayer into the internal cavity of the sponge - and the filter is ready.
How are we going to secure it in the aquarium? After all, the sponge is very light and won’t sink on its own? Let's do the fastening: we need to fix the silicone suction cup on the plastic ring. We put the resulting structure on the filter and fix it in the aquarium. Question: why was the tube with the regulator from the drip needed? Answer: it’s just convenient enough for her to regulate the air supply. And if the sponge had an internal cavity smaller in diameter than the sprayer, then it would be possible to do without the sprayer, replacing it with a wick from a disposable lighter.
How does an airlift filter work?
The work of creating a flow of water is created by rising air pumped by an air compressor (can be of any type - pump, rotary, etc.).
Air, according to the laws of physics, tends upward due to the difference in density. Entering a tube located in a liquid, the air flow quickly expands and creates a kind of “piston” that lifts a small portion of water.
If a filter element is installed at the inlet of the tube, the passing water flow will be cleared of mechanical impurities.
Thus, the airlift filter performs several functions at once:
- Enrichment of water with an air mixture.
- Providing water circulation inside the aquarium.
- Filtration of water from mechanical impurities.
VIDEO INSTRUCTIONS » alt=»»>
Airlift filter compared to a pump filter
As mentioned above, it is difficult to achieve high power from an airlift filter, this is due to the fact that the pushing force in the design is, in fact, air, and not the engine.
In pump filters, the movement of water flow is ensured not by an air “piston”, but by a real mechanical one.
This entails a significant increase in the power and stability of the pumped liquid flow.
Power is the determining factor in the difference between these types of aquarium filters.
For example, an airlift filter is very sensitive to excessive contamination. Even a slightly clogged filter element can stop the operation of the entire device.
Water will stop flowing into the tube and water circulation will stop, although air will still flow into the aquarium. And all because of the small traction force of the rising air.
A pump filter will be able to pump water through the filter element even with a fair amount of mechanical impurities.
The pump and filter of such devices are most often combined into one housing, so pump filters take up a lot of the usable volume of the aquarium (in airlift filters, the components are usually separated - the compressor is located separately outside the aquarium, and the filter is immersed in water).
How to make an airlift filter with your own hands
You can make a homemade airlift filter in different ways. Below we will consider one of the simplest and most accessible.
For this we need:
- Air compressor for aquarium;
- Air supply tube compatible with compressor outlet;
- The lifting tube (its diameter should be several times larger than the supply tube);
- 90° elbow for lifting tube;
- Filter element (for example, sponge);
- Aquarium suction cup compatible with one of the tubes used.
- A hole is made in the lower part of the lifting tube according to the diameter of the supply tube with air.
- From the lower end to the hole, a distance should be set aside that will be sufficient so that a sponge filter can be fixed to the lifting tube.
- A square is mounted at the upper end of the lifting tube, directing the flow of lifted water in the desired direction.
- Using a suction cup, the structure is attached to one of the walls of the aquarium. When the compressor is turned on, air will flow through the supply tube into the lower part of the lift tube.
- Rushing upward, the air will also create a water flow, drawn through the lower end of the tube, equipped with a mechanical filter. The sponge should not touch the bottom so as not to suck up the aquarium soil. And using the square at the top of the filter, you can direct the water flow in the required direction for proper circulation.
The design of the airlift filter may be different. It all depends on the required dimensions, performance and functionality.
Source: https://filteru.ru/%D0%B0%D1%8D%D1%80%D0%BB%D0%B8%D1%84%D1%82%D0%BD%D1%8B%D0%B9 -%D1%84%D0%B8%D0%BB%D1%8C%D1%82%D1%80-%D0%B4%D0%BB%D1%8F-%D0%B0%D0%BA%D0% B2%D0%B0%D1%80%D0%B8%D1%83%D0%BC%D0%B0-%D0%BE%D0%B1%D0%B7%D0%BE/
Calculation of water speed in the filter and method of measuring it
Let's consider a specific example of an external canister filter, consisting of a canister with filler and hoses supplying and discharging water from it. Due to the different cross-sections of the canister and hoses, the flow rate of water will differ, despite the equality of its passing volumes. The water flow in the hose moves at a speed of several meters per second, and in the canister it drops several hundred times, amounting to only a few millimeters per second.
Example:
To simplify the calculation, we neglect speed losses and take into account that we are given the real performance of the filter at a given height of the water level in the aquarium above the canister, that is, the performance takes into account the pressure of the water column.
Given a filter consisting of a pump and a square canister: - pump productivity is 1 m3/hour = 0.00027 m/sec = 0.277 l/sec
— internal diameter of hoses D = 0.02 m (radius = 0.01 m)
— side of the canister Wк = 0.3 m
— V is the volume of water pumped by the pump. Pump capacity = V/t = Ssh*Vsh = Sk*Vk, where Ssh and Sk are the cross-sectional area of the hose and canister; Vsh and Vk - the speed of water passing through the hose and canister. Ssh = π*R2 = 3.1415*0.012 = 0.00031415 m2 Sk = Wk2 = 0.3*0.3 = 0.09 m2 Vsh/Vk = Sk/Ssh = 286.5 Thus, the speed of water, at when passing through the filter, it decreases by 286.5 times. The speed of water in the hose is Vsh = 0.00027/0.00031415 = 0.88 m/sec The speed of water in the canister is Vк = 0.00027/0.09 = 0.003 m/sec When calculating the speed of water in filters, you should Also take into account that the cross-sectional area of the filter is always greater than the cross-sectional area of the filter material. Hence, the speed through the filter material depends on its permeability (when using porous, sheet or fiber filters), or on the size of the particles or granules of the bulk media. In general, when the filler is fresh and maximally permeable, the efficiency of water purification increases with the increase in the ratio Sk/Ssh and Vsh/Vk. The low speed of water passage through the canister and filler ensures a more complete transformation of ammonium by nitrifying bacteria, and also allows solid waste to settle in the filter.
The method for measuring the total pressure or water flow with a real filtration system or pump is simple and does not require the use of special instruments. The easiest way is to measure the total pressure using a tape measure. To do this, you need to connect a transparent hose to the pump outlet, then, with the pump turned on, raise it to a height exceeding the pressure level according to the passport. We will see how the injected water rises up the hose to a certain height. The pressure value is obtained by measuring the height of the rise of water in the hose to the water level in the container from which it enters the pump.
Water consumption is measured using a water meter or water meter. If you don't have one, water flow can be measured using a bucket and measuring cup. To do this, for a certain fixed period of time (for example, a minute), we will drain water into a bucket. Moreover, if we place the jet outlet level at the water level in the aquarium, we will get water flow through the filtration system, with a pressure value equal to zero. In conclusion, we will consider some issues directly or indirectly related to the operation of pumps that affect their service life. Facts that will be useful to know.