Arched corners are used for finishing rooms. They have two main functions:
- decorative;
- protection of corners from damage.
Arches, as an element of architecture, appeared in ancient times for one reason: there were no reinforced concrete beams, and wooden lintels did not last long. Recently, the fashion for decorating doorways with arches has returned. Plastic corners protect sharp edges from accidental damage, abrasion and from people passing by.
Installation of decorative corners
Any apartment will look much more impressive if the edging of existing arches is decorated with plastic corners.
Therefore, let's look at how to glue a plastic corner to an interior arch and make the frame durable and reliable. There are two needs to use a PVC part: to glue and remove a right angle, or to paste over an arc. Condition for creating right angles:
- Surface treatment with a penetrating primer solution.
- Use a square to mark, mark and cut to the required size with a grinder.
- Apply the adhesive mixture to two inner planes of the element.
- Apply the strip, gently pressing it along its entire length.
First, you should level the surface of the opening
. The flexible corner for the arcuate arch is fixed in a slightly different way. Photos and videos will help beginners understand the differences and features of installation
Installing such an element yourself will be no more difficult than the previous option, but pay attention to the following nuances:
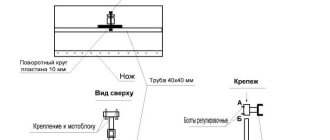
- The width of the sides of the corner when finishing the arc varies. The wide side is laid on the end corner of the arch, and the narrow side is pressed against the wall.
- Silicone sealant or adhesive solution is applied to the element, as in the first case.
- You need to fasten it with several nails - a necessary measure, since the hot solution must completely set.
- Instead of nails, it is allowed to use masking tape - it secures the edge of the plastic corner.
Gluing a decorative corner
Important! It is prohibited to use a home or construction hair dryer to speed up drying, especially if photo wallpaper or paint is used for the walls. Corners for interior arches are easy to glue onto wallpaper
The finishing material quickly sets with glue and allows you to test your strength the very next day. But if you want to cover an arch with an MDF corner, then use these tips:
Corners for interior arches are easy to glue onto wallpaper. The finishing material quickly sets with glue and allows you to test your strength the very next day. But if you want to cover an arch with an MDF corner, then use these tips:
- This type does not require additional fixation, but after applying glue to the corner and pressing it to the surface, wait a couple of seconds and then peel off the element again.
- After waiting for the glue to thicken, you can safely return it to its place. Usually 1-2 minutes is enough.
It is better to use a wooden corner for arched openings made of the same material. It is difficult to bend, so you can glue it on straight planes. Ideal use is rectangular portals where there is no round element.
Glue the plastic corner to the arch
Interesting! Among the abundance of finishing elements, you can choose cork, rubberized, rubber corners. A rolled and flexible rubber corner is simply necessary in places where water hitting the surface makes it slippery. These can be glued to tiles and concrete if necessary.
It is also possible to cover the arch using ordinary plastic corners, but in this case the elastic threshold will be much smaller. In order to bend the product to the desired size without damaging the product, you should heat the material with a hair dryer.
For the decorative design of arches and walls, polyurethane and polyurethane foam are used - in this case, all surfaces must be smooth. If there are small differences, then you need to glue the elements together by gently pressing and increasing the amount of glue in these places.
The procedure for gluing an arched plastic corner with glue
- Surface preparation. It is important to note that you cannot glue plastic overlays to wallpaper. If the work surface is covered with wallpaper, it must be removed. Excess wallpaper is removed using a sharp stationery knife.
- After all dirt, dust and old wallpaper have been removed, the surface is primed. The gluing process should be carried out no earlier than after 30-40 minutes.
- The glue is applied to the product and evenly distributed over the surface in a thin layer.
- The profile is applied to the place where it should be located according to the designer’s plans.
- For better adhesion to the surface, the corner must be slightly moved so that the applied glue is evenly distributed over its surface.
- Then you need to remove the corner and wait five minutes, and then attach it again and finally glue it and secure it with masking tape.
- After the glue has completely dried, the adhesive fixing tape can be removed.
Specifics of the shape of the arches
Designers have created many options for arched structures. You can look at the photos and choose them for any doorway and any taste preference. But of course there will be limitations due to the existing dimensions of the doorway. If you want to make an arched opening larger than the dimensions of the opening, then you should carry out calculations to find out whether expansion is possible and how this will affect the safety of the building. In addition, redevelopment will have to be carried out with the involvement of equipment and specialists, which increases the cost of the work.
You should carefully consider the choice of arch shape. It largely depends on the style of the room itself. So rooms in the classical style, Provence, are well complemented by Florentine arches or semicircular structures. The semicircular shape of the arch visually expands the space and increases the height of the ceilings. Modern minimalist solutions make it possible to decorate arched openings to make them compatible with any interior and add lightness to the room. Arches are used most often in passage rooms, or between the living room and hallway, dining room and living room, living room and children's room (so that kids are always supervised). In rooms where a person works or relaxes alone, it is better not to use such structures.
Arched openings can have a complex structure, with unusual design and construction solutions. They are called active.
Designs with a simple form and design, mainly used only to mark boundaries in rooms, are called passive arches.
Arches can vary in shape, so you can choose a design for your living space to suit your taste that will fit into the interior:
- Trapeze. Arched opening with chamfered corners. Ideal for decorating the interior space of rooms in a classic style (English) with high ceilings.
- Ellipse. Arched arches with regular shape. Such models look very beautiful and rich if they are made of natural wood. A segment-shaped arch (its radius) usually occupies most of the width of the doorway. A slight rounding helps make the room more spacious. An arch in the form of an elongated vault with rounded corners is more often used for zoning a kitchen. Suitable for Art Nouveau and Art Deco styles.
- Rectangles. Simple arched structures. Takes up the least amount of space, making it suitable for small rooms. At the same time, unusual decor can turn a rectangular arch into a work of art. Rectangular arches are suitable for high-tech or minimalism style. A rectangular arch with clear lines is used in trendy interior designs.
- Semi-arches. Such arched frames are called Thai. They are distinguished by their originality. On one side there is a straight line, and on the other a classic semicircle. Visually, such an arch in the interior of a house resembles the English capital letter D and looks very original.
- Roman. These are arched openings in the form of a regular semicircle. The width of the opening should be equal in size to the arch itself.
- Eastern. Decorative arches with a characteristic point at the top of the dome. The center of the vault extends upward, giving the arch a parabola shape. Such designs look very beautiful in the interior, especially if they are decorated with bright patterns in the Moroccan or Arabic style.
How to glue a flexible corner onto an arch
Before you start gluing, you need to accurately measure the opening and the length of the corner. Measure the perimeter of the opening from the baseboard with a margin of 2-3 cm on each edge (just in case). Please note that the perimeter of the opening will be at least 5 meters, and corners longer than 3 meters are not sold. Thus, it will not be possible to cover it with one piece. To begin, attach the flexible corner to the arch and start marking from top to bottom.
Plastic protective corners.
The lower ends of the corner should be at the same distance from the floor. You can level them with a water level. If it is not there, then take marks from the floor. We will assume that it is horizontal. Even if he is not, the human eye will not be able to perceive it. The seam between the corners will be visible in any case: if one end is lower than the other, then aesthetically this design will lose.
How to glue a flexible corner onto an arch
How to glue a flexible corner onto an arch
How to glue a flexible corner onto an arch
How to glue a flexible corner onto an arch
Preparing the opening
At the beginning of work, measure the dimensions of the opening - in case you have to slightly change them. Drywall, putty and other materials are used to change the size or shape; if you plan to do this, then prepare the necessary materials in advance.
Now we need to prepare the surface. Clean the opening from dirt, seal all cracks and degrease the mounting area. Create as smooth and even a surface as possible, preferably by sanding and wiping it.
Before starting finishing work, the surface of the arched opening should be leveled as much as possible.
In cases where the opening is plastered, make sure the surface is smooth. If there are any cracks, chips, or unevenness, remove this layer and apply a new one. Then wait for it to dry completely and clean the surface and sand it.
Installation features: how and with what to glue the arched corner
When purchasing arched corners, it is better to take more material so that there are no errors in the work. To do this, you need to measure the total length of the arch and add another 10% for margin. If the weight of the structure is small, then you can use liquid nails to glue the plastic arched corners. If a more bulky and heavy finishing of the arched opening is expected, then it is better to use special glue.
The glue for the arched corner is selected depending on its color: it is better to glue white elements with white glue, and for colored elements use colorless glue. Perforated corners are attached using staples, screws, nails without heads, or they can be glued to putty. If you plan to glue cork corners, then you need to use special glue for cork. Gluing corners into an opening is a simple process and does not require special skills.
Installation of decorative corners
Any apartment will look much more impressive if the edging of existing arches is decorated with plastic corners. Therefore, let's look at how to glue a plastic corner to an interior arch and make the frame durable and reliable.
There are two needs to use a PVC part: to glue and remove a right angle, or to paste over an arc. Condition for creating right angles:
- Surface treatment with a penetrating primer solution.
- Use a square to mark, mark and cut to the required size with a grinder.
- Apply the adhesive mixture to two inner planes of the element.
- Apply the strip, gently pressing it along its entire length.
First you need to level the surface of the opening
The flexible corner for the arcuate arch is fixed in a slightly different way. Photos and videos will help beginners understand the differences and features of installation
Installing such an element yourself will be no more difficult than the previous option, but pay attention to the following nuances:
- The width of the sides of the corner when finishing the arc varies. The wide side is laid on the end corner of the arch, and the narrow side is pressed against the wall.
- Silicone sealant or adhesive solution is applied to the element, as in the first case.
- You need to fasten it with several nails - a necessary measure, since the hot solution must completely set.
- Instead of nails, it is allowed to use masking tape - it secures the edge of the plastic corner.
Gluing a decorative corner
Corners for interior arches are easy to glue onto wallpaper. The finishing material quickly sets with glue and allows you to test your strength the very next day. But if you want to cover an arch with an MDF corner, then use these tips:
- This type does not require additional fixation, but after applying glue to the corner and pressing it to the surface, wait a couple of seconds and then peel off the element again.
- After waiting for the glue to thicken, you can safely return it to its place. Usually 1-2 minutes is enough.
It is better to use a wooden corner for arched openings made of the same material. It is difficult to bend, so you can glue it on straight planes. Ideal use is rectangular portals where there is no round element.
Glue the plastic corner to the arch
It is also possible to cover the arch using ordinary plastic corners, but in this case the elastic threshold will be much smaller. In order to bend the product to the desired size without damaging the product, you should heat the material with a hair dryer.
For the decorative design of arches and walls, polyurethane and polyurethane foam are used - in this case, all surfaces must be smooth. If there are small differences, then you need to glue the elements together by gently pressing and increasing the amount of glue in these places.
Installation process
Installation of the element can be carried out using various fasteners. The most common options are:
- self-tapping screws;
- small carnations;
- glue for plastic;
- liquid Nails.
Self-tapping screws can be used for those products where it is intended and there are special covers on sale that will allow you to hide their caps. The use of self-tapping screws is also allowed if it is necessary for the overall mood of the finish. For example, they are perfect for a loft style. Small nails without heads are used to make it easier to hide the fastener. This approach is used when the type of main finish does not allow the use of an adhesive. In this case, the diameter of the nails should be minimal so that the plastic does not split during the process of driving them.
Preparatory work
The preparatory work before installing the corner can hardly be called such in the classical sense of the word. By the time the corner is fixed, the appearance of the opening should already be complete and have a finishing touch. If the overlay will be mounted directly on the putty, then it is necessary to ensure that the edges are perfectly smooth and there are no sagging that could interfere with a good fit. If there are sagging, they must be removed with a spatula or sandpaper. It is important that there are no cracks on the surface. For good adhesion, if adhesives are used, you will need to degrease the work area. This can be done in various ways. One of them is to use a soap solution and then wash it out.
Note! In cases where the owners prefer to have an arch that will be covered with wallpaper, then in this case, when fixed with glue, the corner should not hang on the wallpaper. To avoid this, the strip of wallpaper that overlaps the corner is cut off with a construction knife. This will allow installation directly on a bare wall.
Installation
Correct measurements contribute to high-quality installation, so it is important to determine how much corner is required for the arch. If you have to combine several elements, then it is better not to choose the central top point as the junction point. In this case, it is difficult to play up the joining place so that it is unnoticeable, and it is more striking than other areas. A good solution would be to use a solid corner that bends in the middle. You can sharpen the parts on the slopes of the arch. On a straight line it is easier to make the junction less noticeable.
The place where the corner will be glued is treated with deeply penetrating primer. This is done in order to increase adhesion and reduce the percentage of glue absorption by the wall surface. Further work can begin after complete drying. The corner is cut to the required size. Glue or liquid nails are applied to the inner surface in the middle. In this case, it is better to use a transparent composition so that the dye does not appear on the surface of the wallpaper, trim or the corner itself. The amount of composition applied should be such that, after pressing, it is evenly distributed on the shelves. You can first experiment with a small piece of corner to find the ideal amount.
After applying the glue, you need to press the corner over the entire surface. In most cases, the overlay must remain fixed for a certain period of time. To do this, you can build improvised clamps from wooden beams. If, during pressing, excess glue protrudes beyond the corner, then it must be quickly removed with a washcloth so that no lint remains. The corner is fixed in such a way that its larger side is pressed against the end of the arch, if we are talking about an uneven corner.
If you want to fix a corner that does not have sufficient flexibility, you can prepare it in two ways. One of them is to heat the material to the required temperature. To do this, you can use a technical or household hair dryer. You shouldn't be too zealous, because you can deform the lining. As it warms up, it is necessary to give the corner the shape of an arch, pressing it against the planes. After it cools down, it will remain in the required position. Another option is to create slots in a shelf that rests on the wall. Cuts are made at equal distances to facilitate the bending process. But the appearance of this option leaves much to be desired, so the gaps can be closed with a suitable composition or you can find an original approach to the shape of the corner. A video of the entire process is below.
Selecting a corner
Most often, a plastic corner is used to ensure the joining of wallpaper and the corners of an arched opening, since it is quite difficult to perfectly fit the edge. In this case, the task is to choose the color, as well as the size of the overlay that will be used. The most common sizes are:
- 0.9×1.6 cm;
- 1x2 cm;
- 1.3×1.6 cm;
- 0.5×3 cm.
Compliance with the given dimensions cannot be called a requirement, and each manufacturer varies the parameters depending on the equipment used. Most often, profiles with a length of 2.7 or 3 meters are found on sale. The thickness of the material varies depending on the surface on which the corner in the arch will be fixed. The most common are corners with a thickness of up to 1.4 mm. The color palette is quite wide. Profile coloring is carried out during the manufacturing process by adding various pigments or using a special film. Thanks to this, it is possible to choose an overlay to match the wallpaper or trim that will be present on the arch.
This will make it easier to choose an overlay that will fit perfectly on the arch without deformation or damage. If it is necessary to emphasize the shape of the opening, then it is necessary to purchase a corner not in tone, but in contrast to the main color of the finish. An overlay that is too large in a small room will look awkward, so for small rooms it is better to try to use the minimum size of the overlay. In the case where the wallpaper has several tones, the overlay is selected to match one of the three most pronounced ones.
Types of designs
An arched plastic corner is not the only option for this type of finishing. However, steel or aluminum options are not suitable for every style, and therefore are used for decorative purposes much less often. Another thing is that such a design strengthens the doorway and can also be used as a surface for fastening when covering with plasterboard, for example.
Plastic products can also perform several functions, and on this basis they are divided into 2 groups.
- Functional - soft perforated strips that are installed under the plaster. One side of the product is perforated, the second has the shape of petals. This allows you to frame an opening with an arch length of up to 3 m. Both PVC and metal products are produced. They have no decorative value.
- Decorative - not perforated, usually with a smooth outer surface. Flexible corners can have different colors, imitate wood or stone. It is very easy to secure a soft product, so you can do this type of finishing yourself.
Recommendations for carrying out work
To ensure that gluing the corners to the arch does not cause any particular difficulties, during the work it is advisable to adhere to the following recommendations:
- Glue corners only on a clean, dry, mechanically stable base, be it wallpaper, decorative plaster, paint, etc.
- Under no circumstances should corner joints be placed in curved areas (the joints will be visible and high-quality gluing of materials will not be ensured).
- Direct contact of the adhesive tape with the body of the corner should be avoided (marks may remain when removed).
- All necessary equipment should be at hand.
- The adhesive (liquid nails or silicone sealant) must be transparent to prevent stains during installation.
- Cutting the finishing material is best done using a mounting knife or hacksaw blade.
And of course, all work is best done with gloves in order to prevent contamination of the surfaces being finished.
If you liked the material, I will be grateful if you recommend it to friends or leave a useful comment.
The advantage of plastic structures
Polymer structures made of foam materials are unable to provide a protective function, because they are quite fragile and are damaged by slight mechanical impact. The most durable product is PVC. The advantages of this material can be considered:
- ease of installation;
- ease of maintenance;
- smooth surface;
- provision of protective functions;
- light weight;
- a certain elasticity;
- moisture resistance.
PVC is a universal building material and is used in various fields. For example, metal-plastic windows are made from it. The surface of products made from this polymer is perfectly smooth. This indicates its resistance to various contaminants that do not clog into the pores. In addition, corners can become dirty over time from constant contact with hands; cleaning them is not a problem and is done using various chemicals. Installation of the structure does not cause any particular difficulties even for an untrained craftsman. The weight of the plastic corner is minimal, which does not create additional load on the finishing or supporting elements of the arch. You can use such a corner in the kitchen, because it is not afraid of changes in humidity and temperature. These factors do not affect the shape of the pad.
Application of decorative plaster
Decorative plaster on the opening, creating a relief texture.
Finishing features
- Its advantages: easy and simple application, durability.
- Disadvantages of decorative plaster: restoration is difficult, the relief is difficult to wash or clean.
We attach the corners (made of aluminum or PVC with mesh) under the plaster.
To decorate with decorative plaster, we will need relief rollers or stamps.
Plaster finishing tool
Note that using ready-made slow-drying mixtures will make the work easier: we will have time to make a relief on the wet plaster.
Work order
- Distribute the mixture over the surface - the instructions will indicate the thickness of the layer (but more than 1.5 cm).
- Now we create a relief using relief rollers or stamps. By the way, rollers save us material and time, unlike stamps.
- Then we prime the dried relief.
The photo shows a method for creating relief on ordinary, still damp plaster.
After 20 hours we paint according to a special scheme:
- to emphasize the relief, first apply dark paint with a roller with a longer pile;
- second layer: apply light paint with a roller with a shorter pile or rubber - now only the tops of the relief are painted.
How to glue a plastic corner the first time and without errors (21 photos)
Arched corners are used for finishing rooms. They have two main functions:
- decorative;
- protection of corners from damage.
Arches, as an element of architecture, appeared in ancient times for one reason: there were no reinforced concrete beams, and wooden lintels did not last long. Recently, the fashion for decorating doorways with arches has returned. Plastic corners protect sharp edges from accidental damage, abrasion and from people passing by.
Tips for decorating an arch with a corner with your own hands
Depending on the characteristics of the material from which the selected corners are made, they can be fixed with liquid nails, sealant, or special glue. Sometimes the easiest way is to use the old, proven method - a hammer and small nails. In any case, the main thing in the work will be consistency and accuracy. If the corners have not been previously prepared for fixation, you will need to trim their edges. This will allow you to achieve optimal connection of fragments and obtain a beautiful, holistic result.
Facing an arched opening is a process that requires care and diligence. However, there is nothing complicated in such work. That is why you can safely choose the material you like and experiment.
Perforated arch profile
A flexible corner profile for plaster can be made of metal, plastic or cork. The perforated arched corner got its name because of the holes that are located along its entire surface. On the one hand, the product is equipped with cuts that resemble petals and give it an L-shape. The perforated surface allows, during the plastering process, to obtain a smooth, beautiful edge on the most uneven and curved sections of the arched opening.
The working process
If you want to achieve a good result, then you need to have all the necessary materials and tools at hand. We will only discuss the wallpapering stage; you must prepare the surface in advance. The base must be dry and level.
Materials and tools
The following materials are needed for work:
Sometimes the arch is highlighted with wallpaper of a different color. Another option is to paint the surface of the arch; in this case, instead of wallpaper, you will need paint of a certain color.
For an arched structure, if you will paste it separately, it is better to prepare the composition a little thicker than for smooth walls. When cooking, use 10% less water to obtain the desired consistency.
I recommend using a special primer for wallpaper. It not only strengthens the walls, but also paints them white, creating an ideal base for wallpapering.
If the corner is attached under the wallpaper, then a special version of small thickness is used, which has a small protrusion to form the contour of the arch.
Tool for work:
Construction knife. You need a very sharp version with a hard blade 25 mm wide. In addition to the knife, be sure to purchase a set of spare blades. A good option is a tool with segmented blades; they are very rigid and cut very accurately;
A sharp knife allows you to perfectly cut wallpaper along the edge of the arch
Brush for applying glue. You need an option with thick pile to distribute the composition evenly and quickly. The most commonly used is a poplar, but ordinary options with a width of 10 cm or more can also be used;
The Maklovitz brush is very suitable for applying thick wallpaper paste.
Brush for leveling wallpaper. Since the surface of the arch is uneven, using a spatula to press the wallpaper is not very convenient, as it can damage the material. It is much better to use a special brush; it is 30 cm wide and provides quick and convenient leveling even on semicircular surfaces;
A brush is needed to level the wallpaper on the surface, press it and remove excess adhesive.
Scissors. With their help, it is very convenient to make cuts on the edges of the wallpaper when folding it, if the folding technology is used. It is also convenient to use scissors to cut wallpaper sheets into pieces of the desired size.
To work with wallpaper you need comfortable, massive scissors.
The working process
Let's figure out how to paste over a door arch:
You can continue work after the surface has completely dried. This usually takes from 1 to 3 hours.
If the arch is small in width, then it is sealed with two sheets with a joint in the middle.
Some types of wallpaper also require adhesive to be applied to the wall. In this case, the composition is distributed along the base. The instructions on the packaging with the composition will tell you whether this is necessary.
A strip about 20 mm wide is left along the edge
Special precision is not needed, it is important that the protrusion is more or less even along the entire length of the edge
Methods for installing arched corners
Installation begins with surface preparation. Regardless of what the arch is made of (brick, drywall or other materials), the preparatory stage must first be carried out. It is also necessary to strengthen the surface of the opening before gluing the decorative corners. Let's look at how to glue a plastic corner to an arch in two situations:
- In a new building, where the walls are only plastered and not finished with anything;
- In a residential building with finished walls (painted, wallpapered).
Methods for installing arched corners
Methods for installing arched corners
Methods for installing arched corners
In the first case, the scope of work is small, it can be easily completed even by novice builders:
- Products are attached to brick walls with plaster or quick-drying putty.
- The corner is screwed to the drywall with screws, glued with liquid nails or placed on gypsum putty.
- At the next stage, the installation site is plastered, sanded, painted or wallpapered. After this, decorative protective corners are installed.
In the second case, when the opening has already been made and the wallpaper is pasted, more complex work has to be carried out. Procedure:
- First, you need to carefully draw a parallel line on both sides of the arch the width of the perforated corner. To do this, you can make a template from a plank.
- Remove excess plaster from both sides of the corner with a putty knife.
- Secure the perforated corner using one of the above methods (with nails or glue).
- Putty and level the walls in one plane.
- After puttying work, check the plane with a straight, long ruler or slat. There should be no gaps between it and the wall.
If the plane is level, proceed with the sticker.
If the walls are crooked, the corners will need to be spread out.
Nuances you need to know about:
- To fix the perforated profile in the opening, prepare spacers from wooden planks.
- First, the upper part (along an arc) of the profile corner is installed and the places at the lower points are marked with a pencil on the wall.
- Then the lower pieces of the corners on the right and left are installed and fixed.
- After the lower profiles are secured, the upper part is installed. Due to the elasticity of the plastic, the profile will press against the base and will not fall.
- Another fixing option is to glue a corner to the wall with masking tape, if the wall surface allows this.
If in some places the perforated corner moves away from the surface, press it and fix it with a self-tapping screw, and only then treat it with putty. If the screw is sticking out above the surface, ignore it. After the putty has set, you can unscrew it and seal the hole.
Stages of wallpapering arches
First, the walls located on the sides of the arch are pasted so that the ends of the glued wallpaper do not touch the opening. The next strip is glued with a slight overlap onto the doorway (up to three centimeters); the excess must be cut off with a knife or scissors. The allowance strip should be well lubricated with glue and pressed to the inside. The last strip covers the area of the arched vault.
To match the pattern, you need to apply the wallpaper to the place where it will be glued, select a pattern that matches the one already glued, and mark the desired place with a pencil. When gluing the cut-out fragment, do not forget about the need to remove the bubbles that form under the strips of wallpaper. Do this with a rag, sponge or rubber spatula. With wallpaper that does not require matching patterns, things will go much faster.
How to wallpaper an arch - a step-by-step description of the work process
When gluing wallpaper on arches, the most important thing is the accuracy of the junction of the wall and the opening.
When I glued wallpaper in a room with an arch for the first time, the result of the work was far from ideal. Careless joints, folds, peeling areas - all this worsened the appearance. But with practice comes experience, and now I can say that following the technology will allow you to achieve an excellent result, even if you have never glued wallpaper to an arch.
The technology discussed in the article is suitable for gluing arches of any shape
Selection of materials
Decorative stone is created from natural components: expanded clay, cement and pumice with the addition of a special mineral pigment to give color. This material is considered environmentally friendly and safe - it is not afraid of corrosion, rotting and fungal diseases. Upon completion of the drying and firing processes, it gains durability in no way inferior to the original.
Decorative stone is resistant to very high and low temperatures, therefore it is often used for cladding fireplaces and external walls of the house. It is also used in rooms with high humidity: swimming pools, bathrooms and others. It is worth adding that an arch made of such material is easy to wash and dry using conventional means.
Currently, it is possible to choose a decorative stone that imitates any natural stone not only in color, but also in texture. Therefore, the choice of materials should depend solely on the design of the room.
The tiles are sold in even plates of different thicknesses and sizes. There is also a corner option that helps you easily decorate the upper part of the arch. But it should be selected very carefully, after completing all the calculations.
If the arch itself is made of plasterboard, then choose flexible, lightweight acrylic material or gypsum tiles. A brick arch can be decorated with stones in sand-cement mortar. In addition, try to choose narrow tiles - they are easier to install on the semicircular part of the opening. The cost of such material depends on the country of origin, company, quality, weight and even patterns on the stone.
The installation process is carried out quickly and without unnecessary difficulties. You don't have to purchase additional fasteners or involve specialists. But, in any case, before starting finishing work, it is necessary to check all the stones.
First you need to prepare the material:
- Open the packages and mix the parts.
- See how they will look most advantageous. Combine them according to shades, long with short – the arch should look natural.
- Turn the pieces over on their backs to check for a foamy layer that will make the tiles less durable. If there is one, clean it using a wire brush.
Types of corners for finishing arches
According to the place of use, corners are divided into:
- those that are installed on plaster;
- corners that are glued under the plaster.
The first ones have a wider range: they are made of different materials and can be of almost any color. The latter have special holes for better adhesion to the surface. They come in both metal and plastic.
- alignment of external arched corners;
- protection of corners from accidental damage;
- surface decoration.
Wallpaper tends to peel off from the base over time. A doorway trimmed with decorative corners will hold them on the wall and also give the room a finished look.
Perforated corner for strengthening corners and slopes.
How to decorate an arch in an apartment with your own hands
Their peculiarity lies in the truncation of the radius, the arched arc has a slightly modified straightened shape, rounded corner parts.
Such varieties are suitable both for large halls and for installation in hallways with low ceilings.
Slavic type. The openings are rectangular in shape with smoothed corners. These varieties are used for any room in which they are combined with other decorative elements.
Half-arches or Thai. They are often used to create unusual, original designs in different rooms.
They have curly ways to smooth corners and create the radius of the side part.
Portals. The most popular varieties. They are rectangular arches with different types of finishes.
Some samples are real works of art, decorated with stucco, stained glass, and flowers.
Trapezoid. This design is similar to a type of portal, with clearly defined, smooth edges and sewn-in beveled corners.
Arch transom. It is a decorative design for a rectangular opening in the form of a superstructure above it, increases the penetration of light into the room, and serves as an interior decoration.
Modern materials provide unlimited possibilities for creating arches of different models: in the form of an ellipse, asymmetrical figures, curved lines, non-standard shapes.
In any case, the use of an arch will make the apartment unusual, unlike others, decorate the interior, and become its highlight.
What materials can the corner be made of?
To decorate arched openings, corners made of the following materials are used:
- plastic;
- metal;
- tree;
- MDF;
- polyvinyl chloride;
- duralumin;
- and others.
Such building materials are very durable and have a long service life. With their help, you can hide the imperfections of the arch - cracks and protrusions. Corners are great for both rectangular openings and more non-standard designs; they can be bent without any problems.
When choosing corners for finishing an arch, keep in mind that they can be solid or folded. Corners are also intended to strengthen the structure (relevant if you are installing an arch yourself). This type requires more reliable fastening, using screws or plaster, for example.
The most popular are profiles made of plastic - it is easy to glue, the material is quite flexible, it is easy to bend and can be given the desired shape.
The most common option for finishing arched openings is framing with a plastic corner
How to choose a decorative corner
Currently, the building materials market offers many products for finishing corners on arches, but the most popular elements for solving these problems are plastic decorative arched corners, which are available in a wide range of colors and overall dimensions. In view of this, we consider it advisable to consider the methodology for selecting these particular components.
So, firstly, you should pay attention to the design of the finish (arched corners should have shelves of different widths). If you use corners with identical shelves, then in places of bending, these attributes will turn inside out and it will be problematic to glue them
Secondly, when choosing a decorative finish, you should take into account the color shade of the material. Moreover, it is advisable to build on the colors of the attributes already installed in the room (doors, floors, etc.).
Thirdly, you must immediately decide on the number of elements (a standard arch usually requires 4 corners).
Why are arched corners needed?
The advantages of arched corners are undeniable, therefore, by choosing this type of finishing, the owner will receive a lot of advantages. Decorative arched corners have an impressive service life - up to several decades. However, they do not require painting and are easy to clean. The price for arched corners is quite reasonable and affordable for everyone, and the choice is simply amazing with the variety of colors and shades. In addition to the fact that decorative arched corners are mounted on any type of surface, they also hide irregularities, gaps and other corner errors. But still, their main function is to highlight the ornate curves of unique design ideas.
Features of finishing arched openings
When the appropriate material has been selected, you can begin the design process. Before attaching the corners to the wall, you need to perform several preparatory procedures. First, measure the length and width of the doorway: you may need to slightly change their shape or size when installing the corners.
In some cases, to give the arch the desired shape, it is necessary to prepare additional materials: drywall, putty, metal frames and other items with which you can create an original top of the arch or change its size.
After giving the required shape, thoroughly clean the arch from dust, grease and other contaminants. Ensure that the surface is smooth and level and, if possible, seal any cracks. It is advisable to sand the surface and wipe with a dry cloth.
Remember! The installation of arch corners should not be carried out in a room with low temperature or high humidity, as this will negatively affect the strength of the fastening.
When the arched structure is completely ready, you can begin attaching the corners. For this you may find the following materials useful:
- sealant;
- glue for corners (will depend on the chosen material);
- hammer;
- liquid Nails;
- small regular nails;
- corners;
- materials for decorating and finishing corners.
You won't need some of these items. This will depend on the specifics of the installation: some people prefer to simply glue the corners to the surface, while others think it would be safer to nail them down.
The process of installing the corners is quite simple: the main thing is to be careful when gluing them, since each part of the corner must be even and connected to adjacent parts to create a complete structure.
Tip: start with the main corners on the sides of the arch, and then attach the upper parts. If the arch is voluminous, it is advisable to start from the front part, since the internal materials can always be adjusted to size.
If some materials are initially ready for fastening, then, for example, finishing an arch with a plastic corner will be more difficult, since in addition to the wall itself, it is also necessary to prepare the plastic. It should be degreased from the inside and carefully measured. After applying glue or liquid nails to the inside of the corner, press it firmly against the wall and hold it with your hands until it dries.
Since plastic corners are quite light, they can move during the drying process, so it is better to control this process.
Remember! When using liquid nails for plastic, do not choose options that are too strong, as they can destroy the structure of the plastic, creating cracks and stains that will be obvious.
Arches can be decorated in a variety of ways: patterns can be cut out of the corners, lamps can be installed in a wide arch, materials can be repainted, and moldings can also be glued over such a structure.
As you have seen, there is nothing complicated in decorating an arch using corners. This is done quickly enough, and you don’t even need to seek help from qualified specialists. In addition, thanks to the variety of materials for the corners, you can decorate the arch to suit every taste, and it will always be harmoniously combined with the interior style, finishing materials and pieces of furniture.
In order not to miss important details and study the features of such procedures in more detail, we suggest you watch a video of finishing an arch with a corner. We hope that our tips will help you transform your interior and make it even more comfortable.
What is needed for finishing
First of all, you need to purchase all the necessary materials and tools. To properly finish the arch you will need:
- corner;
- assembly adhesive (it depends on the selected material);
- sealant;
- liquid Nails;
- metal nails;
- rubber hammer.
You may not use any of the above, it depends on the specifics of the installation - some will just want to glue the corners, others will find fastening with nails more reliable. When choosing your method, consider the following points:
- Liquid nails are often the cause of stains.
- Do not choose too strong liquid nails for working with plastic, they can destroy the material
- Metal nails are visible and have a negative effect on the appearance of the decoration.
- When tightening self-tapping screws, you can overdo it and cause cracks, chips, or bend the material.
When everything is prepared, you can proceed directly to finishing the arch with your own hands.
We use decorative plaster
Today, finishing arches with decorative plaster is not so rare - people often choose just such a cladding for their structures. And there are reasons for this, which we will talk about right now:
This is what a blank arched opening made of wood looks like
- Applying decorative plaster to an arched opening is very simple; no difficulties arise here. The finished finish will be durable - you can’t argue with that;
- Among the disadvantages, it can be noted that work aimed at restoring the finish is not so easy to carry out. In addition, keeping the relief clean is not as easy as just washing it. Keep this in mind if you decide that finishing the arch with decorative plaster is exactly the solution from which your interior will benefit.
To cover the surface of the opening with decorative plaster, you will need relief stamps or rollers.
Please note: using slow-drying mixtures for finishing arches (we are talking about ready-made compounds) is the right option to make the whole process easier. While the plaster is damp, it is easy to create relief on it - any master will confirm this
Execution order
- The mixture must be distributed over the surface. To avoid mistakes, carefully read the instructions: the recommended layer thickness is given there. As a rule, this figure does not exceed 15 mm;
- Then, using relief stamps or rollers, the relief is created. Rollers are generally a very convenient option for such work - they will help save not only time, but also the material itself. The same cannot be said about stamps;
- When the above procedures have been completed and the relief has already dried, the arched opening is primed (more precisely, the finish that was applied to it).
Then you have to wait - usually at least twenty hours. And you can color it. There is a special scheme here:
- To effectively highlight the relief, first apply dark paint with the roller that has a longer pile;
- The organization of the second layer looks like this: light paint is applied with a roller (the tool has a shorter pile than in the first case).
Sometimes they even choose a rubber tool. That's all - only one thing remains: you need to paint all the tops of the relief so that the work looks finished.
A little about the cork corner
This material is environmentally friendly and has a high degree of elasticity. You can install it yourself. The main thing is to measure the opening correctly; mistakes are not allowed here.
The stages of working with cork corners are as follows:
- pre-clean and degrease the surface;
The process of preparing a cork corner - glue is applied inside the cork corner; it must glue the part for at least 20 minutes;
- lay and carefully press the element along the entire plane of the opening;
- the glue from the cork transfers to the wall, no air bubbles should form;
Glue for cork corner - Lightly tap the corner to remove excess glue;
- You need to wait at least two hours for drying.
Options for finishing arched corners in the room
As a result of performing such actions, a single structure is obtained, the connections in it will be smooth and harmonious.
( 1 rating, average 5 out of 5 )
How to choose and glue a decorative arched corner
Framing a doorway is an essential part of decoration. Almost all available building finishing materials are used for this purpose. However, if the opening has an unusual configuration, not all of them are suitable for cladding.
Corner
A flexible arched corner is ideal for solving this problem.
Advantages and disadvantages
The plank is used for finishing free doorways or openings with very large depths, where it is not possible to seal the slopes with wood or MDF panels. Of course, first of all, they have to be glued to arched portals, however, they are also quite suitable for rectangular or arches with corners.
The advantages of framing are:
- PVC products are not afraid of water and large temperature changes, so you can finish the opening to both the kitchen and the bathroom;
- decorative arched corners emphasize the interesting entrance solution and highlight the portal against the background of the wall;
- installation of the product is extremely simple: the corner is simply glued to the wall. Moreover, it may not even be perfectly smooth;
- the color range of products is very extensive;
- the parts are easy to wash and clean; they do not require special cleaning or preservation measures;
- If the finish is properly secured, it will last for many years;
- The frame can be glued to any surface: stone, plaster, concrete, wood.
The only disadvantage of this option is the inherent flammability of plastic products: the material burns weakly, but quickly deforms when the temperature rises above 120 C.
Tools and materials
The following tools will be required:
- actual arched corners;
- liquid nails or similar adhesive;
- glue for PVC materials;
- primer, putty;
- screws or nails;
- spatula, mallet.
You can not only glue the planks, but also secure them with nails and screws. This option is most often used when installing metal models, but is also applicable to plastic ones.
Installation of a flexible arched corner
Soft planks are sold in lengths of 3–7 m. Before gluing the trim, you need to measure the length of the arch and calculate the required quantity. If the length of one product is not enough, then it is necessary to provide a small margin: the arched strips are joined at an angle of 45 or 90 degrees, and for this you need to cut off a certain amount of material.
- The surface of the opening is cleaned of old finishing dirt and dust. Be sure to treat with a degreasing compound.
- The wall is pre-primed and puttied. It is necessary that the joint between the slope and the wall is exactly 90 degrees. The smoother the surface, the easier it will be to attach the flexible strip.
- Prepare an adhesive composition: colorless for colored products, and white for white.
- The glue is evenly applied to the profile and then glued to the joint. The composition does not set immediately, so the position of the soft bar can be adjusted. Builders recommend that after this first “trying on”, remove the profile and then re-glue it to improve the polymerization of the adhesive.
- To fix the product firmly, the bar is additionally fixed with masking tape or tape.
How to glue a flexible PVC arched corner is demonstrated in the video.
Materials for making plastic corners
If we classify products by material, then there are two types of corners for arches:
- metal;
- plastic.
Metal ones are only perforated for plaster. They serve to strengthen and prepare external corners for final finishing. They have to be cut when used.
On curved surfaces, when a perforated corner metal profile is bent, bumps appear, and the round arch becomes polygonal. Therefore, when strengthening openings, a plastic perforated corner profile is used. It is attached with glue or screwed to the wall.
Perforated corners are made from plastic for finishing corners and slopes. They are flexible and inexpensive. Products are made of PVC or polyurethane. They hold their shape well when bent. The corners are so soft that they can be used to finish curved surfaces with a minimum radius. Also, products made from PVC and polyurethane plastic are more durable and do not fade.
Mounting methods
Reinforcement
How to properly reinforce corners when puttingtying walls with your own hands?
Actually, there is nothing overly complicated in this work.
- A small amount of gypsum or acrylic putty is applied to the corner along its entire length.
- A reinforcing profile is pressed into it. Part of the putty will protrude through the perforation or mesh.
- Excess putty is leveled with sliding movements of a medium-width spatula (about 30 centimeters). Possible protrusions are removed with the same spatula, only at a right angle to the surface - to avoid its deflection.
- After the first layer of putty has dried, the corner is puttied again, after which it is sanded and primed for painting or wallpaper.
Finishing right angles with plastic
A typical example of such work
- when we use a plastic corner for...
So, how and with what to fasten the profile?
- The surface of the wall is primed with penetrating soil.
- The corner is marked using a square and cut to size.
- A strip of liquid nails or universal polymer glue - Titan, Dragon or their analogues - is applied to both planes of the corner from the inside. The author, however, used high-quality silicone sealant for this purpose - with consistently excellent results.
Here we need to make a small lyrical digression. A sealant whose price per tube is at least 130-150 rubles can be considered high-quality, and the manufacturer has considered it possible to sign on the packaging. Cheap sealants differ from expensive ones, first of all, by much worse adhesion to smooth surfaces.
- The corner is pressed tightly against the corner of the wall along its entire length. If it lags a little due to unevenness, you can press it to the surface by leaning a board, galvanized profile or any other object of appropriate height against the wall; fortunately, the force should be very small.
On durable surfaces, you can use regular or masking tape for temporary fixation.
Arch finishing
What do the instructions for the arch look like? Obviously, when fastening, the straight angle will lag behind the curved surface.
- The plastic profile must have sides of different widths. The wide one will be pressed against the bend of the arch, the narrow one (no more than 10-15 millimeters)
- against the flat wall. - The corner placed on glue or sealant is pressed against the arch with several slats, pieces of plywood, laminate or wall panels nailed to it with thin nails. After the glue has dried, the fixing elements are removed and the nail holes are filled with putty.
MDF profiles
Universal corners for finishing MDF panels are attached extremely simply:
- A strip of synthetic glue is applied to the surface of the corner facing the wall, after which it is pressed to the place of permanent dislocation.
- Then the product is peeled off and left for about a minute. During this time, the glue on both surfaces will thicken.
- The corner is pressed against the wall again - this time for good.
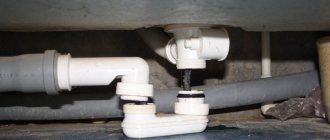
Plastic panels
How are plastic corners installed for finishing corners at the junction of PVC panels?
- The profile is put on the end of the panel. A spatula 10-12 centimeters wide will help do this job without crushing the thin plastic.
- The next panel is inserted into the free groove of the profile. As you can see, everything is extremely simple.
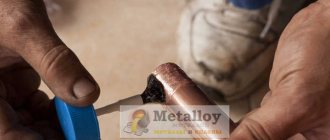
Wooden corners
How to decorate the corners of walls in an apartment with wooden corners?
There are two possible ways.
- The already familiar technique with silicone sealant is suitable if the finishing is not intended to be dismantled in the future.
- Reversible fastening method - with copper nails 20-25 mm long without heads. To avoid crushing the wood with a hammer blow, a hammer is used - a steel rod with flat ends.
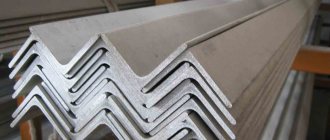
Duralumin and aluminum profiles
And here, too, two solutions are possible.
- A high-quality sealant has excellent adhesion not only to wood, but also to metals.
- Plan “B”
- fastening with thin galvanized self-tapping screws with preliminary drilling of holes and countersinking them to fit the caps.
It’s easy to find ready-made profiles on sale - with holes and fasteners.
Feng Shui recommends creating an environment in your home with a minimum of corners. The arch is fully consistent with this technique, and most importantly, it visually expands the space of the apartment and the doorway itself. But to be durable, it needs to be strengthened. By learning how to attach an arched corner, you can increase the life of the arch and ensure the integrity of its edges.