DIY screwdriver chuck repair
Today, many people use a tool such as a screwdriver, so it is not surprising that there is a high demand for them.
Very often the device breaks down, and the buyer rushes to a repair shop, paying money for repairs.
You don’t always want to do this, of course, so in our article we will help you become more familiar with the design of a screwdriver. You can deal with some problems on your own.
We will look at various cases of screwdriver breakdowns, namely: we will deal with the most common breakdowns of such an important part of the tool as the chuck.
Screwdriver chuck: description, function
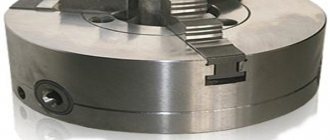
The cartridge is a metal cylinder with a cavity inside, equipped with a ring and a control sleeve. It is fixed to the shaft. With its help, the drill or grinding attachment is securely fixed in it for further work.
The fixation of the working part of the tool (drill) is ensured by the thread. The drill is tightened in two ways.
The first method is to tighten it with a special wrench; in the second method, the drill is tightened when the chuck is rotated in the direction opposite to the axis of rotation of the drill.
How to disassemble a screwdriver chuck
Despite the fact that today there are many models of screwdrivers on the market, they have the same general approach to removing such an element as a cartridge. Now we will briefly describe it.
In order to unscrew it, you need to remove the screw securing it to the shaft. It is located inside the cartridge; the screw should be rotated clockwise. After you have unscrewed the screw, you should jerk the cartridge in the opposite direction.
Attention! If you try to unscrew it manually, you must set the drill to second speed if it is two-speed. When purchasing a tool, it is advisable to lubricate the screw with machine oil.
In some cases, when this element does not want to give in, then you should put the tool on first speed, hold it in your palm, and turn the reverse to the left. The cartridge should come off the thread easily.
How to replace a screwdriver chuck
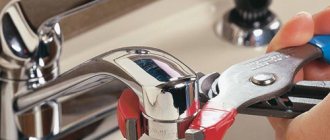
It will not be easy for an untrained user to replace it, since without the help of a special tool you will not be able to do it with your bare hands. There are two ways in which it can be removed, and we will consider them further in our article. In order to change it, you should pay attention to the actions that we described in the article above. Dismantling is performed with the following tools:
- A hex key is usually a 10mm L-shaped metal rod. Its short part should be fixed in the chuck, the long part should be rested against something, for example, a table. We turn the cartridge, and then remove it by turning the key.
We looked at the dismantling method using a key. The method to remove the element manually is described above.
Important! In especially severe cases of jamming of moving elements, you will have to completely disassemble the tool body and remove the spindle with gearbox and chuck.
To do this, you will need a vice in which you will clamp the tool, and a pipe wrench with which you will unscrew the chuck. Tools designed for inserting a wrench make this task easier.
But they are not found on all models, so you will have to deal with it using the above method.
This is a moving element of the tool, which consists of many rubbing parts. During operation, it is subject to wear resulting from the action of friction forces, impact forces and other factors.
The chuck's runout and excessive play can frighten an inexperienced craftsman. In some cases, it is not always possible to allocate the time or finances to contact a repair shop.
Therefore, we will look at how you can do it yourself when repairing various tool malfunctions.
Repairing a screwdriver with your own hands when the chuck is loose
A small play within 1 mm usually does not create visible problems during operation. If the value is larger, you should pay attention to the condition of the gearbox. So, the procedure is as follows:
- Unscrew the bolts securing the top cover of the tool. Let's take it off.
- Unscrew the electric motor from the gearbox. We inspect the fastenings.
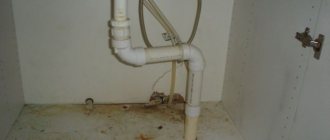
- Let's disassemble the gearbox. Often the cause of failure is a malfunction of the bushing located inside. It is possible to remove the bushing using the steps described at the beginning of the article (see how to remove the cartridge manually). The bushing is easily pressed out by hand.
- We are replacing the bushing. Then we assemble everything in the following sequence: bushing, shaft, bushing bearings, retaining ring. Lubricate the rubbing parts.
- After this, we assemble the gearbox in reverse order. We attach it to the electric motor.
- Assembling the screwdriver body.
Repairing a screwdriver with your own hands when the chuck runs out
The main culprit for this problem is the screwdriver gearbox. To make sure of this, you need to remove it by dismantling it in the above manner. This particular breakdown may indicate several problems in the gearbox, which we will indicate below. The reason may be:
- violation of the gearbox shaft geometry;
- production of gears;
- malfunction of the shaft support bearing;
- wear of the pins securing the satellites of the planetary gear.
The above parts are produced only in factories, so you won’t be able to make them yourself. All you have to do is purchase them and replace the broken ones.
Screwdriver chuck thread
Structurally, this movable element is fixed in the tool body in three ways:
- Fastening using Morse taper.
- Carving.
- Securing the set screw.
Fastening using a Morse cone has been known for a long time and consists of the following. The shaft has the shape of a cone, repeating the contours of the surface inside the cartridge - the same cone. By combining them in a certain way, a reliable connection is obtained.
Connecting the shaft to the chuck using a threaded connection consists of having a thread at the end of the shaft onto which a chuck with the same thread can be freely screwed.
The fixing screw is most often used as an additional fastener. Its head has notches for a Phillips screwdriver, as well as a left-hand thread. You can see this screw by unscrewing the cams that cover it.
To find out what kind of mount your tool has, you need to carefully inspect the body of the tool. Each type of fastening has its own designation.
For example, this: 1–6 B 10 will mean that the cartridge is secured using a Morse taper of size B10, and nozzles with a shank diameter of 1 to 6 mm can be used for it.
If you have the following entry: 1.0–11 M 12 x 1.25, you will know that you should use nozzles with shanks from 1 to 11 mm; the metric thread has a cross-section of 12 x 1.5 mm. Foreign manufacturers use indicators in inches, for example, 1.0–11 ½ – 20 UNF.
In this article, we examined the main problems that arise during the operation of the tool, and paid attention to such a critical component in the design of a screwdriver as the chuck. At the same time, we figured out how it is attached to the design of the screwdriver, gave some tips on how to repair it yourself, and also tried to outline ways to solve repair problems.
Source: //pro-instrument.com/ruchnoj/kak-snyat-i-otremontirovat-patron-shurupoverta.html
Screwdriver chuck: description, function
The cartridge is a metal cylinder with a cavity inside, equipped with a ring and a control sleeve. It is fixed to the shaft. With its help, the drill or grinding attachment is securely fixed in it for further work. The fixation of the working part of the tool (drill) is ensured by the thread. The drill is tightened in two ways. The first method is to tighten it with a special wrench; in the second method, the drill is tightened when the chuck is rotated in the direction opposite to the axis of rotation of the drill.
How to disassemble a screwdriver chuck
Despite the fact that today there are many models of screwdrivers on the market, they have the same general approach to removing such an element as a cartridge. Now we will briefly describe it.
In order to unscrew it, you need to remove the screw securing it to the shaft. It is located inside the cartridge; the screw should be rotated clockwise. After you have unscrewed the screw, you should jerk the cartridge in the opposite direction.
Attention! If you try to unscrew it manually, you must set the drill to second speed if it is two-speed. When purchasing a tool, it is advisable to lubricate the screw with machine oil. In some cases, when this element does not want to give in, then you should put the tool on first speed, hold it in your palm, and turn the reverse to the left. The cartridge should come off the thread easily.
How to replace a screwdriver chuck
It will not be easy for an untrained user to replace it, since without the help of a special tool you will not be able to do it with your bare hands. There are two ways in which it can be removed, and we will consider them further in our article. In order to change it, you should pay attention to the actions that we described in the article above. Dismantling is performed with the following tools:
- A hex key is usually a 10mm L-shaped metal rod. Its short part should be fixed in the chuck, the long part should be rested against something, for example, a table. We turn the cartridge, and then remove it by turning the key.
We looked at the dismantling method using a key. The method to remove the element manually is described above.
How to Remove Chuck Runout on a Screwdriver
How to remove
chuck runout in a screwdriver.
A method that happened by chance and helped me get rid of the chuck runout in the screwdriver.
Anton Finisher Hace 12 days
I have a Bosch like this, model gsr 10.8 vec.
Samvel Mnatsakanov Hace 17 days
Tell me, I wanted to buy an 18 V Bort drill, with 2 batteries. Unfortunately, I returned it after checking. When rotated, the cartridge produces a slight figure of eight.
Later I stopped by Leroy and checked, our client still has screwdrivers, they all have an eight chuck when rotating.
Explain what's the joke here? Maybe I'm doing something? If you use a 2 mm drill, but it is also extra long, then this will be a serious error. For self-tapping screws, I think it’s not particularly creepy.
Sergej J Hace 17 days
There are possibly two prerequisites. The thread of the cartridge is very tight, as it is also called, sometimes crooked cartridges come across, considering the quantity of their products the Chinese supply us with.
A crooked chuck is usually made carelessly, the difference in the thickness of the jaws or jaws being clamped is visible; I don’t know how to name it correctly, and a crooked chuck usually has runouts already at the very base. like an uneven grinding wheel.
Our client is left with drills with crooked chucks in Leroy, I don’t have the opportunity to be, they’re just very screwed from the factory. When tightened tightly, the thread begins to slightly warp the cartridge to the side at the end of a long drill, this is very noticeable.
Choose one with the minimum runout, remove the cartridge at home and tighten it loosely, but tighten it well with the locking screw. I think the eight will disappear. If you don't like it, take it back. No one canceled the two weeks for the exchange. Fortune!
Yuri Z. Hace 24 days
How about unscrewing a screw from a socket? It’s like using a screwdriver but tightening it tightly. I haven’t tried it!
Sergej J Hace 23 days
It is necessary to hit the screw well a couple of times; for this purpose, use a strong screwdriver; therefore, there is an option to knock or sharpen a piece of rod and unscrew it clockwise. Fortune!
BALEON GIBELIN Hace un mes
Vasily Hace 4 meses
If the parts are turned and the thread is cut in one pass, then no matter how you pull it, it will not go anywhere to the side. And if it goes away, it means the cartridge flange is machined unevenly. If you have a lathe, you can fix it, although it’s painful
Alex Pushkin Hace 3 months
Absurd. You twist the cartridge no matter how you twist it, even weakly, even by two threads, it will tighten indifferently during its operating time.
Alex Pushkin Hace 4 months
1. I often removed/installed/changed the cartridges on drills/screwdrivers. So I have enough experience. 4. I didn’t see the answer to my questions.
Sergej J Hace 2.4 meses
In full terms, however, it is weak. You haven’t even tried it, but you create controversy and call it nonsense. try it and you will be happy. Don't want to try? Ask those who succeeded. there are many such comments.
How to remove chuck runout in a screwdriver
A method that happened by chance and helped me get rid of cartridge runout
in
a screwdriver
.
How to remove free play of the chuck in a screwdriver \ The chuck is loose \ Tool repair \ Brest
Let's not forget to share videos!) Enjoy watching!) My affiliate program on You Tube: .
Alex Pushkin Hace 3.5 meses
There's no need to jump from 5th to 10th. The whole point of this video is 7:02, loosely tightening the cartridge. So little else Is the cartridge fully tightened? And, again, what prevents the cartridge from tightening during operation?
Sergej J Hace 5 months
The cartridge is fully tightened, pressed with an external screw. This is enough, you can put it on the thread locker. Try it yourself, everything will work out.
Alex Pushkin Hace 2.4 meses
And will it prevent the cartridge from tightening?
George Soros Hace 3 meses
Thanks for the info.
George Soros Hace 5 meses
Sergej J So far it hasn’t helped, I have a Metabo powermax, everyone is happy with it, the drill is even when scrolling, but when you drill, it swears a little. And in addition, there is a certain weakness of this instrument.
I have an IS530ER drill, it’s a pleasure to drill with, it’s very powerful, but a little heavy. And with this Metabo, even 0.6 tin is difficult to drill due to matting. If you press.
Of course, the drill will break. The shurik itself quickly heats up.
Sergej J Hace 3.2 meses
Glad if this helped.
Compilation Hace 3 meses
Thank you for sharing your finds with people! I just need to find more. Since the screwdriver is new and there is no wear, and also the cartridge has nothing to do with it. My cartridge is removable. and under it is an ordinary 6.35mm hexagon.
And the situation is saved only by the curved bit holder from falling. It turned out to be exactly the same angle and I’m putting it in one position for now. free play is completely lost. The truth about drilling is, of course, the same ambush. So, as Nikulin said. .
Let's get acquainted and find!
Sergej J Hace 3 months
The method is suitable for screwdrivers in which the chuck is threaded onto the spindle, but for you I figured out something like the Makita TD0101F 230 W with a hexagon instead of a chuck. Buy a thin, even drill with a hex shank and check it.
It’s better to make a purchase in a store by holding it in a screwdriver or drill with an even chuck, and with this drill determine what is uneven, the hexagon itself on the screwdriver , in other words, the chuck with a hex shank that you insert into it.
Try to jam your own cartridge
into the drill and find exactly where it will spin or hit.
I have a small chuck with a hex shank, used for clamping drills smaller than mm, so it turned out to have a bent axis with a thread that is screwed into the chuck itself and the hexagonal part is even.
Dmitry Dzhugashvili Hace 4 meses
I also have 2.7 Shurik. networked and battery-powered. For battery-powered ones, in general, everything costs clearly, that is, there are no gaps anywhere, alas, it hits, ska (I’ll try it your way, thanks.
Vladimir Papin Hace 5 meses
Thank you very much for your review of the cartridge bug fix! I bought, in the excitement of a Hummer 12 V, Lithium, in a store 220 volts. 4500 rubles and a crooked cartridge. (he was sane and sober). 1st screwdriver! For about 15 years our client has been wondering whether I need him or not.
This question suddenly came in handy! While still in the store I saw some kind of small beating
test drill, alas, I thought.
that these are Chinese crooked drills. Shame on my gray head! OH! Which drills I have had are corded, flawless, 2.4 SKIL for 30 years, still working. At home I tried to drill, with a millimeter runout of the drill and bit.
The screwdriver drilled and tightened, but I realized that the cartridge was defective. I didn’t go to the store to exchange the problem, but watched your video! There are miracles in the world! But there is no beating of the cartridge! Thank you! Fortunes For you and than just suitable and mentoring video instructions!
Joseph Gumilyov Hace 5 meses
Apparently, the method works, but sometimes for me. didn't help. Apparently the bushing in the gearbox is broken(
Sergej J Hace 3.5 meses
If the bushing is broken, the shaft itself will swing from side to side; you can simply check this by shaking the shaft with your hand. If the shaft does not wobble, and this method did not help, then you may have gotten a crooked cartridge. All that remains is to test and change the cartridge.
Source: //berkano.ru/kak-ubrat-bienie-patrona-na-shurupoverte/
Disassemble the screwdriver cartridge
RK3AFW ! Your videos are not showing. :unknw: Only they don’t work for me?
Tried to pull him off by holding him in a clamp
Logically, it can only go in one direction... But nothing comes of it ((
Maybe the plastic skirt needs to be turned so that it comes off the plastic clip with grooves?
Well, they are assembled somehow initially at the factory...!?!
They collect it somehow. IMHO, like this:
Those Ryomas that have retaining rings - it’s clear how. A plastic coupling is put on, then a protective metal skirt (in the diagram it is under No. 2 (protecting sleeve)), then a retaining ring is installed.
In the diagram it looks like a two-coupled one, with metal. couplings Rem Extra RV, but the essence is the same:
As I heard, the function of this protective skirt is not only to protect the chuck, but also to protect the part/material that this part of the chuck may touch when rotating the chuck (drilling/screwing). Therefore, it can rotate freely when drilling/screwing, regardless of the plastic coupling on which it is mounted.
On the Jacobs cartridge, which I unsuccessfully tried to disassemble, this is metal. the skirt does not rotate. It is embedded in a plastic sleeve. I thought that it was inserted with force, I tried to turn it and/or pull it out of the plastic coupling, holding it with a Cobra, but I couldn’t. After sawing the coupling, it became clear that the metal had to be removed. skirt without damaging the plastic. the coupling would not have worked. The shape of the skirt is a curved edge (shown in the photo with a red arrow).
It turns out that there is a layer on this Jacobs. coupling and metal. the skirt is one piece. The metal does not allow them to be removed. part - I don’t know what to call it correctly (bushing? flap?) which is pressed into the body of the cartridge. Even before sawing, by spreading the jaws and looking into the chuck, you could see the joint - I tried to pick it out with the tip of a knife and a screwdriver to widen the joint, but nothing happened. (Red arrows in the photo).
On the inside of the plastic coupling there is an annular protrusion-belt with additional six protrusions that will not allow you to remove the coupling without first removing the pressed-in flap insert (shown with red arrows in the photo).
So, probably, they assemble it this way - they put on the coupling and then press the insert-fitting into place.
It's probably done the same on your cartridge.
I think that you can carefully cut the coupling. Then try to clean, rinse, lubricate the cartridge, and then reassemble it. Secure the halves of the sawn coupling with a “tire”. Choose a suitable metal tube or plastic one.
Does your chuck have a ratchet lock or not?
Without blocking - simpler cartridge design. Modified May 20, 2021 by Barnauletz
Why doesn't the screwdriver work?
Furniture repair or installation is in full swing, but the screwdriver has stopped working... Let's look at the main causes of breakdowns and how to repair a screwdriver with your own hands (the video will also help us with this).
To answer the question why a screwdriver does not work, and how to repair it, you need to have an understanding of the design of a screwdriver, its main components, among which are the following: gearbox, reversing device, electric motor, speed controller and, if the tool is autonomous, a battery (rechargeable battery) battery).
Moreover, both expensive and cheaper screwdrivers are based on a similar device, differing from each other in the presence of certain advanced options. From here we can identify the main reasons why a screwdriver does not work, which almost all models suffer to one degree or another:
- The first thing you need to pay attention to is the serviceability of the battery or a breakdown of the electrical cable from the network (mains screwdriver).
- Failure of the tool start button.
- Engine speed is not regulated or poorly regulated.
- Impossibility of reverse switching.
- Chuck runout.
- The electric motor does not rotate.
Faulty battery or screwdriver cable
Everyone understands that, regardless of the “steepness” of a hammer drill, its operation is impossible without an energy source.
Therefore, first of all, you need to check the serviceability of the battery if you have a mobile hammer drill and does not depend on the power source. The reason for battery failure is its discharge or long-term use.
The second reason can be eliminated by completely replacing the battery, and the first by simply recharging it using a rectifier included when selling the tool.
Screwdriver battery disassembled
As a rule, two batteries are included in the same kit: one is in use, that is, in operation, and the other is being recharged. If the charger fails, it would be more rational to replace it with a new one unless, of course, you are an expert in radio electronics.
If you own a corded screwdriver, first of all, if the motor does not rotate, check the entire electric drive chain: the socket, the cable plug and the cable itself. Believe me, it often happens that the socket fails (the contacts burn out), the cable plug may fail for the same reasons, and the cable itself may be damaged as a result of careless handling.
Failure of the screwdriver start button
As a result of long-term use of the tool, as well as the conditions in which it has to be used, there are often cases when the start button of a screwdriver fails - this is also one of the reasons why a screwdriver does not work. The problem is solved by purchasing a new start button mechanism in the store and replacing it with an old, faulty one.
Start button (red) of the screwdriver
Getting to a faulty start button is not difficult: you need to use a Phillips screwdriver to unscrew all the screws connecting the two halves of the tool body.
Next, using an electric soldering iron, disconnect the button wires from the electric motor, disconnect the terminals connecting the button to the battery or power cable and remove the problem from the case.
We insert a new button in its place, perform the connection process in reverse order and check the operation of the new part by connecting it to the battery or power cable.
Stages of disassembling the screwdriver button
Sometimes it is impossible to purchase a new start button in stores and you have to restore it yourself. However, we will not describe this entire process in detail for two reasons: firstly, the Internet is full of articles on this topic, and secondly, repairing the start button with your own hands is not the topic of our article. Therefore, we will move on.
Screwdriver motor speed cannot be adjusted
The lack of adjustment of the screwdriver motor speed significantly reduces the convenience of working with the tool, and also makes it impossible to perform high-quality work. The regulator is located in close proximity to the start button or is made as one piece with it, however, the speed control transistor is attached to the electric motor where it is cooled through the radiator grilles.
Location of the electric motor speed controller (7)
As practice shows, if such a problem occurs, it would be more correct to replace the speed controller completely with a new one. Fortunately, they are on sale and are relatively inexpensive. All attempts to repair it led to the same conclusion unless, of course, you are an expert in electrical engineering.
Screwdriver reversing switch
The reversing switch of a screwdriver plays an important role when performing work on screwing in self-tapping screws, as well as removing them when necessary. The electric motor reverse circuit is located in the same housing with the speed controller, and the speed redirection switch button itself is located in a convenient place on the handle.
Start and reverse button located next to each other
Switching is carried out by changing the polarity at the terminals by moving the reverse button. Repairing the entire reverse circuit, including a PWM generator located on the board, comes down to cleaning the switch contacts and replacing the reverse circuit with a new one.
Screwdriver chuck runout
The runout of the screwdriver chuck indicates that there are problems in the serviceability of the tool gearbox, which is located immediately behind the electric motor. This is another reason why the screwdriver does not work with full impact.
Screwdriver planetary gear parts
The output shaft of this gearbox is the mounting location for the clamping chuck, so if we talk about the runout of the chuck itself, you need to keep in mind the runout of the gearbox shaft. The reasons for this may be the following:
- a) curvature of the gearbox shaft;
- b) wear of gears of the gearbox;
- c) failure of the gearbox shaft support bearing;
- d) the maximum output of the pins on which the satellites of the planetary gear are attached.
All of the above parts are of factory origin and cannot be repaired. The problem of screwdriver chuck runout in this case is solved by replacing the gearbox parts with new ones.
How to repair
If the screwdriver cannot be turned on, this means that the problem is related to the electrical part. For network tools, the socket, plug, power cord, button, and motor are checked in sequence. On batteries, the charging unit, battery, power button, and motor are diagnosed.
Problems with the mechanical part (extraneous sounds, noise, vibration) are associated with malfunctions of the gearbox, ratchet or clamping motor.
Charging block
If the cordless screwdriver does not start, remove the battery, charge it, and check its operation after a couple of hours. If the problem persists, diagnose the charger and battery using a multimeter.
To check the charger, select a DC voltage measurement on the tester and set the nominal to 20 V (or 200 V if the battery nominal is 24 V). Next, the charger is connected to the network and the voltage at the output terminals is measured. The value should exceed the battery parameters by approximately 2V. If the values are lower or there are no readings, the memory is faulty. It is very difficult to repair it if you do not have skills in working with electronics, so it is more advisable to purchase a new charger.
Battery
To check the health of the battery, simply replace it with a working one and see if the equipment starts. If this is not possible, the battery is charged and removed after three to four hours. Next, connect a tester to the terminals and measure the voltage at the output. If the readings on the multimeter are lower than the nominal values, the battery is broken.
First you need to disassemble the battery. To do this, unscrew the screws and divide it into two halves. If the battery is not removable, which is very rare, it is disposed of and a new one is purchased in return.
Having disassembled the battery, the user will see a certain number of barrels (cans), depending on the battery voltage. The nominal value of each of them is 1 Volt; to obtain 12V or other values, the banks are connected in series. Further:
- Examine contacts between banks. If breaks are detected, restore the circuit.
- Measure the voltage on each barrel. If it is below 1 V, this element will need to be unsoldered and replaced with a similar one. The necessary parts can be purchased or taken from an old, unused battery.
- Having restored the circuit and changed the banks, the battery is assembled, charged and its operation is checked.
It is important to remember that the battery contains electric current, so all work must be carried out very carefully, observing safety precautions.
Problems with the button
Repair of the screwdriver button will be required if the charger and battery are working properly. First, check the voltage coming from the battery to its terminals. If it is missing, look for a damaged wire or contact, otherwise check the button.
You will need to short-circuit the wiring coming from the battery to the input contacts of the button, and connect the probes of a multimeter set to resistance measurement mode to the output terminals and turn on the device. The fact that the part is intact will be indicated by zeros on the screen. Otherwise the user will see the value of infinity.
If the button is collapsible, open it and clean the inside of dirt, and also check the contacts. They often burn out, but after cleaning with sandpaper the functionality of the screwdriver is restored.
If the contacts are badly burned or the button is not removable, you should replace it with a new one. It is inexpensive, so it is easier to recognize it as beyond repair than to waste time and energy trying to restore it.
Electric motor
The next unit that needs checking is the electric motor. Typically, it wears out the brushes that transmit voltage to the motor armature. If their length is reduced by more than 40%, the parts are changed. This is also evidenced by sparking that could be seen inside the case when the device was operating. These elements cannot be repaired, so they are replaced with similar ones in shape and size.
If the brushes are intact, the reason is in the motor itself. You will need to check the screwdriver motor with a multimeter by measuring the resistance of the armature winding. The infinity value indicates a winding break. This part is sometimes changed or rewound, but it is easier to purchase and install a new electric motor, because Finding an anchor for a screwdriver, especially one made in China, can be very difficult.
Replacing brushes
To change brushes, you will need to buy a new original set or select identical ones in shape and size. The motor itself can be serviced or maintenance-free. In the first case, the steps are simple - just disassemble the case, remove the worn ones, install new ones and reassemble. In the second case, the process is more complicated - you will need to bend the rolling to remove the part with the brushes, then replace the worn-out elements and return them to their original place.
Gearbox
A gearbox is a mechanical unit used to transmit torque from the axis of the motor-power unit to the cartridge and consists of a set of gears. If they are metal, it is better to repair the part rather than replace it with a new one. The assembly is disassembled, cleaned of old grease, then the damaged gears are removed, and new ones of similar size are installed in their place. Then the gearbox is carefully reassembled in the reverse order.
If a grinding noise is heard during operation and the device jerks, this indicates a bent shaft. A noticeable beating appears. The gearbox must be completely replaced.
Ratchet
This is an adjusting ring with numbers that limits the force when rotating the cartridge. It allows you to adjust the screw-in depth of the self-tapping screw, prevents bit wear and cutting off the splines of the fastener. Each number indicates a certain force - the larger it is, the higher the force of action. The last icon is a picture of a drill, it is set to maximum torque.
Do-it-yourself screwdriver ratchet repair consists of an external inspection, checking the integrity of all elements, removing contaminants and subsequent lubrication.
Keyless chuck
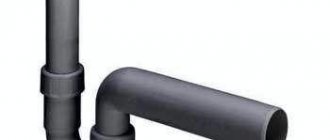
Chucks in screwdrivers differ in the type of fastening. The first - Morse Cone - is indicated by the symbols “1-6 B10”. To knock it out, they hit the body with a hammer.
The other two types of parts are fastened with a threaded connection or the same, but with a fixing screw. To remove them, open the cams and unscrew the screw clockwise if there is one. Next, a 10 mm L-shaped hex key is clamped in the fists and struck with a hammer. The thread is displaced and the cartridge is unscrewed.
If the assembly is faulty, this is indicated by play or misalignment of the clamped bits, as well as uneven extension of the cams. To fix the problem, the cartridge is disassembled by removing the plastic plug from the base. If it is metal, it is knocked out with a hammer. Next, remove the flare nut, unscrew the clamping jaws and check the threads on both parts. If it is broken, the damaged elements are replaced.
Cams or flare nuts are rarely found on sale. To replace them, they are removed from another instrument. Therefore, usually the cartridge is simply replaced with a serviceable one.