With the right approach, making souvenir coins (minting) can become a permanent source of income and quite a profitable business. Such souvenirs are purchased with pleasure by tourists, collectors, and vacationers. The coins depict the name of the city, its attractions, historical and solemn events, names, meaningful and funny inscriptions. Some companies mint business cards and logos in this way, which is essentially nothing more than advertising. Modern coinage does not require large expenses for organizing such a mobile business, but requires only the correct organization and approach.
Modern coin minting technology
The stages of organizing a business are as follows:
- Register as an entrepreneur.
- Choose a form of taxation: UTII (single tax on imputed income) or a simplified system.
- Buy the necessary equipment.
- Purchase consumables (blanks made of different metals).
- Decide on the nomenclature of souvenir coins.
- Make a demonstration stand.
The sale of souvenir coins is carried out without installing a cash register and does not require the issuance of any documents to buyers.
How to make a coin with your own hands
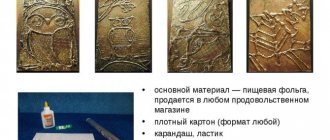
Making coins with your own hands, master class
Roll cold porcelain balls and make small cakes on a modeling board, give them the shape of a coin using a bottle cap or other object of the desired diameter. Use a stack or knife to remove excess material.
You can simply print your favorite coins or decorative buttons on round blanks. But the inconvenience is that when imprinting a flat coin, the circle of the coin is often broken with your fingers, and the imprint also turns out to be the opposite. Therefore, it is better to make stamps: take several thicker circles, stamp the coins you like in them, and carefully press the design itself with a needle. After the material has dried, glue the handles to the seals.
Handles can be made from a felt-tip pen cap by gluing it to Moment glue. Another tip: before making prints, do not forget to lubricate the print with vegetable oil so that the material does not stick to the print. It is better to tint the material itself a little in a color different from the color of the print, so that it is visible if the seal gets clogged.
In 20 minutes I printed almost a hundred coins, in denominations of 5 and 50 European cents)))
Of course, the coins are not perfect and even rough, but their great advantage is that they are very light and do not weigh down the craft or panel. If you go over the coins with fine sandpaper, they will become much neater. Here is a master class on making a Money Tree panel using these homemade coins!
Equipment for minting production
Many manufacturers offer coin minting machines in the trading network.
If you wish and have the necessary materials and components, you can make it yourself. Equipment designs can be different, allowing you to mint from 1 to 3 coins at once. Finding everything you need to open such a business is not difficult: just enter “Buy equipment for minting coins” in a search engine, read customer reviews and, based on the ratings, decide from whom to buy it. Equipment includes:
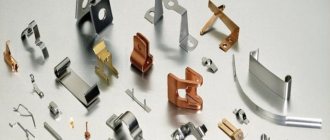
- stamping press;
- anvil;
- hammer, sledgehammer or powerful hammer;
- stamps (clichés).
VIEW Coin minting machine on AliExpress →
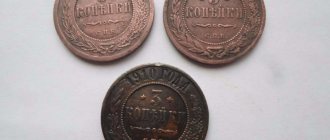
In addition, you need to have a certain number of blanks, which can be made of different metals: aluminum, copper, brass, silver and even gold. The cost of production directly depends on the material on which the print will be made. You can buy blanks with a diameter of 25 and 30 mm at the following prices:
- aluminum - from 22 to 30 rubles;
- brass - from 29 to 42 rubles;
- copper - from 28 to 38 rubles;
- silver - from 4 to 5 thousand rubles (depending on the sample);
- gold - from 48 to 57 thousand rubles (depending on the sample).
VIEW Blanks for minting on AliExpress →
Most often, entrepreneurs who have a business producing souvenir coins use blanks made of copper and brass.
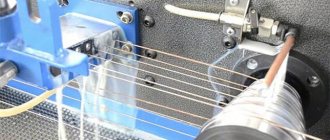
The manufacturing process itself is simple. Blanks made of sheet or round material (usually 25 or 30 mm in diameter) are inserted into a special press consisting of 2 parts. On each part of the coining press there is a drawing or inscription of a three-dimensional type (obverse and reverse). Next, the lid is struck with a hammer and thus an image is obtained on a piece of metal.
The design of stamps is developed independently or with the help of specialists. It begins with the production and approval of a sketch. It is usually performed in computer programs, most often CorelDRAW. If the entrepreneur himself does not own the program, then on the Internet you can find sites where they will quickly develop it at a reasonable price (for example, coinmaker.ru/site.html). Next, the sketch is converted into a vector image and laser engraving is performed. The metal is then heat treated and chromed or polished. This is the cliche making process in a nutshell. But the stamp can also be ordered from companies that manufacture them for a reasonable fee. If the sketch is developed by the entrepreneur himself, then making cliches from third-party companies will cost much less.
Just like thousands of years ago, before becoming a coin, a piece of metal goes through a very difficult and long path from the mine shaft to the master’s stamp. On the pages of this article we will try to trace and clearly illustrate the evolution of European coinage from the Hellenic masterpieces through bracteates to large and beautiful testons and thalers. The technology of coin production has always kept pace with the level of scientific and practical knowledge of man for centuries. By studying ancient coins and the technology of their production, you can, like looking at a cut of wood, see at what level people’s knowledge in the field of metallurgy was at one time or another. How crafts were developed, to understand what the aesthetic ideas of a particular region and time were, to find out what the political and economic situation was at that historical moment. Using a microscope and macro photography, traces of almost all the step-by-step procedures that a piece of metal underwent before becoming a coin can be found on the surface of a coin. For each period of coin production, the craftsmen used a number of techniques characteristic only for this period of time or geographical place of minting. Knowledge of the technological intricacies of the operations used in the manufacture of ancient coins will help the novice collector avoid the annoying moments associated with purchasing counterfeit coins.
Archaeologists and numismatists have concluded that coins were invented as means of payment in the Mediterranean between 700-600 BC. After a couple of centuries, the main method of producing coins in the Mediterranean became minting, rather than casting, as was the case at the dawn of coin production. A minted coin had a number of advantages over a cast coin. Visually, the stamped coin was distinguished by the clarity of the transmission of the smallest details of the stamp design, which could not be conveyed during casting. The very process of producing minted coins was so technologically complex and multi-stage that producing coins of the same quality in artisanal conditions became impossible. Minting also served as an additional “degree of protection” from counterfeiters of that period: a counterfeit cast coin was identified visually by areas not filled with metal, by cavities left by air bubbles, blurred relief of the image and the absence of the stamp sheen characteristic of a genuine coin. Coins from the 6th century BC They were round-shaped pieces of metal with a three-dimensional image. Their production technology consisted of preparing a single coin blank of a certain weight, by casting in a mold or cooling a drop of metal on a flat surface. After the required number of blanks had been produced, they were sent for minting. The stamps were made of bronze, a relatively soft metal, so they wore out very quickly and became unusable. This explains the huge number of stamp varieties of the same type of coin. To make the stamps last longer, the master's assistant heated the future coin in the oven and used tongs to apply it to the lower stamp. Having placed the top stamp on a red-hot circle of silver, the master struck the coin with a hammer. The working surface of the upper stamp (a rod with a square cross-section) was initially not decorated, but represented an abstract high-relief geometric pattern, which, penetrating into the metal, contributed to better embossing of the obverse.
Lydia, Croesus (c. 560-546 BC) 1/2 stater.
Gradually, the design of the reverse became more complex, squares and rectangles gave way to complex designs, letters, palmettes and images of plants appeared. The next stage in the design of the reverse was to place on it a negative, concave image of the obverse of the coin. This type of coin is characteristic of the Greek colonies of Southern Italy.
Southern Italy, Metapontium in Lucania, nomos (520-510 BC)
With the development of minting technology and the growing skill of artists and engravers, the image on the reverse became more complex and acquired the stylistic and semantic role of a “second fiddle” supporting the obverse side of the coin. The hierarchy of the sides was also taken into account when making the coin: the upper stamp (reverse) wore out much faster, so images of secondary meaning and significance were placed on it, and on the lower stamp (obverse) the image of a god or ruler was most often placed. Gradually, in the process of coin production and its further circulation, the round shape of the coin with double-sided minting replaced other forms of payment. And the coin acquired those basic features and forms that have remained virtually unchanged to this day.
Bronze top stamp of an Athenian tetradrachm found in Egypt, and the reverse of a silver Athenian coin of the 4th century. BC.
The flowering of the medal art of antiquity occurred in Classical and Hellenistic Greece, which gave us the highest masterpieces of small sculpture. The regularly minted coins of the ancient Greek city policies amaze with the height of their artistic and technical mastery.
Decadrachm of Syracuse (400-395 BC)
The technologies borrowed from the Greeks were preserved and developed by the ancient Romans. The mint, located on the Capitoline Hill, near the Temple of Juno Coins, with millions of copies of denarii with portraits of emperors and mottos glorifying their victories, covered a significant part of the needs of the vast Roman Empire for money. Artistically, the coins of Rome are inferior to the best Hellenistic examples. But the merit of the Roman coin masters is the creation of a well-functioning, almost industrial technology for making coins. Coins become not only a means of payment, but also a means of propaganda, responding with amazing speed to the rapidly changing situation in the Empire. Successive emperors sought to assert their power by minting coins with their name and portrait, and then celebrating their victories on the reverse of the coin. The technological difference in the production of Roman denarii was the method of making coin blanks. The large circulation and short deadlines did not allow wasting time on single production. Therefore, the metal was cast into molds consisting of a series of interconnecting depressions. Liquid metal, filling the bath, overflowed into the adjacent hole, etc. Then the blanks, connected by a sprue, were cut, after which they were minted. Over time, this method has been significantly improved. A silver ingot of a certain weight, intended for making coins, was crushed into shavings. In accordance with the coin stack used, pure metal was mixed in proportions with the alloy (most often it was copper), and the bulk mixture was evenly distributed into several heat-resistant casting molds, each of which had a certain number of recesses, according to the size of the future coin. In the oven, metal shavings were baked, combining into a single piece. Therefore, a bunch of Roman denarii has an uneven, rough surface, characteristic of a conglomerate of sintered particles. The extracted blanks were flattened with a hammer and sent for minting. This method significantly reduced the time and effort of monetaries spent on preparing coin circles. Since the metal allocated to each coin was not weighed separately, the disadvantage of the method was the significant difference in weight of each denarius, but it was possible to easily and accurately control the total consumption of material and the number of coins made from a pound.
Clay molds in which coin blanks were made
The minting of denarii was carried out with a pair of stamps, the lower of which was securely fastened in a vice, and the upper one was held by hand and applied by the master directly during minting. The high relief of Roman coins, like Greek ones, was high, and in order for all the details to be minted well, the blank was first heated in a furnace. The heated blank had less rigidity, which extended the life of iron and bronze stamps.
The production of blanks and the minting itself were the main technological operations in the production of coins. But the most important and responsible process, which determined the type of future coin, was the production of stamps. A portrait was always placed on the working surface of the lower stamp, and a mirror image of the reverse was always placed on the end of the upper one. This is not just a tradition, but a production necessity caused by the fact that the upper stamp always wore out faster than the lower one, and the obverse image was more significant and difficult to manufacture.
Denarius of Emperor Maximinus (235-238) and iron stamps of the first centuries AD.
The production of stamps in Rome was carried out by engravers - scalptores monetae, and at each mint they formed a special corporation, headed by a praepositus. Having received the approved sketch of the image and the text of the legend of the future coin, the craftsmen began making the minting tool. The stamp blanks were two bronze or iron rods. For stability, the future lower stamp was shorter than the upper one, which had to be held by hand. The end of the stamps was leveled, cleaned and polished. Then, using a metal compass, markings of the rim and legend were applied to the working surface. Using a pre-prepared punch, with the silhouette and volume of the emperor’s head, the base of the negative profile image was minted on the stamp. Using a series of smaller and simpler punches, with a working edge in the form of dots, triangles, crescents, rings, portrait details were applied to the base of the head using the chasing method. So the nose, eyes, lips, hair on the head and beard appeared until the image of the ruler became whole and complete. It’s hard to believe, but to make a realistic and lively portrait of the emperor, the master almost always did without using a chisel, working on the image only with the help of chasing. When the portrait or figurative composition was completed, the master began chasing the rim and legend. Almost all letters of the Latin alphabet were minted using several punches: long and short “I”, large and small “C” and “S”. Once the image was complete, the stamps were re-polished. The final operation removed traces of markings and metal residues, which were squeezed out with a punch when applying an in-depth image. After hardening, the stamp was ready for coinage.
The use of punches not only simplified the production of stamps, but also ensured unity of style, uniformity and recognition of Roman coins. Since the upper stamp, unlike the lower one, was free and was arbitrarily attached to the blank during minting, Roman coins, for the most part, have a free obverse-reverse relationship. But with the advent of the conjugate stamp, coins with a strict aspect ratio appeared in the late empire.
Conjugate stamp of a coin of Constant I with the letters of the Antiochian mint, found in France, and a bronze follis of this emperor minted in Antioch.
The political and economic crisis of Rome was also reflected in the decline of the Roman monetary system. In the main coin of the Empire for that period, the silver denarius in the second century of the new era, the content of pure silver was constantly decreasing. And by the end of the century, the Roman denarius had only 500 samples.
At the beginning of the third century, in an attempt to save the monetary system of the Empire and restore public confidence in the coins of Rome both within the country and abroad, Emperor Caracalla began issuing a new coin. It was named in honor of the emperor, whose full name was Marcus Aurelius Antoninus. Antoninian, a multiple of two denarii in value, was initially a high-grade five-gram silver coin. Visually, the Antoninians differed from the denarii in that on the denarius the portrait of the emperor was depicted wearing a laurel wreath, and on the Antoninians - in a crown. The appearance of this new coin only temporarily alleviated the difficult economic situation of the Roman Empire. But soon, due to the damage to the money, the content of pure silver in the Antoninian, just like before in the denarius, began to rapidly fall. And by the end of the third century, this coin became almost copper, and then generally only lightly covered with silver. Emperor Constantine at the beginning of the fourth century achieved some stability in the monetary economy of the empire by introducing a new gold coin, the solidus. But, the monetary systems of the Roman Empire and the description of its coins will not be distracted from the main topic of the article: coinage techniques.
Vladimir Khomutov
Frame
Decorating the headband, you can start by selecting materials for work. You will need superglue, gold or silver paint, a photo frame and coins. They can be different in size.
Stages of work:
- Paint the frame and allow time to dry.
- Using glue, glue one at a time to the surface around the perimeter. You should not place a large number of coins, as this will seriously weigh down the frame.
- If desired, paint money on top from a balloon. Then the product will turn out to be a uniform color.
After drying, you can post photos of your travels.
Requirements and materials for manufacturing
The actual way to create an album isn't that different. As basic materials you will need:
- A4 sheet of paper;
- office file;
- marker or felt-tip pen;
- ruler;
- soldering iron;
- simple stationery tape;
- stationery knife;
- folder with binder.
As a result of simple manipulations, in both cases you will receive an album in the form of a folder with a binder, in which the required number of sheets-envelopes with coins enclosed will be enclosed. But before you start creating your first album, you need to draw the proposed cells on a piece of paper using a ruler and marker. This will give you a stencil.
The length and width of each cell should be a couple of millimeters larger than the largest coin in your collection. Although you can make the cells of an individual size, a gap of several millimeters will still be required for the coins to fit properly.
Be sure to check out these tips on how to clean coins at home before putting your coins in an album. After this, you will be able to determine the degree of safety of the coins using our article. For example, you can take a 50 ruble coin from 1992 () and use today’s guide to choose one for it or make an album for coins with your own hands.
Manufacturing process: first method
One of the options that will work for you
The first method is as follows: after the preparatory stage, attach the stationery file to a lined sheet of paper using paper clips or clothespins. Using a heated soldering iron tip, trace each cell along the contour.
Beads
Create a drawing that will show how to arrange the coins.
- This can be one, two or three rows.
- Arrange them in a checkerboard pattern.
- Use a drill to drill holes in the coins and use copper rings to connect them.
- Then gradually attach the coins of the bottom row with rings according to the pattern.
- The final touch of the product will be the clasp.
- You can now choose one in a hardware store or online.
Coinage. Industrial and amateur equipment
To put it simply, industrial equipment is the same press, but with a high degree of automation. In his work, the main criteria are high speed of work and absence of defects.
Amateur equipment is a compact device with much lower performance. But image quality is of paramount importance. Many companies offer similar devices, so anyone can start producing their own souvenir coins.
However, we should not forget that counterfeiting of current banknotes is punishable by law.