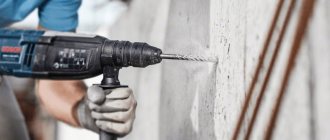
What is the best way to drill ceramics?
It is necessary to drill porcelain stoneware or tiled surface of the tiles in the bathroom on the wall in a non-impact mode. In this case, it is necessary to ensure a low rotation speed of the drill and not put too much pressure on the power tool so that the ceramic does not crack. Putting a lot of pressure on a drill or hammer will not increase productivity. High speed and excessive force will only contribute to overheating of the edges of the cutting device and increased vibration. It is allowed to drill the tile body of the bathroom tile on the wall at higher speeds, but to do this you must first go through the vitreous coating.
Working with a drill and a crown
Lock the cutting tool in the chuck, reduce the speed of the drill to 600 per minute. There is no need to core the center, it is a relic of a bygone era. Contact of the cutting edge with the surface of the part must be made when the drill reaches the set number of revolutions. If you first press the drill against the tile and then turn on the rotation, there will certainly be slippage.
There is no need to apply pressure right away. Lightly touch the tile and use light pressure to mark the center of the hole. Only then does the pressure increase. IMPORTANT: the tiles must be fixed on a flat and level surface .
To make the job easier and extend the life of the cutting tool, water the drilling area with a thin stream of water.
If this is a recommendation for spear-shaped and twist drills, then for crowns and tubular drills it is a prerequisite.
With a thin drill, if desired, you can make a cutout of any shape and size. To do this, drill frequent holes along the contour, and then squeeze out unnecessary elements. The edges are processed with a file.
Elementary technology: drilling tiles in the bathroom
In order to hang a shelf, hooks, install electrical equipment and for any other purposes, you may need to make a hole in a solid tile and it can be successfully drilled if you strictly follow all the tips and act according to the technological process. In fact, the operation algorithm is simple: you need to drill a hole that penetrates the wall, insert a dowel into it, and then screw in a screw or self-tapping screw. But first you should find out how to drill tiles in the bathroom, since the success of the entire enterprise may depend on this.
Advantages and Disadvantages of Tools
Before you start working directly, it doesn’t hurt to think about how to drill ceramic tiles in the bathroom, that is, to finally decide on the equipment. Today on the market there is a wide selection of a wide variety of drills, hammer drills, hand rotators and who knows what else. Among this variety, you should choose only the most suitable one.
The most suitable tool for drilling tiles is an electric drill, which has variable speed. It will be much more convenient and faster to work with it, and low speeds will eliminate or at least minimize the risk of cracking of the glazed ceramic surface. A high-quality drill is not cheap, but it is an indispensable assistant for the home craftsman, so you should not waste money on equipment from well-known manufacturers.
A battery-powered screwdriver is the second profitable and convenient tool that is suitable for drilling tiles in the bathroom without any problems. It also has one more advantageous property - it can be used even where the equipment cannot be connected to the network.
Rotary hammers from well-known companies also have enviable multifunctionality, so you can use such a tool when drilling holes in tiles. True, the price of such equipment is even higher than that of a drill if we are talking about professional models.
The most tedious and time-consuming process is drilling ceramics using a hand drill. However, if you only need to make a few small holes, you can try to do it this way.
Selecting consumables and components
Low-speed drills, screwdrivers or hammer drills are mainly used for drilling holes in ceramic tiles.
But choosing the right tool is only half the battle, since it is important to understand which drill to use to drill tiles in the bathroom so as not to damage the glazed surface. Moreover, you must take into account that drills for brick or concrete can be immediately put aside, their use does not bode well, the tile will simply crack and will have to be replaced
There are three most suitable consumable options that will best suit your purposes:
The best drills for drilling dense and slippery ceramics are diamond-coated drills, which makes their tips look like sparklers. These are quite expensive components, because their production uses chips of natural diamonds and it is impractical to purchase such drills for making one or two holes. If you are faced with major repairs, construction or finishing, this is your professional occupation, then you simply must have it in your “arsenal”. The second place is rightfully occupied by spear-shaped drill bits for drills with pobedite tips. They are designed in such a way as not to split the tiles, and the special sharpening does not allow them to slip off when starting work. Due to this shape, the adhesion of arrow-shaped drills to the surface improves, and the risk of cracks and chips is reduced
The price of such drills is much lower than diamond ones, but they cannot be called cheap either. When figuring out how to drill tiles in the bathroom, you can pay attention to drills made of refractory, durable metals, which are designed for processing metal surfaces, if nothing else is at hand. The cost of such a drill bit for a drill is quite affordable for everyone, however, you will have to work at your own peril and risk
It won’t hurt if such equipment is new, perfectly sharpened, and also has a pobedite coating or tip.
Thus, it will not be at all difficult to decide on drills and all that remains is to figure out how to drill the tiles in the bathroom step by step so that they do not burst or become cracked, which will add more work to you in replacing them.
How to drill out tiles from tiles
First of all, practical advice.
Great if you have extra tiles
or its fragments of sufficient size. Then you can practice first, and then move on to the main work.
You need to make the correct markings in advance. However, it is possible to highlight the drilling point on the tiled surface with an ordinary marker or a primitive pencil.
But do not forget that not every pencil can leave an imprint on the tile. Moreover, such a mark can easily be accidentally missed or erased.
The solution is as simple as possible: in place of the future hole, glue a piece of ordinary adhesive tape for painting work, on top of which a mark is already drawn.
But the benefits of adhesive tape don’t stop there. It is much easier to start drilling with it, since due to its presence the edge of the drill will not jump off the designated place.
How to drill out tiles from a wall surface correctly?
Check the speed
Do not forget that when working with such material it is not recommended to work at high speeds.
A good rotation speed can be from one hundred to four hundred revolutions.
A certain value in any case depends on the parameters of the tile itself, on the type and diameter of the drill, and in most cases is established experimentally.
Disable the shock function
Do not forget! If your drill has a specialized hammer function, make sure it is turned off every time you start drilling.
Prepare the base
In the case where work is carried out with unlaid material, it is necessary to prepare a convenient and functional place for working with a stable, ideal surface.
A material is placed under the tile that does not interfere with the free operation of the drill: plasterboard, plywood or wood.
Calculate pressing force
The working part of the tool can noticeably heat up during drilling, heating up the area on the tile. This can cause it to crack.
Therefore, do not get carried away and make excessive efforts.
Cool the drill in time
There is no need to rush; it is better to cool the drill sometimes by dipping it in machine oil.
If work takes place on a horizontal surface, it is possible to organize local cooling.
To do this, I make a closed plasticine shaft around the possible hole, which is filled with water.
Experts often use forced supply of a special cooling solution. For this purpose, a special supercharger vessel is assumed, thanks to which liquid is uniformly supplied to the drilling area.
Check the tilt of the drill
Important! During work, the drill is placed only perpendicular to the tiled surface.
Naturally, there are specialized devices for this, but if they are not there, then you will need to monitor this throughout the entire drilling process.
Protect your eyes and hands
When large holes are made in ceramics, sharp fragments often scatter. Therefore, first of all, take measures to protect your eyes and hands well and diligently.
How to drill small holes in ceramic tiles on a wall surface?
In most cases, these holes are necessary when you need to place a cabinet, shelf, mirror, hanger, piece of furniture or other attribute on the wall surface. Very often, plastic driven dowels with a diameter of up to 12 mm are used.
Let's consider the option when the wall is already completely tiled, under which there is a fully hardened mortar or glue.
We find the location of the upcoming hole. Ideally, it will not be located near the edge of the tile (no closer than one and a half centimeters). If you do not follow this rule, then during operation the tile edge may burst and even break off due to vibration and overheating.
- We install the drill in the intended place and start working at low speeds.
- When the drill penetrates the tile, it must be pulled out and replaced with more conventional wall perforation equipment (of the required size). In other words, after drilling a hole in the tile, we drill it to the required depth already in the thickness of the wall.
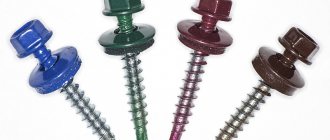
- Then we nail a dowel into it, into which the necessary fastening is screwed.
What kind of drill to make a huge hole in ceramic tiles?
Large holes (20 mm or more) are in most cases made in the material before it is laid on the floor or walls. Tile
is placed on the workbench, after which detailed markings are made.
In this case, the working method is different: it depends on which drill is selected for the job.
If the choice fell on the so-called “ballerina” , then it would be better to first make a small through hole (3-4 mm) in the very center of the tile with a small drill.
This procedure will significantly simplify subsequent work. When specifically installing the ballerina (her movable leg), we use it to set not the diameter of the future hole, but its radius. Pay attention to this. After installation has taken place, the fixing screw is tightened tightly in order to remove the possibility of the leg moving.
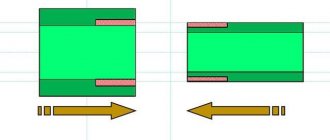
During operation, the drill should only be perpendicular to the surface of the material: it needs to provide the same pressure at low speeds.
With a lot of pressure, it is difficult to hold the tile in place, and the drill can also jam. It is necessary to ensure that the cutting depth is the same along the entire length of the circumference.
The process will be greatly simplified if you drill out the tile
tiles with a special
core drill : diamond, tungsten carbide or corundum. Such drills often have a specialized shank for fastening, or they are made in the form of a collapsible design that allows the use of drills of various diameters.
How can you make a hole?
To make a hole in a tile use:
- Drill:
- Spear-shaped;
- Tubular;
- Spiral with pobeditovy cutter;
- Diamond-coated crowns;
- Ballerina;
- Cutting disc with grinder;
- Diamond-coated string;
Depending on the amount of work and the type of tile, one or another device is used. Among them there are universal and highly specialized.
- Drill.
Spear drills have 2 or 4 edges. The second option is less common. The edges are formed by soldering, which are made of pobedite alloy. Spear drills are intended only for drilling tiles. Some manufacturers produce models for porcelain stoneware, but practice has shown their poor functionality.
If you drill wet, you can double the life of cheap drills.
Expensive models from Bosch or KWB cost an order of magnitude more, 600-700 rubles. Of course, if handled carelessly, they can also break, but careful use is guaranteed to make more than one hundred holes.
Tubular drills represent a qualitatively different level of consumables. In appearance, it is a high-alloy steel tube with diamond coating on the working end. They are already able to cope with porcelain stoneware and Metlakh tiles. Almost always, the manufacturer recommends using them for wet drilling.
The cheapest models of the domestic brand “Praktika” cost 150-170 rubles. Expensive ones, from Bosch or MESSER, will cost 2.5-3 thousand. Moreover, in expensive models, the dry drilling function is implemented. This option is made possible thanks to vacuum deposition of abrasive material and the integration of a miniature coolant container.
Twist drills with a Pobedit cutter occupy a special position. They are rather an upgrade of conventional models, but their intended purpose is deep holes in durable material. This is confirmed by the spiral grooves, which remove dust very well when working with thick tiles.
- Diamond-coated crowns.
Structurally, they can be thought of as tubular drills of large diameter. But these are more complex devices. Depending on the diameter and model, they can have from 8 to 36 teeth, or without them. Some of them do not even have segmenting slots, that is, this is a real large-diameter tubular drill.
All models must have a centering drill in the center.
There is no clear division of them according to any characteristics into tubular drills and crowns. Some manufacturers produce drill bits without a shank with a diameter of 8 mm, while other companies offer tubular drills with a shank, ø20 mm.
But in any case, for large-diameter holes, diamond-coated crowns are used.
The cheapest models cost 180 rubles, the most expensive from RUBI, 11-12 thousand.
- Ballerina.
A convenient device in the form of an h-shaped compass, with the possibility of adjustment. The central leg is an analogue of a spear-shaped drill. A cutter, most often made of a tungsten carbide alloy.
Almost all of them can drill a hole from 20 to 90 mm. Some models are equipped with a protective screen. Price from 350 to 1000 rubles.
The ballerina is attracted by the possibility of adjustment, and an inexperienced buyer is attracted by this feature. But they are extremely inconvenient to use! The reason becomes clear if you imagine the ballerina not as a device for work, but as an eccentric. When drilling, even at low speeds, the vibration is so strong that it takes considerable effort to hold the drill in one position.
- Cutting disc with grinder.
This option can be considered indirect, because the holes are made not by drilling, but by sequentially cutting closely spaced slits. The method is labor-intensive, the edges are uneven. But it is possible to make a cutout in the form of any figure of the correct shape: a square or a triangle.
The disc is required to have a smooth edge and diamond coating.
It doesn’t make sense to buy it specifically, and more often this option is used if the work takes place in emergency mode.
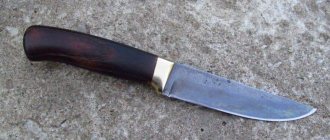
- Diamond coated string.
This is an ideal device for cutting holes of any geometric shape, in all tiles without exception. It is a string with ears on which an abrasive coating is applied. The material can be different, from tool steel to tungsten. It cuts any tile like butter. The only negative is that mechanization is impossible; all work must be done manually.
Price from 200 to 600 rubles. If you don't break it on purpose, it will last for several years.
How to drill a hole in porcelain tiles
It should be understood that porcelain tiles cannot be treated outdoors. That is, the method in which the workpiece is fixed on the workbench in such a way that its processed part hangs above the floor is unacceptable. Otherwise, the material will split into pieces during the drilling process.
The hole must be located as far from the edge as possible. The recommended minimum distance from it is 1.5 cm. If you do not need to drill through it, it is advisable to make a mark on the drill in advance to which it should reach during operation.
When using a hammer drill, you need to turn off the impact mode in a timely manner, otherwise the finish will be hopelessly damaged.
Drilling instructions
When using drills with a pobedit tip, you must set the rotation speed of the drill or screwdriver to 500 rpm. If we are talking about working with a diamond drill, then the optimal speed for it is 1500 rpm. In both cases, to prevent the tool from sliding on the surface of the tile, it is better to seal the treatment area with masking tape.
Before drilling on the wall, carefully tap it: if the sound indicates the presence of voids, you will have to abandon the work, since such a finish will not withstand processing. It is also undesirable to touch the seams - this can lead to the appearance of cracks. As a last resort, the hole should be made strictly in the middle of the joint.
As soon as the drill goes through the tile and reaches the concrete, change the drill to one that is designed specifically for this material. Unless, of course, there remains a need to go deeper. The last two recommendations also apply to tiles laid as a finishing coating on the floor.
When working on a workbench (or table), the porcelain stoneware should be firmly fixed and ensure that there is a solid backing (plywood or drywall) under its entire area.
The video shows the drilling process.
Tips for core drilling
Forming holes using diamond cylinders is not much different from similar operations with drills. And yet there are some peculiarities.
Thus, the recommended rotation speed of the crowns depends on their diameter. If it is no more than 3 cm, the drill should be set to 800 rpm. Tools with a large diameter (from 6 cm) are best used at a speed of 400 rpm.
It’s good if the model has a centering drill - it will help hold the drill in place. If this is not available, it is better to make a special template: cut a hole of the required size in a plywood or plasterboard sheet.
The finished stencil should be applied to the surface to be treated, secured and begin to drill into it. After you manage to go deeper into the material at least a millimeter, the plywood can be removed.
Watch a video on how to properly drill tiles with a crown.
Working with a ballerina
The first step is to fix the cutter of the device at the distance from the axial stand that will correspond to the required radius of the hole. The distance can vary from 15 to 45 mm. Before starting drilling, it is recommended to make a small depression in the center of the circle being cut out. It will help to correctly install the ballerina and avoid its displacement in the future.
In places where processing is intended, the surface of the material should be lubricated with machine oil (excluding the hole in the center).
Having secured the device in the drill chuck, you can start drilling at low speeds
In addition, you need to hold the drill firmly in your hands, avoiding distortions, otherwise the process will proceed unevenly: some part of the intended circle will be cut out, and some will not. To prevent the working elements of the ballerina from overheating, drilling must be carried out with periodic stops.
How to drill tiles correctly so they don't crack
Many people ask themselves the question of how to drill tiles so that they do not crack during the drilling process. After all, in order to hang many shelves, cabinets and hooks in the bathroom (and not only) you need reliable fastenings in the wall.
Often people simply turn to professionals and then they no longer have to rack their brains over the question of how to drill holes in tiles on the wall. But even more people do home renovations with their own hands, without resorting to the help of specialists.
Tile is a fairly durable, but slippery and fragile finishing material. It is with these features that the risks and errors that arise during drilling are associated. After all, due to uneven load and vibration, the material can simply crack. Pro tip: Drill holes in the tiles before attaching them to the wall. Before such manipulation, it is advised to soak it in water for a day. This will make it more pliable and less fragile. But if the tiles are already laid on the wall, you can also do all the required work with it.
Some tips for those interested:
- It is best to drill holes in the seams. This way, the risk of tiles chipping is lower, and the cosmetic defect of the masonry is not so noticeable.
- Due to the strength of this finishing material, it is optimal to choose diamond-coated drills. Pobedit drill bits for drills are also suitable.
- It is better to drill at low speeds and constantly wet the hole with water.
- In order to mark the location of the future hole, masking tape is used. A mark is applied to the glued strip of masking tape with a marker or felt-tip pen for precise drilling.
You definitely need to choose the right tool to do this job.
What tool do you need to drill tiles?
In order to prepare places for attaching shelves, hooks and cabinets on a tiled wall in the bathroom, you need to have the following tool:
- Drill with different operating modes.
- Drill. It is better to have tungsten carbide spear drills. But a regular Victory drill will also work for these purposes. You just need to sharpen it well before work.
- Conductor. This is a kind of stencil for drilling holes of various diameters. Made in the form of a thick plate, which already has holes of different diameters.
- Felt pen or marker.
- Masking tape or adhesive tape.
If you need to drill a hole of large diameter, then instead of a drill you need to use the so-called “ballerina”. However, working with this tool requires skill. It is advisable to practice on pieces of broken tiles before drilling holes in tiles. And after this it will become completely clear how to drill tiles on a bathroom wall.
Features of performing such work with tiles
First of all, you need to remember that you cannot drill into the material at the very edge. This is due to the fact that with this type of processing the risk of splitting the tiles increases. We advise you to step back from the edge by at least 1.5 cm. This will help reduce the risk of cracks and chips to zero.
We also note the features of drilling holes up to 1.5 cm:
- Fix the drill and turn the drill or screwdriver to minimum speed.
- After drilling the tile, change the drill to a regular one and continue drilling the wall under the cladding.
- Blow dust out of the finished hole and install a plastic dowel into it.
The most important thing is that when drilling, do not forget to wet the hole in the tile with water. By doing this, you will minimize the possibility of splitting and/or cracking of the tiles. Drilling tiles is difficult only the first time, each time you do it better.
Tips and tricks
If the tiles are drilled at low speeds, it is better to use a metal drill. But you need to know that this drill is only enough for one time.
It is not advisable to make holes along the edges of the tiles or along the seams of adjacent products - in 90% of cases this leads to damage to the tiles.
Instead of a regular drill, you can use a hammer drill . It is clamped in the chuck, then (with the “no impact” mode previously turned on), the tile is drilled, the mode is switched and the base is processed.
It is also advisable to periodically moisten the drill with water during operation. Of course, before this the drill is turned off.
General rules for drilling tiles
Almost all types of facing tiles - from natural stone to ceramics and glass - have similar characteristics:
- high surface hardness. It is determined on the Mohs scale (whether scratches are formed when the surface is exposed to natural materials - from talc to diamond), from 1 to 10. The higher the hardness, the better the tile resists mechanical damage and the more difficult it is to select the tool material;
- inability to bend and deform under applied force;
- fairly high fragility;
- low resistance to vibration.
From these characteristics we can draw the following conclusions regarding how to drill tiles:
- The tool material must have a higher Mohs number than the facing surface. For example, for porcelain stoneware, the surface hardness is 7; accordingly, it is necessary to work with a drill with a hardness of 8 or higher, preferably a diamond one (hardness 10, maximum). But for ordinary ceramics with a glossy (polished) surface, the hardness is only 5...6 Mohs units. Therefore, a tool made of hardened steel is acceptable;
- hard and brittle material easily splits under vibration and impact. Therefore, we select a drill, screwdriver or hand-held drilling device (branch) that does not produce shocks or vibrations. A power tool with continuously adjustable speed is suitable - a low-speed drill, a screwdriver. Hammer drills and impact drills cannot be used!
- the presence of voids under the tile increases the risk of it splitting. Therefore, if the locations of future drilling are known in advance, care must be taken to uniformly fill the space under the cladding with mortar or glue. This also applies to finishing in general;
- the drill will slide on a smooth (glazed, polished) surface. To avoid this, it is necessary to either cover the surface with a rough material or clean the area until it is rough.
If you follow these simple rules, you can drill tiles on a wall or floor without damage.
What is required for processing?
The best option for working with ceramic tiles would be a corded or cordless screwdriver. Its high rotation speed (800-1000 rpm) allows you to easily handle tile processing. An alternative to a screwdriver is an electric drill, or a manual modification if you have to drill a small hole.
Selecting a drill and auger
When the unit is prepared, all that remains is to choose the type of nozzle aimed at solving certain problems:
- Diamond coated drills. They give the best results for drilling even very hard tiles, but due to their high cost, it makes sense to use them only for a large volume of work.
- Drills with a tip made of pobedit. They work well with soft tiles and medium-hard tiles. It is recommended to drill ceramic tiles on the wall using so-called feather drills - they have a small sharpening angle that does not allow damage to the tile glaze.
- Spear drills. Suitable for laying dowels, they have a low price and an enviable service life.
- Single-sided sharpened carbide drills. These attachments reduce the risk of overheating and make working with very fragile and thin tiles easier.
- Core drills with tungsten carbide coating. Universal components that can easily cope not only with the most durable tiles, but also with marble, brick and porcelain stoneware.
Diamond core drills require periodic cooling with water, and work with them at low speeds - no higher than 500 per minute.
What else can I drill?
If you need to get a hole of a large diameter, a drill with adjustable teeth - the so-called ballerina - will come to the rescue.
The device can drill holes up to 9 cm in diameter, including non-standard shapes for which there are no suitable crowns. But due to the manually moving bracket, the edges of the hole are uneven. Therefore, it is advisable to use a ballerina in cases where the perforation will be covered with something.
Cuttings with cutting disc
The tile must be fixed on a soft, thick base, for example, on a wooden block. The reason is that the disc will come out from the back side by 5-7 mm. With this immersion depth, it is possible to trim the edges of the hole more accurately.
The gap between each slot is 3-4 mm.
The cuts are made crosswise. In this case, most of the jumpers will fall off on their own. The protrusions remaining at the edges are broken off with wire cutters or pliers.
The edges do not need to be processed if they will be covered with decorative panels or overlays.
Rules for drilling tiles
Before drilling begins, the tiles are marked and paper tape or adhesive tape is applied to the area where the hole is provided. You can also use a plywood stencil to make drilling out a smooth surface easier. Pressing it against the surface of the tile, you can begin to drill a hole. To make a hole in a tile that has not yet been placed on the wall, you should do the work on a flat surface.
Drilling begins with small revolutions, without much pressure. The crown should be positioned parallel to the tile so that when the drill is recessed, it can go deeper into the surface evenly along its entire diameter. Sudden movements are not allowed.
When working with diamond bits, it is allowed to make holes at high speeds. But as a result of this, strong heating of the tool is observed, which will lead to burning (burning) of the diamond coating, and because of this, the tool itself will deteriorate. Thus, for fast work it is necessary to provide the availability of water to water or wet the drill. Dry drilling is allowed, but at low speed.
If there is no diamond coating on the crown, then it is necessary to adhere to the “wet” method of drilling. In particular, if this applies to tiles on which there is a coating in the form of glass glaze. But for ordinary tiles, the use of this method is more preferable. In addition, wetting the tools with coolant allows you to complete the job much faster.
When using a ballerina, it is important to choose the right size for her. The distance between the central and side tools is set 2 times smaller than the size of the hole diameter we need
Then drilling is performed at low speeds in the designated areas. The tiles must adhere in such a way that the scattering of fragments does not injure anyone. It is important to use glasses as eye protection. The power tool should be positioned as level as possible when drilling, without tilting or distortion.
Now you know how to drill tiles correctly, taking into account the use of various tools. This process is not particularly difficult, but requires some preparation and knowledge
When performing such delicate work, take your time, remain calm and careful, and do not forget to wet the tool with coolant
Features of drilling tiles
Drilling holes in ceramic tiles is a very specific process. It should be approached with the utmost care. The main task is not to break the tile itself during work.
This can happen for the following reasons:
- Exceeding the maximum permissible drill speed;
- Working with a blunt drill;
- Too much pressure;
- Changing the vector of effort application;
- Local overheating.
Please note that many factors lead to the same result. Therefore, scrupulous process control is required throughout the entire operation.
How to drill?
It is recommended to drill the porcelain slab from the front side. To use the drill resource more economically, holes are sometimes drilled 2/3 of the tile thickness, and the remaining third is simply knocked out with a strong blow. In this case, chips often occur on the back surface of the tile. They should be invisible, so you should drill the tile directly from the face. The resulting chips should not be scary, since they will not be visible later.
To perforate porcelain stoneware, it is better to use a drilling machine or drill stand. Thanks to such devices, the service life of the drill increases and the work is greatly simplified, and the hole turns out beautiful and accurate. It is necessary to use a 2-speed drill, since when perforating porcelain stoneware with a diamond drill, a significant rotational speed is not required. The use of an impact drill is not recommended because the slab may crack. If you are using a hammer drill, you must disable the hammer function.
Before you start drilling, do not forget to place a fiberboard or plywood board under the porcelain stoneware so as not to accidentally damage the surface of the floor or table with the drill. The drill should only be directed vertically; the slope should not be too pronounced in relation to the slab.
Wet
Diamond drills tend to heat up during operation and require cooling to increase their service life. At home, you can cool the drill using a container of water covered with a lid. Several small holes are made in it, and water is supplied in small portions to the drill. For these purposes, you can also use a special cylinder. This method is called "wet drilling".
If the work is done correctly, a neatly drilled element corresponding to the diameter of the drill will fall out of the plate. Of course, it is more convenient to drill a recess in porcelain tiles on a table or on the floor when they are removed. It's much more difficult to get it right on a wall. You can use a crown or ballerina without placing the hole too close to the edge of the tile.
Dry
There is also the so-called dry drilling of porcelain stoneware. It is used in cases where it is necessary to obtain a large number of holes in a relatively short period of time (and with an impressive volume of construction work).
Inside the drills designed for such drilling, there is olive oil. When starting work, it is necessary to hold the drill not at a right angle. You need to bring the tool to the surface to be processed with the drill already spinning. This is necessary in order not to damage the surface of the tile.
When the drill warms up, you will need to change the angle to a straight line, then you can continue working. Significant effort should be avoided. It is better to work at 1.5 thousand rpm, this is necessary for cooling the product. As the olive oil heats up during drilling, it oozes out to help cool it.
Video “How to drill ceramic tiles correctly”
The video provides information on what tools to use for drilling tiles and how to do it correctly.
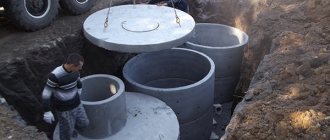
How to make large holes for a socket or pipe
When replacing a faucet, installing an electrical outlet and installing a new pipe, it is necessary to make neat large holes in the wall that correspond to the diameter. Speaking about which drill to drill ceramic tiles with, I would like to note:
- carbide crowns;
- circular ballerina drills.
What is better to use - a crown or a ballerina?
There is a special cutting crown, which is coated with diamond. Its cost is quite high, so it’s easier to rent it, especially if you need it for a one-time use. When working with it, try to water the crown as often as possible to cool it and prevent overheating. Also avoid high speeds as this may damage the tool.
In addition, when performing one-time work, you can use cheaper options, for example, a crown with pobedit teeth. The main disadvantage is low wear resistance. After making only 20-30 holes, it becomes no longer suitable. The diameter of the crown can reach 15 centimeters, this is enough even to make a passage for placing a sewer pipe. However, the toothed crown should be used as carefully as possible, without harsh manipulation. But even despite careful work, the hole in the tile and wall will be uneven and chipped, and this is worth taking into account.
Ballerinas are spear-shaped or cylindrical drills, in the shank of which there is a bracket mount, where the spear-shaped drill is also attached. If we move it along the bracket, we can change the size of the diameter of future holes. It is optimal if the middle centering drills are not cylindrical, but hexagonal.
How to avoid splitting tiles when drilling
To calculate the place where the drilling will take place, it is necessary to retreat from the edge of the tile at least 15 millimeters. In this case, the risk of chips and cracks will be minimal.
Before you start drilling into the tiles, you need to soak them in water for about minutes. This is, of course, if the tiles have not yet been laid. The tile will absorb moisture, this will help avoid small chips.
It is also recommended to constantly moisten the drilling site with water; this additional precaution will help avoid splitting and replacing a piece of facing masonry.
The best option is a hole in the seams between the tiles.
General information
Selection of tools and devices
So, what device should you use to make a hole in a ceramic tile? First you should choose the drill itself. The device should not have high speeds or have a shock function (or it should definitely be turned off before starting work), because the work is carried out with extremely fragile material.
Suitable for working with tiles:
- A standard electric drill that will be turned on at minimum speed.
- A low speed screwdriver that can be plugged into an outlet.
- Cordless screwdriver with a rotation speed of no more than 800 revolutions per minute.
- Hand drill.
When the tool is selected, familiarize yourself with the nuances of the work.
Certain nuances of work
To know how to drill a hole in a tile, you should consider important features:
- Never even allow the drill or the tile itself to overheat, as otherwise the top layer may become covered with a “cobweb” and the material will crack.
- In order to cool the working surface, you should regularly wet the drilling area with chilled water.
- Try to correctly determine the pressing force. If you press the drill very lightly, you simply won’t be able to drill a hole, and if you press too hard, the tile will crack.
- When drilling in tiles, never set the reverse mode; only slow rotation of the drill in a clockwise direction is allowed.
- Be very careful at the joints, as the tiles there will not have a protective coating and will begin to crumble easily.
In addition, you should definitely select drills for the tool.
Selection of drills
The science of how to properly make holes in tiles is not very complicated, but there are still certain features, for example, the right glass. If you are at least partially familiar with what construction work is, then you know for sure that drills can be different - for wood, metal, concrete and other materials. So tile drills have their own characteristics. The process is based largely on the friction of abrasives. For this reason, you may find it useful to use a pobedite/diamond drill bit to create holes in tile or porcelain tiles. They are usually shaped like an arrowhead or a crown.
If you are not short on funds, then the best choice would be to purchase consumables (drills) coated with diamond. Of course, they will cost more, but they will work better with ceramic products. Drills, which are shaped like a spear (with a pobedit), are also intended for working on tiles. Due to the special shape of the tip and the unusual angle of the cutting edge, the contact surface is noticeably reduced. It will require less effort from you, which means the tiles will not crack.
How to prepare to drill out tiles
What can make working with the material more difficult? Let's remember how it's done.
Material characteristics
The innovative specifics of the process involve firing at high temperatures.
Also, the material has a high density and has a particularly hard (especially if there is glazing) surface, while it is characterized by specific fragility.
The material does not have plasticity, and due to this, if not handled very carefully, drilling and cutting, it can crack, form chips and even fall apart.
Moreover, the hard surface has an abrasive effect on cutting tools, rendering drills unusable and dull in a short time.
Rules for drilling tiles
Because of this, it is very important to follow a number of specific rules:
- tiles do not like vibration influences,
- tiles are afraid of heavy loads,
- tiles do not like excessively revving modes of drilling tools.
It follows that you need to use special drills made of heavy-duty materials that can easily overcome solid structures. They must also contain a specific sharpening and configuration.
Preparing the tools
What you need to drill out tiles from tiles
without loss?
A good screwdriver with a fairly powerful power source. Sometimes such a tool is completely sufficient. Electric drill with speed control option.
The simplest, already forgotten by some, hand drill . In most cases, it is completely sufficient for making small and not very deep holes. Moreover, there will definitely be no problems with adjusting the rotation speed. In most cases, even a regular brace is used.
Special devices - jigs : they can be used to make the process easier for drilling straight holes. Using suction cups, they are fixed to the surface, preventing the drill, especially at the beginning of work, from moving to the side.
What other tools can you use?
But what to do if there is no crown or ballerina in the house, and the hole needs to be made only once? Purchasing special attachments becomes impractical, so you can use other tools for the job. Let's look at exactly how you can drill through tiles without these attachments.
For example, an electric drill can be replaced with a hand drill. Of course, this will greatly increase the time spent on work, but the quality of the hole made will be higher. The main thing is to control the pressure on the tool and keep it at the right angle.
Working with a ballerina
The sequence of actions is similar to the previous point, but to reduce vibration, it is better to reduce the speed to 400 per minute.
IMPORTANT: the drill must be held strictly at an angle of 90˚ . You can determine whether you are maintaining the correct angle at the moment the cutter touches the surface of the tile. If the cutter strikes only along one edge of the circle, then there is an inclination. And an incorrect angle increases vibration.
Please note that the larger the diameter of the hole drilled by the ballerina, the stronger the vibration will be!