Pit
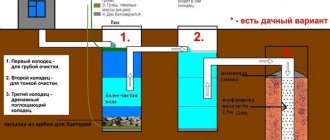
From the point of view of the complexity of installation work, the simplest do-it-yourself well for a well is a pit, which has the following features:
- This is a depression dug around the head to accommodate the shutoff valves.
- Its depth is usually at least one and a half meters, and the walls need to be lined with brick or filled with concrete. In addition, if in the area where the property is located the soil freezes to a great depth, it is advisable to insulate the well body.
- The upper part of the pit can be covered, but this solution will not provide the required tightness.
Its main advantage is that it is possible to build a well for a well with your own hands, using improvised materials. But inside it there is a significant level of humidity, as a result of which it is impossible to install automatic control equipment there, as well as hydraulic accumulators and other devices.
Types of wells
Pit
Depending on the available resources and tasks, it is possible to equip a couple of types of wells.
And the most uncomplicated from an installation standpoint is the pit:
- A well of this type is a recess dug near the well head in which shut-off valves are placed.
- In most cases, the pit is made at least one and a half meters deep, and the walls are lined with brick or filled with concrete.
Advice! If the soil in your climate freezes deep enough, the well pit should be insulated.
- The upper part of the pit can be overlapped, but this does not provide sufficient tightness.
The main advantage of the pit is that it can be made with your own hands using available materials. Along with this, the high level of humidity in the well does not allow placing automatic control units, hydraulic accumulators, etc. there.
Adapter
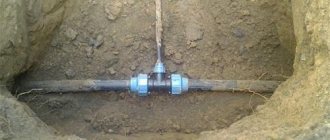
Unlike a pit, an adapter is a structure that is installed on the well casing itself:
- In most cases, the adapter device for the well is made of steel or plastic. The metal option is preferable because it provides excellent tightness.
- The adapter is mounted so that the water pipe is below ground level.
The main advantage of this solution is the low price. But it can only be used if one casing is used for water intake.
In addition, it should be noted that it is possible to equip a well with an adapter only if the well pump is secured to the pipe. Suspension systems are equipped otherwise.
Caisson
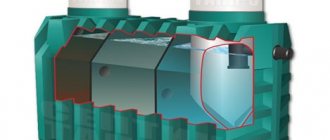
The most ideal type of piping is a caisson-type well:
- A caisson is a sealed container that contains the well head, water pipes, shut-off valves and automation.
- The design of the steam tank is similar to a pit, but it is much more waterproof and has high heat-saving properties.
- Caissons can be bought in special stores or made independently. In the second case, you will save significantly, because plastic and iron containers are quite expensive.
It is the caisson structure of the well that we will focus on as the main option for piping our well.
Adapter
This type of well for a well, compared to a pit, refers to structures that are mounted directly on the casing of the source:
- It is usually made of plastic or steel. The second option is preferable, since it can provide better tightness.
- The housing is mounted so that the water supply pipe is located lower than the ground level.
The main advantage of installing an adapter is its affordable cost. But this option is only permissible if one casing is used for water intake. It is built under the condition that a well pump is installed on a pipe, since suspended systems are created differently. It is important to choose the right pump for the well so that you do not have to change the equipment later.
Types of wells and wells
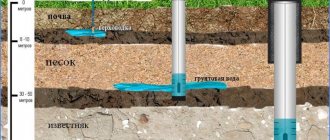
There are several types of wells, differing from each other in depth, and therefore in the quality of the water supplied. Shallow or sandy wells are drilled to a depth of 10 to 50 meters.
If the source is more than 50 meters deep, then it is considered artesian. It is characterized by a limestone layer, and it can only be broken through with special equipment.
Each type has its own drilling method. There are several technology options - rope-impact, perforated, rotary.
If you plan to break through a water source yourself, then manual drilling technology is also used. What you choose depends on the size of the planned burial, the type of soil, and the purpose of using water.
The most common types of water sources are a well, a sand well and an artesian well. They are characterized by their own depth, quality and volume of supplied water. They also differ in the type of soil in which they break through and in their service life.
Main types:
- well;
- on the sand;
- artesian
A well or Abyssinian well does not require special equipment to operate and can be made independently. A metal pipe with a sharp tip and holes in the walls is used.
The tube is driven into the ground to a depth of 8-10 meters. Thanks to the holes on the walls, the pipe is siege-proof and at the same time serves as a filter for the well. The soil type should not be hard.
The advantages of such a well include the ease of manufacturing on your own and the simplicity of the design. However, there are some disadvantages - it is impossible to install an in-depth pump, but only a surface one, due to the small diameter of the pipe.
As a result, it is not possible to provide sufficient water supply pressure. Another disadvantage is the relatively short service life, about 5 years.
Deepening into sand occurs to a level of 15-30 meters. A pipe is installed into the drilled hole, at the end of which a metal mesh made of stainless steel is attached. The mesh is designed to filter pebbles, which are rich in coarse-grained sands.
It is in these layers that the filtration pipe is installed. Such a water source can meet the needs of a country house. With constant use it will last 15 years.
Of course, only an artesian well can cover all water needs and provide the house with crystal clear water. Drilling occurs to the level of calcareous rocks.
Therefore, the depth of artesian water can reach 200 meters. Such a source can provide more than 10 cubic meters of water per hour. Its service life is 50 years.
We install metal-plastic pipes with our own hands: the tools necessary for installation, as well as step-by-step instructions.
Caisson
It is believed that the most advanced type of piping is a caisson well for a well:
- The head, automation, shut-off valves and water pipes are placed inside the sealed container.
- The design of the tank is similar to a pit, but it is distinguished by good water resistance, and, in addition, it has significant heat-saving parameters.
- Caisson wells are sold in specialized shopping centers, but you can also install them yourself. If you choose the second option, then you will be able to save a significant amount, since metal and plastic containers are quite expensive.
Technology for constructing a caisson well
When constructing a well for a well of this type, various materials and products are used:
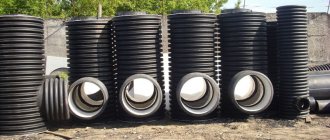
- Plastic cases
. They are the most affordable of all commercially available devices. They are characterized by high strength and tightness. At the same time, plastic walls conduct heat well; for this reason, caissons made of polyvinyl chloride should definitely be thermally insulated. In order to prevent deformation of this type of container, experts advise installing it on a concrete pad with a minimum thickness of 5 centimeters. - Metal cases
. They are made of steel with an anti-corrosion coating; the products have a high degree of mechanical strength and good water resistance. They, like plastic ones, need insulation. The main disadvantage is the high price. In order to ensure the tightness of all joints, it is necessary to weld the lower part of the caisson to the casing pipe, if possible. To prevent moisture from getting onto the walls of the well, you can make concrete blind areas along the perimeter.
Pit preparation
At the initial stage, before making a caisson-type concrete well for a well, they begin to dig a pit:
- To avoid damage to the head, use only hand tools.
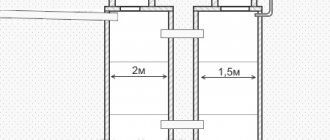
- The minimum size of the structure can be 100x100x100 centimeters, and the maximum - 150x150 centimeters with a depth of 180 - 200 centimeters.
- The parameters of the pit should be larger, since the volume will be partially narrowed due to the thickness of the walls, floor bedding and thermal insulation laid around the perimeter.
- A 20-centimeter layer of gravel-sand mixture is poured onto the bottom of the excavated pit. It is moistened and compacted until it begins to decrease in size.
Then they begin to build the walls.
Do-it-yourself well at the dacha: a guide to arranging a typical well from rings
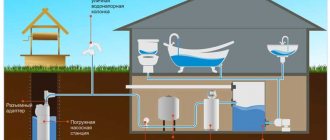
Having your own source of water at your favorite summer cottage will significantly increase the level of comfort. It will eliminate the need to carry buckets of water to care for carefully grown plants or to fill containers in a bathhouse or shower.
The construction of a water intake structure can be entrusted to a team of workers specializing in this field. But it is better to dig and equip a well at your dacha with your own hands, investing a minimum of money in it. We will tell you how to choose a place for a water source, how to drill and equip a working.
- Technology of construction from ready-made rings
Proper preparation – 100% success
Any enterprise requires careful preliminary preparation from the future contractor. Especially something as labor-intensive as digging a well.
Errors in planning, distribution of forces and work stages will certainly affect the result. In the best case, construction will last for a long, but unknown period, in the worst case, it will end with the construction of a useless tunnel “to nowhere.”
Image gallery Photos from Arranging a well in a dacha plot will relieve owners from a lot of problems associated with living outside the city. Well water in a dacha is used for watering plants, cleaning the house and area. Filtered and boiled well water is used in cooking and preparing food for consumption. Water extracted from the well. fill containers in a country bathhouse, inflatable pools, decorative ponds and summer shower tanks An originally designed well house will serve as a spectacular accent in a country landscape picture Water from a well can be extracted in the usual manual way by winding a chain or cable around a gate For mechanized pumping of water from a well, surface pumps are used or submersible vibration units such as Malysh. Dacha water intake sources are used periodically, which is why the wells are filled with silt. This does not happen with wells; they do not require regular pumping and flushing, but you still need to take care of the source. A well in a dacha as a means of solving problems. Providing water for caring for the site and plants. Well water for drinking and cooking. Water for hygiene procedures. A well as an art object in landscape design. method of raising waterPumping water from a well with a pumpAdvantages of building a well in a dachaResearch of an independent hydrogeologist
In order to eliminate the senseless expenditure of funds and muscular effort, it is necessary to conduct preliminary hydrogeological studies.
The best option for exploration is drilling. However, doing it yourself before building a well is at least unwise, and hiring drillers is expensive and unprofitable. It would be better to drill a water well right away.
Independent hydrogeological surveys consist of a banal survey of neighbors who have their own well or well.
You need to find out from them:
- At what depth does the water surface stand during flood and dry periods?
- How many meters were drilled or excavated to construct the water intake structure.
- Doesn’t water tend to “leave” from the water intake shaft if the summer is not pleasant with precipitation for two or three weeks, but is exhausting with heat.
- What kind of soil was extracted from the borehole or well during their development: was it clayey or sandy?
- Have drillers ever had to break a boulder with a chisel, or well builders have had to lift a large, heavy stone from a well?
Traditionally, suburban land plots and summer cottages are located in flat areas without pronounced relief structures. Wells are dug in sedimentary deposits that can be easily mined.
Work is carried out to the first aquifer, trying to bypass and block the high water if it is located at a depth of about 3-4 m from the surface.
Most holiday villages are located in flat areas, which are characterized by almost horizontal occurrence of soil layers. Groundwater in flat areas lies almost at the same level
Underground water, contained by the pores of sedimentary rocks, usually occurs in the form of a kind of pool. According to gravitational regulations and the law of communicating vessels, the surface of this pool is located at almost the same depth at all points.
This means that the geological and hydrogeological situation on your site will be almost the same as that of your neighbor.
Some level deviations are recorded as the groundwater moves. For example, if it is unloaded in the form of a spring in a ravine located 3-5 km from the work site.
Then the level at a point located closer to the spring will be slightly lower than at its distant counterpart. However, these deviations can be neglected when digging a well, because their significance is usually insignificant.
Significant differences in the height of the groundwater level (groundwater level) will occur if the well is built on a hillside. Water will always drain in the direction of easy discharge, which the slope provides it with. Therefore, they try not to build wells on such sites, because natural drainage significantly reduces the volume of produced water.
If there is high water in the work area, the level of which in the spring-autumn period will be on average 3-4 m, it is recommended to block it with a well shaft and reach the underlying aquifer. The level and water abundance of perched water are unstable, the water is most often polluted by domestic wastewater
From neighboring sources, you can determine the depth of the mirror with fairly high accuracy using a barometer. Its scale is marked with divisions of 0.1 mm, which in terms of heights equals 1 m.
So, if above the neighboring excavation the device shows 831.7 mm, and above the point of the planned well 831.5 mm, then the depth of your water intake structure will be 2 m more.
Information about the composition of the soil will help you evaluate your own strength for digging on your own. If neighbors insist that the development is difficult and there are a large number of boulders, it is better to entrust the work to a team of coven workers. You will still have to monitor their actions, which means you need to familiarize yourself with well construction technologies.
The approximate water level in the well planned for construction can be determined by the mirror of a nearby reservoir. The water in the well will be at approximately the same levels
In addition to the “testimony” of the owners of existing water intake structures, organizations that carried out drilling or construction near your site can provide information about the hydrogeological conditions of the area. Information can be provided by the local weather service, which has a complete package of data on climatic conditions, natural phenomena and geological conditions in the region.
How to determine a place to dig a well
For a water intake structure, you must select a suitable location in advance. It is undesirable to arrange it in a place where garden plants have been planted for several decades and the soil has been fertilized with chemical compounds.
Please note that well water is rarely drinkable. If the plans do not include the extraction of the drinking category, then you can ignore the previous cycles of fertilizer application.
Due to the small size of summer cottages, it is difficult to find a place to install a well with drinking water. Due to the insufficient distance from possible groundwater contaminants to the source, it can only be used for cleaning and irrigation (+)
We list the main factors influencing the selection of a site for building a well:
- Elimination of contamination. The distance from places where negative components are likely to be introduced: from domestic and outbuildings, livestock pens, cesspools, compost heaps is at least 20 m. In the case of constructing a well with drinking water, there should be no such objects at all on a summer cottage.
- Reduce costs . The shortest and most direct pipeline route if a water supply system is planned. The shorter the length of the highway, the less money will be spent.
- Optimal location. There should be a minimum of 5 m between the foundation of the dacha and the well. The water intake structure will “draw” groundwater into itself according to the principle of a whirlpool. It will constantly strive to replenish the depleted reserves, attracting not only water, but also soil particles, which will ultimately wash away the soil under the foundation if the well is close.
Vast summer cottages are rare in our realities, so choosing a place in the direction of movement of underground water on the site is strange, to say the least. However, if the ground surface of the plot has a certain slope, then, if possible, it is better to choose a place for the well at the lowest point. There, the thickness of soil to be excavated will be smaller, and the influx of water will be greater.
According to the requirements of SanPiN number 2.1.4.544-96, there must be at least 50 m between the source of drinking water and objects of possible groundwater contamination (cesspools, compost heaps, cattle pens, etc.) Specifics of a typical well design
The maximum depth of a traditional well with a shaft-shaft is considered to be 30 m. Digging below is dangerous, too difficult, and impractical in terms of costs and labor costs. At the dacha, you can make a very shallow well, the height of the shaft will be 6 - 8 m.
Digging a shallow shaft is not difficult; a standard bucket or an inexpensive surface pump will work to extract water. However, the extracted water from shallow workings is applicable exclusively for irrigation and other economic purposes.
A water intake can be made with a shaft 15 - 20 m deep. From such a depth there is a greater likelihood of obtaining drinking water. The chances especially increase if the aquifer is covered by loam or sandy loam - clayey rocks that do not allow water to pass through. They prevent the penetration of atmospheric and flood water along with household wastewater, industrial oils, and chemicals.
The well builder's task is not only to extract soil from the excavation, but also to form the walls of the well shaft. They are constructed from stone, brick, logs, wood plates, timber, monolithic reinforced concrete poured into formwork placed in a pit.
The most common material option for wall construction at the moment is factory-made concrete rings or home-made analogues, poured into a mold right on the work site.
Regardless of the material used to construct the walls of the shaft well, its design includes three main elements: 1 – water intake part, 2 – barrel, head (+)
Regardless of the material used to construct the walls of the well, they are constructed in accordance with a single design scheme. Its main parts are:
- Header. The part of the mine that rises above the earth's surface. The standard height is 0.7 - 0.8 m, but with variations. Equipped with a well house for protection from atmospheric negativity. For manual lifting of water it is equipped with a collar or crane.
- Trunk. The part of the mine measured from the earth's surface to the water surface. Serves to strengthen the walls of the excavation and to protect against ground collapses.
- Water intake part. A section of a mine immersed in an aquifer. The main working element of a well, ensuring the supply of water to the structure and, if necessary, creating a supply.
Apart from the geometric parameters, there are no significant differences in the design of the head and barrel. The width and height vary, and the shape of the shaft in plan: square or round. The main design difference that determines the division of wells into types is determined by the design principle of the water intake part.
Based on differences in the design of the water intake part, wells are divided into:
- Imperfect. The water receiving part of this type is immersed in the water-saturated formation at approximately 70% of the capacity of the water carrier. The mine is not installed on an aquifer, therefore the influx of water into it occurs both through the bottom and through the walls of the water intake part.
- Perfect. The water intake part is completely buried in the aquifer. The base of the mine rests on a water-resistant layer, which is why the influx of water occurs exclusively through the side walls.
- Perfect with a sump. The water intake part rests on a water-resistant layer; water enters the shaft from the side through the walls. The water intake is supplemented with a kind of reservoir formed in the underlying waterproof layer.
The sump is arranged to form a water supply. Consequently, its volume is calculated based on the actual daily consumption. If it is necessary to increase the volume of water that can be pumped out at a time, the sump is arranged in the form of a bell with an expansion towards the base.
The well design is chosen in accordance with the geological situation in the work area, the experience of neighbors in building similar sources and the real need for water of future owners
A survey of neighbors can also help in wisely choosing the optimal well design. A similar imperfect scheme or a perfect scheme supplemented with a sump may suit you. It all depends on your actual water needs.
It should be remembered that well water cannot “stagnate” in the mine. If it stays there for a long time, it will bloom or begin to rot.
If you do not plan to permanently live in a country house with abundant water procedures, then an imperfect design will provide a sufficient amount of water. At the bottom of it, a bottom filter is made of gravel or crushed stone to retain grains of sand.
Gallery of images Photo from If the well's water intake is buried in fine sand, a bottom shield made of aspen, larch or oak is laid on the bottom of the trunk. The bottom shield is constructed by analogy with the lid covering the mouth of the well, but a gap is left between the board elements for the influx of water. On the back side, the shield elements are connected two transverse boards To prevent the wooden shield from floating up, it is loaded with a layer of crushed stone or large pebbles Making a bottom shield Bottom shield from aspen board Option for fastening shield elements Loading a wooden shield in a well Construction of a well from concrete rings
Constructing a water source on a summer cottage is the simplest option that can be done independently. The use of ready-made concrete rings will allow you to dig an excellent well at your dacha with minimal loss of effort and expense, and, if desired, decorate the head with a stone or log.
However, the most economical method will still be the one that involves pouring reinforced concrete well elements yourself.
Image gallery Photo from To construct a well, concrete rings are delivered to the site using lifting equipment. The construction of a well from ready-made rings is most often carried out in two ways: manually and with the help of mechanization. In the first case, the earth is dug up under the lower edge of the ring, it is removed and a concrete shaft is gradually built up. To facilitate the process, a tripod with a block at the top is installed. With its help, buckets filled with soil are pulled out of the mine and rings are installed. If boulders are encountered during the development of the mine, with the help of a tripod they can be removed from the face without any special complications. The second method involves the use of excavator equipment to develop a pit. In the case of water supply construction, trenches are also formed. It is easier to fasten narrow concrete rings in pairs with mounting brackets before immersing them in the pit. During construction, manual fastening is carried out during the construction of the well from the inside. The assembly of the shaft from concrete rings is similarly carried out using lifting equipment. Even an excavator boom can come in handy. After constructing a mine, the space around it is filled with sand or soil extracted during the development of the pit. The upper 0.5 - 1.0 m are equipped with a clay castle Delivery of concrete rings to the site Digging a mine opening by hand Tripod for installing concrete rings Removing a boulder from the opening Development of a pit with an excavator Connecting rings with metal brackets Installing concrete rings in a pit Filling the space around with soil Construction technology from ready-made rings
In the construction of wells from concrete rings, the lowering method is mainly used. Although you can go the other way: install concrete elements in a pre-dug shaft, but the lowering method is more practical and safe. With it, the walls of the shaft are strengthened simultaneously with the extraction of soil, which prevents the collapse of loose rocks into the shaft during operation.
For the construction of a well, both concrete and reinforced concrete rings with a locking chamfer along the end edge are suitable. Note that with equal sizes, the first and second options differ in weight. For example, with the dimensions of a concrete ring Ø 1 m and a height of 0.7 m, the weight will be on average 800 kg. A similar reinforced concrete element will weigh only about 500 kg.
The use of reinforced concrete factory rings is the easiest way and most convenient material for constructing a mine well
In addition, the wall thickness of a concrete ring for constructing a well must be at least 10 cm, preferably 12 cm. And when using reinforced concrete rings, a minimum of 6 cm is allowed, but the average thickness is 7 - 8 cm.
The construction of a well shaft from concrete rings does not require the mandatory use of lifting equipment
The size of the walls is largely reflected in the size of the internal diameter, and this in turn affects the convenience during the development of the mine and the subsequent use of the well.
It is better to construct a well shaft using the lowering method, but you can install them in a pre-dug pit using the technology shown in the diagram
The appropriate diameter of the rings is selected based on the comfortable position of the worker while digging in the mine. On average, this is from 1.0 m to a maximum of 1.5 m. You should not hope that there will be more water in a wide well. If it is imperfect, then the influx will be equal to both the wide and narrow trunk.
In addition to the factory-made concrete rings, you also need to purchase a shoe - a shortened concrete ring equipped with a cutter along the lower edge. It will speed up penetration and ensure smooth immersion of the column of concrete elements into the ground. When constructing a shaft from homemade rings, the lower edge of the starting ring is made in the form of a cone.
A tripod with a block for a rope with a hook attached to its top will help to significantly facilitate the process of lifting soil from a well shaft. Lowering and lifting can be done using a manual winch or an electric winch
If, when digging a neighbor's well, loose sand was extracted, then there is a possibility that the upper part of the trunk would be clamped by collapsed rock. At the same time, the lower part continues to fall, the upper part remains clamped in place, and a gap appears between them, which is extremely difficult to eliminate.
The stepped version of the well shaft arrangement is made of cone-shaped rings, which form stiffening ribs on the outside, and steps on the inside for ascent/descent
The most common method of constructing a well from rings is the lowering method, according to which the trunk is built up from above and immersed in the ground by digging from below.
To avoid such a serious accident, it is better to stock up on a 16 mm rod for making brackets fastening the rings or a strip 5-10 mm thick.
To facilitate the procedure for lifting soil from a mine being developed, it is advisable to make a tripod and attach a block to its top. This makes it easier and faster to free the trunk from the dumped rock.
Concrete or reinforced concrete elements for the construction of a well shaft are purchased in advance, taking into account the height of the neighbors' shaft, or are poured at the construction site
Steps of the lowering method of constructing an imperfect shaft well:
- We mark the outline of the shaft according to the actual sizes of the rings. The simplest marking method is to install a peg in the center with a string tied to it equal to half the diameter of the ring. With this simplified compass we need to outline the boundaries.
- We dig out a round pit according to the markings. It may be slightly wider than the outline to make it easier to immerse the starting ring. We dig to about ¾ of the height of the concrete element.
- We install a shoe with a cutter in the pit and check its position with a level. If necessary, we align the position so that there is no further distortion of the barrel.
- We immerse the starting ring into the shaft. We fasten it to the shoe in four places with staples or metal plates cut from a strip, if there is no confidence that the shoe will not separate from the concrete column when immersed.
- We select the soil inside the shaft without digging it under the shoe.
- We dig four or more cavities under the shoe so that logs, bricks, or similar temporary supports of equal height can fit there.
- We install the supports so that the assembled part of the well rests evenly on them. We control the fit of the barrel with a level and plumb line, so as not to subsequently correct flaws that increase with depth.
- We dig up the remaining areas under the shoe and knock out temporary supports.
- We plant the ring into the ground, trying to maintain uniform immersion.
- We act in accordance with the algorithm described above until the upper edge of the ring is aligned with the day surface.
- We lay a sealant along the chamfer of the installed ring - tarred hemp cord Ø 20 mm. We use a seal for at least three to five lower rings. It is needed in the water intake part and a little higher in case the level rises during the flood period.
- We install the next ring, if necessary, connect it to the previous one in 3 - 4 places around the circumference.
Using this method, we go deeper and increase the rings until water-saturated sand appears. We dig as many meters of shaft into it as the neighbors had. At this time, it will be necessary to constantly pump out water from the excavation so that it does not interfere with the worker.
The diagram shows the process of digging up soil under the cutting shoe of a well trunk step by step
If there is no information on deepening into the aquifer, then after installing at least one concrete element, another simplified reconnaissance must be done.
Before digging up the soil under the trunk, you need to dig something like a hole in the center. If there is only sand and small stones in the pit, then the development of the mine can be continued until the next ring is immersed.
Then exploration is carried out again until the roof of the waterproof layer appears at the bottom of the pit - clayey rock similar to plasticine. This is a signal to stop digging.
Now the work in the mine consists only of installing a bottom filter made of a three-layer gravel backfill. The gravel is poured into three tiers 15–20 cm thick. The fraction of each upper layer should be larger than the lower one.
To prevent shear and displacement of concrete rings, they are connected with bent brackets made of reinforcing bars, welded brackets or metal plates with bolted fastenings (+)
When installing a perfect type of well at a dacha, the shaft should be installed on the roof of a water-resistant layer. Naturally, there is no need to conduct exploration during the digging period. The shaft is simply gradually immersed until it hits the aquiclude.
It should be noted that one or more starting links of a perfect well must allow water to pass through the walls. To do this, semblances of windows are formed in rings in a checkerboard pattern, filled with fine mesh, slag concrete crackers or similar porous materials with filtering capabilities.
The number of rings should be such as to completely cover and slightly exceed the capacity of the water carrier.
Rings with side filters are used not only in the construction of perfect wells, but also in the construction of imperfect structures in layers with low water inflow.
In order to increase the flow of water into imperfect wells with a small flow rate and to install a filtering water receiving part of a perfect well, the starting ring is arranged with perforation. Its function can be performed by peculiar “windows” made of large-porous concrete or holes filled with a fine stainless steel mesh
Before you decide whether to dig a well yourself or invite guest workers, it is worth calculating the amount you will have to pay for digging a well. You can learn more about determining the price of your own source from our recommended article.
Method of making homemade rings
The construction technology is similar to the previous method, but is complicated by the procedure for making concrete rings. To do this, you need to stock up in advance on collapsible formwork from boards or sheet metal interconnected into one sheet.
It is clear that the formwork must be paired: one part must follow the outer surface of the ring, the second the inner one. It is better to select the size and shape of the formwork according to the dimensions of the factory rings.
Image gallery Photo from To make concrete rings yourself, you will need formwork, which can be rented or made from roofing iron. The diameter of the rings is selected based on the installation method. If digging a well will be done manually, then the internal size should be from 1.2 m for ease of work. To prevent the concrete mass from deforming the formwork during hardening, spacers are installed inside - metal rods that provide rigidity. For the manufacture of reinforced concrete rings, reinforcement is installed inside the formwork before pouring. mesh The concrete will require a minimum of 28 days to harden. At this time, the poured formwork should be protected from direct sunlight, excessive moisture and freezing. Within 28 days, the concrete does not harden, but hardens and gains strength. The hardening process occurs from the periphery to the center of the body of the concrete product. After the specified period, the concrete will not harden completely, but will be ready for assembling the well. Formwork for pouring concrete rings can be made from boards, connecting the elements with a metal strip or rubber strips. This formwork can be used many times. The construction of formwork from slats will eliminate the characteristic ribs that form at the joints of the boards in the plank version. In order to make it easier to remove the formwork, it is advisable to lay polyethylene inside it. Using formwork to make rings. Selecting the optimal diameter for concrete rings. Spacer inside the metal formwork. Reinforced mesh for reinforced concrete products. The period of hardening of the concrete element. Dismantling the formwork after hardening. Homemade formwork from a board. Arrangement of formwork for pouring from a lath.
To prepare the solution, you will need Portland cement of a grade of at least 400, river or quarry sand and gravel of fractions 30 - 70. In order for the rings to sink freely into the ground, the walls of the handmade product must be as smooth as possible. Therefore, preference should be given to fine gravel.
To produce rings yourself, you need to develop a formwork design. The optimal proportions of concrete mixture are 1:2.5:4 and/or 1:2:3; CC from 0.5 to 0.7
Water is needed with neutral acidity. Its volume is determined according to VTs graphs, taking into account that the water-cement ratio for filling the elements of the well cannot be less than 0.7. Taking into account the consumption of cement and water, it is possible to calculate the volume of initial components for the manufacture of rings.
It is necessary to think in advance about the type of seam edge of the rings: the butt quarter will be straight or with a beveled wall.
Joining the elements of a concrete shaft will be carried out faster and with greater accuracy if an end chamfer is provided during pouring
To form a rebate during the pouring period, two more ring-shaped parts will be required, one of which must be laid on the bottom of the formwork, the second on top of the pouring. These parts must fit together so that the manufactured well elements can fit tightly together.
At the formwork preparation stage, a decision is made on the use of reinforcement. If a reinforcing frame is used, the consumption of grout for filling will be reduced. It is possible that the cost of the ring will increase slightly, but at the same time the rigidity and strength of the structure will increase.
If you plan to install concrete rings in a pit using construction equipment, you should install mounting loops in the reinforcement frame
The reinforcement is constructed from vertically installed rods and horizontally laid rings from 10 - 12 mm bar. The diameter of the rings should be smaller than the size of the outer part of the assembled formwork, but larger than the inner one, so that the structure fits freely into the gap formed by them.
Between the vertical elements of the reinforcement frame there should be about 25 cm, between the horizontal rings 10 -20 cm. To create a unified system, the reinforcing bars and rings are fastened with knitting wire.
The formwork is filled in layers 100 - 150 mm thick. As the solution is filled, it is compacted until laitance appears on the surface. Tamping must be done; the denser the solution is laid, the higher the strength characteristics of the product.
After laying the mixture into the formwork, care should be taken to ensure that it hardens correctly. For the first 10 days, the ring must be protected from possible freezing and drying out. The surface should be periodically moistened or covered with damp sawdust.
Having completed the construction of the shaft, you should equip the well head and build a clay castle - a ring of crumpled compacted clay. The width of the castle is 0.5 m, its depth is from 1.0 to 1.5 m (+)
The starting ring is made with a lower cutting edge. If you don’t want to bother with the edge device, you can buy or fill the shoe separately. The formation of filter windows in the walls of concrete rings, as in the previous case, depends on the structural type of the well. The technology for constructing a mine from homemade rings is no different at all.
Image galleryPhoto from A variety of techniques are used in finishing the concrete ring that serves as a well head. For example, covering with slats or boards. Finishing the head is easy to do with your own hands. For this, it is important to select a binding composition that is compatible with the concrete base and the material being mounted. All possible materials are used for cladding that imitate natural stone or brickwork. The stylization of a log or timber frame, made only for the above-ground part of a shaft well, looks great. Covering the well head with boards. Finishing the head with your own hands. Decorative cladding tilesInstallation of decorative log house
Having completed the work on constructing a well shaft, you can safely begin arranging your own source. At the bottom of an imperfect structure, the trunk of which is buried in the aquifer, but does not rest on water-resistant rock, a bottom filter should be built.
The bottom of an imperfect type well should be equipped with a bottom filter. It is filled with three layers of rocks with good filtration properties. The first layer is about 10 cm of sand, then 15 cm of fine gravel and on top of larger gravel (+)
A clay castle should be placed around the trunk to protect against household waste from entering the shaft. The head must be equipped with at least a lid or canopy and a device for lifting well water.
Don’t forget that in addition to digging your own water source, its owner will also have to carry out regular maintenance. This article is devoted to the methods, rules and frequency of cleaning a well.
Conclusions and useful video on the topic
Video #1. How to choose the best place to install a well in a suburban area:
Video #2. An example of a self-digging mine well:
Video #3. A video with a step-by-step demonstration of the process of constructing a mine well yourself:
Building your own well is not an easy, but completely doable task, which a home craftsman can easily solve without the involvement of hired workers. True, he will need at least two assistants to extract soil to the surface and to monitor the condition of the worker at the bottom of the mine.
In case of dizziness, it is necessary to immediately raise it to the surface, and before work, regularly check the gas content with a burning candle or gas analyzer.
Would you like to tell us how you installed a well on your own summer cottage? Do you have any questions about the topic of the article, or have you found any controversial points in the information? Please comment in the block below, leave posts with your opinion and photos on the topic.
Source sovet-ingenera.com
Creating well walls for a well
The instructions describing the construction of the walls of a caisson well with a well provide for the step-by-step execution of the work:
- All surfaces are covered with dense polyethylene. Thanks to this, a waterproofing contour is created that provides protection from moisture to the equipment located in the caisson.
- Having stepped back 5 centimeters from the grid, they begin to install the reinforcement strapping, which is a lattice whose cell dimensions are about 20 - 25 centimeters.
- For reinforcement, use a rod with a thickness of at least 5 millimeters.
- Then the formwork is installed using beams and boards. Since the walls should be quite thick, it is necessary to provide space for spacers that will protect the structure being created from being squeezed out by the concrete mass.
- To prevent the solution from leaking, the inside of the formwork is lined with polyethylene, attaching it to the beams and boards using a construction stapler.
- The concrete mixture is poured and processed using a vibration compactor, allowed to dry completely, which takes almost 4 weeks. On the 10th day it is allowed to dismantle the board panels.
- When the walls are completely dry, holes are made in them with a hammer drill in the places where pipes are planned to be installed. To prevent damage, they are placed in special metal sleeves when laying. The gap between the edge of the hole in the walls and the sleeve is sealed with self-expanding foam.
An alternative to concrete walls is brickwork or reinforced concrete rings. But in the second case, increased attention must be paid to sealing the seams.
Floor installation
When constructing a well above a well, a particularly important point is the correct installation of the ceiling, for which:
- A monolithic reinforced belt is made on the walls in the upper part, into which a reinforcing mesh is laid, and concrete mortar is poured into the formwork approximately 15 centimeters high.
- Boards with a thickness of 30 millimeters or more are placed on the contour, maintaining a minimum gap, while leaving space for the hatch.
- To ensure waterproofing, the boards are covered with polyethylene, secured with metal brackets.
- Formwork is built along the edge of the hatch and along the perimeter of the well and concrete is poured there, the mixture is leveled and left to dry. To ensure that the surface slowly loses moisture and the cement becomes as strong as possible, the well cover is covered with polyethylene. From time to time it is raised to moisten the concrete floor.
After the filling has dried, a hatch is installed in the hole. A steel corner is attached along its perimeter, and the lid is hung on hinges. To insulate it from the inside, polystyrene foam or polystyrene foam is used.
How to find the right place
When determining a site for digging, you should study the surrounding area. You can find out from neighbors who have already carried out this kind of work. Naturally, if wells have already been installed near your site, then there is a high probability of finding suitable water on your land.
It should be remembered that clay and sandstone layers have the highest degree of water content.
You can only reliably confirm the presence of water by drilling. But this method is expensive. Therefore, they use indirect methods. A well in a dacha can be placed where:
- there is a large accumulation of moss on the ground, and there are a lot of midges and mosquitoes in the air;
- green spaces are concentrated even during periods of drought;
- flooding of basements is observed;
- There are frequent fogs when there are no bodies of water nearby.
Dowsing will also help you. To do this, take two brass sticks. The length should be about 500 mm, and the diameter should be 2-3 mm. They are bent at an angle of 90 degrees, but so that one end is 100 mm. They walk around the site with these sticks in their hands. If there is an aquifer, they intersect.
The nuances of installing factory structures
If you purchase a steel or plastic well made in a factory, the task of making a well for a well becomes much easier.
In this case, it is important to correctly install the purchased structure so that it provides reliable protection for the equipment that services the well:
- First, a pit is prepared, the dimensions of which must exceed the dimensions of the body by at least 30 centimeters.
- A gravel-sand “pillow” is made at the bottom of the pit. When the structure is plastic, a concrete screed with a thickness of at least 5 centimeters is poured over the embankment.
- A hole is made in the bottom of the well for installation of the casing pipe.
- The body is placed in a pit so that its neck is located 10 centimeters above the ground level. This will protect the well from surface runoff.
- The place where the casing pipe is connected to the well is sealed, for which you can use special sleeves welded to the bottom of the well.
- To level the caisson when installing it in a pit, beams are used. It is sprinkled with clay along the perimeter and compacted, creating effective waterproofing. To reduce heat loss, you can sprinkle it with expanded clay.
- Pipes and cables located in casings are placed in the technological openings of the walls and all connections are sealed.
- The pit is covered with soil.
- Install the well cover.
If desired, a narrow concrete belt is poured around the perimeter, which will protect the walls from moisture penetration and thereby significantly extend the life of the structure.
Tips and tricks
- Among other selection criteria, it is worth considering the location of the hydraulic part. In the case of choosing a caisson, the hydraulic bridles are located in the house or in a container outside. When installing the adapter, there will be no space next to the well; additional equipment will have to be installed inside the house. To do this, you will have to exclude at least about a meter of usable area. Experts, by the way, recommend this placement for year-round wells. It is more convenient to maintain equipment located in the house - warm and dry. It is also believed that equipment will last longer with such placement.
- If people live in the house seasonally, the equipment can also be placed inside, but in this case an underground caisson is placed. Because during the period when the house is empty, the water in the well may freeze, but the caisson will maintain a positive temperature. At the same time, inside the country house itself, it is necessary to drain the water from the system pipes.
- If the soil in the area is problematic, then it is advisable to protect the water pipe with a special casing. The electrical cable is also placed in a HDPE protective pipe. It is better to connect hydraulic equipment to the system through special valves. Demountable connections are more convenient to maintain and replace if broken.
- Regardless of the selected type of equipment, the connection diagram must include a check valve, which is installed after the pump. Please note that the coarse filter is installed in front of the hydraulic accumulator tank. During the operation of the well, it is important to carefully monitor the pressure level of the pneumatic device of the membrane tank.
- You need to check it every month, and if necessary, pump it up with a compressor. In conclusion, it should be noted that when installing water wells yourself, it is worth understanding the process of mining, which is regulated by law.
- In many cases, registration of a newly created well is impossible without obtaining a license. Responsibility for violation includes a fine. Individuals will have to pay up to 5 thousand for violating this norm, and legal entities – up to 100 thousand rubles.
- Without registration and obtaining a drilling license, it is possible to extract resources from formations not used for centralized water supply systems. If no more than 100 cubic meters are taken from the well. If water is taken for one’s own needs and does not involve entrepreneurial activity.