Decorative finishing of facades allows not only to improve the external appearance of the house, but also performs protective functions. There are a lot of materials for outdoors. Which one to use depends on the taste of the owners and their financial capabilities; on sale there are categories for every budget. One of the materials that dates back more than one century, but is no less relevant, is plastic. She is also a “wild” stone, she is also sandstone, limestone. And how to choose it, prepare what and how to veneer it so that it doesn’t fall off, FORUMHOUSE participants will tell you.
A little theory
Plastushka is a flat natural stone, essentially pressed quartz sand with the addition of rocks and limestone. The color range varies from white and light yellow to cherry, but most often all shades of gray-green are found. The average thickness of the tiles is from 1 to 4.5 cm. For facade work, a plaster of 2 cm is used; if it is thinner, it will “play” and is not strong enough, while a thick one is too heavy. And for paving pedestrian and driveway paths, the thickest one is chosen. If installed correctly, it will even support a truck.
The cladding is made from smooth plastic, with natural relief, or from processed material - “torn stone” (with chips). Both options look impressive, but chipping is more expensive.
What are the specific features of garden paths made of flat stones?
The idea of building a stylish and original path made of plastic in the garden is to the liking of land owners who prefer natural landscape designs. Besides their aesthetic appearance, these trails have other positive qualities. Among them:
— the need for small capital costs for construction; — durability guaranteed by the excellent strength characteristics of the stone; - texture and unusual texture of the paste; — minimal labor intensity of work due to the ease of processing and cutting stone with an ordinary grinder; — resistance of the path to environmental influences, temperature changes and humidity; - excellent functionality and practicality.
Application options
Although many people believe that only the base is finished with plastic, this is wrong. This decorative and durable material is universal.
- Facade decoration is rare, but it looks amazing.
- Zonal finishing - window and door openings, corners. A common option, the main thing is to choose the right basic finish.
- Formwork and walkways look nicer than bare cement and will last longer.
- Columns - under a canopy, in a gazebo.
- A patio is a popular element of modern yard design.
- Barbecue area - decorative elements are also lined when the fireplace is large, and the area in front of the grill is lined. If the barbecue is combined with a covered gazebo, the plastushka is placed on racks and along the fence.
- Elements of landscape design - flower beds, alpine slides, pavements, benches.
- Fences – both posts and main fences.
The stone goes well with brickwork and wood, with decorative plasters and clinker. A typical siding facade, shaded with a stone plinth, will look more advantageous.
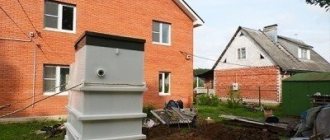
Forum member Candy, from Moscow, combined a plastic sheet with a brick.
CandyFORUMHOUSE participant
The walls are made of facing bricks, golden-straw color. The sandstone on the base is light green. So that there is no upper edge - the base will merge in level with the wall - they were removed with a plastic sheet. We chose a stone with a torn edge; it looks better than edged stone with brick.
Laying plasters on a concrete base
» Articles » Laying plasters on a concrete base
Considering how the plasterboard is laid, it should be noted that this finishing material is considered the optimal solution in terms of price and quality for lining garden paths in summer cottages.
It is used when it is necessary to enhance the effect of solitude with nature and emphasize the naturalness of the landscape.
Plaster laying technology
After the cement has completely set, you can proceed directly to finishing activities.
First, the stone is installed using a dry method, that is, without the use of an adhesive solution.
You should start laying the plaster from the center of the path.
The largest element is installed in this place, and from there the rest of the stones will be adjusted.
The central stone should not only be the largest, but also the most beautiful.
:
Sandstone should be selected in such a way that the installation joints between adjacent slabs are minimal.
After all the stones are laid, it is recommended to label them with chalk so as not to get confused about where each element should be.
Many craftsmen recommend indicating the number of the adjacent tile with which it will be joined (for example, 5/6, 3/7, etc.).
To glue a stone to a concrete base, you need to use a special glue for natural stones, which is quite expensive.
Therefore, to reduce its consumption, first the glue is diluted to a liquid consistency, and then cement and sand are added to it.
In order for the path finished with stone to be beautiful and reliable, the adhesive solution should be applied evenly over the entire joining area of the facing material.
At the same time, the presence of air bubbles is not strictly prohibited, since they can affect the strength of the entire structure.
After applying the solution, the stone can be placed in its place with little pressure.
Excess glue that comes out is removed with a spatula.
If any element has a smaller height, then it can be adjusted using the same glue.
To do this, you just need to apply it to the tile with a large ball.
To ensure a tighter fit of adjacent stones, they are tapped with a rubber hammer.
After completing the facing activities, it is necessary to let the glue set.
The track may be used no earlier than two days after its registration.
After the set period has expired, the laid stone can be washed.
If you want to get a “wet” effect, then treat the path with polyurethane-based varnish.
A properly laid path will serve you for many years.
Plastushka is not afraid of either cold or moisture, so this coating can be used all year round.
stoydiz.ru
Plastushka stone: laying paths with your own hands
Irregularly shaped paving and paving slabs made from a variety of sandstone and composed of dolomite, quartzite and slate are called “plastka” or “wild stone”.
These dry slabs are usually gray-green in color. Less common is red, yellow or white. The thickness of the tiles varies from 10 to 50 mm, however, it is not recommended to use material thinner than 20 mm for paving due to the insufficient strength of the resulting paving surface.
The popularity of plaster is easily explained by its affordable price and original appearance, which can emphasize the natural design of garden paths, as well as small areas. This natural stone is sold in both processed and unprocessed forms, but, in any case, it is easily adjusted to the required size and configuration using a grinder with a diamond wheel.
Advantages and disadvantages of the material
The positive qualities of sandstone tiles include:
- sufficient strength for arranging paths;
- original appearance of the paved surface;
- environmental safety;
- long service life;
- high levels of frost resistance and resistance to changes in outside temperature.
The main disadvantages of the plasterboard are the need to use more complex laying technology and the impossibility of using it in places with increased weight load. For example, in parking areas or for paving the driveway to the house.
Materials and tools
To pave a walkway covered with natural stone, you will need the following materials:
- plasticine;
- cement grade PC400;
- river or washed sand;
- fine gravel or crushed stone;
- geotextiles;
- adhesive mixture for tiles.
Tools required to complete the work:
- tape measure 5 meters long;
- cord;
- building level;
- bayonet and shovel shovels;
- plaster rule;
- rubber hammer;
- set of spatulas.
Source: https://vest-beton.ru/stati/ukladka-plastushki-na-betonnoe-osnovanie.html
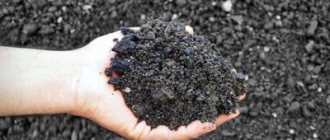
Preparing the stone
The plaster has a layered structure, and there may be dust and earth on the surface; the stone needs to be processed before work. It’s easier to spend an extra couple of days on preparation than to reposition it when it falls off. Preparation is gradual.
- Fill it with water for a day - either pour it into a container with a stone, or lower it into a container with water.
- Clean the dirt with a metal brush and remove all flaking parts with a spatula or trowel.
- Lay out to dry.
Some people advise simply shaking off sand and dust, but this is not enough. The stone swells in water; what comes off after treatment will otherwise peel off from the wall.
But the plastic won’t take on any extra, it’s porous – only the outer layer. In addition, salts will come out.
Tumbled plastic is for sale, it is already machine sanded, with a rounded edge. But such pleasure costs several times more than usual and not everyone can afford it.
If you plan to lay out patterns, you should lay out the material in advance and select it by color, thickness, and shape. However, the sandstone itself is beautiful; even without patterns, it produces an interesting texture.
What tools and materials to arm yourself with?
Laying the plasterboard will be crowned with success and will not take much time only if you have all the necessary tools. Remember the components of the standard set:
Tools for laying plasterboard
- pegs and long ropes/laces (for marking);
- electric cutting machine or “grinder”;
- cutting wheels intended for stones;
- rubber hammer;
- level;
- rule;
- pick;
- shovel;
- hard brush for applying glue;
- spatulas of different sizes.
The robot will also need simple materials:
- sand;
- medium-sized crushed stone;
- cement;
- glue for natural stone.
Preparing the base
Regardless of whether it is a wall or a plinth, the base must be strong, clean, and always primed.
Some recommend mixtures such as “Concrete-Contact” containing abrasive, but this is a waste of money. What is important is the adhesion of the glue to the surface, that is, its penetration, and not the roughness that such a primer gives. It is worth choosing a concentrate with antiseptic additives, deep penetration.
Under a sheet thicker than 3 cm, a reinforced layer is made - a mesh, on dowels. It can be mounted directly on brick, without plaster. When the base is plastered and the sheet is thinner than 3 cm, you can do without a mesh, but the wall should be as smooth as possible. If the base is a layer of insulation or an OSB board, reinforcement is required.
Types of stone used for paving in the yard
Craftsmen consider flagstone to be the ideal material for paving a yard, every detail of which is torn and unedged. Typically the following types of stone are used:
- sandstone;
- quartzite;
- shungite;
- dolomite;
- quartzite sandstone;
- siltstone shale;
- limestone that has undergone special treatment.
Flagstone is usually laid on a mortar made from special glue, very fine sand and high-quality cement.
Many enterprises specializing in the creation of building materials offer the purchase of identical, evenly sawn stones, and of a wide variety of types. They are usually laid on sand, dry mix or concrete.
What to plant on
In order to obtain sufficient adhesion to the base, and after several cycles the cladding does not crumble, it is better not to skimp on the solution. An ordinary sand-cement mixture will not hold the stone; glue is specially produced for it. Different manufacturers have their own numbering, but the general category of such tile adhesive is “Granite”. It is designed for increased load, frost-resistant, and has greater permeability. It is more convenient to work with glue: the layer is thinner, the solution is more elastic and does not shrink for a long time. During the time before setting, it is possible to adjust the position of the stone.
However, you should prepare in advance for high consumption, the plastic literally sucks up the composition. The consumption indicated on the bags can be safely multiplied by two, or even three, depending on the basis. This is confirmed by forum users.
TatianaCherFORUMHOUSE participant
The glue consumption was monstrous; 15 bags were needed for 30 squares. But the result pleased me more than the costs upset me. Everything is fine, not a single stone has fallen off in two winters. I don’t regret that we didn’t mix the glue with the cement.
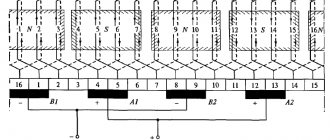
Technology for creating a “sketch” from clay
Wild stone laying scheme
Laying plasterboard with your own hands will be a little more difficult than paving slabs, but the result of the labor is worth the effort. It is most convenient to first lay out the tiles without glue, and only then glue them. While laying out, you can shape the stones using an electric machine.
Laying begins with the “central” stone: in the center of the future path you need to lay the largest and most beautiful tile, to which the rest will be attached using glue. It is important to choose the optimal thickness of the “central” plate, since other elements will correspond to it. For the first stone, you need to choose such that there is a minimum gap at the joints formed after laying.
Useful advice! Label the stones with chalk (for example, numbers 1,2,3), indicating which stone to settle after the previous one (you can use this designation option - 3/5, 7/9). This will avoid mistakes during installation, and will also save time, and the glue will not dry out before installation.
Job
The glue is mixed with a mixer and applied to the paste with a spatula-comb in a thin layer. For compaction and finishing, use a rubber hammer. The seams are sealed with a special gun or homemade devices. Please note: the stone instantly absorbs the solution and gets dirty. If you wash it, stains remain.
Sandstone is cut with a grinder; a diamond disc can handle any thickness. You need to work with glasses and away from the object, dust flies several meters.
A contrasting seam looks better than gray. The adhesive can be tinted with construction carbon black or dyes to match the finishing materials. There should be a few millimeters between the segments for thermal expansion. If placed end to end, the tiles will push each other out. A wide, even seam looks beautiful.
The top is covered with plastic sheeting at an angle or a special ebb is installed. As an option - a smooth, thick glue seam. To make it perfect, the level can be marked with a string and taped with construction tape. After the break it will be like following a ruler.
Tiling and finishing work
While the concrete base is curing, the natural stone can be prepared for installation. To do this, the plaster is laid out near the trench and the individual elements are adjusted to each other. Cutting sandstone is done with a grinder and a diamond wheel.
Thicker and larger stones are placed closer to the middle of the garden path, and thin and small stones are placed along the edges. This will provide better coating strength and the ability to install small slopes for rain and melt water drainage. To avoid errors, it is recommended to number the tiles after preliminary adjustment.
After the concrete mixture has set, the plaster is glued to the base. This is done using a special tile adhesive. Considering the high cost of the material, cement and sand can be added to it when mixing. A layer of adhesive is applied to the surface in an even layer, and when laying tiles, the surface level is leveled by tapping with a rubber hammer. Protruding excess adhesive mixture is removed with a spatula.
Protection
After laying, sandstone must be treated with a protective agent. This can be a shiny or glossy varnish, stone impregnation or water repellent. The treated stone becomes moisture resistant, will not become covered with fungus or mold, and dirt will be easy to wash off. And the resulting “wet stone” effect significantly increases decorativeness.
Bosy047FORUMHOUSE Member
I decided to see what it would look like. I wetted one half with water and left the other half dry. There is no doubt left: in a week, as soon as it dries, I will treat everything with a water repellent.
Types of stone placement in the yard
Currently, laying stone in the yard is carried out in three ways:
With a row laying system, stones are usually laid “in a staggered manner”, filling the gaps between them with crushed stone or soil, which is then sown with grass seeds.
Wild stone is usually laid in scaly-arc-shaped or segment-arc-shaped patterns. At the same time, the master always makes sure that he gets a complete picture of the surface being created, which is not only practical, but also aesthetically pleasing.
With a row, they usually lay wild stones in the yard “in a staggered manner,” while filling the gaps between them with crushed stone or soil, which is then sown with grass seeds.
Free-form masonry involves laying stones at your own discretion. However, it is mainly those who have been paving their yards with wild stones who succeed in creating a beautiful and smooth surface.
Conclusion
Plastushka is an original, natural finishing material. It is durable, looks good, and goes with any decor. If the technology is followed, the facade will serve for decades without needing renovation or restoration.
Forum members share the secrets of the technology in the topic of natural stone on the facade, and cladding with Dagestan stone is now at the peak of popularity. For fans of siding - a video about the features of selection and installation.
Subscribe to our Telegram channelExclusive posts every week
Advantages of flat tiles
This finishing material is in great demand among owners of personal plots. The advantages of this stone include:
— ease of processing (if you use a grinder);
- low cost;
— natural and environmentally friendly material;
— practicality;
— resistance to influences (mechanical, chemical, etc.)
- high strength.
Laying process
We will lay the stone using a special mortar - grouting. This is a dry mortar with a very high sand content. The “flatbread” of prawns should be small. It should always be smaller than a tile of stone. If you look at the stone and the prance from the side, they should resemble a mushroom with a thin stem and a wide cap. The seams between the stones should not be too large. 0.5-3 cm is enough.
When the main part of the plaster is laid, you need to make the correct slope. This is necessary so that during rain there are no puddles on the path and water flows down the edges. The whole difficulty of this stage of work is to visually make the path look even, but, in fact, its top should be the highest part, and the edges should gradually lower.
The joints need to be filled using a solution that builders call “cement milk.” This is a mixture of a very liquid cement solution with PVA glue, brought to the consistency of cow's milk. You need to pour this substance into the seams using an ordinary watering can.
How does a rocky flower bed differ from a rock garden and rock garden?
Firstly, to make stone borders for flower beds, you do not need to carefully select the material as, for example, for an alpine slide. A flowerbed made of stones has little in common with a large-scale rock garden structure, which in its essence should correspond as closely as possible to the natural topography of the mountains and contain plant varieties with a well-developed root system. In an ordinary flower bed decorated with stones, the choice of plants is not so important.
A separate similarity can be found with rock gardens. But again, in a rock garden bed, minerals are used in different sizes and laid out naturally and asymmetrically. And simple round, rectangular or square flower beds in a country house made of cobblestones or bricks are laid in exactly one to ten layers, depending on the desired height.
Stone flower beds at the dacha
DIY stone flowerbed - ideas for creating beautiful flower beds
DIY diagram of a flowerbed made of stones
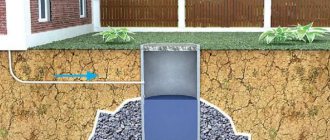
Drainage layer arrangement
The drainage layer of garden paths is necessary to remove moisture coming from rain, melt and groundwater. To install it, a trench 30-35 cm deep is dug across the entire width of the future covering. The bottom of the trench must be compacted and lined with geotextiles. This is necessary in order to prevent the germination of weeds and to ensure the possibility of reliable drainage of moisture into the soil.
Scheme of a plastic track.
On top of the canvas is sprinkled with a small amount of sand and a layer of crushed stone 15-20 cm thick. The crushed stone is covered with another layer of non-woven textile so that the concrete does not mix with the drainage layer when pouring.