Requirements for the installation of a drainage pipe
Drainage is widely used in areas with high groundwater levels.
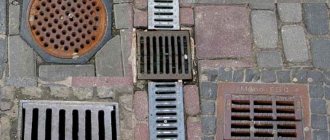
Drains are installed below the groundwater level. The material of the product itself must be durable, stable and smooth. The liquid must pass easily through the pipes under high pressure. To reduce the possibility of the influence of precipitation, the system is equipped with storm water inlets. In this case, the drains have a surface installation. Next, the system is connected to a common liquid drainage channel.
You should not buy drainage pipes that are too cheap, as they can quickly fail
Requirements for drainage pipes:
- Low temperature resistance;
- Maximum smoothness of the inner walls.
Soil drainage on a site can be closed, immersed in the ground, or open, which is a network of open grooves.
In the first case, the system is designed to drain groundwater if it floods the area. In the second, drainage ensures a decrease in soil moisture during the flood and rainy season.
Both types of systems can be designed and installed in-house.
When purchasing a plot, owners often have no idea about the hydrogeological features of the area. If the soil is too wet and there is prolonged stagnation of water on the surface, you should select the correct drainage scheme ( )
Systems of the first type require careful design; when installing them, it is necessary to strictly adhere to the laying technology and the slope angle of the drainage pipes.
Linear options become necessary if you need to drain areas around buildings, paths, entrances, improve the surrounding area, or remove excess moisture from the garden.
Such drains are shallow ditches into which water flows and then moves to special receiving tanks, storm drains, or to a discharge point off-site.
The choice and features of installation of elements of drainage systems depend on the expected load on the system: soil density, the amount of water that enters the drains. If the load is too great, you should choose structures made from the most durable materials
Through the indicated drainage channels, the collected water is discharged in the same way into a collector well and then into an absorption well, drainage ditch or pond. Therefore, work on installing systems with point water intakes is not much different from systems with linear options.
Open systems are very simple to implement and cheap, but they spoil the landscape with an unaesthetic appearance. Another disadvantage is that the walls of the ditches have to be constantly adjusted, because they crumble under the influence of moisture, and the system ceases to perform its functions (water stagnates at the bottom of the trenches and does not move to the discharge point).
When planning drainage, you should decide on the type of system. You need to consider whether it will be open or closed. In the first case, ditches with slanted walls are dug to facilitate water drainage. The width of such a trench is usually 0.5 m, and it is dug to a depth of 0.7 m ( )
To solve the problem of crumbling ditch walls, you can use the crushed stone filling method: coarse material is placed on the bottom, and fine material is placed on top, after which the entire drainage pad is covered with turf.
This option allows you not to trim or strengthen the walls of the trenches, but it is suitable for areas with relatively low humidity, because The capacity of the ditch is greatly reduced.
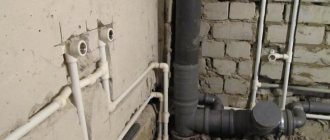
To arrange a drainage system around the house, special perforated pipes are used - drains, laid to the depth of the foundation. They are placed in pre-formed ditches and covered with material with excellent filtering properties, gravel, small crushed stone or GPS.
To monitor the operation of the system and carry out periodic cleaning, inspection wells are installed. They are located at each turn and every 20-25 m of the linear route of the drainage pipeline.
Installation of foundation wall drainage around the building
It is easy to erect during the construction of the building, much later. The same ring drainage, but placed along the base. The latter becomes the second wall of the trench. The main part of the work begins with it after digging the trench. The base, the exposed foundation, is thoroughly cleaned of dirt, first covered with 2-3 layers of bitumen primer, and after drying - with bitumen mastic. Apply in 2-3 layers, reinforcing with fine-mesh plastic mesh.
The outer wall is made inclined. Specific dimensions depend on the depth of the drainage trench. In the diagrams below, the photo depth is 160 cm (optimal for central Russia).
A sand cushion is formed and carefully compacted at the bottom. Geotextile sheets are laid on top. Coarse crushed stone is poured onto the latter. Drains are laid with a slope towards the collection well. Fine crushed stone is poured on top and wrapped in geotextiles. The trench is filled with sand and part of the excavated soil.
The drainage system and rainwater drainage pipes must not be combined. It will disable the drainage and turn it into a foundation destroyer.
You can make a blind area above the wall drainage - it will increase the degree of protection from moisture and make the drainage system more efficient.
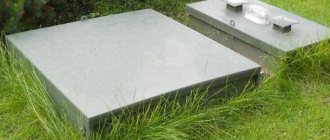
Backfilling drainage pipes with gravel
Pipeline installation at industrial facilities
When developing the pipeline layout, pipeline routes, methods for compensating for thermal elongations, places and types of fastenings, location of valves, types and locations of drives to valves, pipeline slopes, places for condensate and air removal, drainage system, locations and sizes of valve and pipeline service areas are outlined.
fragment of the thermal power plant layout
A well-executed layout should provide:
- Ease of installation, maintenance and repair of the pipeline
- Good compensation of thermal expansion
- Minimum hydraulic resistance
- Lightest pipeline weight
- Simplicity and convenience of fastenings
- Good drainage
- Uniformity of nodes
- Maximum use of parts manufactured according to standards and norms
- Possibility of expanding the station without alterations of pipelines, with minimal shutdowns of installed units for connecting newly installed pipelines.
Meeting the full amount of these requirements in some cases turns out to be difficult.
The designer’s task is to develop a layout solution that best satisfies all the stated conditions.
Steam pipelines with a steam temperature of 450 C or higher, requiring periodic monitoring of the metal creep rate, must be laid in places accessible to constant observation.
The main routes of such pipelines should be located on the floors of the building.
For sections of such steam pipelines located at a high altitude above the ceilings (for example, from the boiler steam shut-off valve to the columns of the boiler room building), maintenance areas must be provided.
The fittings should be located in places convenient for operational operations:
- Opening and closing shut-off valves
- Inspection and repair
the fittings are located on the deaerator service area
The most desirable arrangement of the reinforcement is such that it is accessible from the main working floors of the building.
When the valves are located in places that exclude the possibility of direct maintenance from the main operating elevations, drives for remote control of the valves must be provided, with the installation of control columns in places convenient for operating personnel.
Sites must be provided for inspection and repair of such fittings.
Above the locations of heavy reinforcement, provisions must be made for suspending hoists.
The route should be convenient for installation in enlarged blocks.
The pipeline route must provide sufficient flexibility so that the self-compensation stresses, as well as the forces and moments transmitted by the pipelines, do not exceed the permissible ones.
First of all, the flexibility of the pipeline should be used when laying along its natural route. Resorting to artificially increasing the flexibility of the pipeline by inserting U-shaped expansion joints, including additional turns and lengthening the arms should only be done in cases where, with the best arrangement of fixed supports, it is not possible to compensate for the thermal elongations of the pipeline laid along its natural route.
It should be taken into account that an artificial increase in flexibility entails an increase in weight and cost of the pipeline and increases hydraulic losses.
For low pressure pipelines, compensation of temperature expansions can be solved by using lens compensators.
Kinds
Let's look at different types of drainage. First of all, drainage can be open or closed.
Open drainage system
This system includes ditches and French drainage.
Ditches
The simplest type - ditches - is not suitable for all soils, but for clay and loam that is slowly permeable to water. This system eliminates surface water. If the plot is on a slope and the house is in the middle, then it is advisable to draw a ditch over the house perpendicular to the slope - this way you will reduce the amount of moisture near the foundation. Open drainage is easier to construct in areas with a slope - or you need to carefully check the change in the depth of the ditches, and this is problematic.
Ditches with a depth of 50–70 centimeters and a width of about 50 centimeters can be located throughout the entire area in a “Christmas tree” pattern (in cases of uniform flooding of the entire area), along the perimeter or locally in especially flooded areas. In the case of a tree-like structure, the central ditch is deeper than the side ditch and goes deeper towards the drain. The ditches should have shallow edges (about 30) to prevent them from crumbling, and the shape can be either trapezoidal (with a flat bottom) or V-shaped.
Ditches can be designed in different ways.
- Cover them with geofabric and pour fine drainage material there - crushed stone, pebbles, expanded clay - not to the top; but geotextiles on the edges of the ditch must be masked with turf or earth.
- Cover them with geofabric or do without it, filling the ditch to the top with crushed stone.
- Cover with geofabric and cover with large drainage material - for example, pebbles.
- You can do without geofabric.
- As a last resort, do without everything at all.
The ditches of linear open drainage (“tree”) are connected by a deeper “trunk” and close on the ditch at the lowest point of the site, approaching the drain.
The arrangement of the ditches is a “Christmas tree”, which closes onto the main ditch leading to the drain
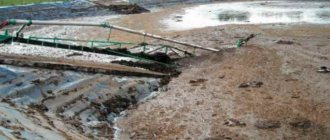
The main disadvantage of an open system is the need to distribute the excavated infertile soil somewhere. Ditches take up space for planting, do not at all decorate the area, and require constant care and cleaning.
French drain
This is a simple and beautiful structure in the landscape sense - a “stone pond”, or “stone stream”, filled with gravel and acting as a drainage basin. It is made as an open drainage, sometimes with only crushed stone inside, sometimes with soft drainage, but it looks more aesthetically pleasing. It must be connected to a normal drainage system, since it can accumulate moisture, but it needs help to drain it.
“Stone stream” is a type of French drainage, and also an element of landscape design
Storm surface drainage can be conditionally classified as open, although it is protected by gratings, and the system also has closed deep areas.
Closed drainage system
A closed system, on the other hand, is used primarily to remove soil water. Because not much precipitation percolates to depth, and if the soil is clayey, it does not infiltrate at all. Unlike an open system, this system makes it possible to plant plants above it and erect garden structures. Closed drainage - usually deep. In addition to geotextiles and drainage materials, it uses: perforated pipes-drains (in the case of “soft” drainage, drains are not used), and fittings for them. In addition, they include:
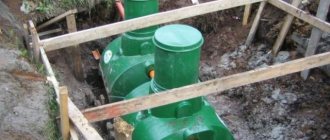
- collector wells or free-standing wells;
- absorption/cesspools or wells;
- artificial or natural reservoirs.
Permanent drains
In cases where continuous formation of condensate may occur during operation of the steam line, devices should be provided for continuous drainage of the steam line.
Such cases include steam lines for saturated steam and steam lines for supplying superheated steam to equipment in hot reserve (steam lines to a backup feed turbopump, to a high-speed ROU, and others).
To organize permanent drainage, the following measures must be taken:
- Live steam pipelines to all ROUs that turn on automatically must have a steam ventilation flow to the shut-off valve due to the pressure difference at the point of connection of the ROU and the point at which the drain tube is connected to the main steam pipelines.
- All backup steam supplies to the deaerator, switched on automatically, must have a steam ventilation passage with a drain pipeline connected with a throttle washer behind the pressure control valve in the deaerator.
- If necessary, condensation traps are installed on low-pressure pipelines.
Research
Before the start of design work, data about the territory is collected.
Site plan:
- location, boundaries, area, drawing on a scale of 1:500;
- development marks (boundaries of existing and planned buildings, communications);
- supplemented by plans of buildings and communications indicating the planned burial.
Hydrogeological conditions:
- groundwater characteristics (recharge intensity, flow direction, sources);
- GWL (calculated, steady, appeared);
- height, degree of capillary soil moisture;
- analysis of the chemical composition of groundwater.
Soil characteristics:
- filtration capacity, porosity, water loss indicators;
- compound;
- load-bearing capacity, stability;
- natural slope.
A relief organization project is being preliminarily developed. Drainage design is carried out in relation to it.
Surface laying of drainage pipes
The work includes creating a plan with pipe routing. Take into account the placement of drains and other water drainage elements
In this case, the slope of the pipes is taken into account. Surface pipe laying involves installing drains on finished surfaces
Stages of laying surface drainage:
- Determine the location of liquid discharge. This information is taken into account during planning. The laying depth is determined below the ground freezing level. As a rule, this figure is 60-80 cm.
- Sand traps should be connected to the pipes. This is a kind of liquid filtration.
- When arranging wall drainage, storm water inlets are installed. Rainwater is immediately directed into the ground.
- Next they dig a ditch. The bottom should be compacted and crushed stone laid.
- Then the drainage details are installed. Provide holes for the pipeline. End elements must be equipped with plugs. The pipes are fixed using concrete-sand mortar. Installation begins from the reset point. The joints should be well sealed.
- Next, the heel is made of concrete and the lining is restored.
- Then they check the functionality of the drainage system. When everything looks and functions well, the system is covered with bars.
Surface laying of drainage pipes is carried out on a special coating
Before installation, calculations are carried out and the necessary material is purchased. Design includes data collection. The local land resources department will be able to provide them.
Required data for design:
- Groundwater level for each season;
- Soil properties and its structure;
- Amount of precipitation.
These calculations will allow you to determine the depth of the pipes. The material used for laying is perforated plastic pipe. To prevent clogging of drains, they are wrapped with geotextiles.
Installation of drainage with perforated pipes and geotextiles:
- First, they mark out the territory, focusing on the wiring diagram. Then they dig a trench. The depth is determined during design, and the width is equal to the pipe plus 40 cm. The slope of the pipes is also taken into account.
- A cushion of crushed stone and sand is placed at the bottom. 10 cm of sand is enough, which will have to be compacted. Then add 20 cm of crushed stone.
- Next, pipes wrapped in fabric are installed. The elements are connected with special couplings.
- You should also make sure that the pipes are sloped correctly using a tensioned cord.
- Inspection wells are installed at turns. They allow you to monitor and clean the system.
- Then you will need to dig trenches. First, crushed stone is poured, then sand, and then the previously dug up earth.
Before burying drainage pipes, they need to be checked for leaks.
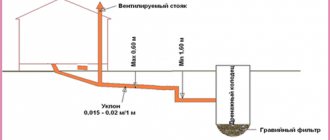
Water is discharged into an open reservoir or sewer. But the end of the pipeline must be equipped with a check valve. An alternative to it is a prefabricated well. When it is full, the liquid should be removed.
It is quite possible to do the installation yourself. It is better to entrust the design to professionals. In other work, you should follow the instructions and correct calculations.
When arranging drainage, the topography of the site is of fundamental importance. The system must be built so that there are no problems with the outflow of liquid into the ditches. If there are no results of geodetic research, you should draw up a diagram yourself, marking on it the places where rainwater drains.
The pipeline is led to a drainage well. If it is long and located on a flat area, inspection wells are installed at each 50 m section. They are also needed in places where the pipeline turns and bends, where the slope changes.
You can also build a drainage well with your own hands. It consists of a bottom, a shaft with a neck and a hatch. The dimensions of the well must be large enough so that a person can go down into it and clean it of silt. If it is not possible to equip a large well, then it should be equipped in such a way that you can wash the walls with a hose and scoop out the dirt.
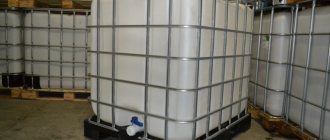
Concrete, plastic, and brick can be used as materials for making wells.
Polymer wells are very popular. They are purchased ready-made. The advantages of such tanks are tightness, strength (due to the corrugated surface, stiffening ribs), chemical and biological resistance
Drainage system design
Drainage is best described by the formula from the textbook “Hydrology and Hydraulic Structures”:
Drainage is needed to drain such heavily flooded areas
How drainage works
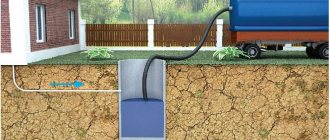
Typically, drainage of waterlogged soil occurs using surface or deep inclined water drainage paths. Water from the soil enters artificial paths and flows independently along the slope into an absorption/cesspool or man-made or natural reservoir on the site or beyond.
A plot and house with properly laid drainage is a guarantee of your peace of mind
In all cases the following are used:
- geotextile fabric of various types and configurations, from fabric to sandwiches;
- drainage material of various types - granite or dolomite crushed stone, sand, pebbles, expanded clay, synthetic materials.
When is drainage needed?
Drainage of various types (open, closed, deep, linear, point, storm of various types) is almost always needed. There are no ideal areas.
- If you have a fence with a foundation, then it often “seals” the area, preventing the natural removal of moisture - you need open or deep drainage around the perimeter.
- If the site is horizontal or located in a lowland, then with a large volume of precipitation, moisture will regularly and deeply saturate the fertile soil, which will lead to swamping of the area; you need open or closed linear drainage on the site.
- If your house on such a site is not on a pile foundation, but on a slab or strip foundation, then fungi will develop in the basement, when the soil freezes, the foundation will be squeezed out, the walls will crack - you need slab, wall and ring deep drainage.
- If there is abundant groundwater and/or its close occurrence (especially if its level is closer than one meter from the surface), which swamps the soil and can squeeze the septic tank to the surface when freezing, deep drainage is needed on the site.
- If the soil is clayey, preventing the penetration of moisture, then the “excess water” accumulated near the foundation will cause the soil to move (the foundation may float), and rainwater will not go into the ground - deep drainage requires open, or vertical, or drainage wells.
- If your plot has a strong slope, then the fertile layer is simply washed away during rain - you need at least open drainage.
- And if you have a lot of paved paths and terraces, blind areas near the house and extensive lawns, you need surface storm drainage of both types: point and linear.
When the need arises for arrangement
The need to create wall drainage arises in the following cases:
- regular flooding of the basement and basement with ground and surface water;
- the presence of groundwater close to the base of the building;
- installation of equipment in the building, the operation of which is impossible in conditions of high humidity;
- lack of a groundwater drainage system;
- location of the structure on clay soil;
- the beginning of designing the foundation of the building.
Wall drainage can have the following type of structure:
- Plast. Drainage is installed below the foundation slab. In this case, water passes through the perforation and collects in the catchment well.
- Linear. Drains are laid along the perimeter of the building at the level of the blind area. This system effectively removes surface water.
Types of drainage used in drainage system projects
Extract from SNiP 2.06. 15-85 (clause 3.23 “Engineering protection of the territory from flooding and flooding”): “When choosing systems of drainage structures, the shape and size of the territory requiring drainage, the nature of groundwater movement, geological structure, filtration properties and capacitive characteristics of aquifers must be taken into account , the area of distribution of aquifers, taking into account the conditions of recharge and discharge of groundwater, the quantitative values of the components of the groundwater balance were determined, a forecast was made for the rise of the groundwater level and its reduction during the implementation of protective measures.”
Drainage systems used today are classified according to many criteria - by landscape architecture objects, by target orientation, by design, by principle of operation, by materials used, by hydrogeological conditions and soil properties. Here are just a few of them, the most relevant for drainage of plots for private households.
According to the design of the watercourse, drainage can be:
Open (cavitary)
– the simplest to implement. Along the perimeter of the site, trenches are dug with a depth of 0.6-0.7 m and a width of 0.5 with the walls deviating from the vertical to the outside by 30°. Open drainages serve to collect and redirect melt and rainwater in areas located on slopes.
Backfill (cavity with filler)
— it is arranged as follows: the bottom and walls of the trench are lined with geotextile, which acts as an additional filter material and prevents silting of the drainage. Geotextiles are laid out so that they protrude 30 centimeters on each side of the ditch. Then half the trench is filled with broken bricks and large crushed stone, after which finer material is poured almost to the top. The filling of the ditch is covered with the edges of geotextiles, soil is poured on top and turf is laid.
Closed (tubular)
- differs from backfill in that in a ditch, on a prepared bed of sand and crushed stone, drainage pipes are laid at a certain slope. Then a water-carrying layer of sand and crushed stone is created on top of the pipes. Geotextiles are used as in the previous case. The scheme of a closed-type drainage system is usually made in the form of a “herringbone” (there may be other configurations). Water from the side channels flows into the central one and is discharged to the water discharge point.
According to the principle of operation, drainages are distinguished:
- systematic
(evenly distributed throughout the site) - selective
(the drainage system is laid selectively for individual sections of the territory) - cut off
(head) - to intercept and redirect groundwater that comes from outside (for example, during flooding).
According to soil and hydrogeological conditions:
- horizontal drainage
- differs in that the drains are laid horizontally with a calculated slope towards the discharge of water - vertical drainage
- is a system of wells and boreholes.
By types of landscape architecture objects:
- double drainage
- installed in areas where a high density of trees and shrubs is planned, due to which repair of the system in the future will be difficult - coastal drainage
– carried out in river floodplains - wall drainage
- to drain water from the walls and foundation of a building - reservoir drainage
- used in cases where water accumulates under a site or structure.
Wall drainage
Performed close to the building. One of the walls of the drainage trench is part of the base or foundation. Additionally waterproofed with bitumen. The outer wall is made inclined, extending beyond the blind area.
The bottom of the drainage should have a clear slope. Provided with a compacted sand bed. Geotextiles are laid on top. Coarse crushed stone is poured onto it, drains are laid, and covered with smaller stones. Inspection wells are installed at key locations. Wall drainage does not have to be a closed system. Can only be arranged near part of the building.
Waterproofing the foundation before installing drainage
DIY drainage system
You can carry out all the necessary work on installing drainage either with your own hands or by hiring a team of specialists. Let's look at the steps to install drainage yourself:
- First you need to dig the necessary ditches for the drainage pipes.
- At this stage, work on compacting the channel takes place. You can compact the channel by jumping on it.
- Sand and crushed stone are poured onto the bottom and walls of the channel.
- At this stage, you need to cover the surface with geotextile fabric. The edges of the canvas should come out of the channel with a margin.
- The gravel is washed and laid out at the bottom of the trench. The gravel layer should be approximately 20 centimeters.
- Drainage pipes are wrapped in geotextile fabric.
- At this stage, drainage pipes are placed in the channel. There they are connected using couplings.
- In those places where three or more pipes are combined, wells must be installed. In addition, they are installed every 50 meters.
- The structure is covered with gravel on top. The layer should be about 20–25 centimeters. 10. The edges of the geotextile fabric, which were kept in reserve, cover the entire system.
- The system is covered with soil from above.
- The collected water is either used for economic purposes or drained into the nearest ravine.
It is not difficult to ensure the drainage of excess moisture from the area. But before starting work, you should carefully study the geography of the area, the type of soil and find out how deep the groundwater is. The information obtained should be used as a starting point when choosing the type of drainage system, the type of pipes and the features of their installation. Only with correct calculations will the drainage network function correctly.