Home » Cesspool » We create a cesspool with our own hands without pumping
When building a private house far from a sewer, the question arises: how to organize the storage and disposal of wastewater. A cesspool is designed to solve this problem. There are two main types of waste pits: a sealed (or waterproofed) pit and a pit without a bottom (drainage). The sealed pit does not allow wastewater to enter its environment and is intended for areas with sandy soil; it is also designed for large (more than 1 cubic meter per day) volume of drainage.
- Requirements
- Walls
To clean the waterproofed pit, a special sewer pumping machine is called in twice a month. The cost of use is expensive. If the volume of wastewater is small, a profitable solution would be to build a cesspool without a bottom; such a drainage pit does not require pumping. It’s quite easy to construct it with your own hands, which will save a lot of money.
Materials required for construction
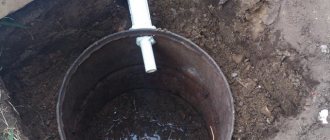
If the soil is dense and well-absorbing, a lot of starting materials will not be required. In this case, there is no need to strengthen the walls of the pit. The bottom can be filled with crushed stone and rack sand. However, cases with such ideal land are not common in our country. In the vast majority of cases, the walls of the pit have to be strengthened, otherwise it may crumble. Brickwork, slate or similar material works well for this. Another option: a plastic or metal barrel with a cut out bottom, in the lower part of the walls of which you will need to make several holes so that the drain water is filtered through the ground.
An advantageous pit shape option is a cylinder. A pit made in this form distributes the load on the soil evenly, reducing the risk of structural failure to a minimum. The cube-shaped camera is inferior in this regard.
How to lay a drain pipe
The drain pipe ensures the drainage of wastewater from the bathhouse into the drainage pit. Moreover, its presence should be provided for at the stage of construction and design of the bathhouse. The pipe should exit at the bottom of the foundation. As for the connection of the pipe with the drainage pit, it must be straight - no fractures or bends, because in this case the drainage will be very poorly drained. You should also observe the slope of the pipe to ensure natural movement of water. The work of installing the drain pipe will look like this:
Installation of the drain pipe and angle of inclination
- dig a trench of the required depth;
- arrange a cushion of crushed stone;
- lay the drain pipe, observing the slope;
- connect;
- check the tightness of the system;
- cover the pipe with soil.
In order to cope with this job, you do not need to have any special skills. Construction is quite simple and quick.
Trench preparation and excavation work
Where to put the excavated soil? If the soil is of good quality, sprinkle it on an area with vegetation. Stones, sand and clay for removal. We decided to equip the pit with brickwork, ceramic bricks are the way to go. Durable material that does not have “hydrophobia”. You can save on bricks by laying bricks edge up. You need to leave holes between the ends - this is an outlet for water. A simple and useful tip is to use natural stone so as not to spend money on brick, it is profitable.
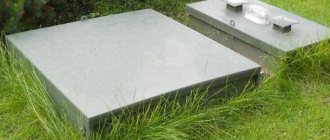
Is the masonry complete? Then we begin to form the bottom, a waterproof bottom! The same crushed stone and sand will serve as backfill. Construction waste is also suitable. It is better not to underestimate the bedding layer, at least 20 cm. The upper part of the masonry should exceed the ground level by 30-40 cm. The pit is covered with a concrete slab or metal sheet.
If vehicles will drive across the site above the pit, then the thickness of the slab should be at least 30 cm. If the soil does not absorb drain water well, then holes can be left in the slab so that when the pit overflows, drainage can be pumped out. Only this hole needs to be covered with something, otherwise you can accidentally fall into it. The strengthening is completed, all that remains is to fill its outer part with already dug soil (fill the unusable part of the hole with sand). In the place of the former pit, you can grow plants or create a passage.
Pit made from old tires
As a rule, the drains do not contain solid waste, which means that the arrangement options can be very simple. Special materials may not be required at all. Improvised means will also do. Used car tires are perfect for this. The larger the tire diameter, the better. The sidewalls of old tires need to be cut off using a grinder or jigsaw. So, the prepared tires are placed on top of each other in the pit. The lower part of the pit is also filled with crushed stone. In the tire lying on top you need to make a hole for the drain pipe and adapt it. After this, you need to put a metal sheet on the cylinders and fill it with earth according to the level.
Drainage hole made using slate
Wave slate is perfect for filling a drainage hole. The first sheet is placed on the bottom. The second is superimposed on the first so that their waves touch each other with high points. Subsequent sheets are also laid until 30-40 cm remains to the top of the pit. The drain pipe is inserted into the gap of the upper quarter of the slate masonry. You can strengthen the structure by filling broken pieces of slate, and then filling the remaining empty space with soil. This method is mostly suitable for sandy soil.
The last two methods should not be used if it is expected that vehicles will pass through the hole.
Actually, in this thread I would like to discuss the advantages and disadvantages of building a septic tank with your own hands using a specific example. Greetings to all forum participants. He took up the arrangement of his village-dacha farm with both hands. First of all, I decided to prepare all vital communications. I consider the disposal of household waste to be a priority. The septic tank is planned for year-round use. On weekdays, 1-2 people will use it, on weekends from 2 to 10. The drainage will be carried out from the bathhouse, kitchen, toilet and summer kitchen.
Groundwater level is more than 4 meters. I don't even know how deep.
We built a septic tank from what was at hand. And I came across: - 18 bags of M-500 cement. - approximately 2 m3 of crushed stone. - approximately 1.5 m3 of sand. - 4 sheets of flat pressed slate 1x1.5m. — metal corner 35 meters. — fittings of different diameters (about 130-150 meters). — pipes for external laying (red) 2x2 meters. 1x3 meters. — pipe for internal installation 1x0.5 m. 1x2m. — expanded clay approximately 1m3. — used bricks, 200 pieces.
Septic tank plan, top view:
We built everything with our own hands on weekends. We started with a 2x3m hole. and 2m. in depth, pipes were brought in:
Since the walls of the pit were drying out and crumbling, they stretched some kind of plastic roll material over them. And tied the reinforcement:
The formwork was installed and concrete was poured:
After 2 weeks they removed the formwork and were horrified. Almost along the entire perimeter of the septic tank, at the very bottom, the concrete did not lie tightly, and in some places there were even through holes. Friends, don't repeat other people's mistakes. It is necessary to use small crushed stone. Make the formwork wider. Compact the concrete with rebar. Don't skimp on formwork:
We installed new formwork and corrected the shortcomings:
This is what happened (the walls below became thicker, and “patches” are visible):
I cut the corners and adjusted everything:
I cut the slate, cut the spacers for rigidity and so as not to block the bottom and put the reinforcement on the corners:
We reinforce and fill with concrete. In addition to the reinforcement, pieces of corners and other scrap metal were thrown into the concrete:
A week later, they welded the frame for the hatch and lined it with bricks (In the photo, my uncle, the last time he stacked a brick in the army, he puffs but lays it out):
Another week later, a 15-20 centimeter layer of expanded clay was poured on top. and clay under the lid. All that remains is to make a hatch from flat old Soviet batteries and cover the hatch with waterproofing material.
In total, we got a septic tank with a useful volume of 3.75 m3. The first chamber is 2.25 m3 and the second chamber is 1.5 m3. overflow slightly above the middle. I haven't installed the tees yet. According to my calculations, the ventilation pipe will draw air into the septic tank, and the outlet will be connected to the sewer pipe in the bathhouse and brought to the roof. For additional cleaning and absorption of gray water into the soil in the spring, I plan to dig a long trench 2 meters deep, 30 cm of crushed stone at the bottom, a drainage pipe with holes on top and bury it. I plan to use a septic tank in the spring. And the release of fecal waste into the septic tank is planned no earlier than next fall.
August 3, 2021 Specialization: Capital construction work (laying a foundation, erecting walls, constructing a roof, etc.).
Internal construction work (laying internal communications, rough and fine finishing). Hobbies: mobile communications, high technology, computer equipment, programming. Surely many of you are interested in building a cesspool for a country toilet. This task is not new for me, so I take this opportunity to tell you how to make a pit for a toilet in the country.
DIY septic tank for a country house
Every summer resident and resident of a country house faces a problem: living in a country house outside the city, having become accustomed to city comfort, he wants to take a bath or shower, and sometimes he doesn’t really want to run outside to relieve himself every time.
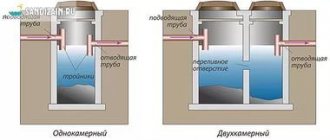
The problem is that there is no central sewage system. Today, this problem is easily solved; there are a large number of sewerage schemes for dachas and country houses. The author, not having a lot of money to buy a septic tank, decides to build it with his own hands. Having studied the operating principle of this sewer system, I came to the conclusion that there is nothing complicated about it. A septic tank consists of two reservoirs connected to each other by a pipe, the first serves for sedimentation and shrinkage and decomposition of solid parts of human waste, and its liquid part, when completely filled, flows into the second container, called gray water, and subsequently into drainage. This is essentially the whole principle of operation of this sewer system.
The author wanted to make his septic tank in concrete because the groundwater level is far away and there is no need to fear an environmental disaster))). He gives advice to those whose groundwater level is close to the surface, it is strictly necessary to use sealed plastic septic tanks to avoid contamination of wells. So what did it take to bring your idea to life.
Materials:
cement grade M-500, sand, polyethylene film, metal corner, fittings, flat slate, boards, nails, wire, sewer pipes, brick.
Tools:
shovel, hacksaw, hammer, welding machine, pliers.
From the beginning, the author gives a diagram of his septic tank.
Next, I dug a hole for the sewer.
I dug a trench below the freezing level and laid a sewer pipe in it.
Then he begins to prepare and reinforce the future structure.
Then the formwork was built and concrete was poured.
Two weeks later the formwork was removed.
Let's see what happened
From the top, the author welded a lid like this from corners and fittings.
Next, I placed flat slate on the reinforcement.
And poured cement mortar on top.
Above the inspection hatches I welded a frame like this from the corners and lined it with brick.
And then he covered it with earth and covered it with a lid. And one more thing, as you can see in the photo, the author removed the ventilation pipe.
That's it, the sewer system for the country house is ready and now you can take a bath and shower in the house. Source
Become the author of the site, publish your own articles, descriptions of homemade products and pay for the text. Read more here.
Pros and cons of using pits
The building I want to talk about falls into the category of local treatment facilities, which are used to accumulate or process sewage flowing from a private home.
A cesspool for a country toilet is a fairly simple design, but it has both its advantages and disadvantages. I will voice both the first and second ones for you.
| pros | Minuses |
| Environmental friendliness . Sealed cesspools accumulate organic waste, which is then pumped out using sewage disposal equipment and disposed of at municipal wastewater treatment plants. | The appearance of an unpleasant odor. If you do not take care of removing biological gases, the cesspool can emit an unpleasant odor and spoil your comfortable vacation outside the city. |
| Easy to install and operate. The pit is built very quickly and easily, and using it is even easier: you just need to call specialists in a timely manner to pump out the sewage. | The need to call equipment. To dispose of waste, you must call special equipment. Although, I once told you how you can clean the hole yourself. |
| Possibility of installation in any area. Even if the groundwater level is high (as was the case in my case). |
Be that as it may, my neighbor asked me to build a cesspool. But he didn't say from what. Therefore, I had to choose the design myself. But more on that below.
Disadvantages of cesspools
Before you start making a country toilet, you should consider installing a cesspool - see options for building cesspools of different designs. A special tank is needed to collect waste. And to prevent the spread of odors, you will need a pit with a sealed bottom. But this option requires systematic pumping.
A good solution for a cesspool is to install a drainage bottom. The liquid will quickly be absorbed into the soil, and particles of the solid structure will settle. With significant accumulations of waste, siltation of the bottom may occur. And for such a case, special cleaning will be required. First, contaminants with solid waste are removed, and then the filter bottom is restored.
The following points should be noted among the disadvantages of a cesspool:
- To maintain and care for a country toilet, you will need financial investments. When the tank is full, pumping is necessary, carried out regularly.
- Even with high-quality sealing, you cannot protect yourself from the occurrence of an unpleasant odor in the country toilet.
- After some time, the walls begin to let in sewage and contaminate groundwater.
If a sewage system is installed at the dacha, it is necessary to come up with ways to insulate the container. In severe cold weather, sewage may freeze, which causes difficulties in using the system.
Types of designs
The design of the cesspool can be different...
I've built pits out of everything you can imagine. But the most common options were:
- The pit has no lining at all.
It is almost never used in construction, as it can contaminate groundwater and soil. In addition, the soil from the walls crumbles during operation, so the useful volume of the structure is constantly decreasing. - Tire pit.
Car tires (old) are used as wall material. I know from experience that this design lasts about 30 years. There are two disadvantages here: the small volume of the container (if you do not use tires from a mining dump truck) and its leakage. - Slate pit.
I once built something like this. The design is very simple, leaky and ineffective. Suitable as a temporary measure until you build something more decent. - Brick pit.
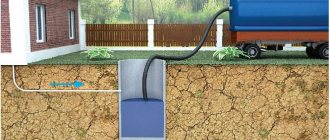
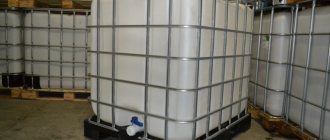
The structure is strong, but short-lived. If waterproofing is poor, water from drains will penetrate into the thickness of the brick walls, which will quickly lead to their destruction. - A pit made from ready-made containers.
This is not exactly a hole, but rather a sealed large barrel that is buried in the ground. Sold in construction supermarkets. An excellent option if you don't mind the high price. - Pit made of concrete rings.
Robust and durable design option. I often built such pits, but here I couldn’t do it without the help of a crane. You will not lower the ring into the prepared pit on your own. - Pit made of monolithic concrete.
This option appeals to me the most. You can make such a design yourself, and I will talk about it below.
What needs to be considered during construction
The first point that you need to pay attention to is the budget that you can allocate for the construction in question; the choice of one or another building material will depend on this.
What can influence the choice of materials:
- ease and speed of construction;
- reliability and durability of the structure;
- aesthetic appearance.
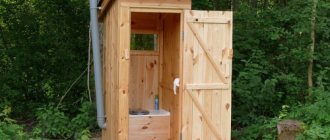
Summer toilet as a decoration for a summer cottage
This point will be significantly influenced by the “frequency” of using the closet:
- The toilet is being built purely for use in the warm season (dacha season).
- It is planned to operate the premises year-round.
The main difference lies in the need for careful insulation of the toilet in the latter case, which, in turn, will require the use of various insulation materials, and, accordingly, additional funds.
Having decided on the material and decided to build a summer toilet for year-round use, where to start?
Advice. You should take the chosen location for construction seriously. This simple task requires a thorough and balanced approach, since the wrong choice can lead to negative consequences in the future.
Let's look at this process in more detail.
To begin with, it is advisable to consult with the sanitary inspection and obtain permission from them. As you know, there are no strict rules for carrying out construction of this kind.
Attention! According to existing sanitary standards developed for rural areas, the cesspool must be located at a distance of at least 12 meters from residential buildings, drinking wells, fruitful plants and places where poultry and animals are kept.
The depth of groundwater in your area is determined. If this figure does not exceed 2 meters, then it would be advisable to build a powder-closet type toilet. At a depth of more than 2.5 meters, you can build a backlash closet or a version of a toilet with a cesspool. If your site is located on a flat surface (without complex terrain), then to choose a place to build a toilet it will be enough to maintain all the necessary distances of sanitary standards. If the terrain of the area is complex, then you will have to resort to certain calculations, which are especially important when the relative placement of the well and cesspool.
Drawing of a cesspool device
Elementary, but important:
- When calculating the location for the future toilet, take into account the directions (wind rose) in which the wind blows more intensely on your site.
- Keep the closet tidy and clean regularly.
- If possible, place the building on the back side of the house (if this is the case in your case).
- Place the cesspool away from the veranda or terrace.
- Be sure to provide for the possibility and ease of access of the sewer truck to the cesspool (overall dimensions of the machine itself and the length of the hose for pumping out waste). At this point, it is worth considering that with a hose length of 7 meters, only 3 meters are lowered into the hole. The remaining 4 m are unwound around the site.
Many people want to build a closet on their own and do it right, because... If you have good material with photos, the issue under consideration becomes elementary.
Durable and durable stone summer toilet
Pit construction
So, let's look at how to make a pit for a toilet in a country house with your own hands from monolithic concrete. The instructions below are divided into several steps for convenience.
Determination of tank volume and installation location
First, I need the depth and width of the pit for the toilet in the country. That is, in another way, the volume or amount of sewage that will need to be stored in it.
This parameter depends on the number of people living in the country house and the intensity of use. I took as a basis the fact that the home will not be used permanently, but only during the summer season. In addition, washing machines and dishwashers, which use and drain large amounts of water into the local sewer system, will not be installed in the house.
If you are faced with the task of building a local sewer system for a private home, then it is better to build a septic tank that not only accumulates, but also purifies wastewater. It needs to be cleared of waste much less often using a sewer machine.
- a person consumes on average about half a cubic meter of water;
- five people are expected to stay at the dacha (grandmother, grandfather, a young man with his wife and their child);
- the house has a heater with a capacity of 150 liters;
- then per person you need 150 liters of water per day, for everyone 750 liters;
- determine the final volume based on how often you want to call a vacuum cleaner;
- I settled on once a month, that is, the pit will have a volume of 20 cubic meters;
- respectively dimensions 2 by 5 by 3 meters.
At the same time, I will immediately say that I did not deepen it much downward, since groundwater passes there. Therefore, it turned out to be wide and long, but not very deep.
When designing, I also recommend taking one point into account. No matter how full the sewer truck is, you will have to pay the same amount for calling it. Therefore, calculate the volume so that the tank of special equipment is completely filled (there is no point in driving it empty for your own money).
Now about the placement. Information about where the cesspool I am building is located will not be of interest to you, but in order to correctly choose the point for digging a pit for your own structure, I will point out the basic rules:
- it should be 25 meters away from the well or borehole;
- from a residential building – 5 meters;
- from a public road - 5 meters;
- from a natural reservoir – 30 meters;
- from trees and bushes - 3 meters;
- from the fence of your site - 3 meters.
So take a plan and decide where you will place it. But don’t be clever, otherwise it will be difficult to install an external sewer later.
Preparatory work
And now I’m starting to build a hole. For this I will need the following materials:
- Portland cement brand M400 - at least 7 bags;
- crushed stone, which will act as a filler in concrete;
- sand as part of the solution;
- waterproofing agent - in my case bitumen coating.
You also cannot do without the following tools:
- two bayonet shovels with handles of different lengths;
- shovel for collecting soil;
- measuring tool;
- ladder;
- laser level (you can take a water level);
- rope and trowel;
- spatula and brush.
Before digging a hole for the toilet, I took pegs and white rope and marked on the site the place where the future hole will be located. I noted the distance more, since I am going to install both external and internal formwork.
But if the soil on your site is hard, you can use the walls of the pit as external formwork. Then the hole needs to be dug exactly according to the external dimensions of the future storage tank.
You also need to go a little lower than the design depth of the hole (in my case 3 meters). Crushed stone and sand will be poured down, so it is necessary to provide a space of about 30-50 cm high for this.
Moreover, after pouring the floor, I plan to throw some soil on top and plant grass. Therefore, my three-meter (deep) hole requires a pit at least 4 meters deep.
I got something like this:
Once the excavation work was completed, I carefully leveled the soil below and poured a layer of sand mixed with crushed stone there. I compacted it, poured some water on it and compacted it again to prevent the soil from shrinking during the operation of the building.
And then he began to construct the formwork.
Construction of formwork
To make the enclosing structures into which concrete will be poured, I used:
- OSB boards - they can be wrapped with plastic film to make dismantling easier and to organize proper dehydration of the monolith;
- wooden blocks - with their help I made stiffening ribs;
- self-tapping screws - you can take any, not necessarily galvanized.
I immediately draw your attention once again to the fact that I will have both internal and external formwork. But for many it is only internal. So adapt the proposed instructions to suit your conditions.
So, the instructions for installing the formwork are as follows:
- I installed OSB sheets and secured them together with wooden blocks. It is better if your sheets are long enough to make formwork for the entire height of the walls. If this is not the case, you will have to work in several stages.
- I attached a plastic film to the formwork, which protects it from getting wet.
By the way, you can replace it with rolls of roofing felt. And if you use steel sheets instead of OSB boards or plywood, it is not at all necessary to lay waterproofing.
- The bottom of the septic tank was concreted.
There is no need to create a perfectly flat surface (like, for example, in a house). The main thing is that there are no voids inside the concrete slab. So I mixed a concrete solution of cement, sand and crushed stone, then poured it into the formwork and poked it many times with a crowbar to compact the surface. It’s not visible in the photo below, but I inserted reinforcement bars along the edge of the formwork to later tie the floor surface and the monolithic concrete walls together.
- Installed internal formwork.
To do this, I took the dimensions in advance, after which I made something like a box from OSB boards, which I installed in the future cesspool and secured in place so that it was the same distance from the external enclosing structure. It’s not entirely clear from the text, but from the illustration you’ll immediately understand what’s what.
- I made a hole and inserted a pipe through which sewage from the toilet would flow into the pit.
If this is not done in advance, then you will have to drill into the concrete, seal the hole, and so on and so forth. In the photo, the installed pipe is marked with a blue oval.
This is how I made the formwork. Additionally, I note that I did not use reinforcement when constructing the pit. If you see the need for this, then install a frame of metal rods in the gap between two formworks: internal and external.
In the meantime, I’ll move on to the most important thing - concreting.
Wall construction
This stage will be the longest in time, since after pouring the concrete it is necessary for it to completely harden, which takes several weeks (the exact time depends on weather conditions).
For concreting, I used homemade concrete, which I made from M400 Portland cement (one part), sand (two parts) and crushed stone filler (three parts). In addition, I used the Master Silk additive, which makes the finished solution more flexible and fills the formwork better.
I mixed everything using an electric concrete mixer.
There is no point in describing the operating technology here. You just need to mix the required amount of solution and fill the formwork with it. In this case, the concrete must be compacted thoroughly so that there are no voids left inside the walls.
Then I left this entire structure alone until the solution completely hardened. It took 15 days. Then he dismantled the formwork. It turned out like this.
At this point, the construction of the walls was completed, but I did not move the concrete mixer far. After all, the flooring still needs to be poured. But before that, in order to make it more convenient to work, I decided to waterproof the bottom and walls of my monumental structure.
Waterproofing
Here I would like to immediately apologize to the readers. I waterproofed the walls of the cesspool for the country toilet using bitumen mastic. This event is quite “dirty”, so I couldn’t take out my phone and photograph the process.
Well, the process itself went like this:
- First, I went down into the concrete pit and thoroughly cleaned all surfaces of dirt. If you have any cracks or other defects after drying, they need to be eliminated. Everything was fine with me.
- Then he heated the bitumen with a gas burner until its consistency began to resemble liquid sour cream.
- After that, I added a liter of diesel fuel to the bitumen bucket. You can also use gasoline, but be sure to remove the bucket from the fire to prevent a fire.
- I treated the walls of the cesspool with the first layer. For this I used a wide and thick paint brush. After that I waited for it to dry.
- I coated the walls with bitumen again.
If you don’t want to bother with heating bitumen, buy water-soluble emulsions or special compounds for waterproofing concrete. But know that they take much longer to dry.
Bitumen smells strongly during operation. That's why I didn't do the top cover of the cesspool until I finished the waterproofing. Otherwise, I would have to writhe in a dark and “smelly” pit, brushing the walls.
Requirements
Sanitary standards for placing a cesspool drainage pit on a site
It is necessary to carefully consider the choice of location for the cesspool, since violation of sanitary standards may result in administrative liability. The pit should not be located outside the developer's land plot.
For its construction, a flat surface is chosen; in case of hilly terrain, the lowlands of the site are chosen. It is advisable that a sewer truck has access to the pit for pumping out in case of overflow with waste. More precise placement instructions:
- 4-5 meters from a residential building.
- 3 meters from the fence, road, trees.
- At least 25 meters from a well, well, spring.
- 30 meters from the nearest body of water.
Depending on the type of soil on which the waste pit is located, the regulated distance to sources of drinking water changes. When placed on sandy soils, it is allowed to build a cesspool no closer than 50 meters to the wells. For clayey conditions – from 20 meters.
Septic tank volume
To calculate the volume of the waste pit, it is necessary to take into account the number of people living in the house. The capacity is calculated based on the fact that one person uses 170 liters of water per day. Thus, for three people a waste pit with a volume of 10 cubic meters is needed.
As experience shows, if the pit is equipped with a good drainage system or is located on sandy soil, a smaller volume of 6-7 cubic meters will be sufficient. If you dig a hole with your own hands, it is better to think about the reserve volume in advance so that excess drainage does not go beyond the drainage hole and pumping is not required.
Excavation
It is best to begin excavation work in mid-summer, in stable dry weather. A foundation pit is prepared for the future drainage pit. Most often, it measures 2 meters high, wide and long (8 cubic meters). You can dig it out either with your own hands or with the help of an excavator.
First, the top layer of fertile soil is removed; it is better to distribute it throughout the garden. Subsequently, the soil is removed. If the soil around the pit is sandy, you should be wary of the collapse of the pit walls. To avoid this, you can prepare wooden panels and temporarily place them with emphasis along the walls of the pit.
Once the required depth has been reached, it is recommended to leave the pit for two days. The bottom of the cesspool should be at least one meter above the autumn/spring groundwater level. The permissible depth of pits of this type is from 1 to 3 meters.
It is not recommended to dig a drainage hole deeper than 3 meters, because during use, sewage will gradually settle to the bottom and it will be difficult to remove it from such a height.
Drainage
In order for wastewater to flow out of the pit into the soil faster and without the need to call for pumping, you need to prepare high-quality drainage. First, sand is poured into the bottom of the hole. The thickness of such a layer should be 30 cm. After this, the bottom of the pit is lined with a special synthetic fabric (geotextile), the edges of the fabric should overlap the walls of the pit.
Areas adjacent to each other are stitched. A layer of crushed stone 10-20 cm thick is poured onto the fabric. The crushed stone is covered with a second layer of synthetic fabric. The edges of the first and second layers are stitched or covered with bitumen. The drainage layer remains in this form until the pit is used.
If you create a cesspool yourself for a country toilet (without pumping), drainage can be simplified. A layer of sand (30 cm) is poured onto the bottom of the pit, and a layer of crushed stone (20 cm) is placed on top of it.
Sewer pipe connection
When installing a sewer pipe, you should pay attention to the difference in height between the end of the pipe in the pit and the level of the pipe in the house. It should not be less than a meter. If the height difference is small, the drains will stagnate in the pipe, and blockages are possible.
It is best if the pipe extends outside the house underground. The depth of the pipe should be deeper than the winter freezing layer of the soil, so that during frosts the drains do not freeze, clogging the pipe. If the pipe comes to the surface, it should be properly insulated.
back to menu ↑