A clay castle is one of the necessary measures designed to drain high water from the well, which carries dirt, a lot of chemicals, microorganisms, waste products of various living beings, including humans.
Melt and rainwater should not directly fall into the drinking well, otherwise it becomes a drainage well, with water intended for watering the garden or other technical needs, but drinking such water is extremely dangerous. The process of constructing a clay castle is quite labor-intensive, and a large amount of clay is required. After all the activities, it is necessary to carry out cleaning, clearing the bottom of the well from spilled soil and related items, plants, etc., for complete confidence in the quality of the water.
Work on constructing a clay castle is carried out as follows:
- The shaft is dug from the outside to a depth of 150-180 cm from the surface of the earth and a width of 50-60 cm.
- We fill the resulting trench with clay, compacting it periodically.
- A mound is placed on top 15-20 cm above the ground horizon, with an inclination away from the well.
For wells where the groundwater level is close to the surface of the earth, often in lowlands, areas where there were previously swamps, we use sand instead of clay, which is covered with a layer of 20-30 cm of clay on top. A small layer of clay above the sand acts as a drainage system from the well, thereby preventing water from passing through the sand directly to groundwater and then into the well. In addition, such volumes of clay are not capable of causing harm when frozen. For wells located in areas with low groundwater levels, we recommend making a clay castle entirely from clay.
What it is
A clay well lock is a layer of compacted clay that is placed along the concrete rings of a water shaft to prevent rain or waste water from entering. It is actually a water seal.
Advantages and disadvantages
The advantages include:
- Reliable and effective waterproofing material. It is not for nothing that at the depth where the clay layer lies, there is practically no groundwater.
- Very low cost.
- You can build it yourself.
- Simplicity of design.
- If constructed correctly, the structure will last a long time; it will not have to be repaired or maintained.
However, there are some disadvantages:
- The installation process is quite labor-intensive and long.
- Not every clay is suitable for the shutter.
- If it has not dried properly, then during frosts it will swell and cracks will form.
- If compacted poorly, the material tends to shrink, which will lead to the formation of a hole around the shaft.
Clay castle
What is a clay castle and what is it used for? A clay castle provides protection during the construction of walls, the foundation of a house (foundation) or a basement. Clay castle, or in other words, clay screen. A clay screen is a clay layer that is compacted and compacted; it also protects the structure from the influence of groundwater. The crushed clay creates a barrier to water penetration, keeping the overall structure safe.
Pros and cons of a clay castle
A clay castle, like all structures, has its advantages and disadvantages. Let's look at all the benefits first:
- the clay castle around the well is completely protected from groundwater and rainwater;
- you will not need to seal the seams on the structure every year;
- You can save money because clay is a free and environmentally friendly material. You will not have to spend additional money on purchasing other materials.
Since there are advantages, there are also disadvantages:
- Although a clay castle is protected from moisture, waterproofing with clay is still the wrong step. To do this, it is necessary to use other materials;
- clay layer located in the zone where the soil freezes, the clay begins to increase in volume. This happens in the spring every year. After a certain time, it may happen that the structure begins to gradually collapse;
- Due to the high sand content, the clay settlement will decrease after installation of the clay castle.
The process of creating a clay castle
Since the foundation is the foundation of the house, it must be completely isolated from the influence of groundwater and rainwater. The structure of the clay castle and its width depend on the depth of the house’s foundation in the ground. If the depth of the foundation is two meters, then the width at the bottom of the clay castle is 40-50 centimeters, and at the top – 25-30 centimeters. It is not very common to install a clay castle around the foundation.
Before starting the entire installation, a pit of the required width is dug. Crumpled clay should be placed in layers in the pit.
The layer should be ten centimeters.
If you did not have time to do all the work in just one day, then the entire structure must be covered with a membrane that will protect the structure from moisture. In order to make a waterproof coating around the building, you need to wait about half a month after building the clay castle.
In order to provide complete protection from any moisture, a waterproofing membrane can be placed between our structure and the base of the house.
Clay castle for a well
An important point is to insulate the well from moisture. This is necessary because drinking water in a well can become contaminated if groundwater enters it. The most common procedure is to create a clay castle around the well.
The whole process is quite labor-intensive; all work requires a huge amount of material. Once all the work is finished, do not forget to clean the well.
During all work, it is necessary to follow a certain algorithm of actions. Installation procedure:
- There is a long deep ditch along the entire surface of the well shaft. The dimensions of this trench are: width – 600 millimeters, depth – 1700 millimeters.
- The trench is filled with clay. It is important to compact the clay at all times.
- A small waterproof covering is created at the top of the clay castle. This blind area should slope away from the well, and its height should be two hundred millimeters.
Installation technology
There is a certain technology:
- To create a castle, you need to use a material that has natural moisture. When it is extracted from the earth cover for future storage, the material should be soaked in water and then covered with something. In order to check the quality of the created material, try to mold something from this clay. If the quality is poor, then the clay should crumble in your hands. The material should slide off your hands. All this will help you understand whether the material is ready to start using. Since clay contains a huge amount of sand, twenty percent lime can be added to it.
- You can achieve the best results when compacting the material in an auxiliary structure (formworks). To install the formwork you will need wooden panels. It must be installed so that the thickness of our clay castle is two hundred millimeters. Tamping should take place in layers, the height of which should be on average 250 millimeters.
- Geotextiles need to be placed on the outside of the clay castle. This canvas will prevent erosion of the structure by groundwater.
- The process of making a clay castle is reminiscent of the process of creating a blind area for a building. The width of a clay castle can be different, it starts from one meter, the depth starts from 50 centimeters. The best thing is that all these indicators were greater. The clay is covered with a geotextile fabric, and you can put cobblestones on the fabric.
As you understand, clay is a suitable material that can be used to isolate a well from underground moisture. The cost of clay as a material is low, and maybe even non-existent, since the clay is right under your feet. Any procedure that involves clay can be performed independently. This work does not require any specific skills or effort. But at the same time, the work is quite labor-intensive.
Clay replacement
Today, many companies offer materials that can replace clay. Such materials include a mixture of sand and gravel or ordinary sand. But can all this become a substitute for clay?
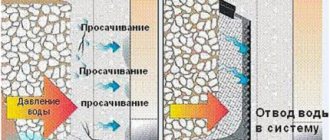
Sand, as a material, is not designed to retain water. Sand is a filter for water, that is, this material simply allows it to pass through. After the sand allows water to pass through, it comes into contact with the concrete rings and penetrates into the well shaft through possible cracks.
Although clay can get wet, it is a completely waterproof material. Due to the fact that clay can get wet, during severe frosts in winter you may see a slight displacement or advancement of the well rings.
When and why do you need such a device?
A clay castle around the well is needed if there is a risk of swampiness or an abundance of perched water on the land plot in the spring and autumn.
To prevent the aquifer from concrete rings from becoming clogged with soil and debris carried by rain, as well as the upper layers of groundwater, it is not enough to hermetically seal the seams between the rings. It is necessary to provide additional waterproofing.
The correct clay castle for a well made of concrete rings on vodatyt.ru
After the well is dug, so that the walls do not burst, it is necessary to carry out the arrangement. Craftsmen recommend using a clay castle for a well made of concrete rings. This technology is popular due to the high degree of protection of reinforced concrete structures in the ground.
Features of waterproofing with a soft blind area
The use of temporary waterproofing in a soft blind area around a well has a number of technological aspects that must be taken into account during the installation process:
- The entire structure is laid at the level of the second ring.
- The materials used are waterproofing film and sand.
- The edges of the film strips are thrown over the well rings.
- Decorative material is laid on top of the film and sand.
In this case, all technological requirements must be met.
Laying technology
Before making a clay castle, you need to dig up the soil to the level of the 2nd ring. The selected soil is no longer used and must be removed and disposed of. A film is placed on the bottom. The size of the area to be closed is at least a meter from the outer wall of the reinforced concrete ring.
One end of the film is placed over the well above the seam. It needs to be secured, for which a metal belt, tape or self-tapping screws are used, which are screwed directly into the concrete. In the case where adhesive tape is used, several turns must be wound. After this, the cavity is filled with sand on top of the film.
Backfilling is not carried out to the very top if FEM or natural rubble stone is used as a decorative coating. When laying, check that there is a slope away from the well of at least 1.0-1.5 degrees. But this is a temporary method, and to ensure the tightness of the well, a clay castle is a necessity. But not every type of clay can be used as a material.
What clay is suitable
Not every one is suitable for the shutter. You need to select raw materials according to several parameters:
- It must be very fat.
- It cannot contain sand or lime.
- Looks like plasticine.
- If you rub it, there will be no grains of sand on your palms. The piece will remain a single mass.
The best way to check the composition of the raw material is to mold it into a ball and leave it in the sun to dry. The oily one will crack and become tough. The ball containing sand and impurities will remain unchanged, and grains of sand will shine on its surface.
How to improve
- Soak in water for several days. This measure will allow it to gain a sufficient amount of moisture and become more pliable for work.
- Soak in water, but leave it outside for the whole winter. After it sits in the cold and then thaws, the clay will become like real plasticine.
- Add slaked lime to the raw clay in a ratio of 20% to 100%.
Preparing surfaces for interior finishing
To create a reliable protective layer, several sequential actions are performed using sealing compounds. This procedure applies to new and old wells.
At the initial stage, it is planned to prepare the walls of the well for further processing. Surfaces are thoroughly cleaned with a metal brush. There should be no dirt, moss, fungus, plaster or other mortar residues left on the base. At the joints, grooves are made approximately 2.5 cm wide and 2.5 cm deep. If there is a leak, the joint is expanded even further in this place (up to 50x50 mm). It is advisable to treat the walls with a special primer or simply moisten them with plenty of water.
How to do it yourself
After the well is installed, you can begin backfilling with soil. You can't bury it completely. It is necessary to leave the top two rings unburied, this is approximately 180 cm from the top level of the ground to the bottom of the castle. If the source is already buried, then you will have to dig a trench around it 180-200 cm deep and at least 20 cm wide.
Now you can start forming layers. The shutter is laid in stages, 20-30 cm at a time. Each layer is compacted with a special tool. It is not enough to simply trample it with your feet, as air will remain in it, which will then fill with water. For compaction, a homemade wedge-baba is used - this is a wide log approximately 150 cm in height and 25-30 cm in diameter with handles attached at the top.
The clay castle consists of two parts:
- The inner part is clay adjacent directly to the concrete ring, on the other side pressed by a soil dump.
- The outer (visible) part is located at ground level, rising 20-30 cm above the ground. Also, we must not forget about the slope from the well to the side. This is necessary so that water flows outside the castle during rain.
In areas with harsh climates and sudden temperature changes, the high moisture content of the valve may freeze, causing it to swell, crack, and begin to expand, pushing the shaft rings inside the barrel, displacing the joints.
Subsequently, no matter how sealed the source is, soil and high water will begin to penetrate into it, which, in turn, will lead to a deterioration in water quality. To prevent this from happening, you need to add a compression layer.
Waterproofing
Over time, even a properly constructed well can begin to leak water. Therefore, it is better to detect leaks in a timely manner and eliminate them. Here's what forum user Rash98 writes:
Rash98
I have the same problem, or rather they are going to dig a well for me (from rings). The problem of gaps between rings has been known to me for a long time from many. But no one has ever proposed a single intelligible solution. Except for continuous concreting instead of rings.
The idea about the outer concrete jacket is interesting. Moreover, probably, this shirt should be at the top edge on the same level with the top ring. And it would probably be nice to make this shirt in the form of a reverse cone so that the soil does not bulge out.
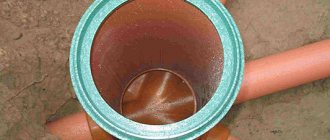
It is not always beneficial for land owners to take such radical measures. Modern concrete rings usually have a locking mechanism. But this also does not guarantee the absence of leaks. The well is built from special rings with locking joints at the joints and effective waterproofing is used, which can be:
- Outdoor _ It is installed during the construction of a well.
- Internal . It can be applied to joints after the source has been put into operation.
The building materials market today has a large selection of mixtures and compositions that make it possible to create a sealed protective water barrier. Products for eliminating non-pressure and pressure leaks are available for sale.
Groundwater repair and restoration
Sometimes, if installed incorrectly, as a result of long-term use, the valve becomes unusable, and dirty water begins to penetrate into the shaft.
If during the inspection it turns out that the water seal is not working, then it can be repaired. When the upper part of the lock has peeled off and a gap has appeared between the clay and the ring, as well as in the ground, it means that the well has shrunk, and you can get by with repairing the upper part. To do this, you need to dig out and remove the clay to a compacted area. Compact the layer again and add the required amount again. For repairs, it is better to use new clay, fatter than before.
If it is clear in the shaft that groundwater is flowing through the butt joints, then the entire castle must be repaired. Here you will have to do everything again. Completely remove the clay from the trench and fill it with new clay. Of course, you can try to use the old one, but in this case it needs to be thoroughly processed (soaked in water, mixed with slaked lime).
Conclusion + useful video
Summarizing all of the above, we determine that all the work associated with the installation of a clay castle can be done independently. Teams that claim that this is not necessary cannot be considered professional, or are being cunning in front of the customer. The described procedure is one of the mandatory measures for the improvement of natural drinking water sources.
The only thing that needs to be taken into account is that the clay castle is installed two years after the well is put into operation.
This means that in some cases decoration will have to be postponed. And within a two-year period, sand will be installed instead of clay. Otherwise, there are no difficulties, and the water in the well will remain clean and clear for years.
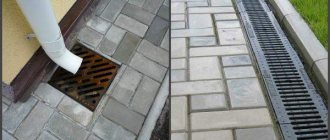
What is a blind area: what types are there?
After installing the water seal, the issue of draining storm water from the mine shaft remains open.
A blind area is a structure around a well, equipped with a slope from the ring to the side. It comes in hard and soft material.
Solid:
- clay;
- concrete.
Soft:
- special waterproofing film;
- bikrost, roofing felt;
- high density polyethylene film.
Pros and cons of soft and hard
There is a fundamental difference between soft and hard. The second one looks like a slab, the first one, on the contrary, is not visible at all.
Concrete and clay have a structure that can swell when frozen.
Soft, on the contrary, does not deform.
Also, when the earth shrinks around the well, the solid blind area will not sag, and a gap will form between the concrete and the ground, which will not be immediately visible. Over time, water and soil will get into it. If a ring gets into the barrel, it can ruin the quality of the water.
Tips for use
- It is not advisable to equip them immediately after installing the well. It is better to let the soil settle for a year or more.
- When installing a soft blind area, it is better to use special waterproofing films.
- It is better to make a castle and blind area in late spring, when there are no longer frosts and the soil is still filled with water. In addition, during the spring and summer it will be clear whether the work was carried out correctly and whether it copes with water.
- The slope angle for a solid blind area is 2-5 degrees. For soft - 5-10.
- To install a concrete blind area, it is better to assemble wooden or metal formwork, and not just pour raw materials into a dug ditch. This will help give shape and neatness to the final product.
- After arranging the concrete blind area, you can build any decorative structure on the surface, for example, a gazebo with a roof.
3 ways to reliably protect a well from the outside ↑
If work is carried out during the repair of a hydraulic structure, foundation preparation will be required. To do this, the well trunk is dug out to 3–4 meters, the destroyed concrete is beaten off with a hammer, the surfaces are washed and cleaned, and the protruding parts of the reinforcement are treated with an anti-corrosion agent. Only after this can you begin the main work:
Method 1. Laying rolled materials. The base is primed (you can use Betokontakt, bitumen-gasoline mortar and other compounds), seams and joints are sealed, and the surface is leveled (cement-sand mortar with PVA is suitable).
When the materials have dried, apply another layer of primer, after which the concrete base is coated with bitumen mastic and the roll material is glued onto it. Seams and joints are sealed.
Method 2. Use of penetrating compounds of the Penetron or Elakor system. The surface is moistened, covered with a waterproofing agent, left for three days, constantly moisturizing. Re-processing is possible.
Method 3. Applying shotcrete mixtures using special guns. A 5-7 mm layer of cement is applied to the prepared base. It will take 10-12 days to gain strength, during which time it is watered 3-4 times a day. After this, apply a second layer and also leave it for 10-12 days, constantly watering.
When the coating is ready, the space around the well trunk is filled with sand and gravel, compacted, and a blind area is made. You can build a clay castle.
Sealing seams and cracks with waterproofing materials