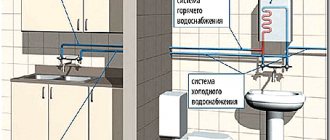
Water supply to a private house from a well is a rather complex and time-consuming process. It is necessary to install various pressure boosting systems, as well as autonomous water supply. There are several main points:
- A dug well, at least 6–8 meters deep.
- Water supply main to the building.
- High power submersible pump, station.
- Pipeline layout.
- Installation of a tank (expansion), storage tank and other equipment.
What are the advantages of a well?
If there is no well, but there is a central water supply nearby, then you can connect from there. But, as a rule, this is a very costly matter, since permission from certain authorities will be required, and this can cost not only money, but also nerves.
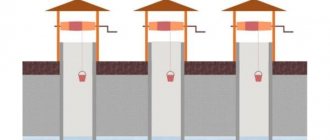
In order to make a well yourself, you do not need anyone's permission. In fact, this is a very simple device, but you need to take into account that you will have to dig deep, the depth of such a hole starts from 5 meters and ends maybe 18 meters. Everything will depend on how deep the water is relative to the surface of the earth.
The easiest way to find out is to simply walk around your neighbors and look into their wells. It is good when the underground water does not lie deep, but if this is not the case, then digging a well can require a huge investment of money. Often, this is the only way to provide your dacha with water.
A well-made well can last half a century. One of its advantages is that you can use water at any time. Water enters the house using a pump or the old fashioned way - in buckets. But the first method is more modern, although buckets may be needed if there is suddenly no electricity, but it is better than nothing.
After the well has been dug and the initial work has been done, care must be taken to ensure that the water that enters the house is completely clean and suitable for drinking.
Ensuring well waterproofing
The water to be used must be completely clean and free of dirt; only then does it make sense to carry it into the room. An untreated well can contain anything from chemicals to excrement.
All this is located in the upper layers of the earth, where groundwater flows. It is necessary to exclude the possibility of such impurities getting into drinking water.
Basically, the well is protected from dirt by reinforced concrete rings, but this is not enough to ensure that the water in the well becomes perfectly clean.
Concrete, despite all its strength, will deteriorate over time and will no longer protect the well from groundwater entering it. The first thing to do is to completely seal the rings, the joints between them and the technological holes.
It is best to begin waterproofing before the rings are lowered into the well. In this case, they are processed from all sides. This procedure can be carried out by gluing roofing felt on the outside of the rings, but since this is not always convenient, it is better to coat them with a special impregnating compound.
After use, this composition crystallizes in the pores, after which the rings become as wear-resistant as possible. Strength will be added if you coat it twice.
Waterproofing of joints occurs by placing a seal between the rings. It is elastic and increases in size after exposure to water, which makes it reliable, due to the fact that it fills the pores that are located between the joints. Next, we’ll look at how to bring water into a house from a well.
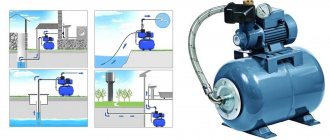
How does it work and what does a pumping station consist of?
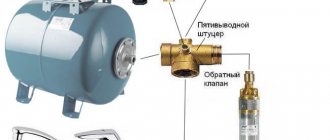
There are several versions of such devices. They all differ in the type of pumping unit and storage tank used. If we consider a model with a hydraulic accumulator , then we can talk about a higher degree of efficiency due to the design features:
- membrane tank divided into two compartments by a partition;
- a pressure switch that controls the operation of the device during significant changes in pressure values;
- electric motor;
- the pumping unit itself;
- ground terminals;
- pressure gauge;
- cable.
The basis for the functioning of such a device is a pressure switch, which is triggered when there are significant changes in the pressure value, both down and up. This allows you to reduce the number of equipment starts and, thereby, reduces the wear rate of the main components. If we are considering a model where a storage tank , then in this case you should not expect great performance, since the liquid moves naturally, without any forced action on it.
In addition, the considerable dimensions sometimes make it difficult to install the device, and the storage tank itself must be mounted above the level of the pumping station. And another important drawback of this type of equipment is the likelihood of flooding of the room when water overflows from the storage tank. But this only happens if the tank full sensor breaks down. It is this element that is responsible for starting the equipment.
The main components of the pumping station are also described in the video.
A pumping station with a hydraulic accumulator and an external ejector allows you to lift water from a depth of 8 meters or more
If you need to connect the pumping station to the well yourself, the diagram will vary depending on the type of pumping unit: with and without an ejector . Moreover, the first option exists in two variations: with a built-in (higher productivity) and a remote ejector. A special feature of the design with a built-in ejector is the ability to suck in water when creating a vacuum. However, there is an increased noise level. Versions with a remote ejector are somewhat less efficient. The simplest and most inexpensive devices are ejectorless ones.
After reading a separate article, you will learn how to choose water supply pumping stations for a private home.
Over time, various types of contaminants can appear in well water. Read about various ways to clean a well yourself in this material.
Find out what types of plumbing schemes there may be in an apartment or house and about their features.
Communications from the well to the house
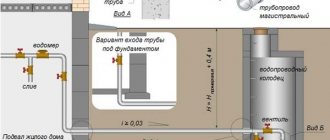
After the waterproofing of the well is completed, you can begin to make a pipeline to the house. This activity must be carried out taking into account that the water does not freeze in the pipes in winter.
To do this, a trench is dug, after which gravel along with sand is poured to the bottom. Then the polyethylene pipes (HDPE) themselves, with a diameter of 32 mm, are laid. This size is very optimal because you can easily find the necessary parts for it.
- Long-burning boilers: review of the best models of 2021 + instructions for beginners
Do-it-yourself potbelly stove: effective devices and features of operating a stove with maximum efficiency
Fire safety of public buildings
The price of such a pipe is not high, which makes it possible to install two pipeline lines so that one of them works and the other is in reserve. This must be done in case something happens to one of the pipelines.
After a trench has been dug and the bottom has been filled with crushed stone and sand, additional protective measures must be applied. You can use a larger pipe for this, and you can also use other materials.
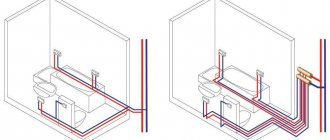
Even if the trench is dug deep enough and the pipe is not threatened by frost, it is still better to throw a layer of polystyrene foam on top. This will provide an additional guarantee that frost will not reach the pipe. Below in the photo there is a diagram of how to bring water into the house.
Construction methods and materials
Brick
You can build a well for water supply from brick.
The modern range of building materials and technologies is huge, so there can be a lot of ways to build hydraulic structures. One such method is to build a brick tank.
Brick is a familiar traditional building material, the quality and reliability of which is unquestionable and time-tested. Of course, you can use it to build an excellent well for water supply that will last for many years.
During the construction of centralized networks by government and hired services, this material is practically not used, but private owners use it quite often.
As a rule, the placement points of hydraulic structures (HTS) are planned in advance, and when developing trenches, pits are also dug for their installation.
The pit is dug at the stage of soil development.
With this approach, you just have to do the following:
- Level, compact and add sand and gravel mixture to the bottom of the pit;
- Pour a reinforced or unreinforced concrete slab at the bottom;
- Lay the walls of the structure taking into account the openings for the entry and exit of pipes. Usually they use half-brick masonry with standard ligation of rows;
- Cover the walls with a concrete cover with a hole for the hatch;
- Perform external waterproofing of walls;
- Backfill.
Usually half-brick masonry is used.
Important! When constructing holes, it is necessary to take into account the dimensions of the embedded glasses, not the pipes. When inserting pipes into cups, it is necessary to take measures to waterproof the entry points of communications.
The disadvantages of the method are the high cost of bricks, the complexity of the work and the relatively long construction time.
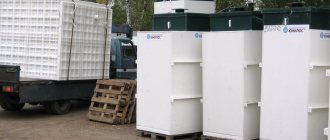
Plastic
Plastic products are becoming increasingly popular.
A fairly new, but very popular type of hydraulic structures are plastic tanks. They fully comply with the accepted standard sizes and are ready for operation, they have specialized inputs for communications with sealing systems, stairs and hatches.
A variety of materials are used - polypropylene, polyethylene, polyvinyl chloride, etc. Typically, the walls of the housing are made with stiffening ribs and corrugation to strengthen the structure. At the customer's request, the product can have insulation and other additional systems.
The buildings are equipped with everything necessary.
Installation is simple: a tank is placed on a prepared concrete or gravel pad, secured with special anchors (cables, brackets, mounting ears) and backfilled. Products with a reinforced body can be filled with ordinary earth or sand; ordinary tanks with flat walls should be filled with a sand-cement mixture.
The plastic tank is simply installed in the right place, fixed and filled.
The positive aspects of using this type of structure are the speed of installation, ease of installation and complete tightness of the walls, which are not afraid of prolonged contact with water. The disadvantage is the rather high price.
Reinforced concrete
Concrete is the most popular material for the construction of hydraulic structures.
The most common and popular material for the construction of water wells these days is reinforced concrete. This is the most durable, reliable and durable construction method.
There are two ways to use concrete:
- Casting into prepared formwork. A rather labor-intensive method, but the result is a monolithic, durable and very reliable structure;
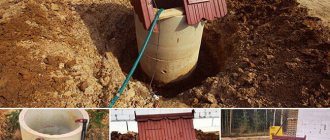
- Precast concrete construction. In this case, ready-made concrete products are delivered to the site, which in our case are cylindrical rings. The rings form a column, which is covered with a concrete cover with a sewer hatch.
Prefabricated structures are more acceptable.
Let's look at the construction of a prefabricated structure in more detail.
For example, we have compiled step-by-step instructions:
- We tamp the bottom of the pit, then we make a sand and gravel backfill and pour a reinforced concrete slab with a thickness of 100 - 150 mm;
Making a concrete pad.
- We treat the outside of the rings with a waterproofing compound, mastic or penetrating insulation . In the calculated locations, we use a crown cutter to cut out holes for introducing pipes;
We cut holes and make waterproofing.
- We lower the first ring onto the bedding made of cement-sand mortar and level it strictly horizontally. Then we apply the solution to the joint and install the next ring, not forgetting to control the level;
- In case of non-standard depth, the last ring can be replaced with an additional element of the required size . We cover the column with a concrete cover with a sewer hatch;
Install the cover with the hole.
- We seal the joints with a solution containing liquid glass or a special sealant for seams;
We process the seams.
- We backfill the structure with layer-by-layer compaction by bayonet reinforcement or using a vibrating tool.
We fill up the structure.
Important! It is better to draw up a drawing of a water well in advance. This will help to avoid inaccuracies and errors during work.
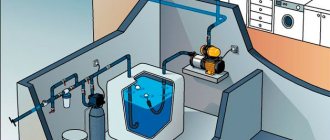
Pump installation
Now it remains to find out what is needed to connect water in the house from a well.
It is better to equip a separate room for the surface pump, because it is very noisy. It is desirable that the temperature in such a place be more than 2 degrees Celsius.
Once the location for the pump has been decided, it is necessary to install a valve on the pipe to prevent water from flowing back into the well.
Of course, it is advisable to also install a filter in front of the valve, which will protect the system from dirt. And already in the room itself a whole water filtration system is installed.
Further, all this is connected to a common water supply system from a well, which operates uninterruptedly.
Heating water pipes from freezing: installation methods and rules for installing heating elementsChimneys for gas boilers: main types and step-by-step installation instructions
- Solar collector: DIY production and operating features
In order for there to be constant water pressure during the process, it is necessary to install a hydraulic accumulator; it will allow the pump to be turned off after reaching the desired water level. You just need to connect it and you can use it. If hot water is needed, an electric water heater is installed for this purpose.
A slight difficulty may arise when selecting the necessary equipment. Difficulties may also arise with electrical wiring. In this case, it is better to contact specialists or simply find out more about how to do it correctly.
Features of summer water supply
This is the simplest option, familiar to every summer resident. You can assemble it alone, it won’t take much time. Typically, a rubber hose is connected to a special branch pipe coming from a central source. The pressure is regulated by a tap and in the old fashioned way by narrowing/expanding the hose itself.
Often, summer residents connect to the main pipe not with rubber hoses, but with their own plastic pipes, which are stretched along the entire site in pre-dug recesses. Special racks are also created from vertically located pipes near those parts of the site that need additional watering (for example, near greenhouses).
Special nozzles are used for pipe branches. which allow you to cover almost the entire area of the garden, if the pressure at the source allows.
NOTE. For summer water supply systems, it is best to purchase pipes made of lightweight materials (polypropylene), since most often summer residents bring them only for the season, and then disassemble them and take them back, because in winter, abandoned property can be stolen by summer house thieves. If you still decide to leave them assembled, be sure to thoroughly drain all the water, because otherwise, when it freezes in winter, it may damage the integrity of the pipes.