How to dig and strengthen a ditch to drain water
Increased groundwater levels or rain flows flooding the area from adjacent slopes create a threat of swamping of the local area. Basements, ground floors, and wells are at risk of flooding. Contaminated water can damage the foundation of a home or disrupt the plumbing or sewer system. Under the influence of external moisture, underground communications will freeze in winter and silt in the warm season. A well-thought-out system for draining the land around the house is required, providing for the removal of surface and groundwater. Based on needs and budget, two drainage systems are planned.
- Storm water – removes surface rain or snow water from the site.
- Drainage – prevents groundwater from rising to the surface of the earth.
Storm water should not be discharged into the drainage system. Otherwise, during the rainy season, the perforated drainage pipe will quickly overflow, and water will begin to penetrate through the holes into the soil. Instead of draining, the drain will saturate the ground with moisture.
If you need to quickly drain an area, the easiest way is to invite specialists. They will plan an effective drainage system of open, closed or mixed type, taking into account the features of the terrain and the wishes of the owner. Craftsmen, using special equipment, will carefully dig trenches, lay pipes, restore or redesign the landscape.
If you have free time, you can independently dig a ditch to drain water along the site, armed with a bayonet shovel. A drainage channel is an easy way to achieve the desired result.
Construction of a closed drainage ditch
Closed drainage ditches are recommended to be placed in areas with a low-lying location, groundwater close to the surface and a high percentage of clay content in the soil.
Construction of a closed drainage ditch.
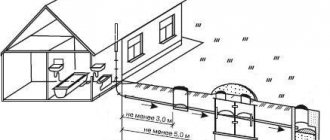
This type of drainage structure is a hole 150 cm deep and 70 cm wide, dug with a slope, at the bottom of which a layer of soil is placed for drainage. A perforated pipe is placed on top of it, covered with earth.
Water is transported through a trench to a collector system or drainage well.
This design has a more aesthetic appearance and works more efficiently than open-type ditches.
Regulatory Requirements
Building regulations define safe distances from ditches to fences and residential buildings. To prevent erosion of the foundation base, the distance should be at least 30 cm from the building. The walls of the drain must be carefully sealed to avoid water seepage.
Based on construction standards (see SNiP 2.05.07-85) drainage channels:
- constructed in areas where groundwater is deeper than 2 meters;
- laid towards the reservoir with a slope of 10 m of the riverbed: 2 cm on clay soils, 3 cm on sandy soils;
- located on the side of the water inflow from the overlying area;
- laid in closed trays in the presence of water in the ground throughout the year;
- to prevent siltation, they should have a flow speed of 25-30 cm/s (if the slopes are without landscaping).
It is prohibited to drain groundwater into natural reservoirs containing fish, running water, or used for recreation. Drains should not lead to swamping of lowlands or further erosion of ravines. The standards define a differentiated approach to the construction of drains depending on the terrain, soil characteristics, and the degree of water content of the site.
Reasons for installing a drainage system
In the list below you will find the three most common reasons that force property owners to turn to a drainage system.
- Clay soil. This problem is very common, since clay soils create excess water in the area.
- Swampy soil.
- The slope of the terrain, which creates a destructive flow of water. Such a flow can wash away the fertile layer of the earth.
If your site is located in a swampy area or the soil has a predominant percentage of clay, you should pay attention to drainage.
Design and principle of operation
The depth, width, slope, geometry, and other parameters of drainage structures that are optimal for a particular site can be calculated by specialists based on hydraulic calculations of water flow during rain runoff using the tabular values specified in the Manual for SNiP 2.05.07-85, paragraph 2.190.
Building codes do not regulate the location, size of drainage channels, or their number for a particular site. These parameters depend on the watering of a specific area and are determined for each case individually.
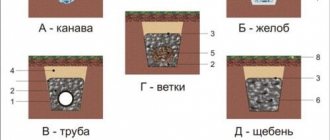
As a rule, the channels have a trapezoidal shape, the depth is about 0.7 m, the width is 0.5 m. To prevent crumbling, the walls of the gutter are made with a slope of 25-30 degrees and are carefully compacted. A thin layer of fine crushed stone or sand is poured onto the bottom. The lifespan of a ditch can be significantly increased by strengthening the walls in various ways.
First of all, it is necessary to provide for the removal of water from places where it accumulates on the site: puddles and streams will show them after rain. The design of the drainage system of drainage ditches can be linear or U-shaped, covering the estate from several sides, or, like a tree, have a main trunk with branches adjacent to it. However, the most effective drainage is achieved if drainage trenches are placed around the perimeter of the site.
A minimum slope of 2% is created in the drainage ditch in order to ensure a uniform flow rate, preventing stagnation of water and clogging of the drain. It reaches a maximum of 7% in flat areas.
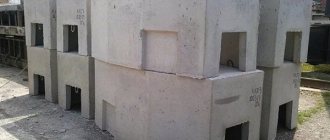
If the site has weak soil or there is not enough space to construct a large canal, it is advisable to use drainage trays.
Types of rain systems on roads
There are several types of stormwater systems:
- open. This is a network of gutters or trays through which rainwater flows. Open systems are convenient for cleaning and repair, but do not provide sufficient performance;
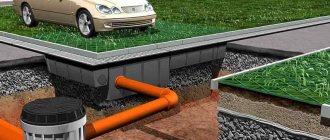
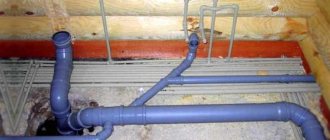
- closed. Wastewater moves through a system of underground pipelines. To clear blockages, a system of inspection or inspection wells is used. The wastewater first flows into storm water inlets, from where it enters the pipes through a network of filter elements. The construction of closed stormwater systems is complex; any leak creates the risk of erosion of the embankment;
- combined. This is the most convenient storm drainage system on city roads, drawings of which are available on specialized resources on the Internet. The scheme consists of open and closed areas located on convenient sections of the drainage line.
The selection and calculation of one or another type of system is made at the project creation stage. The main criterion is the amount of drainage, peak loads, and hydrogeological conditions on the site.
Methods of strengthening
Strengthening the ditch with masonry
The design of the drainage ditch is a simple, non-durable structure. However, without any special expenses, the drain can be turned into a decoration of the estate’s landscape.
The unformed earthen walls of the drainage system are washed away by water flows and crumble, which leads to clogging and deterioration of the drainage properties of the channel. This problem is easily solved by strengthening the slopes. The choice of the most optimal method depends on the type of soil and the desired result.
- The channel gutter is lined with natural stone.
- Ornamental shrubs or wild grasses with a developed root system that reliably secure the slopes are planted along the edge of the canal.
- Strengthening drainage walls with a three-dimensional geogrid.
- Turfing the upper part of the slope: fastening the pieces of turf is done with special wooden knitting needles.
- The use of geomats consisting of three-layer plastic gratings.
- Application of gabions.
- On clay soils, good results are achieved by using geotextiles covered with a thick layer of sand or crushed stone.
- For a summer cottage, a budget option is acceptable: strengthening slopes with old sheets of slate or car tires.
In all cases, having strengthened the side walls, it is necessary to strengthen the bottom by creating a 5-10 centimeter layer of sand, crushed stone, gravel, rock or broken brick.
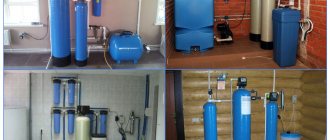
Materials
- Plumbing systems along highways are made of high-density polyethylene called polymer concrete. It is a composite that includes quartz, granite, basalt, and binder resins. The material is characterized by high anti-corrosion properties, resistance to aggressive environmental influences, durability, mechanical strength, and resistance to high temperatures (+ 82 °C). It is used for trenches along highways made of concrete, paving slabs, and asphalt.
- No less popular is HDPE material, which has the ability to self-clean. It is used in areas with low temperatures. It is distinguished by durability, low weight, the ability to withstand heavy loads and ease of installation.
- When constructing road trenches, cast iron, steel or composite gratings and protective edges are also used to prevent the destruction of the ditch walls. They are made of cast iron, galvanized or steel.
Installation instructions
The first thing you need to pay attention to before you start draining highways is the depth. How deep will the drainage be? It is impossible to analyze the soil by eye and determine its characteristics. To do this, you will have to hire specialists who will take measurements and provide you with the necessary information.
Next, plan the slope of the drainage system; the minimum slope size can be 3 mm per 1 m of length. Under no circumstances should the slope be too great. If this happens, choose a closed drainage system.
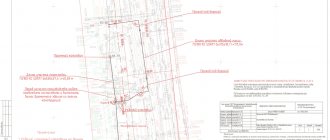
After you have analyzed your site or road, you need to draw a diagram of the future drainage system. Please note that the layout should start from the highest point of your site and go to the place where water is collected in a well or sewer. You can also use a cushion of crushed stone, which transfers water to other layers of the earth, that is, it does not accumulate it for further use as a sewer. Such a system should run along the roads and along the perimeter of the building.
After you decide on a plan, begin work on the site. First of all, trenches are dug, the depth of which is from 0.6 to 2.5 m, but more is possible. In cross-section, the ditch should resemble a trapezoid. The width of the base must be at least 0.4 m. As for the slope of the walls, a proportion of 1:1.5 must be observed (where 1 is the width and 1.5 is the height).
Read on topic: Making paving slabs with your own hands (step-by-step instructions)
If you chose an open drainage, then this is enough, but if it is a closed one, you will have to do some more work and secure it.