How to dig and strengthen a ditch to drain water
Increased groundwater levels or rain flows flooding the area from adjacent slopes create a threat of swamping of the local area. Basements, ground floors, and wells are at risk of flooding. Contaminated water can damage the foundation of a home or disrupt the plumbing or sewer system. Under the influence of external moisture, underground communications will freeze in winter and silt in the warm season. A well-thought-out system for draining the land around the house is required, providing for the removal of surface and groundwater. Based on needs and budget, two drainage systems are planned.
- Storm water – removes surface rain or snow water from the site.
- Drainage – prevents groundwater from rising to the surface of the earth.
Storm water should not be discharged into the drainage system. Otherwise, during the rainy season, the perforated drainage pipe will quickly overflow, and water will begin to penetrate through the holes into the soil. Instead of draining, the drain will saturate the ground with moisture.
If you need to quickly drain an area, the easiest way is to invite specialists. They will plan an effective drainage system of open, closed or mixed type, taking into account the features of the terrain and the wishes of the owner. Craftsmen, using special equipment, will carefully dig trenches, lay pipes, restore or redesign the landscape.
If you have free time, you can independently dig a ditch to drain water along the site, armed with a bayonet shovel. A drainage channel is an easy way to achieve the desired result.
How to make drainage on a site with your own hands: choosing a system
Drainage systems are conventionally divided into two large categories: surface and deep. If the installation of a deep system may require certain knowledge and the help of specialists, then the installation of surface drainage in a summer cottage can be done independently. This type of sewerage can be called the simplest way to solve the problem of excess moisture on the site.
Note! There are certain restrictions regarding the installation of surface and subsurface systems. Some conditions do not allow the organization of one or another type of sewage system. Be sure to carry out a preliminary analysis of the conditions of the proposed construction area.
To develop a preliminary drainage plan for a site, its territory should be inspected and key points identified. All factors that may influence further work on drawing up a site drainage project are considered.
Design of the drainage system on the site
To draw up the diagram, the following information is required:
- A plan of the territory indicating all buildings, the nature and density of plantings, as well as the boundaries of the site.
- Topographic data reflecting the features of the relief (not needed if the site has a flat surface).
- Dendroplan (the diagram is necessary if there is a large number of plantings on the territory or their planting is expected, since the plants are dependent on water).
- Road and path grid (layout of future paths and paved areas that require drainage).
- Communication system diagram.
- Hydrological data (level of water balance of the territory).
On the one hand, hydrological data influences how to do drainage in dacha-type areas, so they are very important. On the other hand, loamy soil types have the same structural structure, so such information may not be needed.
Surface drainage system on the site: device
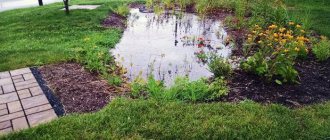
Surface drainage systems collect spring melt and rainwater, and then remove it outside the territory. The installation of such structures is especially necessary in those summer cottage areas where there is stagnation of moisture or large accumulations of it.
The process of installing a water drainage system in the garden
Most often, such conditions are formed if:
- clay or loamy soil is located under a layer of fertile soil (such types of soil are considered waterproof or waterproof);
- the territory has a lowland location, for example, at the foot of the hills;
- the surface slope in the area is partially zero, in other words, the surface is perfectly flat, which is why water cannot move independently under the influence of gravity;
- the site has areas where the soil is oversaturated with water from time to time, for example, places where plants are watered.
Note! In addition, it is possible to install surface drainage in an area with a high groundwater level. In this case, the upper layers of soil may be subject to flooding during high levels of precipitation.
Surface drainage schemes for a land plot in general terms look like this:
- water collection points;
- trenches leading from drainage points;
- a trench connecting the gangway system together;
- a drainage well into which a common trench leads (instead of a well, drainage pipes leading into a ditch or a natural reservoir, or a ditch specially dug outside the site can be used).
Scheme of a closed drainage system
Types of surface drainage for areas with high groundwater levels
In terms of design features, there are two types of surface systems for water drainage:
- point, installed in areas where water accumulates;
- linear - entire networks of drainage pipes that collect water for its further transportation to storage wells.
How much will it cost to drain the area (price of materials for a point system):
| Drainage system element | Name and parameters | Price, rub./piece |
| Storm water inlet | S'park, round | 290 |
| PolyMax Basic (300x300 mm), square | 490 | |
| PolyMax Basic (400x400 mm), square | 990 | |
| Grate to the rain inlet | S'park, round | 100 |
| PolyMax Basic (300x300 mm), square, slotted | 490 | |
| PolyMax Basic (300x300 mm), square, cellular | 500 | |
| PolyMax Basic (400x400 mm), square, cellular | 900 | |
| PolyMax Basic (300x300 mm), square, snowflake | 1100 | |
| PolyMax Basic (400x400 mm), square, slotted | 1300 | |
| Accessories | Siphon partition PolyMax Basic (300x300 mm) | 70 |
| Basket PolyMax Basic (300x300 mm) | 110 | |
| Frame D380, circle, cast iron | 1100 |
Helpful advice! Experts recommend combining both of these systems to achieve the most effective results.
Drainage installation on the site (cost of materials for a linear system):
| Drainage system element | Options | Price, rub./piece |
| Drainage tray | S'park (70 mm) | 70 |
| PolyMax Basic (100 mm) | 490 | |
| PolyMax Basic reinforced (200 mm) | 1190 | |
| Lattice | PolyMax Basic (100 mm) | 180 |
| PolyMax Basic (200 mm) | 820 | |
| PolyMax Basic (300 mm) | 2505 | |
| Sand trap | PolyMax Basic (100 mm) | 1300 |
| BetoMax Basic (100 mm), concrete | 1705 |
Features of do-it-yourself point drainage on clay soil
A point-type drainage system does an excellent job of protecting certain areas of the territory from excess moisture. Before draining a site on clay soil, as a rule, problem areas are identified, which may be:
- placement of drains leading from the roof of the house;
- door pits;
- entry zone;
- terrace; points where water is collected for irrigation of vegetation.
Laying perforated drainage pipes in a trench
To arrange the drainage of a site on clay soil, the following elements are used (prices for them are located in the tables above):
- storm water inlets;
- settling tanks equipped with containers for collecting large particles and debris;
- trenches-ladders transporting water to the storm sewer system;
- dampers that prevent the reverse flow of water and the entry of large particles of debris into the system.
Features of the storm drainage system on the site: how to make drainage
A linear type drainage system consists of gutters that are buried in the soil. These channels move water from the site beyond its boundaries. When arranging such drainage on a summer cottage with your own hands, you should remember that the liquid is discharged by gravity.
On sale you can find gutters made from various materials:
- polymer concrete;
- plastic;
- concrete.
Detailed diagram of the water drainage system
Helpful advice! To reduce the cost of purchasing consumables, you can make gutters yourself. You can make concrete elements at home using special pouring molds.
Grates are placed on top of the gutters to perform a protective function. The material for their manufacture can be plastic or metal (cast iron, steel). These elements have a removable design.
How to drain a site based on the key elements of the system:
- gutters are laid in pre-arranged trenches;
- sand catchers are installed in areas where drainage systems and other similar places are located;
- the gratings are fixed on the gutters.
Do-it-yourself installation of a linear drainage system on a site is done if:
- the angle of inclination of the surface is more than 3° (in such conditions, water can be discharged by gravity, which without drainage can simply wash away the fertile soil layer);
- it is necessary to drain water from the foundation of the house in conditions of prolonged rainfall;
- it is necessary to drain water from the relief slopes of the territory;
The drainage system will help cope with excess moisture in the garden
- utility structures are located in the same plane with the surface of the summer cottage or below this level;
- there is a need to protect the territory of the summer cottage, as well as entrances and paved paths.
Turnkey site drainage installation: cost of work
Water can destroy the foundation of a house, destroy some types of plants, wash away fertile soil from the site and even provoke a landslide. Drying the area with drainage in combination with other protective measures allows you to avoid all these problems.
List of protective measures:
- Performing seamless waterproofing of the base of the house.
- Protection of the waterproofing layer from damage.
- Installation of a drainage system at the foundation.
- Organization of additional insulation of the waterproofing layer at the base.
- Construction of an insulated blind area.
- Turnkey site drainage installation.
Installation of a drainage system by a team of workers
All items from this list (except the last one) are carried out during the construction of the house. It is better to entrust these works to professionals. You can do the installation of a storm drainage system yourself, but first you should figure out what the cost of drainage of a site carried out on a turn-key basis by professionals is. This will allow you to make the final decision as to whether it is worth laying drainage pipes with geotextiles or limiting yourself to surface mounting of the system, which you can do yourself.
Organization of site drainage (price of professional services):
| Name of the work plan | Pipe depth, m | Diameter of drainage pipes, mm | Character of the drainage layer, m | Price, rub./linear m |
| Superficial | 0,4 | 110 (geotextile) | 0.3 (crushed gravel) | 1000 |
| Rational | 1 | 110 (geotextile) | 0.4 (crushed gravel) + 0.1-0.15 (sand) | 1600 |
| Convenient (1 inspection well) | 1 | 110 (geotextile, double-walled) | 0.4 (crushed gravel) + 0.1-0.15 (sand) | 1800 |
| Eco-friendly | 1 | 110 (coconut fiber) | 0.4 (crushed gravel) | 1550 |
| Uncompromising (1 inspection well) | 1 | 110 (Wavin, geotextile) | 0.4 (granite crushed stone) | 2300 |
Installing drainage on a summer cottage: price of elements for the system
Regardless of whether the installation work is done independently or with the involvement of specialists, you must purchase all the consumables necessary for this procedure before installing the drainage system.
Helpful advice! To save money, it is recommended to purchase drainage wells and other consumables in advance. The main thing is not to make mistakes with the calculations. If you are unsure, consult a specialist to draw up a preliminary estimate. The average cost of developing a site drainage system project is 15,000 rubles.
Prices for drainage wells:
| Well type | Options | price, rub. |
| Prefabricated (made of concrete rings, diameter 1 m). Equipment: pump, plastic hatch, pump clamp, drainage (no more than 10 m) | 3 rings | 36000 |
| 4 rings | 40000 | |
| Inspection (made of plastic pipe, diameter 0.315 m). Equipment: plastic hatch, plastic bottom | 1m | 6600 |
| 1.5 m | 6900 | |
| 2 m | 7700 | |
| 2.5 m | 7900 | |
| 3m | 8950 |
The average price of cast iron gratings for storm drains as part of storm water inlets is 3,500 rubles. The package may include a waste basket and walls.
How much does it cost to lay drainage pipes in a country house (price of services):
| Pipe type | type of instalation | Price, rub./linear m |
| Flexible | Drainage trench | 500 |
| Shallow depth (0.5 m) | 700 | |
| Depth below freezing level | 1200 | |
| Tough | Drainage trench | 700 |
| Shallow depth (0.5 m) | 950 | |
| Depth below freezing level | 1600 |
The table shows that the cost of laying pipes for drainage of a site depends not only on the level of burial, but also on the type of material. Working with rigid pipes is much more difficult. This nuance should be taken into account when choosing products.
Regulatory Requirements
Building regulations define safe distances from ditches to fences and residential buildings. To prevent erosion of the foundation base, the distance should be at least 30 cm from the building. The walls of the drain must be carefully sealed to avoid water seepage.
Based on construction standards (see SNiP 2.05.07-85) drainage channels:
- constructed in areas where groundwater is deeper than 2 meters;
- laid towards the reservoir with a slope of 10 m of the riverbed: 2 cm on clay soils, 3 cm on sandy soils;
- located on the side of the water inflow from the overlying area;
- laid in closed trays in the presence of water in the ground throughout the year;
- to prevent siltation, they should have a flow speed of 25-30 cm/s (if the slopes are without landscaping).
It is prohibited to drain groundwater into natural reservoirs containing fish, running water, or used for recreation. Drains should not lead to swamping of lowlands or further erosion of ravines. The standards define a differentiated approach to the construction of drains depending on the terrain, soil characteristics, and the degree of water content of the site.
What is drainage and why is it needed?
Drainage is the process of drying the soil in swampy areas, removing excess water from the ground. This is also the name given to a system of pipes, trenches, and wells installed for these purposes. Why is it needed?
- The most harmless problem of excess water in a dacha is liquid constantly squelching under your feet and puddles all over the territory. This phenomenon is simply unpleasant;
- A negative impact on the harvest is a more serious problem. In permanently swampy areas, harvesting a good harvest is just as unrealistic as in dry sand;
- The proximity of groundwater does not make it possible to make a good cellar on the territory or a basement under the house;
- But the greatest danger threatens the house and other buildings on the site. During the period of autumn rains or spring melting of snow, the soil becomes saturated with moisture, and during frosts it becomes heaving and increases in volume.
Various options for the shape and design of the drainage ditch
The foundations of buildings, fences, and sidewalks are at risk of destruction; - In areas located on slopes, storm flows wash away the surface fertile soil layer. If such an area is not strengthened, then destruction will subsequently threaten the house.
Drainage systems are a reasonable engineering solution that allows you to get rid of the problem of groundwater in your garden. Typically, the territories of gardening cooperatives and villages with individual development are protected from flooding by a drainage ditch in which a pipe is laid, with the possibility of discharging the collected water to a lower place.
It is quite possible to build protective structures at your dacha with your own hands, but this must be done before landscaping begins. Drainage ditch, pipe, well, drainage system - these elements create a drainage system on the site.
Installation of a well for drainage on the site
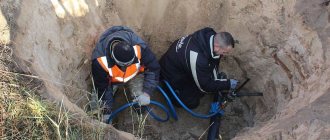
To strengthen them, you will need a large amount of excavation work, both with your own hands and, possibly, with the use of special equipment.
Design and principle of operation
The depth, width, slope, geometry, and other parameters of drainage structures that are optimal for a particular site can be calculated by specialists based on hydraulic calculations of water flow during rain runoff using the tabular values specified in the Manual for SNiP 2.05.07-85, paragraph 2.190.
Building codes do not regulate the location, size of drainage channels, or their number for a particular site. These parameters depend on the watering of a specific area and are determined for each case individually.
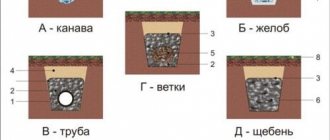
As a rule, the channels have a trapezoidal shape, the depth is about 0.7 m, the width is 0.5 m. To prevent crumbling, the walls of the gutter are made with a slope of 25-30 degrees and are carefully compacted. A thin layer of fine crushed stone or sand is poured onto the bottom. The lifespan of a ditch can be significantly increased by strengthening the walls in various ways.
First of all, it is necessary to provide for the removal of water from places where it accumulates on the site: puddles and streams will show them after rain. The design of the drainage system of drainage ditches can be linear or U-shaped, covering the estate from several sides, or, like a tree, have a main trunk with branches adjacent to it. However, the most effective drainage is achieved if drainage trenches are placed around the perimeter of the site.
A minimum slope of 2% is created in the drainage ditch in order to ensure a uniform flow rate, preventing stagnation of water and clogging of the drain. It reaches a maximum of 7% in flat areas.
If the site has weak soil or there is not enough space to construct a large canal, it is advisable to use drainage trays.
Drainage ditch designs
There are several ways to drain your property without making any special efforts. The choice largely depends on how swampy the area is, climatic conditions and other factors.
The installation of a drainage ditch can be done as follows:
- open method is the most accessible method of drainage, both in creation and in further maintenance;
- closed method - it is a little more complicated in installation and subsequent operation, but such ditches allow you to drain large volumes of water and install wells.
Methods of strengthening
Strengthening the ditch with masonry
The design of the drainage ditch is a simple, non-durable structure. However, without any special expenses, the drain can be turned into a decoration of the estate’s landscape.
The unformed earthen walls of the drainage system are washed away by water flows and crumble, which leads to clogging and deterioration of the drainage properties of the channel. This problem is easily solved by strengthening the slopes. The choice of the most optimal method depends on the type of soil and the desired result.
- The channel gutter is lined with natural stone.
- Ornamental shrubs or wild grasses with a developed root system that reliably secure the slopes are planted along the edge of the canal.
- Strengthening drainage walls with a three-dimensional geogrid.
- Turfing the upper part of the slope: fastening the pieces of turf is done with special wooden knitting needles.
- The use of geomats consisting of three-layer plastic gratings.
- Application of gabions.
- On clay soils, good results are achieved by using geotextiles covered with a thick layer of sand or crushed stone.
- For a summer cottage, a budget option is acceptable: strengthening slopes with old sheets of slate or car tires.
In all cases, having strengthened the side walls, it is necessary to strengthen the bottom by creating a 5-10 centimeter layer of sand, crushed stone, gravel, rock or broken brick.
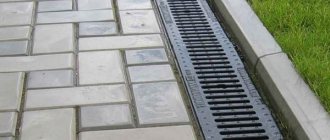
Open drainage device
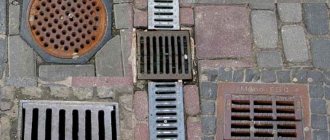
The simplest option for drainage in a dacha is open drainage systems. They are divided into two types: point and linear. Point drains are storm inlets that are fixed in the places where the drainpipe ends.
Such storm inlets are usually equipped with grates for collecting debris. A linear version of open drainage is a drainage ditch.
The simplest drainage systems are easy to make with your own hands. The art of creating engineering communications was mastered by the ancient Romans. A version of Roman drainage is still used in some farms today. Ancient engineers came up with the idea of strengthening drains with bundles of thick rods that prevented collapse.
Option for installing an open drainage ditch
It’s easy to make such a simple reinforcement with your own hands; you don’t need a pipe here, and it can last for 15 years. Stages of creating a drainage trench on the site:
- Prepare the necessary tools: a shovel, a wheelbarrow, and a pick if necessary. Of course, it is easier to dig with an excavator than with your own hands, but this is only if you need a deep trench.
- Without channels and trenches, water flows from the site randomly, but it only seems so at first glance. Of course, the streams run downhill. Therefore, the next step is to analyze the path of rain flows and determine where to collect the water. This could be a nearby pond, river, lake, stream. If nothing like this is observed nearby, you will have to build a drain well or pit with your own hands. Determining the direction of water flow is a very important point.
- For surface linear drainage, a pipe is not always needed. You can simply dig a ditch about a meter deep, bevel the walls at an angle of 20–30° and strengthen them. Old car tires are sometimes used to strengthen the trench. For this purpose, tires are cut into several fragments, then each fragment is cut lengthwise. These rubber parts are placed at the bottom of the trench.
- You can sprinkle crushed stone, gravel or sand on top.
- Stones laid along the bottom and walls will add decorativeness to the gutter. The upper edges can be planted with flowers or low shrubs: their roots, sprouting, will secure the edges of the trench. For the safety of residents, especially children, it is better to fence the length of the trench with a low fence (a hedge is an option).
- Such a trench must be cleared annually of fallen leaves and other debris.
Question details
Several ways to strengthen walls
Arranging a ditch along the fence will only to some extent play the role of a transport system, and the water that will flow into it should be well absorbed into the ground along its entire length at the bottom of the ditch.
The use of concrete sections or other methods of strengthening the bottom will be impractical. It is also possible to use a waterproof rigid base, but only if underground communications will pass under it, which must be protected from precipitation and water in the ground.
Here are ways that are effective for strengthening slopes:
- Dense plantings of plants that have a well-developed powdery root system. In this case, perennial low-growing plants, grasses, etc. are ideal for you for a slope of up to 30 degrees.
- Geomats , which are nothing more than networks of polymer materials with large cells, which are laid in several layers. They will not interfere with the growth of green spaces, but at the same time they will protect the soil from convergence and erosion in areas where the slope is up to 70 degrees.
- Biomats are special porous and cellular polymer sheets with great thickness, which have places for filling soil and perennial seeds. Suitable for areas with a slope of up to 60 degrees.
- Large reinforced cubes made of galvanized steel wire mesh or polymer material that are filled with drainage backfill materials. They are used to construct deep ditches with steep walls in mountainous areas, and also if there is a large depth of groundwater, there is a clay layer close to the surface that prevents the removal of precipitation.
When carrying out excavation work and preparing the base of a ditch, a pit should be dug with a large length and a width approximately 2 times greater than required. Material should be poured along the bottom and a cushion of gravel and coarse sand should be made. The slopes are compacted manually or mechanically, and then covered with a material that has been specially selected for reinforcement.
Calculation
To ensure that the arrangement of a drainage ditch along the fence is not done in vain and copes with the assigned tasks, you should adhere to the following important recommendations:
- The depth of the ditch along its entire length should be slightly greater than the depth of the foundation of buildings located nearby, by approximately 0.3-0.5 meters.
- The slope along its entire length, taking into account turns or a walk around the perimeter of the site, which will direct water to a single point or along the deepest border of the site.
- The slope should be determined by the composition of the earth and the calculated throughput and should be located in the range of 1-5 cm for every 10 meters of length.
If there is a drainage well that extends from the contour of the drainage ditch, it is better to take the outermost drainage system that extends farthest from the well and calculate the recess, and then calculate the control point. Everything must be located along the route that will be used in order to derive the correct ditch geometry.
How to make a ditch along the fence with your own hands
Creating a ditch for draining water with your own hands is not at all difficult, even if you do almost all the land work yourself. But the difficulty will be caused by the fact that there will be a lot of raised soil, and it will interfere during the work. For this reason, it will need to be removed to another place, and can be used to make a front garden around the entire perimeter of the site so that it is raised above the ground level. It will be much easier to use the option where reinforcement is required with biomats, mesh, geomats or geotextiles. In this case, there will be no need to overly moisten the soil for the foundation, and it will be possible to limit oneself to a small volume of loose drainage, gravel or sand, and this will significantly help reduce the load on the performer.
Price of work
It will be possible to make a drainage ditch efficiently, quickly and beautifully if you are willing to pay for the use of heavy rafter equipment. With a minimum volume, you will need to hire a driver with an excavator who can dig the base for a ditch in a few hours and at the same time it will be easier to adjust the shape and geometry of the slopes, and the depth at the base. The execution company will be able to prepare the work project and estimate in advance, so that you do not have to think or guess in terms of the final cost of the work in fact, and you can count on a guaranteed result.
The main burden on the budget of such an event is the creation of a drainage well, if required, and the rest of the work will be relatively inexpensive.
Few people will undertake to refute the assertion that today storm drainage and its variety - a drainage (also known as drainage) ditch - are an integral part of the entire improvement of the site, which is most susceptible to flooding during rains or meltwater runoff. At the same time, it also happens that few people have an idea of what a drainage ditch is and how to equip it.
Advantages and disadvantages
The advantages of a drainage ditch are obvious - it is the ability to effectively remove excess moisture from the site, which means reducing the risk of the following unpleasant phenomena:
- flooding of land;
- waterlogging of the soil and frequent formation of puddles that do not dry out;
- rotting of load-bearing wooden supports of building structures;
- death of plant roots;
- suppression of the growth of seedlings on the territory of the land plot;
- mold formation and active growth of fungus;
- excessive accumulation of dirt in the local area;
- development of chronic bronchopulmonary diseases due to constantly high humidity.
A nice bonus is the ability to independently arrange a ditch. This does not require any special equipment; every adult can take a shovel and dig a trench, and, of course, this is the lowest-cost method of drainage, since it requires virtually no financial costs.
But among the shortcomings we can mention the following:
- the ditch is less efficient compared to storm sewers;
- drainage system of this type has a rather short service life;
- The ditch requires regular maintenance and periodic compaction, as well as cleaning and restoration of the embankment.
Many believe that a drainage ditch significantly worsens the landscape, however, experts assure that, if necessary, the trench can be decorated so that it fits harmoniously into the overall design of the site.
How to arrange a drainage ditch on your own
As a rule, owners of small plots prefer to make do with the arrangement of drainage ditches on their own. And in order for the ditch to operate with maximum efficiency, you first need to mark the area, taking into account the natural slope of the area. You can even make a plan on paper in advance. In order to understand from which places the water needs to be drained first, you can simply wait for the first downpour and see where exactly the water has accumulated the most.
The most successful option is if the site itself is a sloping area. In this case, it will be enough to simply dig a U-shaped or L-shaped ditch. The “herringbone” arrangement of the ditch is also spreading, all the “branches” of which enter areas of the territory and then merge together - into the “trunk”. Taking into account the above parameters of the slope and the dimensions of the channel, a trench is dug, then the ditch is strengthened using one of the methods proposed above.
With the help of drainage ditches, damp areas are drained to prepare areas intended for the construction of buildings and structures.