The first manifestations of through body corrosion in cars of the domestic automobile industry appear already in the second year of operation. In this case, it is not necessary to contact a car repair shop, since repairing holes in the car body without welding is quite simple. Craftsmen have come up with several ways to quickly patch small holes, such as arches or holes in the wing. However, methods without welding are unacceptable for repairing power elements.
Body repair with putty
This method is used when you urgently need to repair a small hole without welding or there are no other options for car repair. However, it should be understood that this is a temporary measure, since the putty will quickly crumble. To repair the damage, use a special putty with small, medium, and large glass fibers. When preparing it, you need to ensure that there are no air bubbles. To create an even layer, a lining is installed on the back of the hole.
A primer is applied to the prepared area of damage. After it dries, putty with large fibers is applied. Depending on the size of the hole, several layers are applied and each layer is completely dry. The total thickness should not exceed 2 mm, otherwise the patch will begin to crack. The last layer is applied with fine fiber putty. The repaired surface of the car is treated with fine-grained sandpaper.
Fiberglass and mesh
To repair more extensive damage, an aluminum patch mesh is used. A piece slightly larger than the hole is cut out of it and attached with masking tape. Next, sealing holes in the car body without welding is carried out in the following sequence:
- a thin layer of fiberglass putty is applied without touching the tape;
- after drying, the tape is removed;
- subsequent layers of putty are applied after the previous one has dried;
- the surface of the car is treated with sandpaper or a grinding machine until smooth;
- To strengthen the mesh, several layers of putty are applied to the back of the body.
Long-term auto patches are made from fiberglass and epoxy resin. Several overlays are cut from it, the first of which should cover the hole with a margin of 2 cm. The size of each subsequent piece is made larger than the previous one. The last overlay should cover all the metal stripped during the preparation process.
The cut pieces are impregnated with resin and placed on the hole in a sequence of increasing sizes. If you need to seal large holes on the back of the body, use linings to prevent the fabric from sagging. After laying all layers of fiberglass, wait for the resin to completely harden. The time required for this is indicated in the instructions.
Car body soldering
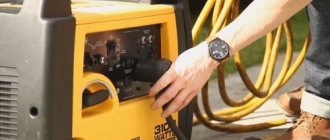
This method is used to seal small and large holes without welding. To work, you will need flux, which will protect the metal from rapid oxidation. Soldering acid, sold in radio stores, can successfully cope with this task. To achieve the required temperature, you will need a soldering iron with a power of 1 kW or more, or a version heated with a blowtorch, but it is better to use a gas torch. The solder is chosen to be refractory, since it can be used to repair a hole in the car body more reliably.
Small holes are simply filled with solder, starting from the edges and gradually fusing to the center. A large hole in the body is covered with a patch cut from tin from a tin can. It provides:
- strong connection, almost like welding;
- significantly longer service life than putty, but less than welding;
- possibility of sealing large holes;
- ease of implementation, repairs are accessible even to beginners.
The work is performed in the following sequence:
- A patch is cut to fit the size of the hole. The larger the area of contact with the body, the more reliable the connection.
- The soldered edges of the patch and the damaged areas are cleaned with sandpaper until shiny.
- Using flux and solder, the cleaned surfaces are tinned.
- After applying the patch to the repaired area of the car, it is heated to the melting temperature of the solder. In this case, you need to ensure the continuity of the seam so that there are no missing sections.
- After cooling, the remaining flux is removed, and the soldering area is washed with hot water and soda.
The disadvantage of this method is that the patch swells due to heating. If checking with a ruler confirms this, the bubble is removed with light blows of a hammer.
The resulting depression is leveled with putty:
- Marks are applied to the surface of the patch, plus a few millimeters from each edge, with 120-grit sandpaper. This is necessary for reliable adhesion of the putty to the metal.
- The cleaned surface is cleaned of dust and degreased with a solvent.
- To prevent the metal from becoming rusty, the primer is applied no later than an hour after preparation.
- The first 2 layers are applied with a phosphate or acid primer with an interval of 15 minutes.
- After waiting another quarter of an hour, apply 2 - 3 layers of acrylic primer at intervals of 5 minutes.
- It takes 3 - 4 hours to dry completely. The drying process can be accelerated using an infrared heater.
Rivets
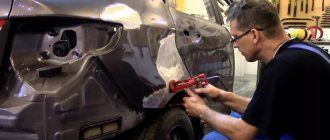
This method not only repairs large holes in the car body, but also replaces parts (fenders, aprons) without welding. In terms of reliability, it is not inferior to welding. It is recommended to install rivets in an inconspicuous place. Since there is no splash of molten metal during operation, like welding, it is often used to repair car floors.
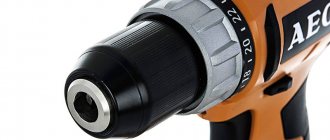
The riveter required for the job can be bought in a store (costs approximately 500 rubles). The technology is simple:
- The patch is cut so that it overlaps 2 cm around the edges of the hole.
- By attaching it to the body, it is given the desired shape.
- The locations of the holes for the rivets are marked.
- After drilling the patch with a drill according to the diameter of the rivets (4 - 6 mm), it is advisable to countersink the edges of the holes so that it fits more tightly to the surface of the car body.
- Having applied the patch again, the center of the first hole is marked and drilled.
- After riveting it and leveling it, the patches are tapped and the remaining holes are drilled in place.
- To ensure a tight fit of the patch to the car body, rivets are fastened from the center to the edges.
- To prevent moisture from getting inside, the joint around the perimeter and rivets is coated with sealant.
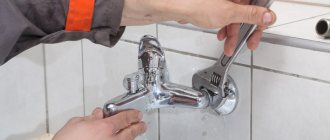
Reasons for replacing thresholds
Rotten thresholds on the VAZ 2107 are a matter of time. To extend the life of these body elements, you need to know the reasons why such an unpleasant problem as corrosion destruction occurs. The reasons why the threshold on the VAZ 2107 rotted are as follows:
- Corrosion - the underbody and sills are exposed to maximum moisture, which is the cause of damage to body elements. Moisture that gets inside the space of a part cannot evaporate for a long time, so a process such as corrosion occurs. The element deteriorates at an accelerated rate when it is exposed to water and reagents that are sprinkled on roads during icy conditions. The first thing that occurs is pinpoint corrosion, which is also called “saffron milk caps”. They are the first harbingers that you will soon need to resort to repairs.
- Mechanical impacts - damage to the car body can accelerate the process of rotting. This type of damage includes impacts from rocks, curbs or vehicles. When the device is deformed, the geometry of the body is disrupted. Mechanical damage causes damage to the paintwork, allowing moisture to enter and destroy the metal surface of the body.
If one of the above reasons is observed, then the driver will soon need to have the devices repaired. Repair most often involves replacing them. When replacing, you need to weld the thresholds, so you will need a welding machine.
What is needed for replacement
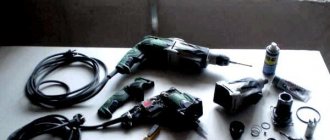
Replacing thresholds on a VAZ 2107 is a rather labor-intensive procedure, but almost every car owner can do it with his own hands. To repair thresholds, you will need to first prepare tools and materials. These include:
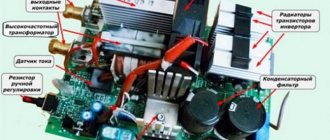
- Power tools - drill, grinder and welding machine.
- Primer and paint.
- Clamps - at least 4 pieces.
- Special joint sealant.
- New elements that will be installed to replace old ones.
These are the basic tools and materials. Additionally, you will need hand tools and supplies. During the work, it may be necessary to replace the amplifier if it is rotten. You can determine its serviceability after removing the old thresholds on a VAZ 2107 car. In this case, corrosion spots or holes will be detected on the amplifier. Let's look at how to remove and replace car body parts below.
Procedure for replacing thresholds on the seven
How to replace thresholds on a VAZ 2107 is described in detail in the material. We begin to carry out work, for which the following sequence is observed:
- Old rotten thresholds must be removed using a grinder. To do this, it is recommended to first remove the front and rear doors and drive the car onto a one-way overpass.
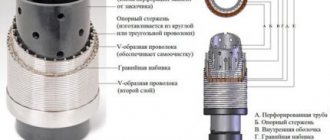
- After this, the condition of the threshold amplifier is checked. The amplifier looks like a steel plate with holes. If this plate shows signs of corrosion damage, then it is necessary to replace the entire amplifier or weld the damaged part.
- Using a grinder and special wheels, you will need to clean the surfaces for welding work. To do this, you will need to remove all unevenness and dirt.
- If amplifiers are being replaced, they must first be tried on and adjusted to the installation location. To do this, corresponding holes with a diameter of 4-6 mm are drilled every 50-70 mm.
- The amplifier is welded to the car body. The joints must be cleaned, and then the entire surface of the element must be treated with an anti-corrosion agent.
- After this, you can begin installing new thresholds on the VAZ 2107. The new element is tried on, after which it is fixed using clamps or clamping pliers.
- Holes are drilled through which the welding connection will be made. Any type of welding is suitable for the job, but it is better to use a semi-automatic welding machine, since the thickness of the metal thresholds does not exceed 1 mm.
- Next, welding is applied. First, we weld the part in the drilled holes around the perimeter, and then you need to weld the part to the car pillar. It all depends on the experience of the welder. The neater the seam, the less work will need to be done after welding.
- After the part is welded, you can begin cleaning the seams. After cleaning, you need to coat the joints with a special joint sealant.
- Now you need to putty the joints. Putty is needed to level the surface of the thresholds with the surface of the car body.
- At the final stage, the part is painted. It is important to take your time here and adhere to all technologically recommended deadlines. After painting, you must also wait until the paint is completely dry.
To increase the service life of new thresholds, they must be treated from the inside with Movil. At this point, the procedure for replacing the device is completed, and you can proceed to repairing the part on the other side of the car if necessary.
Final stage
Regardless of how the car body was repaired, they all end with putty. However, it absorbs moisture, which leads to rapid destruction. Therefore, it must be coated on top with an anti-corrosion or epoxy primer. Body repairs are completed without welding by painting. To do this, use a spray gun or aerosol cans, after covering the adjacent surface of the car with plastic film. You should not use a brush, as drips are possible.
The proposed methods will help to repair a car without welding in case of single damage. However, if a large area is affected by corrosion, it will be easier and more reliable to contact a car repair shop to replace the rusted area by welding. Most often this happens to the floor, so it is recommended to regularly check it from underneath the car using an inspection hole or lift.
When purchasing a used car or conducting a routine inspection of your car, it is necessary to assess the degree of wear of the body, which begins with rotting sills, as the most vulnerable places of the vehicle. How to repair a hole in a car sill without welding if the first pockets of corrosion are discovered? Several simple but effective methods are presented below.
Expert advice
Auto mechanics recommend repairing sills with holes and corrosion using fiberglass. Its advantages include high performance properties. She acquires them after applying fiberglass to the putty. The material can be purchased at auto stores. In addition, you will need putty with fiberglass, solvent and sandpaper.
To ensure that the repaired body elements last a long time, it is recommended that their surface be thoroughly cleaned . Then a piece is cut out of fiberglass, the size of which corresponds to the hole in the threshold. Putty is applied to the material. The fiberglass is glued to the grease-free threshold. After 10 minutes, apply a thin layer of regular putty.
If the composition is dry, the surface is smoothed with sandpaper. Primer and paint are applied on top. Removable and welded thresholds are subject to corrosion more often and faster during vehicle operation. If you do not leave the process in a timely manner, the body will begin to rust. In this case, a major overhaul will be required.
When purchasing a used car or conducting a routine inspection of your car, it is necessary to assess the degree of wear of the body, which begins with rotting sills, as the most vulnerable places of the vehicle. How to repair a hole in a car sill without welding if the first pockets of corrosion are discovered? Several simple but effective methods are presented below.
Cold methods of sealing holes in thresholds
Depending on the degree of damage, a cold or hot repair method is selected. The cold method includes body work that does not require welding equipment. A small hole can be sealed:
- construction putty;
- using fiberglass;
- primer and secured with moldings.
The semi-hot method involves using a soldering iron to seal small holes.
How to fill a hole with fiberglass
The easiest way to repair a hole in a car sill without welding is to use a fiberglass patch. For repair you will need:
- The two fiberglass patches are 2cm larger than the corrosion area. Fiberglass or fiberglass can be used.
- Automotive primer, degreaser.
- Sandpaper, grinder for preliminary cleaning of the surface.
- Putty knife.
- Varnish, paint.
Self-repair takes up to 1 hour and does not require special skills, you need:
- Use a grinder to remove the old paint layer.
- Clean the threshold, if rusty dents or through holes are found, treat with a degreaser.
- The dents should be primed well and the material should dry completely.
- Cut out the fiberglass pads, place them on a dry surface, and secure them with adhesive and epoxy resin.
- After drying, the surface is primed, sanded and painted.
When using fiberglass, it is recommended to additionally secure the thresholds with moldings.
Filling holes with putty
It is recommended to restore thresholds with putty in the following cases:
- In the absence of large through holes.
- If moderate pockets of corrosion are observed that have not affected the geometry.
- For primary rust.
Sealing thresholds using this method is quite simple; repairs take up to 2 hours and do not require special skills, but you must have the necessary tools and material. For repair you will need:
- construction fiberglass and automotive standard putty;
- Bulgarian;
- aluminum mesh if you have to patch a significant but only hole;
- medium abrasive sandpaper from 800 grit;
- medium spatula;
- degreaser;
- automotive primer;
- paint, varnish.
Starting repairs requires preliminary preparation of the surface, for this you need:
- Clean the threshold from old paint by cutting off the layer of waste material with a grinder.
- Sand the surface and treat with degreaser.
- If the threshold does not have through holes, aluminum mesh is not used. If a significant deep focus of corrosion is discovered, cut out a patch of the required size from the mesh and apply it to the recess.
- Cover the mesh with construction putty. If the damage is minor, apply a layer of putty, leveling the composition. Let it dry.
- Sand and apply a thin layer of automotive primer.
- After drying, clean the area with sandpaper.
- Paint over, varnish.
The option of sealing holes with construction putty is often used when repairing a body, but experienced drivers do not recommend it, since it begins to dry out after 7-9 months, allows moisture to pass through, and corrosive destruction continues.
Cold welding method
The method is suitable for sealing small holes in thresholds, when there are no large pockets of rust and the internal metal, threshold amplifier, is not damaged. For repairs you will need polyester resins for body work, i.e. epoxy. Repair process step by step:
- Holes are cleaned with emery, a grinding wheel, and degreased.
- The resin is diluted in the required proportions or a ready-made composition is used.
- Fiberglass of the required size is impregnated with resin and glued to the hole.
- After drying, the surface is primed, sanded and painted.
This method is suitable for repairing those parts of the body that do not experience stress. If this method is chosen for thresholds, it is recommended to always install metal moldings.
How to cook thresholds on a car
To repair a fixed threshold, a trestle or inspection hole with dimensions sufficient for welding work is required. Areas affected by corrosion are cleaned down to metal using an abrasive tool or sanding paper. It is more convenient to weld car sills after removal. After determining the boundaries of the damaged area, it is cut out with a grinder.
The applied patch must be of the same material and equal in thickness. After welding, the seams are cleaned and polished. If the threshold is not painted after repair, the color of the patch must match the main one. In case of applying a coating, the surface is degreased, primed, treated with fine sandpaper and varnish is applied.
If your welding skills are high enough, the thresholds can be cut off and worked on on a workbench before repairs. This is convenient not only when applying a patch, but also when straightening dents. After finishing the work, the thresholds are welded to the body.
It is more convenient to weld car sills after removing
Repair by sealing the hole with metal
Metal patches and subsequent soldering are considered the most productive means for restoring thresholds, even with a large area of corrosion. If rust has not led to deformation of the central pillars and distortion of the geometry, then you can use metal patches and strengthen them with a soldering iron. For repairs you will need the following materials and tools:
- metal patch, size 2 cm larger than the corrosion hole.
- assembly hammer;
- Bulgarian;
- medium abrasive sandpaper;
- anti-gravel;
- anti-rust composition - phosphoric acid, if available;
- soldering iron, tin solder;
- automotive primer, degreaser.
Preliminary work begins with treating the surface with a grinder after the used paint layer has been cut off; for this you need:
- Clean the thresholds and identify areas of corrosion.
- Cut from metal, you can use cans of auto chemicals, patches of the required size.
- Service the edges of the patch and treat the threshold with a degreaser.
- Solder the patch using a continuous seam.
- If the metal protrudes above the surface of the body, press the bubble with a hammer.
- Treat the dent in the metal with a primer, leveling the entire surface. Use phosphate primer for the first layer. After 10 minutes, apply standard automotive grade.
- Let it dry. Sand, apply a layer of paint and varnish.
Experienced drivers recommend not applying paint to the thresholds immediately after repairs, but treating the surface with a layer of anti-gravel and painting within 7-8 days.
What thresholds can be repaired without welding?
The easiest way to repair removable parts is that they are simply dismantled and replaced with new ones. These components are practical to use. Removing them is not difficult, and the whole process does not take much time - dismantling is carried out from the side or outside the spar.
After dismantling and restoration of removable thresholds, we carry out the following actions:
- unscrew the fasteners and dismantle;
- remove traces of rust using an emery cloth - to clean the corrosion we use a grinder with a special attachment;
- after removing rust, degrease the surface and apply putty;
- after the putty layer has dried, it is necessary to prime the surface, and after the primer has dried, begin painting;
- When the painted layer is completely dry, the part can be mounted to the bottom of the car.
Fixing pinholes
When diagnosing a car, if there is a pinhole from corrosion on the threshold, in 80% of cases it is necessary not only to repair the hole, but also to change the amplifier. A full inspection will reveal large areas of rusty metal under a layer of paintwork. If a pinhole occurs from mechanical damage, then it is not associated with natural wear of the metal, so small holes are sealed using putty or soldering.
Soldering is carried out according to the same algorithm as sealing a hole with a sheet of metal, the only exceptions being the small size of the patch.
Use of soldering
If small holes in the threshold or bottom of the car are sealed with soldering, then simple tips will help:
- For heating metal more than 0.5 mm thick, household soldering irons are of little use. It is better to use a portable gas burner that has a small cylinder from 400 to 700 ml. The work will go faster.
- To solder thresholds you need solder and flux. For solder, a composition with lead or tin is used; the flux can be replaced with electrolytic acid.
Experts recommend not using soldering for body work at all. The main reason is that solder, tin or lead have a much lower electrical potential than iron; during their contact, electrochemical corrosion occurs, which can subsequently lead to full-fledged rust at the joints.
The second disadvantage of soldering is hot work, which is carried out in a safe place and as carefully as possible.
Repairing large-scale damage
Any hole in the threshold of a car indicates the beginning of corrosion, but what to do if the destruction of the metal is large-scale and simple means cannot be avoided? In this case, a gas welding machine is required, a complete digestion of the body, and sometimes a complete replacement of parts of the bottom and wings.
Superficial repairs using putty, fiberglass, and small metal patches will not change the situation dramatically; rotting of the body will continue.
The first manifestations of through body corrosion in cars of the domestic automobile industry appear already in the second year of operation. In this case, it is not necessary to contact a car repair shop, since repairing holes in the car body without welding is quite simple. Craftsmen have come up with several ways to quickly patch small holes, such as arches or holes in the wing. However, methods without welding are unacceptable for repairing power elements.
Types of car thresholds
Car thresholds are divided into two large groups: removable and non-removable elements. Fixed ones are part of the bottom and perform protective and decorative functions. During the design process, the total force load is calculated on the welded parts of the bottom; the elements increase the overall rigidity of the body and serve as part of the passive safety of the car. Technically divided into front and rear (left and right, respectively), they consist of two parts: a seal and an outer surface.
Removable sills are also part of the body, but do not carry the power load. The parts are attached to the bottom with bolts from the inside of the cabin. This element can be metal, plastic, chrome, or backlit.
Repair of a removable threshold in 90% of cases comes down to a complete replacement of the hinged element. When changing something that is not removable, such a manipulation simply cannot be carried out due to the rigid attachment to the body with welding seams. Let's look at how to repair car sills without welding, depending on the damage.
Body repair with putty
This method is used when you urgently need to repair a small hole without welding or there are no other options for car repair. However, it should be understood that this is a temporary measure, since the putty will quickly crumble. To repair the damage, use a special putty with small, medium, and large glass fibers. When preparing it, you need to ensure that there are no air bubbles. To create an even layer, a lining is installed on the back of the hole.
A primer is applied to the prepared area of damage. After it dries, putty with large fibers is applied. Depending on the size of the hole, several layers are applied and each layer is completely dry. The total thickness should not exceed 2 mm, otherwise the patch will begin to crack. The last layer is applied with fine fiber putty. The repaired surface of the car is treated with fine-grained sandpaper.
Fiberglass and mesh
To repair more extensive damage, an aluminum patch mesh is used. A piece slightly larger than the hole is cut out of it and attached with masking tape. Next, sealing holes in the car body without welding is carried out in the following sequence:
- a thin layer of fiberglass putty is applied without touching the tape;
- after drying, the tape is removed;
- subsequent layers of putty are applied after the previous one has dried;
- the surface of the car is treated with sandpaper or a grinding machine until smooth;
- To strengthen the mesh, several layers of putty are applied to the back of the body.
Long-term auto patches are made from fiberglass and epoxy resin. Several overlays are cut from it, the first of which should cover the hole with a margin of 2 cm. The size of each subsequent piece is made larger than the previous one. The last overlay should cover all the metal stripped during the preparation process.
The cut pieces are impregnated with resin and placed on the hole in a sequence of increasing sizes. If you need to seal large holes on the back of the body, use linings to prevent the fabric from sagging. After laying all layers of fiberglass, wait for the resin to completely harden. The time required for this is indicated in the instructions.
Car body soldering
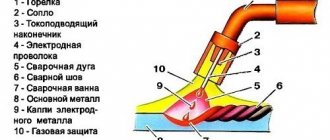
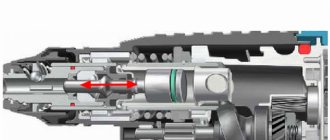
This method is used to seal small and large holes without welding. To work, you will need flux, which will protect the metal from rapid oxidation. Soldering acid, sold in radio stores, can successfully cope with this task. To achieve the required temperature, you will need a soldering iron with a power of 1 kW or more, or a version heated with a blowtorch, but it is better to use a gas torch. The solder is chosen to be refractory, since it can be used to repair a hole in the car body more reliably.
Small holes are simply filled with solder, starting from the edges and gradually fusing to the center. A large hole in the body is covered with a patch cut from tin from a tin can. It provides:
- strong connection, almost like welding;
- significantly longer service life than putty, but less than welding;
- possibility of sealing large holes;
- ease of implementation, repairs are accessible even to beginners.
The work is performed in the following sequence:
- A patch is cut to fit the size of the hole. The larger the area of contact with the body, the more reliable the connection.
- The soldered edges of the patch and the damaged areas are cleaned with sandpaper until shiny.
- Using flux and solder, the cleaned surfaces are tinned.
- After applying the patch to the repaired area of the car, it is heated to the melting temperature of the solder. In this case, you need to ensure the continuity of the seam so that there are no missing sections.
- After cooling, the remaining flux is removed, and the soldering area is washed with hot water and soda.
The disadvantage of this method is that the patch swells due to heating. If checking with a ruler confirms this, the bubble is removed with light blows of a hammer.
The resulting depression is leveled with putty:
- Marks are applied to the surface of the patch, plus a few millimeters from each edge, with 120-grit sandpaper. This is necessary for reliable adhesion of the putty to the metal.
- The cleaned surface is cleaned of dust and degreased with a solvent.
- To prevent the metal from becoming rusty, the primer is applied no later than an hour after preparation.
- The first 2 layers are applied with a phosphate or acid primer with an interval of 15 minutes.
- After waiting another quarter of an hour, apply 2 - 3 layers of acrylic primer at intervals of 5 minutes.
- It takes 3 - 4 hours to dry completely. The drying process can be accelerated using an infrared heater.
Rivets
This method not only repairs large holes in the car body, but also replaces parts (fenders, aprons) without welding. In terms of reliability, it is not inferior to welding. It is recommended to install rivets in an inconspicuous place. Since there is no splash of molten metal during operation, like welding, it is often used to repair car floors.
The riveter required for the job can be bought in a store (costs approximately 500 rubles). The technology is simple:
- The patch is cut so that it overlaps 2 cm around the edges of the hole.
- By attaching it to the body, it is given the desired shape.
- The locations of the holes for the rivets are marked.
- After drilling the patch with a drill according to the diameter of the rivets (4 - 6 mm), it is advisable to countersink the edges of the holes so that it fits more tightly to the surface of the car body.
- Having applied the patch again, the center of the first hole is marked and drilled.
- After riveting it and leveling it, the patches are tapped and the remaining holes are drilled in place.
- To ensure a tight fit of the patch to the car body, rivets are fastened from the center to the edges.
- To prevent moisture from getting inside, the joint around the perimeter and rivets is coated with sealant.
Why do thresholds wear out?
Thresholds are load-bearing elements that provide the body with additional rigidity. Due to the fact that these parts are located in the lower part of the body, they are constantly exposed to negative factors:
All this significantly reduces the service life of the thresholds. In addition, the mediocre quality of painting and anti-corrosion treatment of body elements from the factory leads to the fact that almost every owner of a “Nine” is faced with the need to replace the thresholds on their car.
Signs of the need to replace thresholds on a VAZ 2109
The appearance of even small areas of corrosion on the thresholds is the first sign that these body elements need to be paid attention to.
At first glance, such areas may seem harmless, but if you examine them in more detail and clean them, it may turn out that under the layer of paint there is a serious source of corrosion or completely rotten metal.
It is important not to miss the moment when replacing the threshold is still possible. It often happens that the threshold rots around the perimeter and there is simply no need to weld a new part. In this case, more serious and labor-intensive body work will be required.
Threshold repair options
Repair of the body elements in question can be performed in two ways:
- welding patches;
- complete replacement of parts.
The first option requires less effort and financial investment. However, this is where its advantages end. If you follow the recommendations of specialists, then repairing the load-bearing part of the body with patches is not the best option. This is due to the fragility of such repairs.
It will not be possible to completely remove corrosion with partial repairs, and its further spread will lead to new rust and holes.
If you do not have the opportunity to completely replace the thresholds or the body element in question has minimal damage, you can partially replace the damaged area. To do this, you need to cut out the rotten place, clean the metal as best as possible from corrosion and weld a patch of body metal of the required thickness or use a repair insert.
After this, the threshold is carefully protected from corrosion in order to maintain its integrity for as long as possible.
Final stage
Regardless of how the car body was repaired, they all end with putty. However, it absorbs moisture, which leads to rapid destruction. Therefore, it must be coated on top with an anti-corrosion or epoxy primer. Body repairs are completed without welding by painting. To do this, use a spray gun or aerosol cans, after covering the adjacent surface of the car with plastic film. You should not use a brush, as drips are possible.
The proposed methods will help to repair a car without welding in case of single damage. However, if a large area is affected by corrosion, it will be easier and more reliable to contact a car repair shop to replace the rusted area by welding. Most often this happens to the floor, so it is recommended to regularly check it from underneath the car using an inspection hole or lift.
Removing rotten parts
We begin repairs by removing rotten, rusty and deformed parts. I will describe the process using the example of a car, a VAZ 2109, which I was tasked with repairing. First, I’ll give you my problem areas in the car. The front floor of the car is completely rotten with all the jacks and reinforcements. And the jack could only be used with a sub-engine beam. The rear floor was also rotted. Corrosion also affected the car doors. In general, the bottom was almost absent. The wings were not in the best condition.
The front hood was noticeably rusty, all the floor connectors and the floor of the gas tank and spare tire were missing. The same fate befell the reflectors of almost all headlights. The front spar burst in the gearbox area. And above the muffler, in the floor of the trunk, there was a huge hole. The corners of the door were “eaten” by corrosion.
I describe in detail the condition of my car so that car enthusiasts can identify similar faults in theirs and draw the right conclusions. Once the necessary tools for car body repair are at hand, we begin installation.