Welding is the last stage of installation of metal structures. The process of preparing metal for welding includes several technological operations. First, the blanks are cut from rolled stock, given their final shape, and bent at the desired angle. To obtain strong connections that are homogeneous in structure, oxides are removed from the surface during the preparation of parts. The melting point of the oxides is usually higher than that of the alloy. If you do not remove the top film, it will be difficult to form a melt pool.
An important stage of preparation is the laying of blanks for the future design. They are securely fixed, only then welding begins. A short review describes the features of each stage of preparing parts for work.
Editing and Cleaning
Deformations resulting from transportation of rolled products are removed manually using a hammer or sledgehammer. If this doesn’t work, use a hand press: the workpiece is placed between thick plates and squeezed with force, pulling the plates together. It is important to give the surface its original shape, otherwise internal stresses will arise and the welded joint will not be strong.
Minor curvatures of thin workpieces are eliminated on a soft substrate; to correct complex defects, the following are used:
- sheet straightening machines;
- all kinds of presses that create high pressure.
Cleaning is another stage in the preparation of workpieces, which involves removing dirt and dust from the metal surface that has accumulated during transportation or storage in a warehouse. Water may be needed to remove stubborn stains. Old paint from used metal is removed with sandblasting machines or a grinding tool or sandpaper.
Edit
During storage and transportation, parts of the future welded joint may lose their shape. Distortions include:
- dents;
- bulging;
- warping;
- waviness;
- curvature.
Correct metal cold and when heated. Corrections of heated metal are easier. Editing can be done either by machine or manually. The machine method is used in industry. It is convenient to carry out manual editing using an anvil. Thick steel or cast iron plates are also suitable.
To carry out the straightening process, it is necessary to prepare a metalworking tool. First of all, you can return it to its original shape using a hammer. However, not just any one will do, but one made of soft material. In some cases, you can even use rubber. The shape of the striker is preferably round - a square one will leave marks on the metal. The surface of the striker must be polished. In addition to a hammer, you can use a wooden or metal smoother.
Convexity and undulation are corrected by hitting the edges and gradually moving towards the center. As you approach the central part, they strike more often, but the force of the strikes is reduced. To adjust thin products, it is advisable to use smoothing bars. The straightening of hardened metal is carried out with a straightened hammer.
Marking
The next stage of preparing parts for welding is carried out manually or using special devices. The simplest devices are a core, a metal ruler and a caliper. The metal surface is pre-primed so that the marks are clearly visible. In continuous production, templates are made, applied, and traced.
There is a distinction between the concepts of “basing” and marking. The first is the creation of a preliminary contour, the second involves punching around the entire perimeter and marking. Basting is needed when using templates. It is first outlined with a scriber, and then the contour is passed with a core. When marking manually, core punching is carried out immediately.
Marking workpieces manually is difficult and time-consuming. Preparation and assembly of workpieces using optical or dimensional cutting is preferable. Marking and marking machines have been created for marking metal; they operate on the basis of optics according to a given program. The core moves quickly, the marked sheet metal leaves the machine at a speed of up to 10 meters per minute.
The marking stage is carried out manually or using special devices
Metal cutting
Metal cutting is divided into mechanical and thermal cutting. Mechanical cutting occurs under mechanical influence and is performed on scissors, cutting machines, guillotines, presses, etc.
Thermal cutting is carried out due to the thermal effect (melting) of the metal. It can be done manually or by special machines working according to a program. When using such machines, the need for preliminary marking of metal disappears.
Thermal cutting is less productive than manual cutting. But it is much more universal, because... allows you to obtain parts of almost any configuration and any thickness.
Stripping
The technology of stripping metal before welding involves removing:
- rust to avoid inclusions in the diffuse layer;
- traces of grease, oil, organic matter reduces the quality of welding;
- burrs, metal particles, they can cause defects;
- contamination worsens the structure of the seam;
- oxide layer, it prevents the formation of a melt pool.
For cleaning, use metal brushes, sandpaper, a file, or any abrasive tools. Even minor inclusions in the melt bath lead to defects. To remove oxides and degrease non-ferrous metals, chemicals are used: all kinds of solvents, alcohol, acid. To work with aluminum, non-ferrous and high-alloy alloys, take a new brush so that it does not contain microparticles of carbon steel. On castings, the casting skin is removed before welding; on stamped workpieces, a layer of scale is removed.
For cleaning, use metal brushes, sandpaper, a file, or any abrasive tools.
Equipment
Each procedure requires its own set of tools, but the main ones worth noting are:
- A wire brush is the best stripping tool for workpieces of any thickness. With its help you can clean any metal surface until it shines.
- Acetone is used as a degreaser. It is used before starting welding or before laying flux on the surface to remove all formed films;
- Bench vice – for bending in any conditions. They are also perfect for fixing parts once the actual welding process has begun.
- Gas burner - used to heat the metal to the desired temperature. As a rule, the final preparation of the metal surface for welding involves heating it to avoid deformation.
Metal straightening and cutting parts
To straighten metal, I use special shafts that perform the process automatically, or do everything manually. In the second case, a press or sledgehammer is used to correct existing deformations. Presses are more suitable for massive channels and I-beams.
Metal straightening
After editing, you can already carry out markings, which are done before cutting. Markings are made with chalk or a sharp metal object. For cutting, a guillotine or metal scissors are used, which can be automatic or manual. Welding cutting is also used, which is less precise, but allows you to cut even thick layers. Thin sheets can be cut with a grinder, which is very convenient when welding thin metal with an inverter.
Cutting metal with a cutter
Cleaning parts - nuances
When the workpiece has taken the desired shape, the next step, which includes preparing the metal for welding, is stripping. The surfaces of the filler material, as well as the edges of the part that will be welded, are cleaned of rust, dirt, traces of scale and other unnecessary substances. You also need to remove moisture, oil stains and other chemical films. When welding metal, there should be nothing non-metallic in the pool that would lead to the formation of defects. Even relatively small remains of excess things lead to the formation of pores, the appearance of cracks, the creation of stress in the metal, and so on. Due to all this, the reliability of the welding joint is sharply reduced.
Cleaning metal after welding
Preparing metal edges for welding
Preparing metal for welding involves processing the edges, especially when working with thick workpieces. As a result, they should acquire a certain geometric shape, which will contribute to a more reliable connection. Preparation includes processing the cutting angle, gap width, creating a bluntness, adjusting the bevel length, and so on. Edges are not processed if the thickness is less than 3 mm. If the thickness is too large without treatment, the metal may not be completely welded. This is especially true if the parts being welded have different thicknesses. The correct bevel will ensure a smooth transition between parts, which will relieve load stress during operation of the part. After correctly selecting the parameters, you still need to ensure reliable fixation.
Preparing metal edges for welding
Bending
Another process that involves preparing metal for welding is bending. Strips and sheets are passed through sheet bending machines, which have three to four shafts. If the edges of the workpiece are already prepared, then cold bending can be used. Profile parts are bent under special presses. The thickness of the sheet determines the limits at which angle the metal can be bent; if this figure is exceeded, cracks and unwanted deformations may appear.
Metal bending
For a small bend radius, or with a high sheet thickness, use the hot method, which is used by blacksmiths. As the temperature rises, the material becomes more pliable and less effort is required to bend it. It is advisable to make large holes after bending.
Metal bending before welding
Tack metal
When preparing to assemble metal for welding, the individual parts need to be fixed so that after welding they have the correct position. Sometimes it’s not enough to just put them next to each other or use additional tools to fix them. Here you need to spot weld one part to another, for example, at the beginning and end of the future seam. This will help fix the part along the entire plane so that it does not move in any way. This also helps to avoid deformation during welding when the sheets are bent. The connection is not so reliable as to withstand heavy loads; now the workpiece can be moved and its position changed to any convenient one, for example, to make a horizontal seam.
Tack metal
Basic requirements for the assembly of metal structures before welding
When the metal for welding has been prepared, you can begin assembling the structure. To ensure everything is done correctly, you should adhere to the following rules:
- Free and convenient access must be provided to each connection point of the workpieces;
- All workpieces must be secured as rigidly as possible, while adhering to the specified dimensional accuracy and position geometry, so that other deformations and deviations do not occur during welding;
- All changes in position in space before and during welding should be kept to a minimum so that there are no displacements or distortions;
- Assembly must be carried out in such a way that it does not impede subsequent operations, so everything needs to be planned in advance.
Edge preparation
Thick-walled workpieces cannot be thoroughly boiled without prior preparation; the liquid metal will spread over the surface without penetrating into the joint. The connection will be fragile and will break under a small load. An important point in preparation is the rounding of sharp edges. It is necessary to smooth out the height of the metal by 2–3 mm depending on the thickness of the part.
Edge trimming is done manually, mechanically or using torches. Cold technologies are preferable; the edge is smoother. The type and angle of cutting depends on the consumables used and the type of welding equipment. The dimensions of the edges are indicated in the relevant GOSTs.
The purpose of preparing edges for welding is to provide access to the root of the weld. For thin-walled workpieces up to 3 mm thick, only the ends are aligned. 4 mm parts are welded with a gap of up to 2 mm; if they are thicker, the seams are made on both sides. The edges of thick-walled parts are chamfered or beveled. For one-sided welding, the joints are made in the shape of the letter V or U, for double-sided welding - in the shape of X or K. The size of the mating angle is from 45 to 60°. If parts of different thicknesses are welded, only the thick-walled workpiece is cut off. It is important to choose the right bevel angle, it depends on:
- metal penetration depth;
- the size of the suture bead;
- consumption of electrodes or surfacing wire.
Edge trimming is done manually, mechanically or using torches.
Product assembly
Preparation of the metal surface for welding ends with their assembly. The accuracy of the relative position will affect the quality of the connection. Before assembly begins, all parts are checked to ensure their dimensions comply with the requirements of the drawings. Templates can be used for assembly, and in mass production, jigs are used to facilitate the assembly process.
Assembly for welding is carried out on special stands. The use of supports and clamps is allowed. As the seam is formed, they are removed.
Assembling parts for welding
The prepared workpieces must be fixed in a certain position. This applies to flat and volumetric structures. The workpieces are securely fastened to avoid deformation during welding.
The size of the gap depends on the linear expansion of the alloy. When assembling parts for welding, several rules are followed:
- there should be maximum free access to the work area;
- the joints are strengthened with special devices so as to prevent shifting;
- all turns and changes in the position of the structure in space are minimized;
- assembly of complex structures for welding is carried out in stages;
- rigid fixation is ensured by tacks at a distance of 30–80 cm from each other or by a running seam;
- semi-rigid or temporary - clamp, magnetic corners, wedges, strip combs, other devices;
- volumetric connections are secured with bolted connections.
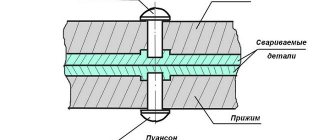
Tack welding is a small seam, 50 to 100 mm long, made with consumables prepared for the job. If a protective atmosphere is used, tacks are also made in a gas cloud. During preparation, it is advisable to connect the parts on the side opposite the main seam. If the tacks are made from the outside, before welding they are cleaned well, scale and the top oxide layer are removed. It is convenient to use a special device for spot welding; a homogeneous layer is formed at the point of contact.
When preparing workpieces of complex geometric shapes, instead of tacks, a running seam is made, not exceeding half the depth of the main one. It is cleaned when processing the root of the main seam.
Assembly involves unproductive costs, loss of time and effort. However, the strength of the metal structure depends on the reliability of the position of the workpieces.
Prepared workpieces must be fixed in a certain position
Fixation
Preparing parts for welding includes securing them securely to each other. This will ensure the correct position when welding and prevent them from shifting. A method that guarantees reliable fixation is tack welding. This refers to small seams made across the connection of parts.
The size of their section is limited - it should not exceed half the width of the seam. The length of each tack is no more than 2 cm. Pipeline assembly involves making longer tacks. The distance between them is from 10 to 80 cm depending on the length of the seam. The step size also depends on the thickness of the materials. For short seams, point joints are used at their edges. The height of the tacks should not be too high.
Small seams prevent movement of parts in joints, maintain a constant gap between them and give the structure additional rigidity. This is especially important for large connections. Tacks are performed in one pass.
Tacks are divided into temporary ones, which are removed after the weld is completed, and those that remain. They are performed on the reverse side of the connection. Before starting the process, it is necessary to do the same cleaning of the surfaces as for the main seam.
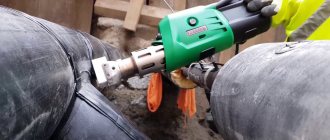
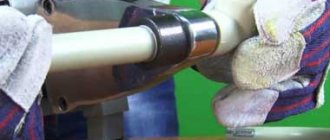
Preparing pipes for welding
The fragments are prepared in such a way as to prevent axial displacement. To prepare stainless and thick-walled pipes, factory conditions are required. The grade of steel affects the depth of cutting the ends and the angle of the chamfer
Carbon and low-alloy steel pipes are processed manually using a cold process. The sequence of operations is the same as when working with flat parts. There are several options for cutting:
- do the cutting with metal scissors;
- use a circular saw, milling attachment or grinder;
- use a gas cutter.
The process of preparing metal for welding consists of processing the ends, smoothing the edges, and chamfering if the wall is thicker than 3 mm.
For any type of welding, the metal is first cleaned around the entire circumference. Only for special electrodes for rust it is allowed to weld metal without stripping.
Bending
Preparatory and welding work includes, if necessary, bending of metals. If the parts are in the form of sheets or strips, then sheet bending machines are used. Parts with a profile are bent using special presses.
If it is necessary to bend a small diameter, as well as with a large thickness, then preheating is recommended. This will make the metal more pliable and less effort will be required.
Welding Preparation Tips
Following best practices can help you optimize the results of weld preparation, cleaning and grinding.
- Reduce the grinding angle: When using a grinding wheel, reduce the grinding angle. This will help you achieve maximum control and reduce the risk of overcutting. The outer angle of the grinding wheel is the most aggressive, so the steeper the entry angle, the more likely it is that the wheel will remove more surface material than required and ruin the workpiece. A shallower grinding angle helps improve control and reduce the risk of material damage.
- Watch your blood pressure. If you are using wire wheels, remember that only the ends of the wire are meant to work. Pressing too hard may cause the wire to bend so that the ends no longer touch the material.
- Use sequential passes. Enter the grinding pass by pulling on the tool rather than pushing it to control the aggressiveness of the grinding wheel. Sand according to the material, using smooth, even strokes rather than short, choppy strokes. This provides effective results with coated abrasives (sandpaper) and bonded abrasives (sanding wheels).
- Avoid sanding by hand. When you use only your hands to operate the grinding wheel, the vibration of the wheel can take a toll on your wrists and forearms. Instead, use the large muscles of your body to move and control the angle grinder. To minimize fatigue, move your entire body in the direction of movement, not just your arms.
Proper cleaning and preparation of the material is a critical first step in producing high-quality welds. Remember that when you prepare to weld, you want to remove contaminants from the surface, not excess material. Selecting the appropriate weld preparation abrasive and following best practices will help you achieve the results you want.
Choose the right abrasive profile
There are several abrasive profiles available to you that can make your job easier or more difficult.
Wire wheels are much more resistant to stress, but do not remove the underlying material. This makes them a good choice for removing surface contaminants and coatings without affecting the underlying metal. Abrasives are designed for cutting and removing base metal. Due to the design of the abrasive, heavy coatings and base metal can accumulate between the grains, reducing their cutting ability.
A Type 27 flap disc (flat profile) may produce a significantly different result than a Type 29 (tapered profile). An incorrect profile actually limits the amount of abrasive that comes into contact with the metal surface. Select Type 27 flap discs for lower grinding angles (5 to 10 degrees) and for light pressure applications such as finishing. When sanding at larger angles (15 to 30 degrees), choose a 29-type flap disc, which is more typical for aggressive material removal.
Wire brushes also come in different styles and sizes. Wire gauge and knot type are the most effective performers. Options include stringer, cable and standard twist.
- The stringer brush has knots that are twisted very tightly into a narrow profile. This brush is designed for cleaning tight gaps and initial welds on pipelines and multi-pass welds. They are also commonly used in general manufacturing
- A cable twist brush has a knot that is twisted almost all the way through, with more wire in the knot so it has extra width, stiffness and aggressiveness. This can be significantly more efficient for weld preparation if you don't have to specifically go into a narrow 3mm gap
- The standard twist brush assembly is not twisted all the way to the end, allowing the wire tips to fluff out for increased fit. These brushes are effective on components with a lot of surface, texture or contour imperfections. Inexperienced operators often get the most effective cleaning with a standard twist brush because it covers a wider area and is easier to control.
Assembly
Immediately before welding, the structure must be assembled. It means installing and fixing all parts in the positions specified by the project. The quality of the seams and the reliability of the structure as a whole will depend on how correctly the assembly is carried out. To do this, you should follow several rules:
- The required gap must be provided between the parts, strictly according to the design;
- The parts are secured so that their integrity is not compromised during the joining and edging process;
- There should be no restrictions on the welding location.
It makes sense to make so-called “potholders”. These are small sections of seams; they will help maintain the integrity of the metal parts installed according to the project and protect the assembly from possible damage even during transportation. Typically, tack welds are welded taking into account the following characteristics:
- their cross-section should not exceed half the cross-section of the future seam;
- maximum cross-sectional value 30 square millimeters;
- the distance from one to the other is 400-800 mm.
Welding and surfacing
Restoring parts by welding and surfacing is a fairly popular and frequently used method. With its help, instrument housings are repaired, cracks are welded, linings are made, etc. The principle of repair is to fuse worn surfaces to work under repair or normal dimensions. Regarding car repairs, two types of surfacing are always used, semi-automatic and, accordingly, automatic.
When automatic soldering is used, the arc is ignited, its movement and the supply of electrode material are mechanized. In the case of semi-automatic surfacing, everything is done manually. It is mainly used for short deposits and welding seams.
The advantages of these methods are expressed in better result quality and high productivity. This result is achieved by the fact that the flux molten after welding protects the deposited metal from the effects of the environment. It is advisable to use this for repairing heavy-duty wheel rims, splined and camshafts.
Welding and restoration of small parts involves the use of automatic vibration-arc surfacing. Thus, it is possible to fuse a layer up to 1.5 millimeters thick. The surfacing head is fixed on the machine support, and the metal part itself is in the center. The electrode wire is fed from the cassette by rollers using a vibrating mouthpiece to a rotating part. Vibrating, it comes into contact with the part and melts under the influence of electrical impulses.
Surfacing welding of parts involves three stages:
- Preparatory work;
- Welding process;
- Processing and work to improve the characteristics of the part.
During preparation, the edges of the parts to be joined are cut and their surface is cleaned. Everything happens mechanically or using oxygen cutting.
Welding galvanized parts involves the transition of zinc from exposure to temperature into a gaseous state. These vapors can cause suffocation and poisoning. Working with these parts requires a highly qualified approach and specially equipped premises.
Welding embedded (rounded steel) parts requires careful preparation. Before work, they are processed by turning if there are cracks, splinters, etc. on them. The thickness of the layer that will be removed is 1-2 millimeters. When preparing threaded surfaces, they must be freed from the thread itself, which has become unusable, as this will prevent sufficient adhesion of the metal surface. Then you need to remove traces of oil; in this case, a gas burner always helps.
Preparation of aluminum parts means a process of deposition in several approaches. Here electrodes of aluminum composition or wire consisting of an appropriate alloy will be used. Welding is carried out by local or general heating of the part at temperatures up to 300 degrees.
Make a plan
To properly prepare for welding, it is important to have a plan before you begin. Otherwise, you can easily become completely immersed in a project that seems simple, only to quickly discover that there are many factors that can lead to costly costs, extra steps, or rework.
Consider these questions when developing your welding preparation strategy:
- What is required for the welding process I use? If you perform submerged arc welding (SMAW), you can often avoid contamination of the surface of the material, but the process requires additional cleaning after welding and between passes. Metal arc welding (MIG/MAG) and gas tungsten arc welding (TIG) typically require more preparation and a cleaner surface to produce quality welds, but also require less effort to clean up after welding.
- What is the best way to prepare the material I am working with? Some materials, such as hot rolled steel, have heavy mill scale on the surface that must be completely removed before welding. Harder materials such as INCONEL alloys require high performance abrasives such as ceramics in preparation for welding. Soft and non-ferrous metals such as aluminum may be more susceptible to pressure on the grinding wheel, causing it to clog. In this case, particles of the base material adhere to the grinding wheel, and an abrasive is required to prevent the grinding surface from becoming clogged with the material being processed.
- What are the finishing requirements? When choosing an abrasive, it is important to know and understand the processing requirements.