How to make a vibrating screed for laying concrete mortar
The reliability of a concrete coating depends not only on high-quality building materials and the correct proportions of the mixture. Maximum strength and durability of the screed is given by thorough compaction. Air cavities and voids in the frozen mass will reduce the quality and shorten the period of use.
Vibrating screed application
When pouring a small platform or formwork for an outbuilding, air is released by piercing the cement mass with a pin (for example, a piece of rebar).
But when installing a floor in a room, laying a road surface, concreting a parking lot or other similar areas, using the manual method is problematic and the high quality of the foundation is not guaranteed.
A special bar with a small amplitude of intense vibrations helps to compact the surface on your own faster and easier.
Structures of any power and complexity are effective if concrete is laid and leveled in a layer of up to 20 cm. Screed of greater thickness is compacted layer by layer.
Operating principle and structure of the rack
The vibration screed consists of two elements:
- Rigid, durable frame. Consists of two parallel slats or wide strips made of high-quality alloy steel or thick aluminum. Lightweight aluminum does not corrode, is easier to maintain and lasts a long time. Steel planks are cheaper.
- Vibration system. A gasoline or electric engine drives the frame into asynchronous motion.
The device moves along the plane manually. When the motor starts, a rotational motion is transmitted, causing translational vibrations of the rack. The vibration of the frame compacts the solution, releasing air from the voids.
A vibration screed with a gasoline engine is more powerful and efficient than an electric one.
But a gasoline-powered unit emits harmful waste products into the environment, so it is recommended to compact concrete indoors using an electrically driven device.
The length of the planks reaches 10 meters, which allows the structure to be used for leveling surfaces of any size. On large areas it is more convenient to compact with an autonomous gasoline engine. The marks left behind are removed with a grinding machine while the cement screed hardens.
Types of vibration devices
Divided into 3 types:
- Floating, non-retractable. The simplest ones, intended for private use. Their power does not exceed 1.2 kW. The area of the compacted surface is limited by the length (no more than 3 meters) of the floating rigidly fixed strip.
- Telescopic, sliding. The devices are practical and versatile, allowing you to compact concrete screeds of any size. When extending, the slats increase the length to 10 meters. The leveling frame of such units consists of two bars. Designed for use by professional builders. Structurally more complex, they cost more than floating models.
- Sectional. The working part is increased by adding additional triangular frames to the rule. Functional, with convenient adjustment.
Precautionary measures:
- Before starting, the tool is carefully checked: the bar must be clean, the fasteners are securely tightened;
- the operating engine must not be touched;
- after turning off the device, the rack is washed with water;
- if necessary, work with a gasoline model indoors, ensure good ventilation;
- The electric motor must be grounded.
Prices for vibrating screeds
The table shows the cost of some popular vibrating screed models:
| Brand | Nutrition | power, kWt | Weight, kg | Price, rubles |
| Impulse M35 | Gasoline 0.71 l/hour | 1,3 | 18 | 38 500 |
| TSS-MSD | Gasoline 0.73 l/hour | 1,2 | 13 | 69 400 |
| Masalta MSD4 | Petrol | 1,5 | 12,7 | 54 300 |
| RUSA VMAX (telescopic 4-7 m) | Petrol | 3,9 | 106 | 82 700 |
| TCC BP 2 (2 m) | 380 V | 0,34 | 39 | 13 500 |
| TCC BP 6 (6 m) | 220 V | 0,34 | 61 | 26 500 |
| TCC BP (telescopic) | 220 V | 0,34 | 48 |
Assembling a basic vibration screed with your own hands
To compact a concrete surface in a small room in 30 minutes, a disposable device is assembled from scrap materials. For production you will need:
- A smooth, strong board 3-3.5 cm wide, 25-28 cm long, 50-60 cm long.
- Handle made of a block or pole up to 1.5 m long.
- Drill with button lock.
- Aluminum mounting plates.
The tool is assembled in the following order:
- The surface of the board must be smooth; for this it is cleaned and sanded.
- The drill is fixed with aluminum plates and self-tapping screws on a wooden plank in the middle so that the axis of rotation of the chuck and the center of the board coincide.
- The handle is filed at an angle and similarly secured to the board with an oblique cut.
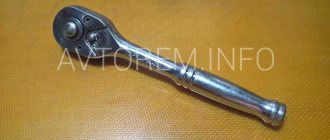
- A rod with a shifted center of gravity is installed in the drill chuck: a piece of reinforcement, a crooked drill bit, or a clamping key to the chuck.
The button of the drill connected to the network is clamped and fixed. The vibration created by the displaced center of gravity of an object inserted into the chuck is transmitted to the board.
The metal profile is more even and smooth than the board. And the weight and power of the units sold make it possible to use long slats and cover a large area, but for a single use such a vibrating screed will do.
Assembling a metal rail
For many craftsmen, the main difficulty is the lack of a welding machine and skills in handling it. In this case, welding of parts is replaced by a bolted connection.
For production you will need:
- steel channel, profile pipe or aluminum rail of the required length (1.5-2 meters or more);
- 2 corners 4x4 20x25 cm or channel sections;
- 2 pieces of pipe or fittings for handles of a convenient length;
- vibration motor, electric motor or internal combustion engine (for example, from a chain saw or walk-behind tractor, together with a clutch).
Unit assembly:
- Corners are welded on top of the center of the channel across the strip. The distance between them is determined by the size of the engine. Holes for mounting the motor are drilled and it is installed. The fasteners are tightened thoroughly so that the vibration is transferred to the frame and the motor does not come loose.
- Handles made of the selected material are welded on both sides of the engine. When working with an electrical device, they are isolated and the motor is grounded. Having the appropriate knowledge in electrical engineering, a speed controller is installed on the handle.
How to make a vibrating screed with your own hands
You should start making a vibrating screed with your own hands from the handles. As mentioned above, they will be made from reinforcement. They should be given a curved shape.
The handles must be attached to the profile by welding and secured with self-tapping screws for reliability.
Before starting this process, the future vibrating screed should be placed on a flat surface, for example, on a workbench or work table.
The handles should be carefully insulated with rubber to make the structure safe.
In addition, it will not be very convenient to grasp handles made of reinforcement. Rubber will soften vibration.
When making a vibrating screed with your own hands, you can use one handle, but professionals consider devices with two to be more reliable and convenient.
The next step is to attach the motor to your homemade tool.
It is best to place it in the center of the profile, since this way the vibration will be distributed evenly throughout the entire unit. It is best to attach the engine using two metal corners.
There are two options here. The first is that the corners are attached to the motor itself, and only then the finished structure is screwed or welded to the profile.
The second involves attaching the corners to a metal beam. But the engine is the last to be mounted on this structure. It is worth noting that spot welding or self-tapping screws can be used to attach the motor to the profile.
After all, not everyone has welding, and few can use it. And almost everyone has an electric screwdriver, which is indispensable in any home.
The main thing here is to remember to use a metal drill of the required diameter.
The vibration installation should be installed in such a way that the cable is firmly fixed to the handles or profile.
A three-phase wire dangling underfoot can cause injury to the person using the vibrating screed.
The starter, which is necessary to give the engine a start, can be left on the motor, but it is better to fix it on one of the handles, since in this case it will be much more convenient to operate the mechanism.
If you have to use the vibrating screed frequently and compact areas of different sizes, you can make its structure prefabricated.
To do this, you can measure pieces of the profile equal in length, cut them using a grinder, drill holes in two places and attach them to the unit on both sides as needed. For fastening you need to use connecting corners.
The vibration lath can also be a double or frame structure. Such equipment is useful for leveling and compacting thick layers of concrete.
The process of its manufacture is no different from a conventional vibrating screed, consisting of one channel. True, in this case the engine will have to be installed in the center of the structure, on a special mount.
In general, it is better to fasten the frame in three places: at the ends and in the middle. The frame vibratory screed can also be collapsible, only in this case it will be necessary to measure out four equal pieces of the profile, use the same number of corners and secure them at the ends.
Do-it-yourself vibrating screed for laying concrete
It is the vibrating screed for laying concrete that makes this coating as durable and high-quality as possible.
The concrete coating itself has a huge number of advantages.
However, in order for it to really have high technical characteristics, it must be filled in accordance with all the rules of existing technology.
Correctly preparing the solution and setting up the formwork is only half the battle; concrete must be laid correctly and competently.
If, after drying, there are airy areas and voids inside the concrete base, then such a coating most likely will not last for a long time and will greatly lose in quality.
Therefore, it is very important during the process of pouring cement mortar to thoroughly tamp and compact it. This will allow the trapped air to be released and thus remove voids.
This work can be done manually, by piercing the fresh mortar with a piece of reinforcement, but no one guarantees the quality of such concrete, and even if the pouring area is large, this will not be easy and quite problematic.
It is precisely in order to simplify the work and make the coating of the highest quality possible that a universal vibrating screed for concrete is used, which you can buy or you can make at home with your own hands.
In general, a vibrating screed for concrete is a special unit, which consists of a rigid, durable frame and a special vibrator that sets it into asynchronous motion.
It is customary to use thick aluminum or high-quality alloy steel as the frame material.
The main element of the vibration system is an engine powered by gasoline or electricity.
In order to put it into action, it is necessary to start the engine, which will transmit a certain rotational movement to the vibration system, and that, in turn, sets the necessary movement directly to the frame.
Thus, the frame of a working vibrating screed forces the concrete solution to move, removing all air voids from it and thoroughly compacting it. The length of the rail itself can range from several tens of centimeters to ten meters.
A floating vibrating screed, which is equipped with a gasoline engine, has more power compared to an electric one.
In most cases, gasoline-powered floating vibrating screeds are used for work in open spaces, since the engine emits harmful impurities into the atmosphere.
If it is necessary to work with concrete in confined spaces, a floating vibrating screed is used, driven by an electric motor.
It should be noted that with the help of a vibrating screed you can not only compact the solution and remove airy spaces from it.
This floating device is also actively used when it is necessary to level the surface of almost any area.
:
The best option would be to assemble it yourself, especially since anyone can do it.
Preparatory stage of work
A floating vibratory screed is not technically complicated, but to assemble it with your own hands you will need minimal knowledge in the field of construction.
As noted above, it is much easier to buy this device at the nearest specialized store, but if you want to save money and assemble it yourself, you should carefully prepare for the work.
To assemble it yourself, you must have basic skills in working with welding and electricity. It is extremely important that when assembling a floating vibrating screed with your own hands, follow the safety rules.
Diagram of the vibrating screed: 1 - working plate; 2- vibrator; 3- shaft; 4-shock absorbers; 5- frame; 6- engine; 7- belt drive; 8.9- pulleys; 10-drive shaft.
This is because most of the work will be done using a three-phase starter.
Experts consider the optimal size of the working part of a vibrating screed to be three meters, and it is better to take the engine power no more than one and a half kW.
As practice shows, a floating vibratory screed with such parameters will allow you to work with a solution whose thickness is up to twenty centimeters.
To make this universal device with your own hands, you need to have a channel and fittings on hand, as well as angles made of steel or aluminum.
In addition, you need to stock up on bolts with different diameters, insulating rubber, and high-quality three-phase cable.
You will definitely need an electric motor of appropriate power, suitable starters for it, as well as the vibration installation itself.
The tools you should find are a welding machine, a drill with a screwdriver, and a set of wrenches.
All materials must be of high quality and reliable, since during its operation the floating vibratory screed will be subject to fairly high loads.
In addition, when assembling this device, it is necessary to comply with safety regulations as much as possible and ensure reliable protection of all electrical components of the equipment.
It is advisable at the preliminary stage of work to draw up a detailed drawing of the assembled device and carry out all work in strict accordance with it.
In order for a homemade floating vibrating screed to successfully perform all its functions and have high durability, all work on its assembly should be done correctly.
Work should begin with the manufacture of handles, for which you can use fittings. The handles should be given a curved shape and attached by welding to the profile.
:
For greater reliability of fastening, in addition to welding, it is recommended to use self-tapping screws.
To protect a person when working with a vibrating conveyor, the handles are carefully insulated with rubber material. Next, lay the base of the device on a flat surface of a workbench or table.
Afterwards, you can begin installing the electric motor on the device.
To ensure that vibration during operation of the device is distributed as evenly as possible, the motor is installed in the central part of the profile.
It is best to fasten it using two metal corners. You can initially attach the corners to the engine itself, and only then to the frame, or you can do the opposite.
The vibration installation should be fastened in such a way that the cable coming from it is fixed as firmly as possible, both on the handles and on the profile itself.
The starter for the electric motor is best mounted on one of the handles, however, it is also possible on the engine itself. For ease of use of the vibrating screed, its design can be folded.
To do this, you need to cut the profile into two equal parts and make a bolted connection.
To level thick and compacted layers of mortar, the device must have either a double or frame design. In this case, the manufacturing process will be exactly the same as in the first case.
Manufacturing a vibration screed with a gasoline engine is much simpler, since there is no need to attach an electrical cable to the frame.
Many experts recommend attaching the vibrating screed frame in three separate places.
It is better if the floating vibrating screed has a completely collapsible design, and for this purpose the frame should be made of four independent parts.
:
The vibrating screed should only be used for its intended purpose, and the installed motor should not be overloaded. This will increase the service life of the device.
The process of compacting the solution should be carried out evenly and carefully.
You should not pour a large amount of concrete, as in this case there will be problems with its compaction, and the vibrating screed itself will be overloaded. Also, do not let the device run idle.
In the event that the solution drops below the level of the lath itself, it should be added using a shovel.
Anyone can assemble a vibrating screed on their own at home with the right approach to the matter.
Of course, it is much easier to buy this universal device, but in this case you will have to spend quite a lot of money.
Do not forget that the durability of the device largely depends on compliance with the rules for its operation.
Vibrating screed for concrete: how to make it yourself - Step-by-step instructions +
Concrete is the most commonly used building material. Due to its performance properties, concrete is used in almost all stages of house construction: the foundation, blind area, floor surface, walls and partitions.
To achieve strength and durability, concrete must be made from a quality mixture and the right tools.
If the concrete solution is properly compacted, the finished surface will be free of cracks. The most important tool when working with concrete is a vibrating screed.
What is a vibrating screed
The vibration lath is a rigid structure consisting of a steel lath with a handle, which contains a motor with a vibrator. Thanks to the vibration movements, the concrete solution is evenly compacted, and the lath itself creates a smooth surface.
Types of vibrating slats
A vibrating screed for concrete is a popular construction tool for screeding. Professional vibrating screeds are divided into several types.
floating
Using guides, the top layer of concrete is leveled.
The engine power compacts the concrete solution to a depth of 15 centimeters.
Vibrating screed made from a grinder for smoothing concrete with your own hands
When I was pouring the foundation slab, I didn’t think about properly smoothing the concrete surface and the surface turned out to be uneven. For such cases, they use not just concrete trowels - they use vibrating screeds. There are both electric and gasoline ones. But their cost is too high for a one-time use on site.
Purchasing a vibrating screed is an option either for companies and teams involved in the construction of foundations, or you need to rent such a tool.
But you can assemble a vibrating screed in 20 minutes yourself and 10 times cheaper.
To do this, we purchase an aluminum rule 1.5-2 m long (second slide) - price from 300 rubles. And a vibrating sander (costing from 1500 rubles). For example, an inexpensive model DEKO DKS300:
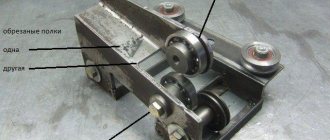
Further, there are two options: if you smooth concrete or concrete screed along the beacons, then the rule can be used vertically. Then we attach the platform (a piece of board) through the metal corners. And we fix the grinder onto it using a perforated metal tape.
You will need two simple door hinges. Through them we attach a handle (made in the shape of the letter A or P) to the vibrating screed. The handle can be made from bars or shovel cuttings. We route the power cord along the handle and secure it with plastic ties. That's it, the vibrating screed is ready.
To level the surface of concrete on a slab foundation or on concrete paths, it is better to place the rule horizontally. And attach the sander to it through 1-2 boards. You can do it even cheaper: buy a drywall profile and a wooden block. Screw the block inside the profile, and fix the grinder on it.
Here the handle is without hinges - screwed on with self-tapping screws. To keep the tool clean, it is better to wrap the grinder in polyethylene, leaving holes for air cooling.
Someone makes a vibrating screed with two rules:
The vibration screed assembly process is shown in a short video:
Aluminum is a soft metal and wears out when working on beacons for a long time. To strengthen it, here’s a tip: stick a metal corner on the foam.
I met another council. Instead of a sander, you can use a hammer drill. To do this, it is fixed on the handle in hammer mode and pressed against the base through the crown. The vibration will be sufficient even to vibrate concrete to a depth. And air will come out of it.
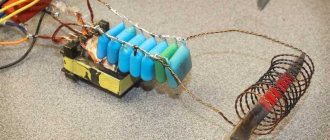
Well, one more design. Anyone who has a deep concrete vibrator can assemble a similar structure:
We fix the flexible shaft pin to the base, and the motor to the handle. The photo shows a factory model for a screwdriver with a gearbox. If you have a drill, you can purchase a mace for the vibrator separately.
Anyone who has assembled something similar - write in the comments about your design.
Subscribe to the channel, add it to your browser bookmarks (Ctrl D). There is a lot of interesting information ahead.
Do-it-yourself vibrating screed for laying concrete (drawings)
The reliability of a concrete coating depends not only on high-quality building materials and the correct proportions of the mixture. Maximum strength and durability of the screed is given by thorough compaction. Air cavities and voids in the frozen mass will reduce the quality and shorten the period of use.
When pouring a small platform or formwork for an outbuilding, air is released by piercing the cement mass with a pin (for example, a piece of rebar).
But when installing a floor in a room, laying a road surface, concreting a parking lot or other similar areas, using the manual method is problematic and the high quality of the foundation is not guaranteed.
A special bar with a small amplitude of intense vibrations helps to compact the surface on your own faster and easier.
Structures of any power and complexity are effective if concrete is laid and leveled in a layer of up to 20 cm. Screed of greater thickness is compacted layer by layer.
Operating principle and structure of the rack
The vibration screed consists of two elements:
- Rigid, durable frame. Consists of two parallel slats or wide strips made of high-quality alloy steel or thick aluminum. Lightweight aluminum does not corrode, is easier to maintain and lasts a long time. Steel planks are cheaper.
- Vibration system. A gasoline or electric engine drives the frame into asynchronous motion.
The device moves along the plane manually. When the motor starts, a rotational motion is transmitted, causing translational vibrations of the rack. The vibration of the frame compacts the solution, releasing air from the voids.
A vibration screed with a gasoline engine is more powerful and efficient than an electric one.
But a gasoline-powered unit emits harmful waste products into the environment, so it is recommended to compact concrete indoors using an electrically driven device.
The length of the planks reaches 10 meters, which allows the structure to be used for leveling surfaces of any size. On large areas it is more convenient to compact with an autonomous gasoline engine. The marks left behind are removed with a grinding machine while the cement screed hardens.
Types of vibration devices
Divided into 3 types:
- Floating, non-retractable. The simplest ones, intended for private use. Their power does not exceed 1.2 kW. The area of the compacted surface is limited by the length (no more than 3 meters) of the floating rigidly fixed strip.
- Telescopic, sliding. The devices are practical and versatile, allowing you to compact concrete screeds of any size. When extending, the slats increase the length to 10 meters. The leveling frame of such units consists of two bars. Designed for use by professional builders. Structurally more complex, they cost more than floating models.
- Sectional. The working part is increased by adding additional triangular frames to the rule. Functional, with convenient adjustment.
- Before starting, the tool is carefully checked: the bar must be clean, the fasteners are securely tightened;
- the operating engine must not be touched;
- after turning off the device, the rack is washed with water;
- if necessary, work with a gasoline model indoors, ensure good ventilation;
- The electric motor must be grounded.
What do you need to know for those who are planning to make a vibrating screed for concrete with their own hands?
If you decide to start making an electric vibrating screed with your own hands, remember that enthusiasm alone will not get you far. You will definitely need knowledge and skills in the construction field.
In addition, the one who is going to make this tool must be able to handle a welding machine and have a little knowledge of electrics.
An integral part of such a process is compliance with technical safety, since the electric vibrating screed is manufactured on the basis of a three-phase trigger mechanism.
Therefore, both during the assembly process and during operation you should act extremely carefully.
Remember that it is better to make the working part of the slats 2.5-3 meters long. However, this depends on the size of the facility being built. The power of homemade equipment should not exceed 1.5 kW.
Practice shows that this indicator is quite sufficient to level and compact a layer whose depth is 15-20 centimeters.
It is important to note that if you are going to use a vibratory screed on a large construction site, its power should be increased. It's much safer and more effective.
Do-it-yourself vibration screed: materials, manufacturing instructions, nuances of use
Pouring a concrete screed in a house is a rather labor-intensive process. Not only do you need to prepare the solution, it needs to be carefully leveled over the beacons. Most often, the usual rule is used for these purposes.
And today we’ll talk about how you can use it and some other parts and tools to make a vibrating screed, with which it will be much easier to level the concrete. And the author of the Sharp Hammer channel knows how to do this.
What may be required to make a vibrating screed
Despite the apparent complexity of such a tool and its considerable cost in stores, you can assemble a vibrating screed at home almost on your knees. The only thing that cannot be done inside the home (at least not worth it) is welding work. But in fairness it is worth noting that there will be a minimum of them.
Platform for installing vibration motor
To make a platform for the engine you will need two wide brackets. You can find them at a metal warehouse, or perhaps someone has similar ones lying around in their garage or shed. As a last resort, you can purchase a small piece of cable duct and unravel it using a grinder. The width of the staple should be 5–7 cm, this will be enough.
https://www.youtube.com/watch?v=8LsIh7mbsU4
To make the platform, you will need to weld these brackets to the handle of the paint roller. In words, everything can be difficult to understand, so we suggest you pay attention to the photo example posted below.
PHOTO: .comThis is how you need to weld the staples to the handle of the roller
That's all the welding work that was mentioned at the beginning of the article.
What to use as a vibrating screed motor
When starting to make such a tool, you should understand that it must be universal. The point is that pouring the screed is a one-time job, which means that the engine from the vibrating screed (if the latter is not needed) should be used for other purposes. Therefore, the best option here would be to use a conventional vibration grinder as a motor.
There is another advantage to using a grinder: you don’t need to trick a regular motor shaft by turning it into a vibrating one. All that remains is to think about how to attach the electrical equipment to the platform so as not to damage the grinder.
PHOTO: .comThe vibrating grinder is perfect for today's homemade project.
What is the most convenient way to connect a grinder?
Here you can simply attach a socket to the long handle, into which the grinder plug will be plugged. However, there is a better idea. It is quite feasible if you find an old drill with a burnt-out motor in the closet. The engine is removed from it, but everything else will be used.
To begin with, wires are removed from the drill that will be used to power the grinder. Next, they are passed through a small piece of pipe with a diameter of 50 mm and a round socket from the extension cord is attached to them. If you put everything together, you get some kind of pistol with a rather long and thick barrel.
PHOTO: .com This drill is quite suitable for a vibrating screed
Now, when you connect the drill to the network, power will be supplied to the socket, but only if you press the key. Moreover, the harder the operator presses, the more tension will be applied to the grinder. All that remains is to secure the resulting structure to the handle, which can be done using regular tape.
PHOTO: .com This socket will be on the back side of the sewer pipe
Mount for grinder
The sander can be secured to the platform using two pieces of DIN rail. They must be screwed in such a way that the power tool can be tightened using bolts on both sides. Elementary clamps that are very easy to disassemble if necessary, and then use the vibrating grinder for its intended purpose.
PHOTO: .com Attaching a sander to a platform can be ridiculously simple
Installation of the main element of the vibration rack
Well, now it’s time to work with the rule. It is necessary to drill 4 holes in it so that it can be connected to the side ribs of the platform with bolts. And again, fasteners from the “couldn’t get simpler” series. If necessary, the rule can be removed and used manually, or replaced with a longer or shorter one.
PHOTO: .com The rule has been established, which means you can assemble and check the vibrating screed for functionality
Final assembly of the tool
All that remains is to do a mere trifle - stick the handle into the place intended for it on the handle of the roller and connect the plug of the vibration grinder to the socket in the pipe. After this, you can begin practical tests.
PHOTO: .comFinal touches: the handle is inserted into the handle from the roller - you can connect the vibrating screed
Real world testing
After completing the work on making the vibrating screed, you can begin pouring the floor. To do this, mix a solution (the more, the better), which is laid out between the beacons. Do not be afraid that the solution will not be produced. When working with a vibrating screed, the time required for leveling concrete will be reduced by approximately 10 times.
When the solution is laid out in a mountain between the beacons, the vibrating screed turns on and simply drags along the guides with slight pressure. Here the master himself will notice how much easier it is to work with such a tool than with the usual rule.
PHOTO: .com The vibrating screed showed itself perfectly, which means the work was not done in vain
Final word
This tool is extremely convenient to use. At the same time, it compares favorably with the one that can be purchased in a store. After all, it is much cheaper.
At the same time, a homemade vibrating screed can be disassembled and parts from it can be used as an independent tool.
This approach will help relieve the home craftsman’s pantry, relieving him of the need to store disposable items that would be a shame to throw away.
We really hope that everything we tell you today will be useful to you. Despite the fact that the author tried to present everything in the simplest possible language, it is possible that something remains not completely clear. If so, ask your questions in the discussions below.
The HouseChief editors will be happy to clarify any unclear points. There you can comment on what you read and express your personal opinion on the advisability of assembling such a tool yourself. If you found the article interesting, don't forget to rate it.
Every opinion is extremely important to us. Take care of yourself, your loved ones and be healthy!
Loading…
Making a vibratory screed for laying concrete
It is the vibrating screed for laying concrete that makes this coating as durable and high-quality as possible.
The concrete coating itself has a huge number of advantages.
However, in order for it to really have high technical characteristics, it must be filled in accordance with all the rules of existing technology.
Correctly preparing the solution and setting up the formwork is only half the battle; concrete must be laid correctly and competently.
If, after drying, there are airy areas and voids inside the concrete base, then such a coating most likely will not last for a long time and will greatly lose in quality.
How to make a Vibrating Screed? Types and instructions - Review +
Concrete is the most commonly used building material. Due to its performance properties, concrete is used in almost all stages of house construction: the foundation, blind area, floor surface, walls and partitions.
To achieve strength and durability, concrete must be made from a quality mixture and the right tools.
If the concrete solution is properly compacted, the finished surface will be free of cracks. The most important tool when working with concrete is a vibrating screed.
Telescopic
Such devices have sliding slats, which allows you to level a large area at the same time.
Before starting work, the slats are fixed to the required distance, which simplifies the work.
Sectional
They have a large grip, which is ideal for industrial construction. They have a collapsible design, which makes them convenient for transportation from site to site. Equipped with a powerful engine.
Aluminum
This type of vibrating screed is designed for processing freshly laid concrete. Designed for private construction. Thanks to its lightness, it is easy to manage.
Based on the type of engine, there are gasoline and electric vibrating screeds.
As noted above, a gasoline vibrating screed is more powerful and, accordingly, more expensive. Electric vibrating screeds have less power, but they are recommended for use in enclosed spaces.
Gasoline engines emit harmful substances during operation, which is noticeably noticeable in confined spaces.
Examples of good vibrating screeds
The Spanish vibrating screed ENAR is perfect for professional use .
The features of this tool are:
- ease of use;
- compacts concrete to a depth of 15 centimeters;
- does not sink into the concrete surface;
- profile length reaches 4 meters;
- Ideal for working on freshly laid concrete.
The price range for a vibrating screed with a Honda gasoline engine with a power of 0.7 hp starts from 44,000 to 51,000 rubles. Weight depends on the chosen model and varies from 15 to 25 kg.
When buying a vibrating screed, remember that it must fully meet your requirements and be suitable for your construction site.
DIY vibration screed
For small jobs, you can use a homemade vibrating screed.
Manufacturing
The simplest option is to assemble a vibrating screed from a board, timber and drill.
- First, the surface of the board must be sanded, all irregularities must be removed. It is this material that will serve as the basis.
- Next, a drill is attached to the board, about 25 cm wide and about 30 mm thick, with self-tapping screws. The drill should lie lengthwise on one of the sides.
- Also, a meter-long beam is attached to the board using self-tapping screws.
The vibration screed is ready.
Usage
It is easy to use.
You insert a curved drill into the chuck of an electric drill and connect it to the mains, thereby creating vibration movements of your board.
Don't forget about safety rules! Wet concrete can be a good conductor of electrical current. Wear gloves and boots.
Flaws
There are no shortcomings in a homemade vibrating screed. They are as follows:
- No matter how you sand the board, it will not have the same smooth surface as an aluminum screed.
- The power of the drill is not sufficient to work with a larger board, and accordingly, the work will be performed in small sections.
- Disposable vibration screed, because After the first use, the board will become unusable.
- It is impossible to regulate the speed.
Vibrating screed option with aluminum profile
It will be more difficult to make a vibrating screed with a metal lath with your own hands. In addition to the monetary costs, you also need to have technical knowledge.
Instead of a board, in this version an aluminum profile will be used. This design will last you longer. The function of the handle will be performed by a pipe, and, of course, a vibration motor.
We do not recommend using welding in this option. For safety reasons, cover the handle of such equipment with insulating material.
Adviсe
- Your homemade design will be reliable if you secure all its components properly . The bolts must be tightly screwed. The wire should not dangle.
- After you have made a vibrating screed with your own hands, test it .
To begin with, a small surface will suit you. Test your homemade tool first, otherwise you may ruin the entire screed. Do the work without rushing.
Vibrating screed rental
Professional vibrating screeds cost from 20,000 rubles (electric) and from 40,000 rubles (gasoline). Not everyone can afford this.
Also, many developers do not see the point in spending that kind of money, and when screeding the floor and foundation, they cannot do without this tool.
Therefore, the best option would be to rent a vibrating screed for concrete. Almost all large stores offer rental services for tools and equipment.
You can rent a vibratory screed for a certain number of hours or several days, leaving a certain deposit, which is provided for by the store’s policy.
Method of working with a vibrating screed
- Before pouring concrete, it is necessary to set the horizontal guides.
- The vibrating screed is lined up along the guides.
- The concrete mixture begins to be poured, which should slightly cover the vibrating screed.
- Next comes the compaction process by vibration of the tool.
- The rail is pulled along the aligned guides.
- During operation, the vibrating screed makes unpleasant noises, and due to vibration, calluses can form, so use personal protective equipment.
All of the above methods will help to avoid difficulties when laying concrete pavement.
DIY vibration screed
For small jobs, you can use a homemade vibrating screed.
Manufacturing
The simplest option is to assemble a vibrating screed from a board, timber and drill.
First, the surface of the board must be sanded, all irregularities must be removed. It is this material that will serve as the basis.- Next, a drill is attached to the board, about 25 cm wide and about 30 mm thick, with self-tapping screws. The drill should lie lengthwise on one of the sides.
- Also, a meter-long beam is attached to the board using self-tapping screws.
The vibration screed is ready.
Usage
It is easy to use.
You insert a curved drill into the chuck of an electric drill and connect it to the mains, thereby creating vibration movements of your board.
Don't forget about safety rules! Wet concrete can be a good conductor of electrical current. Wear gloves and boots.
Flaws
There are no shortcomings in a homemade vibrating screed. They are as follows:
- No matter how you sand the board, it will not have the same smooth surface as an aluminum screed.
- The power of the drill is not sufficient to work with a larger board, and accordingly, the work will be performed in small sections.
- Disposable vibration screed, because After the first use, the board will become unusable.
- It is impossible to regulate the speed.
Vibrating screed option with aluminum profile
It will be more difficult to make a vibrating screed with a metal lath with your own hands. In addition to the monetary costs, you also need to have technical knowledge.
Instead of a board, in this version an aluminum profile will be used. This design will last you longer. The function of the handle will be performed by a pipe, and, of course, a vibration motor.
We do not recommend using welding in this option. For safety reasons, cover the handle of such equipment with insulating material.
Adviсe
- Your homemade design will be reliable if you secure all its components properly . The bolts must be tightly screwed. The wire should not dangle.
- After you have made a vibrating screed with your own hands, test it . To begin with, a small surface will suit you. Test your homemade tool first, otherwise you may ruin the entire screed. Do the work without rushing.