Storm drainage is an engineering structure designed for the rapid collection and drainage of water from the territory of a populated area, industrial enterprise, or separate building.
The absence of such a drainage system leads to flooding of low-lying areas, swamping of the area, destruction of roads and building foundations.
Organized water collection helps to avoid these negative consequences of precipitation. It is necessary to think about the storm drainage system at the design stage of a construction project. Otherwise, creating a sewer system of this type will cost a much larger budget than it could. Therefore, it is advisable to create a complex of engineering structures, which will include a building (facility) and a “storm drainage system”.
To understand what a storm drain is, you need to understand the principle of its operation. A sewer of this type is a highway whose task is to collect rain and melt water, as well as remove it through a pipeline system from a specific area of the territory. In order for the system to work correctly, its installation must be guided by established building codes and regulations, which address the requirements for external sewer lines.
SNiP 2.04.03-85 is precisely the document that regulates the technical requirements for the construction of sewers for collecting atmospheric water. You should not think that for a small house or building for another purpose you can make a storm drain with your own hands without referring to SNiP. Violations of its norms can lead to stagnation of water in pipes and wells, which will lead to completely undesirable consequences.
Features of drainage design
Based on their design features, all roof storm drains can be divided into two large groups:
The first group is characterized by a pitched structure, which is mounted outside on roof overhangs and drains water from the roof. A variety of materials are used in its manufacture, but the most commonly used are metal and PVC plastic.
Advice! They have their own specific features, pros and cons, so you need to be very careful when choosing!
The second group, on the contrary, is characterized by installing the system indoors. It is usually used for drainage from the surface of a flat roof. For good drainage, you can make special technological slopes where funnels can be placed at the lowest part. In most cases, pipelines are installed indoors, but there are rare cases of installations externally, the main thing is that there is access to the sewerage system. Installation of a storm drain on the roof includes a metal pipe, but sometimes also a plastic one. There are two types:
- Unorganized drainage occurs along the eaves and roof overhangs directly into the sewer system;
- An organized look is carried out through gutters and external pipes that will run to the sewer system.
Roofing part of storm drainage system
Since the collection of water from the territory of buildings and structures begins with its discharge from the roofs, we should not forget that storm drainage begins precisely from the roofing part.
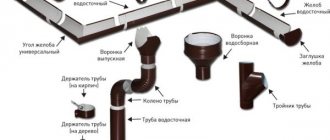
Roof drainage consists of the following main elements:
- gutter;
- funnel;
- pipe;
- stub;
- knee;
- holder;
- connector
As soon as the drainage system on the roof of the building is installed, you can begin to directly install a surface or underground water discharge system.
The procedure for installing the ground part of the storm drain
First of all, they mark out the area where it is planned to install a wastewater sewage system. Then they begin excavation work. They dig trenches for pipes and trays, pits for inspection wells. In this case, the depth of soil freezing is taken into account. Immediately form the required soil slope using a cable or rope.
Next, they begin to install water intakes. Sand is poured into the dug trenches, on which the pipes are laid, according to the developed scheme. Then they begin to assemble the system into a single whole. Filters, grilles or protective nets are placed last. The trays are secured with cement mortar. After this, the line is checked by filling it with water, which should flow freely into a collector or other collection point. If everything is fine, the system is buried.
When installing drainage systems in private houses, you can conduct a final test of the main line by creating artificial “rain”. With proper installation of storm drainage, water, even with intensive watering, should quickly leave the territory.
What does a roof drainage consist of?
The system design consists of the following components:
- Gutters (horizontal and suspended, vertical);
- Drain pipes;
- Holders;
- Connectors;
- End bends.
In order for the roof drain to properly perform its functions, you must make a configuration that will fully correspond to the roof of the house and architectural features. So, for example, for a one-story house with an area of 110 sq.m. 4 pipes are needed.
Important! If everything is installed correctly, then water will flow through the gutters into the outer pipes, which will preserve the foundation. Also, do not overlook the architectural features of the building, and do not save money on small gutters and pipes. A properly selected drainage system can also create harmony in the appearance of a building.
How to correctly calculate the number of pipes for a drain?
Worth remembering! Water can flow into roofs less than 90 sq.m. into one funnel. with a roof slope of 45 degrees.
- The gutter is less than 12 m and does not have any obstacles, then the installation of one pipe will be required;
- The gutter is less than 12 m, but has obstacles in the way, then in this case it is necessary to install the main and its compensating funnel;
- More than 12 m, in this case two funnels are installed at a distance of no more than 24 m from each other;
- It encircles the roof, then we create a paired position of the compensating pipes.
Gutter as one of the main and important components of the device
This component plays an important role when installing roof drainage. There are different types and features of this element, therefore, in order to choose the one that is needed, we must study it.
Wall gutter
It is located at the very edge of the roof, very close to the overhang of the eaves. In appearance, these are low sides up to 20 cm, which act as a water barrier. The trays are placed at an angle to the overhang so that two of them hang over the funnel of the sewer pipe. As the sediment flows down, it hits the sides and is directed towards the funnel, and from there into the sewer. One tray is attached to another using a double folded fold or glue - it depends on the material.
Remember: the most optimal angle is considered to be 15 degrees, since precipitation will not jump over the barrier. In addition, this structure prevents the formation of icicles that could disrupt operation.
Rain or hanging gutter
It differs from a wall gutter in that it is very tightly fastened directly under the roof overhang, which prevents accumulated water from flowing under the gutter. It is held suspended by steel hooks that match the shape of the tray. Brackets placed beyond the edge of the wall are attached to the rafters or front board. There are no kinks in the gutter, so during installation a special hole is made to prevent large amounts of water from accumulating.
Remember! The slope of the gutter depends only on the amount of precipitation per year!
How to calculate gutters correctly?
The usual gutter length is 3-4 m. Their number is always calculated based on the perimeter of the roof. The next step is the calculation of auxiliary parts:
- One connector is installed on two trays;
- One hook for every 60 cm of connector;
- One plug is installed for each final structure.
Assembling the gutter design
We use special parts to connect the trays, which have grips in the upper segment. The edges of the gutter are attached directly to them. Corner joints are made at external and internal angles, that is, we can avoid unnecessary joints.
Fact: For segments larger than 18 m, only expansion joints are used, where brackets are mounted on the sides.
Gutter classification:
They are divided according to two criteria:
- Section shape;
- The material from which they are made.
The first sign may be:
- Semicircular. They are universal and suitable for all types of roofs. The unique shape of the tray provides rigidity and resistance to stress.
- Semi-elliptical. They have a large throughput capacity and cope well with large volumes of roofing.
Based on the material of manufacture, the following types are distinguished:
- Plastic. Installation of a house drain occurs using latches, couplings that have rubber gaskets or are glued together. Small surface defects can be easily hidden with acrylic paint.
- Steel. Galvanized parts, which are coated with polymer, are impervious to corrosion. The huge color range of the model will help you choose the ideal color for the facade or roof. Installation of the unit is carried out using locks and brackets, which have latches with rubber gaskets.
- Aluminum. Anti-corrosion protection is provided by varnish coating. The elements of the device are assembled by fastening and sealing the joints with silicone or special glue for aluminum.
Types of storm systems
During the construction of a house, a storm drainage system on the roof
. Regardless of the amount of precipitation and air temperature, the complex structure must collect all the water and drain it into an equipped sewer - a water collection tank or into the ground outside the site.
There are two types of storm system designs: open and closed.
- An open system is more common and consists of trays and gutters under the roof slope, which receive runoff and pass it through wide funnels into a vertical pipe mounted on the wall and direct it to the drainage area. All parts of the structure are assembled outside the house, so making an open storm drain on the roof with your own hands
is not difficult. An open drainage system is suitable for pitched roof structures. - A closed system is a more complex structure that requires precise calculations and qualified installation. According to a pre-drawn diagram, all vertical elements of the system are located inside the house. To prevent an emergency, the structural parts are hermetically connected with rubber seals using glue and sealant. Pipes run from the roof to the basement and are connected into a single system, and then discharged outside and transport water to the storm drain.
A closed system is often used on flat roofs. Installation is much more expensive, but it works reliably all year round. This is especially true for northern regions and for the middle zone with a temperate climate, where at low temperatures ice plugs form in gutters.
For efficient operation and stable results, it is important to make the right choice of the type and method of installing the storm drain on the roof
. It should be taken into account that if the need arises to redo the system, the integrity of the walls of the house, the blind area and the roof structure will have to be violated.
The last stage of drainage from roofs is the drainage system
We need to figure out where the water flows? All parts are connected with a special adapter - a funnel, which comes in several configurations:
- A funnel located at an angle with a neck;
- With adjustable tilt head;
- With extended functions, just like the similar connecting element.
There is a pipe or elbow at the bottom, which allows for rotation of 45, 60 and 75 degrees. In the middle, the drain may have a branch that turns into one of the following options:
- Regular drain;
- Sewerage (artificially created or public).
The main rule of roof drainage: equipment is selected based on the area of the roof, the architectural features of the house and the annual amount of precipitation. These indicators also affect the calculation of power. Have a successful and productive operation!
Help us become better, evaluate the presentation of the material and the work of the author
Elements of the drainage system
- Gutter A small wide channel located directly under the roof. Water flows into it from the roof, and it also sets the direction of precipitation movement .
- Pipe . An essential element of the drainage system, in external drains it is most often attached to the wall. It consists of several links that are connected to each other by a pipe connector. Direct the flow to the water intake .
- Clamp for drainpipe . A ring with a pin that is built into the building. Holds a pipe .
- Tees separate drainpipes, making two out of one.
- The contours are designed to allow the system to bypass various decorative architectural elements . Often the outline itself is an important part of the building’s exterior.
- The drainage funnel collects rain and melted snow flowing from the roof into risers. These are ordinary holes in the gutter.
- Debris guard . This is a mesh that is located in the funnel and prevents leaves, construction waste, etc. from entering the pipe.
NOTE!
For the system to function effectively, the gutters must be slightly inclined towards the funnel .
Drainage system design
We understand the design of storm drains for the roof
Installation of a roof storm drain is an important step in arranging and protecting the entire structure from moisture. Drainage systems are made from various materials, such as lightweight and very durable plastic, galvanized or polymer-coated metal, and copper gutters. But they all have similar components, calculation and installation are carried out according to the same rules.
For pitched roofs, open systems are predominantly used, that is, traditional gutters, funnels and pipes mounted externally. For flat roofs that are used and not used, closed systems can be used. The drainpipes of this type of stormwater system are laid inside the wall; there are no open gutters.
Only receiving funnels with gratings remain on the roof surface to prevent debris from entering the system. Such a system is quite complex; it is installed during the construction of the house and requires appropriate experience.
What should you consider?
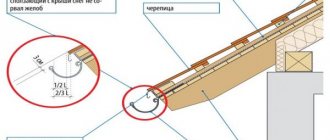
During installation, it must be taken into account that in snowy areas and for slippery roofing coverings, the installation of snow retention systems is mandatory.
When planning drainage systems with frequent icing in winter, it is recommended to use electric heating for drainage gutters, which reduces the risk of damage to them. For stormwater systems made of plastic, gutters and funnels are additionally glued together with special adhesives, which ensures the strength of the system under any climatic conditions.
General recommendations ↑
- There are many different types, brands and varieties of gutter systems. Although they are generally similar, they differ in details. During the installation process, you must study and keep with you the work manual, which can be obtained from your dealer or downloaded from the manufacturer’s website.
- In snowy areas, it is mandatory to carry out snow retention measures for slippery types of roofing (all types of metal roofing, except composite). For other types of roofing, snow retention is desirable. Heating the gutter with an electric cable will minimize the chance of gutter damage.
Snow guards will protect not only people, but also the drainage system from snowfall
Any person who is not afraid of heights and has minimal construction skills can drain a roof using a modular system. Particular attention must be paid to the precise marking of the brackets. It is not worth taking on a roof drainage system made of galvanized steel sheets without gutters without having experience working with seams.
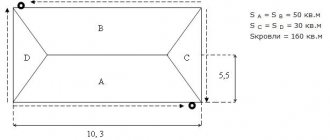
Features of calculating drainage for a roof
Before purchasing equipment for a drainage system, you need to calculate what type of storm drain on the roof will be used and how many gutters, pipes, and components will be required.
System throughput is calculated based on the following data:
- for roofs with an area of up to 50 sq.m. you can use pipes up to 7.5 cm in diameter and gutters whose width is up to 10 cm;
- for roofs with an area of up to 100 sq.m. suitable for pipes with a diameter of up to 8.7 cm, gutters with a width of up to 12.5 cm;
- for an area of 100 sq.m. you need to choose pipes with a diameter of 10-12 cm, gutters 15-19 cm.
The number of drainage pipes also depends on the total roof area, for example, for 100 sq.m. It is enough to use 2 pipes placed in the corners of the building. Accordingly, 2 funnels are also required for the system. To calculate the number of pipes, you need to take into account their length (this value may vary among different manufacturers) and the height of the drain elbow above the ground level (usually this value is 30 cm).
For example, the height to the cornice from the blind area is 7.5 m, and the length of one pipe is 3 m. The total number of pipes for the entire system will be 6, that is, 3 pieces for each corner. For fastening, you will need 5 clamps for each part of the drain: fasteners between pipes, pipe and elbow, pipe and ebb. The number of gutters is calculated in a similar way: you need to calculate the length of the cornice, that is, the perimeter, and divide the resulting value by the length of the gutter.
To install a storm drain, you will need brackets; on average, 1 piece is enough. for every 50 cm of gutter. The number of locks for connecting individual gutters is equal to the number of joints.
When calculating the number of knees, it is necessary to take into account the features of the facade walls. If there are protrusions, additional elbows are used to bypass them; in addition, for every two funnels, two ebbs will be required.
Calculation of rainwater drainage performance
Installation of storm drainage requires a preliminary calculation of the performance of the rainwater system. In this case, the formulas given in SNiP 2.04.03-85 are taken as a basis. The maximum fluid flow rate is determined by the formula:
V = q20 * S * D,
Where V is the maximum fluid flow;
q20 – precipitation intensity in a particular region (taken from the table given in SNiP);
S – roof area;
D – coefficient reflecting the degree of moisture absorption by the material. This value is also found in SNiP.
Gutter installation
To install a storm drain on the roof, you will need the following materials:
- gutters;
- locks for gutters, plugs;
- brackets;
- drainpipes;
- knee;
- clamps;
- funnels;
- drain elbow;
- for plastic systems, special glue is used;
- screws, pins;
- protective nets for drain funnels.
Brackets, gutters
The installation of a roof drainage system must begin by marking the mounting points for the brackets, for which a special tap (marking thread) is used. The center of the storm gutter should be under the overhang line of the slope, the resulting gap should not be less than 25 mm. During installation, a slope towards the funnels of 2-5% is maintained; all brackets should be placed every 50-60 cm (depending on the type and material of the system). The extreme bracket is placed 25-30 cm from the corner plug, the funnel is placed at the edge or in the center of the catchment area, and is attached at two points.
When installing gutters, you must immediately decide on the type of installation:
- on the rafter leg (used for metal brackets);
- on the gable board (for plastic systems);
- onto the flooring using metal extensions (for metal/plastic brackets).
During installation, it is very important to avoid the following mistakes:
- sagging of the gutter (occurs due to too large a step between the brackets);
- overflow of water over the edge of the catchment area (the edge of the roof overhang does not coincide with the middle of the gutter);
- water overflow, splashing (the gap between the eaves and the gutter line is too large).
Drains
The next stage is the installation of drainpipes, carried out from top to bottom. The drain, coupling and elbow are installed so that the socket faces upward; a part of the pipe no shorter than 6 cm is inserted into the elbow-elbow connection (depending on the gap between the wall and the gable board). Next, the rest of the pipe is assembled; fastening to the wall is carried out using clamps in increments of 180 cm. One clamp will be fixing, the second will be a guide; for some types of stormwater systems, manufacturers recommend the use of temperature compensators.
Drainpipes are aligned strictly vertically using a plumb line. The drain elbow is installed after fastening the pipe with clamps; the height of its lower edge from the ground level (blind area) is 25-30 cm.
The installation of the general stormwater system is now complete, but additionally it is necessary to check all the components and the strength of the fastening. If everything is done correctly, water will flow from the gutters into the pipes without overflowing or splashing.
Caring for drainage systems is very simple; at the end of each season, gutters and pipes are inspected, thoroughly washed, and all debris is removed.
Today, the buyer is offered a choice of many colors for the drainage system, which can exactly match the metal roofing. This rain shower looks neat and harmonious. The service life is usually from 25 to 50 years depending on the type of metal.
- The drainage system is made of galvanized steel 0.6-0.7 mm thick with a polymer coating, the shape of the products can be round or rectangular.
- Gutters made of copper, aluminum and steel with zinc-titanium coating are installed extremely rarely in Russia.
- Plastic drainage systems, depending on the roof design, can be connected in two different ways: adhesive or using rubber seals. Pipes come in a wide variety of configurations, but the color palette is limited. Service life up to 30 years
Advantages: ease of installation, light weight, the best tightness among all drainage systems, neat appearance, and, last but not least, reasonable cost.
Disadvantages: plastic does not withstand extreme frosts. It is more fragile than steel and can be damaged by snowmobiles.
Installing a storm system for the roof is an important step in protecting the house from sediment and melt water. A properly installed drain will ensure effective removal of moisture from the walls of the house and the blind area, but for this you need to correctly calculate the permeability of the system and the attachment points of all components.
Galvanized steel drainage system
This material has been used since ancient Soviet times. Even with the advent of better galvanized parts, stormwater systems are still being manufactured. Such drains use rather wide funnels, which slightly spoil the appearance of the system. However, such dimensions hide the low accuracy of manufacturing and installation.
Storm drains from a galvanized steel roof do not have horizontal gutters, but consist of funnels and downpipes. Water flows through special grooves, which are located on the eaves of the roof. For roofs with a large slope, this option is ineffective. However, the absence of horizontal elements makes the system safer during the period of snow melting from the roofs and the formation of icicles.
Other positive aspects include high strength characteristics, reasonable cost and the ability to manufacture structures according to individual designs.
The disadvantage of a stainless steel drainage system is its unattractive appearance and rapid rust damage. You can extend the service life of galvanized drainage elements by regularly painting the outer surface. In this case, the operational period is extended to 30 years. In addition, galvanized products do not have an ideal shape, which makes their connection difficult. The traditional method of joining is rolling; in the modern world, the seams at the junction of elements are filled with sealant.
The role of the drainage system
When moisture drains unorganized from the roof, various problems can arise. On complex roofs, water stagnates in small recesses, which is why it can seep through the roofing pie. This will lead to loss of thermal insulation quality and destruction of the rafter system. If the roof overhang is not designed correctly, moisture flows down the walls, which negatively affects the masonry. If water accumulates on the blind area and is absorbed into the ground, the bearing capacity of the foundation will decrease. Therefore, it is important to install the drainage system correctly.
A properly designed roof drain system helps manage drainage so that key parts of the home are not damaged. In order for the storm water inlet to work, it is recommended to connect the storm water inlet to the sewer system. Otherwise, negative consequences for load-bearing structures cannot be avoided.
Water flowing down the walls not only spoils their appearance. It leads to the destruction of the house: subsidence of the foundation, cracks in the enclosing structures, and so on.
When to start installing the system
The drainage system is of great importance for preventing damage to the load-bearing structures of the building, so its development should occur at the design stage of the house. And in accordance with regulatory construction documentation, installation of the system is carried out before laying the roofing material. But practice shows that these requirements are rarely met. It is also important to decide on the method of attaching the gutters: to the cornice, to the front board or to the sheathing. The most common is fastening to the frontal board; other methods of installing gutters are almost never used in individual construction.
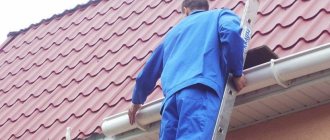
How to install a gutter if the roof is already covered
Very often the roofer hopes that when the job is complete he will be able to tear off a few sheets of roofing in order to install the gutter brackets on the rafters. But usually this cannot be done without removing the roofing material fasteners. If the fasteners are removed, then patches will have to be installed in their place.
Of course, there are ways to avoid these problems. One is to install softwood strips underneath the roofing material to remove the fasteners without denting them. If the roof is covered with slate, then the procedure is simpler. A piece of wooden beam is inserted into the wave, and the brackets for the gutters are attached directly through the slate and the inserted beam.
If the roofing material is already laid, you have to use any available places to attach brackets under the gutters
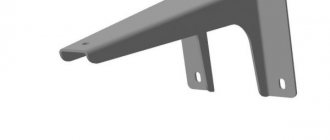
Currently, there are brackets on sale to which the gutter is attached from below, so such a bracket is not visible. They are installed every 40–70 cm in order to ensure sufficient strength under excessive snow and ice loads.
The brackets that are installed on the sheathing or rafters must first be bent to ensure the correct position of the gutter relative to the roof slope.
Video: installing gutters on a finished roof
https://youtube.com/watch?v=WWfcnf2sxS4
Stormwater materials
Modern industry offers different materials for the manufacture of storm drains on the roof. Consumers just have to choose the appropriate option based on the characteristics of the components and their own budget. Let's look at the most popular materials for rainwater inlets:
- Galvanized steel. The most common and inexpensive option for storm water inlets. It looks attractive and performs its functions perfectly. However, it has an important drawback: after a year or two, the protective coating becomes thinner and disappears, causing the steel to become rusty and destroyed.
- Polymer coated steel. More expensive material, but it will last longer. The protective layer is designed for a longer service life. Plus, these pieces come in a variety of colors, so you can maintain a consistent theme throughout your home decor. In order for polymer-coated steel to really last a long time, the protective layer must not be damaged when installing parts.
- Plastic systems. Prices for such systems vary depending on the quality of the PVC. Expensive options, with proper installation and design of the drain system, are designed for 30 years of service. Similar to the previous option, it is possible to choose a color scheme that matches the roofing. The only drawback is possible problems due to errors in the design of the drain. Water can remain in the pipe and when the ice freezes in winter, it can tear the plastic.
- Copper components. This gutter material does not have all the disadvantages described above. However, copper rainwater inlets have a high price tag and are only available to wealthy people.
- Lead storm water inlets. The inertness of the material and attractive appearance make this option the most popular on the market. Such components are not afraid of corrosion and can withstand any changes in temperature and load. There are no special recommendations or difficulties during installation.
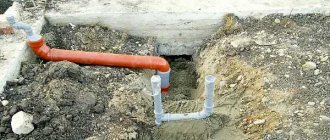
Features of installing a drainpipe and tray
Installing storm pipes from the roof most often does not cause any difficulties. All elements have a convenient length of 4 meters, their connection is quite easy.
Depending on the method of draining water from the building, the drainage area may have a different shape. With a surface drain, the system drain pipe ends with an elbow that has a large offset at an angle of 45 degrees.
If an underground stormwater system is organized on the territory, then the end of the drain pipe can be discharged directly into a storm well.
Design and preparation for installation
The first step in designing a storm drainage system is to calculate the material requirements. Each of the following components will be needed for work:
- gutter, bracket and coupling;
- funnel collecting moisture;
- fitting;
- drainpipes.
Once the amount of material has been determined, it is necessary to calculate the diameter and shape of the pipes. In small garages, bathhouses and saunas, gutters with a width of 11 cm and pipes with a diameter of 7.5 cm are installed. On residential buildings, the roof area is larger, so to drain the expected flow, the size of the main components increases: gutter - 13 cm, pipe - 10 cm. Large buildings , with a roof area larger than average, you will need to purchase gutters with a diameter of 20 cm, and pipes - 15 cm.
For every 8 meters of gutter length, a separate drain is installed. For example, if the length of the wall is 21 meters, then pipes with funnels are placed at the edges and in the center.
An anti-icing system can help ensure the long life of your roof storm system. It consists of heating cables, temperature and humidity sensors. With its help you can avoid the appearance of ice on the gutters. To simplify the operation of drains, robotic devices have been developed to help clean pipes and gutters of contaminants.
If you install a storm drain with an insufficient diameter or do not clean the pipes in time, then the water will overflow. The practical benefit of such systems tends to zero. To save the money spent, it is important to correctly follow the recommendations of specialists.