Snow blower device
If there is a need to create a snowplow for your dacha with your own hands, you need to know the main differences between special equipment. This will help you more accurately determine the appropriate homemade model.
The main differences between snow blowers are the following components:
- Motor. Snow removal attachments do not have their own motor. They get their drive from a walk-behind tractor or a mini-tractor. Full-fledged snow blowers are powered by a gasoline or electric motor.
- Snow removal unit. The mechanism for capturing snow is an auger or rotor. There are combined models - rotary screws.
- The mechanism of the snow blower movement unit. Non-self-propelled models are mounted on skis. Wheels may be present, but the unit still needs to be pushed to move. Self-propelled snow blowers are driven by a motor. The operator only controls the direction of movement. Factory self-propelled guns are produced on wheels and tracks.
To further study the snow blower, you should know its basic structure:
- The unit receives traction force from the motor. First of all, the engine drives the snow removal mechanism: an auger or rotor. In self-propelled snow blowers, the motor transmits torque to the movement unit: wheels or tracks.
- The bucket is the casing of the snow removal mechanism. The working element is always located in front of the snow blower. The width and height of grabbing the snow layer in one pass depends on the dimensions of the bucket.
- The chute for throwing snow is equipped with a rotating visor that sets the direction. A square or round sleeve is made of metal, less often plastic. In homemade products, they use a piece of PVC sewer pipe with a diameter of 110 mm. The visor is the knee.
- An auger or rotor is the working units of the unit designed to capture snow. The first version of the knife resembles a spiral and works on the principle of a meat grinder. The rotor is a kind of impeller with blades. The resulting vortex flow enhances the ejection of snow due to additional air flows. To ensure efficient operation, snow blowers can be equipped with combined units consisting of an auger and a rotor.
- Snow blower wheels are used with rubber wheels. It is important to install tires with a deep tread pattern to ensure good traction on slippery surfaces.
- Factory-made snow blowers have caterpillar tracks. Heavy self-propelled units with a gasoline engine are characterized by improved maneuverability in difficult terrain.
- Even a self-propelled snow blower has handles. They are needed to control equipment. Controls for clutch, gas, and engine start are placed on the handles.
An important component of a snow blower is the control panel. It is installed on self-propelled factory units. All controls are displayed on the panel: buttons, toggle switches, levers.
How to make a snow blower with your own hands from a chainsaw
Having the drawings at hand, you can even build a homemade snow blower with your own hands using a chainsaw. Using such a drive has a number of advantages:
- low cost;
- high performance;
- the possibility of equipping the snow blower with homemade components.
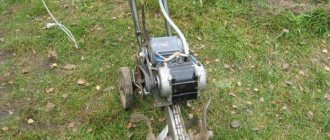
The homemade unit will receive traction force from a gasoline engine. A chain drive is installed for the drive. The tire is removed from the chainsaw. The motor shaft is already equipped with a sprocket. A similar part is placed on the shaft of a homemade auger. For the chainsaw engine itself, the frame is welded. The bucket is bent from sheet steel. The auger is made from a piece of pipe 20 mm thick. The helical blades of the knife cut steel or rubber from the conveyor belt.
Making a screw
When looking for snow blower drawings for assembly, first of all you need to find a diagram of the auger. The shaft of a homemade screw knife is a tube with a cross section of 20 mm. The optimal length is 80 cm. Trunnions are welded at the ends and the bearings are hammered. The auger of a homemade snow blower will rotate on them. A through groove is cut through the center of the pipe and a rectangular plate measuring 120x70 mm is inserted. The blades will rotate with the shaft, pushing snow out of the bucket through the deflector.
Homemade fractional rings in the amount of 4 pieces are cut out of steel. They are stretched to form a spiral and welded to the pipe. If the auger blades of a homemade snow blower are made from a conveyor belt, the rubber strip is fastened with bolts to the eyes pre-welded on the pipe.
Assembly of the unit
After making the auger, a homemade housing is made for it. An excellent option is a piece of pipe or barrel with a diameter of approximately 300 mm. The cut segment in the form of a half is slightly unbent. The sides are welded with metal, the hubs are placed in the center, and an auger with bearings is inserted. On the one hand, the trunnion should protrude. An asterisk is attached to the end of the shaft, the same as on the chainsaw engine.
The frame is welded from corners. A platform with skids is adapted for the engine. It is made with the ability to move along the frame and then be securely fastened in the chosen position. A homemade snow blower bucket is attached to the frame at the front, and control handles are attached to the rear. The throttle control lever is located on the right handle. After installing the motor, the sprockets are connected with a chain. The dangerous transmission unit is covered with a casing. To move, the frame of a homemade snow blower is equipped with skis or wheels from an old cart are adapted.
Making your own screw
The auger for a snow blower is the main moving part of the unit, the manufacture of which does not cause difficulties. It is best to use a rubber belt from a conveyor with a thickness of 10 mm and a length of 1.5 m to make the auger. From the rubber strip you need to cut 4 rings with a diameter of 28 cm. The parts are easily cut out using an electric jigsaw.
Advice! To cut rings from tape, you can do without a jigsaw. Screw 2 sharp screws into a small board and use this device as a compass. After a few full rotations of the cutter, the ring will be cut.
Below are drawings of all screw parts.
A metal pipe with a diameter of 27 mm is used as a shaft. Adapters are attached to its ends, onto which bearings are installed. A 120 mm long cut is made in the central part of the pipe, into which a central plate will be installed, designed to throw away snow. Also, 4 plates are put on and welded onto the pipe. Rubber rings will be attached to them and to the central plate. How this is done can be clearly seen in the next photo.
How to make your own electric snow blower
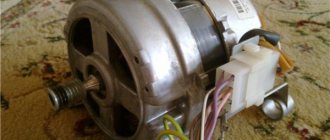
An electric snow blower is assembled with your own hands from a powerful grinder, a drill, and a motor from a washing machine is used. The most popular traction device is the trimmer. For a homemade unit, use an electric scythe with a flat rod and a motor with a power of more than 1 kW.
Electric snow blower drawings
First, you will need to find drawings for your snowblower that show the rotor diagram. It is this unit that is working and the most difficult to manufacture. Using the drawing it is also easier to make a homemade snail for the rotor.
Product assembly
Creating a homemade snow blower occurs in the following sequence:
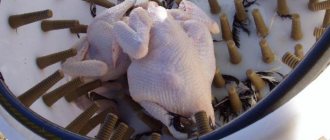
- The snail body is cut from a stainless beer barrel. A grinder is used to cut off a fragment 150 mm wide from the bottom side. By drawing two intersecting lines with a cross, the center of the circle is determined at the bottom. At the intersection point, drill a hole for the trimmer gearbox shaft.
- In a homemade snail, they determine where the top will be. A hole 100 mm wide is cut on the side side, and a piece of pipe is welded. The length of the pipe should be sufficient to firmly install the outlet hose from a piece of PVC sewer pipe.
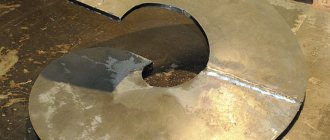
- Having cut out a semicircle from metal, weld 1/3 of the snail from the end. A plug is placed in the upper part so that the snow is directed by air flow to the discharge sleeve.
- The blades of a homemade rotary fan are cut from steel. You should get 4 plates of equal size. It is desirable that they match even in weight. This will avoid imbalance of the rotating rotor. The plates are welded crosswise onto a metal disc trimmer blade.
- Assembly begins by bolting the electric scythe gearbox to the bottom of the barrel. An impeller is mounted on the shaft. They try to rotate it so that the blades do not touch the walls.
- For better snow capture, a homemade snow blower is equipped with a guide blade. A rectangular plate is welded perpendicular to the end of the volute, only on the bottom side. When the homemade snow blower moves forward from pushing forward, the guide vane will begin to capture snow and feed it onto the blades of the rotating rotor.
Read also: Hole size for furniture euroscrew
A homemade snow blower is placed on skis. Connect the cable to the socket and try to start the engine. For control, they use the original rod of the electric scythe. The video shows a DIY snowblower:
How to make a rotary snow blower with your own hands
You can make a powerful do-it-yourself rotary snow blower for your home using a gasoline engine. Additionally, you will need a fuel tank, a muffler, and a cable for connecting the throttle control to the handle of a homemade unit. The rotor shaft can only be manufactured on a machine. The snail, frame and other elements are independently welded from metal.
Description and preparation of components
The technology for assembling a homemade rotary machine is similar to creating a snow blower from an electric scythe. In a similar way, a snail is made from a beer barrel. If in the trimmer the gearbox was bolted to the bottom, then here the rotor is made homemade. The design consists of two bearings on a shaft. They are mounted in hubs, which are attached to the rear wall of the cochlea. An impeller with blades is mounted on the shaft on the working side. The protruding part of the shaft beyond the volute is equipped with a pulley.
A homemade snow receiver is attached to the frame. The gasoline engine is mounted on adjustable skids. A belt connects the rotor and engine pulleys. To move around, the homemade car is placed on rubber wheels.
Advantages of combined units
A combined homemade snow blower consists of a screw and rotor mechanism connected together. The traction device is an electric or gasoline engine. The advantage of a homemade combined model is performance. The auger captures a wide strip of snow, grinding even compacted and slightly icy layers. The fine mass enters the volute, where the rotating impeller blades create a vortex. Crushed snow under high air pressure flies out of the discharge sleeve at a distance of up to 15 m.
Comments (1)
- Sergey Yakovlevich:
03/06/2018 at 22:39Wonderful site! I was attracted by the detailed, expertly described making of homemade devices. I myself make various devices and devices and I understand that giving such a detailed description and illustrating it well is a lot of work. Do you have any ideas for making a homemade waterjet cutting machine? This topic has been bothering me for a long time. At one time I worked on such a machine and since then I have the most enthusiastic memories of it. It is very expensive to buy, but on the other hand, the principle of its design is quite simple. We have plenty of homemade CNC machines, but I haven’t heard about a machine made by ourselves. The main problem, as I understand it, is the manufacture of an ultra-high pressure pump (4000 atm). If you're interested, we can think about it together.
How to make a snow blower for a walk-behind tractor
Craftsmen show a lot of videos with homemade snow blowers attached to a walk-behind tractor. Their only difference is that the mechanisms are hinged. Homemade snow blowers receive traction force through a belt from the walk-behind tractor motor.
There are 3 common models of homemade attachments:
- A homemade rotary hitch is made in the same way as for a rotary snow blower with a gasoline engine. Two guide vanes can be installed, which allows you to increase the width of snow capture.
- The easiest way is to equip the walk-behind tractor with a homemade blade. The working part is cut out from ½ part of a pipe with a diameter of 300 mm. Rods and a coupling mechanism are welded on the back side, allowing you to quickly connect the blade to the walk-behind tractor.
- A self-made rotary auger hitch is a combined device. For a walk-behind tractor, this is the most productive mechanism. The rotor volute is attached to the back side of the auger snow receiver bucket. First, the screw blade grinds the snow. The loose mass enters the cochlea, where the rotor mixes it with air and throws it out through the outlet sleeve.
Rotary and auger-rotor attachments for walk-behind tractors are usually placed on skis. It is advisable to equip the blade with a lifting mechanism to create a full-fledged homemade bulldozer.
Petrol Engine Snow Blower
Snow removal machines are most often created with a screw or a combined mechanism.
The initial stage of work is much easier. For a combined type of snow collector, you need to assemble the kind of rotor that is used in electric models. In this case, the only difference is that the blades are not welded to the rotor body. It is connected to the back of the auger snow blower. In this case, any air-cooled engine can be used. It can be either two-stroke or four-stroke. The frame of a non-self-propelled device must be placed on skis. It will be much easier for the user to use the machine to collect snow on thick surfaces. If the power indicator allows you to create a self-propelled vehicle, then you need to attach special wheels to the frame, and then combine them through the drive with the engine PTO.
How snow removal machines work
A snow blower for home can be electric or gasoline. The difference is in the way they are powered: the former run on electricity, the latter use gasoline. The structure of a snow blower and the essence of its work look like this. A rotating mechanism collects piles of snow and then pushes it in the desired direction. Based on this, all snow removal equipment is divided into single-stage and two-stage machines. In the first case, the force created by the auger (it has a fast rotation speed) is used for pushing out; in the second case, the rotor is also connected to the work. Such equipment is called rotary snow blowers.
The rotor stands at the entrance of the outlet chute, rotates and pushes out the snow. The auger spins at a much lower speed and therefore wears out much more slowly. An auger is a mechanism that crushes snow and then directs it into the snow blower. You can find the auger in the front of the device. It is usually made of metal and looks strong and monolithic. According to some users, the auger looks more like an enlarged drilling rig or screw. It rotates around its axis, skillfully grinding the snow and feeding it inside.
We also recommend reading
A homemade rotary snow blower is good because it can easily cope even with snowdrifts that are frozen or compacted. For ease of use, manufacturers make the surface of the screw serrated.
The electric snow blower is also equipped with a motor and an outlet chute that regulates the distance of snow throw and its direction. Wheels or tracks can be used as a means of transportation.
Also, all snow removal machines can be divided into self-propelled and non-self-propelled models. The movement can be carried out by a motor (you just direct the mechanism) or by a person.
Design and diagram of a snow blower
Before you start designing a machine, you need to prepare calculations and drawings. It will be easier to prepare if you have a clear idea of the visual image, the operating principle of the unit and its functioning in your head.
How does a snow blower with an auger attachment work:
Scheme 1
The front part of the cleaner consists of a huge bucket with a funnel that collects a large amount of snow. Inside there are two conveyor screws - this is an auger (see here how to make it yourself), moving the accumulated mass into the pump. Each screw consists of blades that rotate around the screw.
Once the motor is running, the blades begin to rotate. Each rotation cuts sharp jagged edges into the snow, then is replaced by a second sharp blade.
Rotating conveyors and screws perform the following main functions:
- snow crushing;
- add it to the pump.
The conveyors have a trick - they are located at an angle to the pump, which allows snow to be brought to the pump. With the help of rapid rotation of the screw, the snow mass breaks out at high speed and is carried by air pressure over a long distance.
A scoring plate is attached to the bottom of the “shovel”.
If the structure of a universal device includes an air-cooled electric motor, then the air intake must be protected from accidental contact of the electrical part with wet snow.
Scheme 2
Simulation preparation scheme:
- Buy, or use an existing walk-behind tractor engine. For example, Honda brands (requirements: 6.5 liters per second; auto transmission; gear ratio);
- Prepare a plastic pipe, mainly sewer, with a diameter of 16 cm;
- You will need roofing iron;
- Plywood (10 mm thick) will come in handy;
- Half-inch pipe;
- Steel corner;
- Take a pipe measuring ½ inch;
- The steel plate should be equal to 120*270 mm;
- Jig for drilling holes;
- Rear wheel axle.
- Check the plain bearings according to the pipe size. If the pipe is wider than the inner ring, then it can be turned on a machine.
The total width of the homemade machine is approximately 65 cm (the working width is 50 cm), which is convenient for storage.
More information in the following videos:
Making a snow blower: getting started
Prepare a welding machine, drill and grinder for metal in advance. You will also definitely need sheets of roofing iron and steel, pipes of various diameters, angles, bearings and bolts, a separate square and metal clamps, plywood.
- Decide in advance what type of snow removal equipment you would like to make: auger or auger-rotary. The second option is somewhat more complicated, but in heavy snowfalls its effectiveness is much higher.
- Perhaps the main part of the manufactured mechanism will be the auger. It is a drive shaft to which the “cutting” rings are securely attached. The shaft is made from pipe with a diameter of 3/4 inch. The length is exactly the same as the length of the bucket. Trunnions are welded to each end. In the future, they will allow you to install the shaft in bearings.
- If you are planning to build a two-stage snow thrower, a metal plate measuring 12 x 27 cm is attached to the center of the pipe. Its key task is to transport the snow into the chute. Rings 10 mm thick, made of conveyor belt, cling to the sides. You can also cut them from 2mm thick sheet steel.
- To make a bucket, it is best to take roofing iron. The bucket will close the auger on three sides at once, and the upper part will move forward a little.
- The side parts of the bucket can be made of plywood 10 mm thick. Of course, this is not a DIY snow shovel, but you can be sure that the plywood will hold up. Self-aligning bearings with a built-in shaft and auger are placed on the sides. 2 cm - this is exactly the distance from the edges of the spiral. The main thing is that the auger does not cling to the bucket. A hole is necessarily cut at the top for the outlet chute. To make it, you can use a piece of sewer pipe (diameter 15 cm or more). The pipe bends at the top, setting the desired direction for snow to fall.
- To easily remove and service the engine, take care to build a special frame for installation. Metal corners will come in handy. Weld metal strips to the frame to secure the bucket with auger and motor. Drilled holes will allow you to install wheels and a handle.
- Skis and wheels are the next stage of production. To help your snow blower move properly, you can use wheels or skis. The second option is preferable - snow is snow. Skis are made of metal and attached like a sled. The distance from the frame should be minimal. If you decide to install wheels, make sure that they have the maximum level of grip and are resistant even to very severe frosts.
- Since you and I make manual snow blowers, they must have their own handles. The snow blower design involves installing handles from half-inch diameter pipes. It is most convenient to secure them with bolts. When moving the snow blower, you should be comfortable and comfortable doing so. A snowplow is not a tractor, and it certainly won’t move on its own.
- A few words about the rotor. It doesn't matter whether you make a snow blower from a trimmer or use any other method. But in a two-stage design, an improved rotor can be made instead of a screw. It looks like an axis around which 4 rectangular plates are fastened. It is desirable that they have rims on the edges - this will improve snow collection. Make sure that the diameter of the rotor exactly matches the diameter of the bucket and does not hit it.
- A homemade electric snow blower can be equipped with a simple 1 kW electric motor. The main thing is that it is isolated from water and snow - you don’t want to observe a short circuit, right? The same goes for the power cord. There should be no damage to it.
- There are two ways to connect the motor to the shaft: a gearbox and a belt feed.
Read also: Wood planer
Thus, a typical DIY snow blower is equipped with an electric motor, a separate bucket with an auger, an outlet chute, a frame with special handles and a wire. You can use skis or wheels as a supporting mechanism. As for the screw, it can be manufactured according to various principles. This has already been discussed above.
Design #1 – auger snow blower model
We suggest first considering the option of how to make a snow blower with your own hands based on an old engine from a walk-behind tractor. To do this you need to prepare:
- Sheet (roofing) iron for assembling the auger body;
- Steel corner 50x50 mm for the structure frame;
- Plywood 10 mm thick for side parts;
- Half-inch pipe for arranging the handle of the machine.
When planning to equip a homemade snow blower with an air-cooled engine, it is necessary to provide additional protection for the air intake opening from small snow particles emitted during operation.
The engine power of this device is 6.5 hp. It is quite enough for clearing fresh snow from the garden area.
Thanks to the machine’s working width of 50 cm, it will be convenient to move the structure and clear winding paths on the site. The machine has compact dimensions, its width does not exceed 65 cm. This allows you to hide the snow blower in the barn at any time as unnecessary; it easily passes through a regular doorway.
To make the auger shaft, you can use a ¾ inch pipe. A through cut is made in the pipe, which is necessary to fix a metal blade measuring 120x270 mm. During operation, the captured snow mass from the transport belt will be moved by the auger to the blade. This blade, in turn, under the influence of the rotation of the shaft, will throw the snow to the sides.
The frame of the snow blower can be welded from steel corners 50x50 mm, and closer to the edges of the structure in the pipe to the transverse corners, all that remains is to weld two corners on each side, the dimensions of which are 25x25 mm
The engine platform will be attached to these corners in the future. You can fasten the transverse corners with the longitudinal ones and fix the control handles on them using bolts (M8).
The auger pipe is equipped with a metal blade and four rubber rings d=28 cm, the material for the manufacture of which can be the sidewall of a tire or a 1.5-meter transport belt with a thickness of 1.5 mm.
You can cut rings from a rubber base using a simple device: drive two screws into a board, and then secure this structure tightly to the tape and turn it in a circle. You can significantly simplify the cutting procedure by using a jigsaw.
Since the snow blower auger will rotate in self-aligning bearings 205, they must be placed on the pipe. In order to make a snow blower yourself, you can use any bearings, the main thing is that they must be closed. The support from the cardan of old Zhiguli models can act as a protective casing for bearings.
To insure a homemade auger against ice, it is advisable to provide a safety pin. In addition to its direct purpose - cutting when the auger jams, it will serve as a belt fuse (if a belt drive system is installed). The auger can also be driven by a chain. Its idle speed is about 800 rpm. All the necessary components for a snow blower can be purchased at any specialized store.
A piece of plastic sewer pipe d=160 mm is well suited for discarding snow. It is fixed on a pipe of the same diameter located on the auger body itself
An extension of this section of pipe will be a chute for throwing out snow, the diameter of which should be larger than the width of the metal auger blade.
Recent posts 5 working ways to use tar in the garden 7 indoor plants that help you get married even in adulthood Indoor plants that can bloom in trouble
Before assembling the structure, you need to pay attention to the fact that the dimensions of the machine body should be a couple of centimeters larger than the dimensions of the auger itself. This will prevent the mechanism from touching the walls of the housing during operation.
Since the snow blower engine can be used for other purposes during snow-free periods, it is desirable to provide a quick-release convenient platform in the design of the unit, thanks to which the engine can be removed at any time without using any tools.
A significant advantage of this design solution is the ease of cleaning the body and moving parts of the machine from compacted snow. And storing such a snow blower is much easier: just remove the engine and the machine will become twice as light.
The basis for the skis are wooden beams, which are additionally equipped with plastic linings. You can make such overlays from an electrical wiring box.
The snow blower is ready for use. All that remains is to paint the homemade device and start working on clearing the snow.
Warnings and helpful tips
- Choosing a snowblower is one thing, but making one yourself is something completely different. Be sure to use the drawings when planning your work.
- Small objects often get caught in the manual auger. A snow blower made by yourself may break down and the engine may jam if special fuses are not installed.
- The electric motor has its own cable, but in most cases it is not designed to operate in severe frost. The wire will begin to “freeze” and the installation will work intermittently. We advise you to choose PGVKV wires, as well as SiHF and analogues.
- The dimensions of the bucket must be determined in advance. For example, if you plan to clear very narrow paths, the work surface may simply not fit on them.
- It is very convenient when a single-stage snow blower has an outlet chute located on the top and side. In this case, the snow travels a much shorter distance. The auger spiral tilts at a slight angle to where the chute is located.
Homemade snow blower made in the garage
We can conclude that making a snow removal machine is, although not an easy task, but quite a doable task.
Manufacturing costs are much lower than if you had to buy such a device in a store. If we talk about cost, then an electric installation is much cheaper than a gasoline one. And it weighs several times less. Having weighed all the pros and cons, we can say with confidence that for cleaning small and medium-sized areas, it is convenient and at the same time inexpensive to have your own snow blower.
An electric snow blower for household use can greatly facilitate clearing the local area in winter and become a faithful assistant for many years. The modern market is overflowing with offers from both domestic and foreign manufacturers, and it is not so easy to decide which one to choose. In this article we will look at what you should pay attention to when purchasing and how not to make a mistake when choosing.
Main criteria for selection
Let us dwell in detail on electric snow blowers operating from a 220 V network. A high-quality electric snow blower will easily clear the area around a country house, an area near a garage, paths in the garden or a car entrance leading to the central highway. But like any equipment, snow removal units not only have positive aspects, they also have a number of disadvantages, after studying which it will be possible to minimize the likelihood of an unnecessary purchase and select the most optimal option. Or decide to assemble a snow blower with your own hands. First of all, you should decide what area you plan to clear of snow. In the case of cleaning a terrace, a small yard and several paths, you can purchase samples of low power up to 1.3 kW. But if there is a need to clean a large area, you cannot do without a powerful 1.8-2.0 kW. The power of electric snow blowers varies from 0.65 to 2 kW, limitations are determined by the possibility of electrical wiring in private homes. However, 3 kW electric models are appearing on sale. The distance from the electrical power source depends only on the size of the cord. You should immediately pay attention to the equipment, because in some cases you will have to incur additional costs for the purchase of an extension cord, which must be in a rubberized frost-resistant sheath of a contrasting color, clearly visible on the white snow. Unwinding and rewinding the cord causes some inconvenience, and you must also ensure that it does not get under your feet or rotating parts of the mechanism.
Selection criteria
However, some models are equipped with an automatic winding function. Most electric snow blowers are designed to remove loose snow immediately after it falls, before caking and icing occurs. Therefore, if you plan to carry out clearing, visiting the dacha from time to time, you should clarify whether the selected device is capable of coping with such a task. When choosing a snow removal unit, you need to consider the climatic conditions in which it is planned to be used. After all, many models are not able to work when the ambient temperature drops below 5 degrees, this is due to the low quality of the plastic used; it simply cracks and crumbles in the cold. An important criterion when purchasing is the height of the snow layer captured by the mechanism and the material of the base that is planned clear Metal auger blades can damage the integrity of paths lined with paving slabs or stones. In this case, you should give preference to models with rubberized blades or closed rubber pads. When making a purchase, you need to pay attention to the availability of service centers in your region. The most well-known brands have representative offices in many cities; little-known companies may not provide warranty service at all.
Main types of snow removal equipment
Do-it-yourself snow blowers are designed to mechanically remove snow from the required area.
Their functions also include collecting masses of snow and throwing it back to the main collection point. The engine that powers the car can be gasoline or electric. The snow collection equipment itself can be divided into self-propelled (with wheel or tracked drive), manually operated, two-stage and single-stage. To independently assemble snow collection equipment, you can use various available materials, which every owner definitely has. Before you start creating a structure with your own hands, you need to familiarize yourself with the main types of this technique and find the most suitable option for you.
Electric snow blowers can clean small areas near your home, such as narrow walkways or porches. This device is not suitable for removing large amounts of snow. In addition, its work will not be effective if there is ice or massive snowdrifts. On the other hand, such devices are more compact, easy to operate and store.
Self-propelled snow blowers with a gasoline engine can efficiently handle large amounts of snow in the yard. Moving on their own, such devices have a long ejection range and good maneuverability. This design is quite large in size, but during operation it does not require the use of physical force from the owner at all.
Before you start creating a machine for collecting snow with your own hands, it should be noted that non-self-propelled models are needed for clearing small areas of freshly fallen snow with a thickness of up to 25-30 centimeters. They are most often used for regular cleaning of sidewalks, flat roofs, and garden paths. Such structures are considered maneuverable , but when removing denser layers of snow, it will be quite difficult to control such devices, since in this case you will have to push not only the device, but also the mass of snow in front of it.
When constructing a non-self-propelled homemade snow blower with your own hands (drawings, projects), you need to use the lightest possible parts, since in this case the equipment will do the work at the expense of a person.
Advantages of electric models
Advantages of a snow blower
- Electric snow blowers have more affordable prices compared to their gasoline counterparts.
- They are much more compact and lighter, which makes them easier to move and store during snow-free periods of the year. There is an opportunity to load it into the luggage compartment of a car, bring it with you to the dacha, and a hidden socket in the fence will allow you to connect to the network and clear the approach to the house.
- There is no need to purchase gasoline and oil, which significantly saves money. And the cost of electricity is an order of magnitude lower than hydrocarbon fuel. The absence of a specific odor makes storage accessible not only in a separate room, but also in a pantry.
- The noise level of the operating unit is not too high.
- Maneuverability of control, easy to move even in narrow areas.
- No exhaust gases during operation.
- The presence of a headlight allows you to clear snow at night.
Read also: Requirements for laying cables in the ground
Construction of snow blowers
All designs of electric snow blowers are equipped with:
- engine;
- auger;
- outlet chute;
- protective bucket;
- support wheels;
- handle and switch.
- Screw
The work of snow blowers is based on capturing the snow mass and throwing it to the side. Depending on the gripping method, screws can be divided into:
The helical rotor is vaguely similar in appearance to the auger of a home meat grinder. The cutting edge of the auger can be absolutely smooth, without grooves or notches (these are used in models for removing loose, recently fallen snow) or with sharp teeth reminiscent of circular saw discs. Snow blowers equipped with such a rotor are able to easily bite into compacted snow layers covered with an icy crust.
Based on the material used, rotors are divided into:
- metal;
- plastic-rubber;
- rubber.
model Daewoo Dast 3000E
A stone or branch stuck between the blades can jam the rotating mechanisms and damage the engine. To reduce the likelihood of expensive snow blower components burning out, the augers are secured with shear (safety) bolts, which break first when the machine is stopped unexpectedly by foreign objects. The impeller in two-stage systems is also attached using a similar method. It is quite possible to replace a broken bolt with your own hands without involving service center technicians.
- Outlet chute
Through the outlet chute, snow is thrown to the side. The materials used to make it are metal or plastic. In the instructions, the manufacturer usually indicates the maximum possible tilt length. Under normal conditions, this distance may differ slightly, it all depends on the height of the snow cover, its consistency and density, as well as on the strength of the wind. Thus, a layer height of about 5 cm may not be enough to throw back a significant distance, and too strong a headwind can throw the flying snow mass back. The upper part of the chute is equipped with a visor with which the height of the snow ejection is adjusted. The switch handle makes it possible to adjust the direction of the ejection. It is very convenient when, regardless of which direction the device moves, all the snow is collected from one side of the area being cleared. In household electric snow blowers, such settings are made manually.
Important. Plastic samples are less susceptible to corrosion during operation, however, the lighter the machine, the higher its level of vibration.
- Ladle
Daewoo Dast 2600E
The protective bucket covers the rotating mechanisms located at the front of the machine. Its dimensions determine the size of the snow mass capture. It is not difficult to guess that the larger the bucket, the more powerful the engine must be installed on the snow blower, and at the same time the thickness of its walls must increase. Thin, fragile bucket structures are subject not only to partial deformation during work, but also to breakdowns. The movement of the snowplow is facilitated by equipping it with a metal trimming knife located in the lower part of the bucket. Some machines are equipped with skis on which the bucket rests. The adjustment mechanism allows you to independently set the distance from the ground surface to the cutting edge of the auger. This design is convenient when cleaning the base from compacted screenings; the machine will not grab individual fragments and scatter them to the sides. This will save not only the paths, but also nearby objects: the force of the ejection is sufficient for a falling stone to break glass or injure a person. The knife and skis quickly fail; to increase their service life, they are made double-sided. When abrasion occurs on one side, it is quite easy to turn them over to the other and screw them on with your own hands.
Functioning of a two-stage machine
The rotary auger (two-stage) snow collector is designed differently.
The first stage of the design includes raking snow with an auger; the second stage is ejection through a chute using a special rotor - a discharge impeller. The screw of such rotary-type devices is designed according to a standard screw shaft design, with a toothed and also a smooth edge. Augers can be made of metal, steel or rubber . They are also rubber-plastic, steel-reinforced, depending on whether the snow collector is self-propelled or manual.
The impeller of the snow collection machine for auger machines includes from three to six blades and can also be made of various metals, depending on the intensity of work that the device will have to perform. This can be plastic (for simple models), as well as metal (for cleaning a larger area).
Let's look at a few popular models
model Hyundai s 400
- The Daewoo Dast 2600E electric snow blower has proven itself in harsh winter conditions. Such a machine is capable of capturing a layer of snow 27 cm high and 46 cm wide. Its plastic body can withstand frosts down to -50 degrees. Rubber-metal augers easily remove not only freshly fallen snow, but also compacted snowdrifts, while absolutely not damaging the surface of paths and playgrounds .The engine is protected from overheating and moisture. A bright headlight provides good visibility of the surface being removed. The weight of the snow blower is 15 kg, power 2600 W. A 3-year manufacturer's warranty is proof of high quality.
- The Daewoo Dast 3000E snow blower is the next development from Daewoo; it has a 3000 W engine, which makes it possible to increase the dimensions of the bucket. Now the thickness of the cut layer of snow is 33 cm, width 51 cm. The weight of the unit has also increased slightly - up to 16.8 kg.
- The Hyundai s 400 snow blower has a power of 2000 W, which allows you to remove snow up to 25 cm. The width of the bucket is 40 cm making it very maneuverable. The engine is protected from overheating; under heavy loads it is switched off to cool down. Shockproof, frost-resistant plastic makes it possible to work in severe frosts. You can adjust the range and direction of snow throw with your own hands.
Homemade snow blower
DIY snow blower
Home craftsmen who know the basics of welding and turning can assemble a snow blower on their own. Perhaps it will be somewhat inferior in design to purchased analogues in terms of external design, but it is quite possible to obtain the necessary technical characteristics. To make a snow blower with your own hands, you will need an asynchronous electric motor with a power of 1.8-2.5 kW; you can use less powerful motors, but in this case the throw range There won't be enough snow. It is important to ensure reliable sealing of the engine; snow should not fall on it from any side to prevent a short circuit. The frame of the snow blower is traditionally made of metal, a profile pipe fits perfectly. A water pipe with a diameter of 20 mm is used for the control handle. The bucket is assembled from galvanized steel or roofing iron, the individual parts are connected to each other with rivets or welds.
how to make it yourself
The dimensions of the bucket must be 2-3 cm larger than the auger to ensure unhindered rotation. A plastic or metal sewer pipe is used for the discharge chute, but you can bend it from a sheet of tin. The auger is the most labor-intensive process in assembling a snow blower. High-quality alignment will be required to reduce noise and vibration during operation. A 3⁄4-inch pipe is suitable for the shaft. The auger itself is made from a conveyor belt 1 cm thick. You will need to cut circles with a diameter of 28 cm: by cutting them in a spiral, you get quite suitable blanks, of which 4 pieces are required. The drive can be chain or belt. All bearings used must be sealed, preventing snow and moisture from getting into them. Using your experience in such work, it is quite possible to assemble a reliable model that can compete with factory analogues.
Assembling the auger and body of a single-stage snow blower
The manufacture of an auger snow blower begins with the frame. The shape of the design resembles a children's sled. If these are available, they can be used instead of a frame. Only the sleds needed are steel, not aluminum. A homemade snow blower frame is welded from metal corners. The dimensions of all elements are indicated in the diagram. The result should be a structure with dimensions of 700x480 mm.
The most difficult part of making a snow blower is the auger. First, prepare the material for the spiral knives
It doesn’t matter whether it’s steel or rubber from a conveyor belt, the creation process is the same:
- Four discs are cut out of the prepared material using a jigsaw.
Their diameter should be less than the semicircle of the snow blower body. According to our scheme, this figure is 280 mm. The auger blades are made double-sided, and they are installed at an angle towards the throwing blades. - A hole equal to the thickness of the axle is drilled in the center of each disk. In our example, a tube with a diameter of 20 mm is taken.
- The resulting rings are cut on one side, after which the edges are stretched in different directions. The result should be four identical spiral elements.
- Now it's time to make a shaft out of the tube. First, two blades are welded strictly in the center. They are placed opposite each other. Trunnions for bearings are welded to the ends of the pipe.
- The metal blades of the auger are simply fixed by welding to the pipe. For rubber knives, fasteners made of metal plates with holes are welded onto the shaft. The elements are connected with bolts.
- Bearings are mounted on the screw axles. One of them should be longer. A pulley or sprocket is mounted on this trunnion, depending on the type of drive.
The auger is ready, and now it’s time to assemble the snow blower body:
- For the main element of the bucket, take a sheet of metal 500 mm wide and bend it into a semicircle. In our case, the arc diameter of the resulting element must be at least 300 mm. In such a bucket, the auger knives with a diameter of 280 mm will rotate freely.
- The side shelves of the bucket are cut out of metal, plywood or textolite. Hubs for bearings are attached in the center.
Finally, all that remains is to assemble the bucket from the parts and install the auger inside. The knives should rotate freely by hand without catching the bucket body.
If the auger snow blower is not an attachment to the walk-behind tractor, then we continue to assemble the structure. First, the engine mounts are secured to the frame. It is better to make them adjustable in order to tension the belt drive. Skis are attached to the bottom of the frame. If they are wooden, then for better sliding the surface can be covered with plastic.
A nozzle is cut out from the top center of the snow blower bucket body. The hole must strictly coincide with the location of the throwing blades. A pipe is fixed to the nozzle, and a snow ejection sleeve is put on it.
The finished snow blower bucket is bolted to the frame with skis. The control handle is welded to the back. The engine is also bolted to the frame. A pulley or sprocket is put on the working shaft, and a drive with a screw is made. Adjustable motor mounts are used to tighten the belt or chain drive.
Before starting, the finished snow blower is turned by hand by the auger or pulley. If everything spins normally without any snags, you can try starting the engine.