Homemade final drives
Hello dear forum users!
I bought 2.13 flatbeds from Voight and tried them out as expected. (And my friend and I decided to try to assemble our own. We walked for a long time to the start of production, attracted a lot of knowledgeable people (design engineers) working at the factories, and now we waited for the housing after normalization.
They look specific))
“If you don’t know which harbor you’re heading to, no wind will be favorable.” (c) KMS
What is the body weight?
“If you don’t know which harbor you’re heading to, no wind will be favorable.” (c) KMS
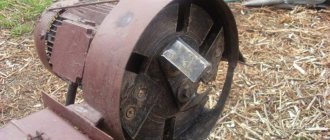
The case weighs 15 kg.
As a result, you should get gearboxes like this:
Hello! And what, if it’s not a secret, were the problems with the Voitovskys?
Hello. In the first two days of operation, one gearbox jammed. After about 500 km, all started leaking, and one began to get very hot. After opening it turned out that the bearings were clamped in the seats, which in turn were oval and very roughly processed. The rollers in the idler gears have eaten the thrust washers. The teeth of the drive gears (working part) were ground off with a grinder, the drive gear of the front gearbox was torn. There is no alignment of the shafts at all. The cases do not close, there are gaps between the case and the lid. The two upper bolts in the housings do not tighten (threaded holes are drilled with an offset. Everything I remember seems to have been written down.
Source
UAZ 3151 ZHORA › Logbook › Repair of front gearboxes
This entry was written on May 13th, today, July 10th, I am adding to it and finishing it.
When driving more than 50 km/h, it tossed quite a bit from side to side. The pins need to be replaced.
Knowing how wonderful the letter “ME” was, the previous owner of the UAZ immediately planned to overhaul the front final drives.
And away I went - I read the materiel... I also printed out Soviet pictures and instructions for repairing warriors... in the end...
instructions and pictures ftopku! “take off this, take off this and then this”, but HOW TO REMOVAL! they don’t write... and it’s even more interesting to “remove it” if the bolt is stuck.
Started from the left side. First, the hubs) ) ) I have “Stelm” - probably something like ELMOs). I took it off - the lithol seems to be normal, in the photo you can see THAT solid bolt that didn’t want to get out! Drilling, punch, hammer... and 10 minutes later, after four turnings of the drill, it turned out. And in general, why fasten the drum with THREE bolts? There’s no need to fasten it at all, because the disc presses the drum to the hub... I don’t understand.
We remove the brakes. OOP, we're getting burned again, the brake pipe mounting bolts, which can be opened with a 14mm wrench, don't want to be unscrewed with an open-end wrench) the edges on the bolts are breaking off! HAMMER in hand and let’s put the spanner on, oh how I love them... We removed the hub without any problems, removed the “boot” or whatever they correctly call it... the Kama Sutra is not nearby, I can’t take a look. The gearbox cover flaunts before our eyes. unscrew the bolts. damn, minus one. drilling or clamping of the gearbox housing in a vice is coming.
Since I was disassembling it without instructions, I hit a dead end, then as I understood it was necessary to remove the gearbox with a fist, but the bolts again did not want to unscrew, “half a bucket” of WD-40 was poured on them.
I dealt with the right side 2 times faster, it was noticeable that this gearbox had already been rebuilt and it was SOOOOOOO difficult to turn on your fist. This is such a cute and “pleasant” smelling litol after removing the right hub, when I remember the smell, it makes me sick! I hate swamps in places like this.
today Uncle Styopa stands bipedal))
Next comes the assembly, and writing down what is needed and how much it all costs! and tomorrow, by the way, the long-awaited salary))) current TSSS, not a word to the wife! PS: for those who don’t know how a military bridge works and where it got +6 cm of ground clearance, you can understand this from photos 6 and 8!)
addition:
I noticed that it’s better not to put off assembling a disassembled bridge for a month or more - it’s forgotten!) Of course, it’s not difficult to remember, the third time you understand which bolt comes from where and how the sapph should be attached... people, have a NORMAL set of keys! Don’t put off assembling the bridge or its parts until later! Don't forget to fill the hub with lithol! Well, don’t forget that working with a company is always better!) )
UAZ 3151 1997, 76 l. With. - service visit
Cars for sale
UAZ 3151, 1997
UAZ 3151, 1988
UAZ 3151, 1998
UAZ 3151, 1985
Comments 56
Hello! Please tell me whether the bridge needs to be rebuilt if the radial play of the military bridge shank is already 3 mm.
Bro, don’t put it off until you become a specialist. You’ll forget where the nut is, and you’re a dick)) If they smell like shit, then it’s a nigol. And pour it on)) If there is nigrol inside, then pouring in is useless - it will leak out. According to my UAZ experience. But you can experiment)))
With a good set of tools, repairs turn into fun and celebration.
Good day! Please tell me where to find the dimensions of the final drive bearing cup. I had a transfer case and the drive does not fit into place, I need dimensions.
Coat the bolts with graphite during assembly and there will be no problems.
and what difference does it make between warriors and leopards, only leopards are wider than warriors.
oh lost I understand. Thank you!)
Even though I don’t understand how military bridges work, can you explain for those who are especially gifted)) and what is the difference between military and ordinary ones
What are the design differences between military bridges and civilian ones?
A military bridge differs from a regular bridge by the presence of final drives. Due to the presence of gearboxes, the bridge is raised relative to the wheel axis by 4 cm, which increases the vehicle's ground clearance (the distance from the ground to the bottom point of the bridge). That’s why military bridges are called “U-shaped” (the bridge is like the crossbar of a letter, with wheels attached to the right and left of the letter). The torque does not fall entirely on the main pair (as on civil bridges), but is distributed between the main pair and the gearboxes. Due to this, the main pair is smaller in size (the military axle housing “hangs” 4 cm less than the civilian axle). The main pair has fewer teeth and they are larger - this increases the reliability of military bridges compared to civilian ones. The gear ratio of military axles is 5.38 (=2.77*1.94 - the gear ratios of the main and final drives, respectively) - more high-torque, but less high-speed than conventional axles. The rear driveshaft for military axles is 1 cm shorter than for civilian ones!
All the letters were stolen from the UAZbuki, it’s hard to choose the words and write them yourself)
Simply put, the collective farm bridge transmits the moment from the cardan to the axle shafts to which the wheels are attached... and on the military ones there is a gearbox of a smaller diameter, then there are axle shafts, which in turn transmit the moment to the final drives, the ones that I repaired) and then the moment goes to wheels
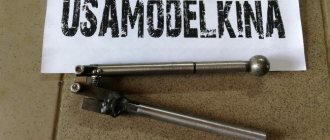
in the pins there is a hole with a thread - I did it using improvised means - I just had a bearing lying around at hand - like the one that holds a fungus - I put it on the side, on top of a plate with a hole and a bolt in it and screwed it into the pin - and pulled it out king pin... when repairing a UAZ, the time is allocated approximately 85% of the time to inventing a device and 15% to implementing it :))))) I assembled it and then remembered that I forgot to push lubricants into the fist (grenade) itself