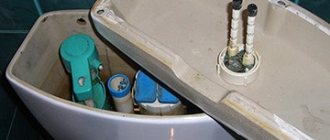
Motor “on windings” (3 contacts + ground)
Here we have 4 contacts: A (+), F1 and F2 (stator winding contacts), 4th (ground) - the contact to which the negative goes from the battery, usually located at the bottom of the motor. The designations and color of the contacts on the winches themselves may vary from model to model, but the essence remains the same.
Don’t forget to connect the winch ground to the solenoid negative. The motor has a thin black cable for this purpose.
Basic examples of colors and markings on the motor:
- yellow, black, red (F1 and F2 - yellow and black, A (+) - red and the 4th contact without designation is ground);
- yellow, red, blue (F1 and F2 - yellow and red, A (+) - blue and the 4th contact without designation is ground);
- A, B, C, D - (most often F1 and F2 are located nearby, A (+) will be closer to the cover, near the brush assembly, the mass is on the body).
Do-it-yourself lever hoist: for the garage and household
A hoist is a very necessary thing when there is a need to lift and fix a heavy thing at a height. Unlike gear hoists. The lever mechanism can lift a load of no more than 5 tons and only to the height of a person.
The hoist is controlled using a special handle, which is part of the structure.
Lever hoists are not suitable for handling heavy loads, so they are rarely used in large production. They found their application in the household and as an assistant for motorists.
Scope of application of lever manual hoist:
- Housing and communal services use this design for laying water supply pipes in dug trenches or installing hatches in sewer pits;
- Farmers and foresters pull out tree stumps or carry heavy logs;
- Car owners use the hoist as a jack - to lift the car, remove a wheel or pull the engine out from under the hood.
The main advantage of a lever hoist is that it can be used in small spaces, such as a barn or garage, or outdoors.
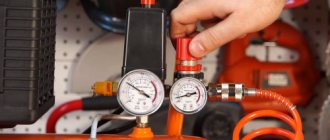
Solenoid installation and connection diagrams
This is a switch that is activated by the remote control connected to it and directs the charge from the plus (+) of the battery to the motor contact we need (winding or unwinding). They are presented in two versions: barrels and monoblock.
Barrel
Barrel connection diagram
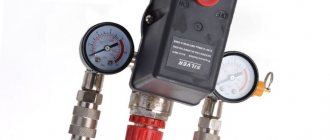
Monoblock (monosolenoid)
Connection diagrams for car winches
Connection diagrams for ATV winches
Connecting the Gruner relay
Just like a regular plus switch, the Gruner performs the function of disconnecting power from the winch, protecting you from its accidental activation. If it turns on spontaneously, the winch, at best, collapses itself (and you are left without expensive equipment), and at worst, the entire bumper of the car.
Plus switch
Gruner relay
Homemade winch: diagram and detailed description
A winch is one of the most necessary tools that every off-road conqueror should have. After all, without this mechanism, it will be almost impossible to pull your car out of a ditch or ford. Some car enthusiasts purchase ready-made winches and install them on power bumpers, while others make them with their own hands.
And if you are in doubt about choosing the right tool, you can try to make it yourself. Our article today will help you with this.
How to turn on a winch without a solenoid?
If, after pressing the buttons on the control panel, your winch does not start working, you can connect it directly to the battery without a solenoid.
Connect the negative from the battery to ground on the motor.
To wind it, you need to apply the “plus” from the battery to “F1”, and connect “F2” to “A”.
To unwind, you need to apply the “plus” from the battery to “F2”, and connect “F1” to “A”.
How to check the solenoid?
It is required to make a standard circuit of a battery, solenoid and winch. After this, alternately close the “plus” of the solenoid with control contacts (1) and (3).
Contacts F1 and F2 of the winch are connected to F1 and F2 of the solenoid, A (“plus” of the motor brushes) is connected to contact A of the solenoid, and with a thin cable we connect the “ground” of the winch to the “minus” of the solenoid.
From the battery we throw “minus” to the “ground” of the winch, “plus” to the “plus” contact of the solenoid, after which we alternately close the “plus” of the solenoid with any of the contacts: “1” (winding) or “3” (unwinding).
If after this action the winch starts working, then the solenoid is working.
How to make?
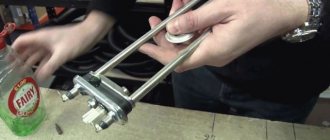
A drum with a cable is the key component that makes up any homemade winch. The drawings of this device must be as accurate as possible so that the mechanism works correctly and reliably. It’s good if you have such a drum ready-made, because it’s much more difficult to make it yourself.
How to make your own drum? To do this, you need to take a piece of pipe with thick walls, and using electrodes and a welding machine, attach cheeks 5 millimeters thick to it. The driven gear must be attached to one of the last parts. The pipe itself is equipped with seats for bearings.
You can make a drum for a winch in another way. To do this, you need to have several hubs from any Zhiguli or Volga. They should be machined into a place for welding and the halves should be attached to a mandrel of the required diameter in order to achieve alignment of all parts.
It is best to take a gearbox with a large gear ratio (worm type). The main advantage of such a mechanism is that there is no need to create a drum brake. Most often, motorists purchase a gearbox from trolleybus doors - it is easiest to mount on the site.
If you decide to make a homemade winch driven by a starter, it is best to take a model with a planetary gearbox. This is what early Zhiguli engines were once equipped with.
To create a mechanism with a starter, the first step is to prepare a platform from a metal sheet. It is necessary to weld seats onto it, on which the drum shaft will then be mounted. After this, the gearbox is installed here with the input shaft facing up.
A homemade adapter is mounted to the gearbox on top. We need it in order to install the starter. A gear with a certain tooth module is mounted on the input shaft. Afterwards the starter is finally attached to the structure. At the final stage, wiring is done. That's it, now such a winch can be installed on a car.
Consequences of incorrect connection
People make mistakes, but be extremely careful when connecting the winch. Some errors are inconvenient, while others can cause serious problems.
Not terrible mistakes
What happens if:
- Confuse "F1" and "F2"? The winding and unwinding positions on the control panel will be swapped.
- confuse "F1" (or "F2") with "A"? The winch will only work in one direction.
- swap “1” and “3” controls? The winding and unwinding positions on the control panel will be swapped.
- confuse “-” (“2”) and “1” (“3”) on the solenoid? The solenoid will click and the winch will only work in one direction (winding/unwinding)
- do not short-circuit the “ground” of the winch with the “minus” of the solenoid? The winch just won't work.
Mistakes with consequences
What happens if:
- Should “ground” and “+” be swapped? If the winch itself does not touch the body/frame of the car, or its body is heavily oxidized, then nothing will change. But the radio remote control will not work. If the winch is well grounded, a short circuit will occur.
- Is the “ground” confused with the power contacts of the motor (“F1”, “F2”, “A”)? Short circuit is guaranteed.
- confuse “A” and “+” on the solenoid? “+” will be constantly supplied to the motor stator (if there is a winch switch, then this is not so critical). In humid conditions, the stator winding, sooner or later, will begin to penetrate the housing and the copper of the winding will decompose.
4x4tur › Blog › Connecting the winch
If the winch is prepared for installation www.drive2.ru/users/4x4tur/blog/806390, then we can discuss the electrical part in more detail.
The winch is connected according to the diagram. Yes, actually everything is simple - the red wire is to the plus of the battery, the black wire is to the minus...
But there are nuances! Before installing the winch, it is worth inspecting the power wiring. Check the power wires of the generator and the engine/frame ground. It is better to install thicker ones. The battery terminals must be replaced and/or cleaned.
1. Don’t forget to connect the thin ground wire of the solenoid
.
2. Sometimes they “forget” to install the ground wire
, citing the fact that the winch is attached to the ground.
However, contact along the body and frame has significant losses. Moreover, the rack housing is aluminum, and the mounting bolts and motor are steel. So the ground wire must go from the motor to the battery terminal. 3. The battery
must be fresh, with a capacity of at least 65 Ah. An old battery will not allow the winch to develop full power. It is best to use AGM batteries - they have a higher output current and charge quickly. There's no point in chasing amps! The battery(s) must be compatible with the generator's capabilities.
Many jeepers “tune” the generator
. I'm not talking about moving it higher from the water, I'm talking about installing more powerful ones. It’s worth mentioning here that modern cars have 140A generators! And they have a freewheel instead of a pulley. This was done to protect the belt due to inertia. In addition to wear, the belt can simply slip off (although no one usually turns off turbo cars after high speeds, allowing not only the turbine, but also the generator to stop).
Another point - the larger the battery capacity, the longer it will take to charge. At the same time, during charging they will not allow the winch to reach full power.
Terminals!
Some cars have
a built-in fuse
. In this case, you need to bypass it and connect the winch wire directly to the clamp bolt! Typically the fuse terminal is larger, but the fuse itself is not always visible. www.drive2.ru/cars/hyunda…rnal/4899916394579243504/
4. All winch wires should be packed in a plastic or textile sleeve and secured. At least where there is touch. This will prevent rubbing and shorting when the insulation melts. Avoid laying wires near the exhaust tract.
5. A plus switch will be useful. There are many options. Both mechanical and electrical. The last two types: solenoid and polarized relay. Mechanical, price 800 rubles.