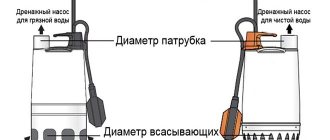
Liquid overflow pump
The simplest design is made from available materials.
The following components will be needed:
- 2 plastic flasks (one with a lid, the other open);
- a piece of PVC pipe of the appropriate diameter;
- special hose for water overflow.
Self-manufacturing of the pump begins with a reed valve. The first step is to cut out a circle from the gasket in the plastic bottle cap. The diameter of the circle should be smaller than the neck of the flask. During the circumcision process, a small sector is left in its original form.
The simplest design of a pump for overflowing liquid.
An 8mm hole is formed in the center of the plug. The next step is to insert the partition into its original position and screw on the cut neck of the plastic product. When twisted, the membrane is clamped, creating a petal-type valve device.
A second bottle with the top cut off is secured on top of the polymer pipe inserted into the finished valve. The result is a structure resembling a funnel. The final stage of making a simple pump yourself is connecting the outlet hose to the second end of the plastic pipe product.
Pump characteristics
How to make a water pump with your own hands? To create a pump, the first thing you need is materials. In this case, first of all, you need to focus on the following criteria:
- The power on which the speed of pumping water from the well depends. On average, for pumping from wells, boreholes, reservoirs and storage tanks, it is 350-400 W;
- Maximum degree of pressure. The approximate required watering pressure for the garden is 40 m;
- Strength and moisture resistance of the material. For example, the best material for making the body is cast iron, the impeller is brass, the shaft is stainless steel, and the mechanical seal is ceramographite.
If you take into account all the above criteria, you will be able to build an effective pump, and water will be pumped from the well in a matter of minutes.
A cheap pump for overflowing water can be made from almost nothing: from two plastic bottles with and without a stopper, a piece of plastic pipe of a suitable diameter and a spout hose.
How to make a plastic pump
Hand pump with side spout
Available low-cost materials and simple technology that allows the summer resident to perform all procedures with his own hands are recognized as the main advantages of the design.
For production you will need:
- 2 pipes: plastic 50 mm and polypropylene 24 mm;
- polymer coupling 50 mm;
- 2 PVC plugs with a diameter of 50 mm;
- PPR bend 24 mm;
- round rubber gasket d 50 mm, thickness 4 mm;
- screw clamp for tie;
- 15mm check valve;
- union nut size 15 mm;
- rivet;
- polyvinyl chloride tee with a cross section of 50 mm with a 350 outlet;
- used silicone bottle.
It is recommended to start by making a check valve.
Several holes d 5-6 mm are cut along the perimeter of the plug. In the center of the PVC product, use a drill to make a hole with a diameter corresponding to the size of the rivet.
The inner surface is covered with a rubber gasket. It is necessary to ensure that the partition covers the entire drilled perforation without rubbing against the walls of the plastic plug. To ensure reliability of the structure, the screed is performed in the center. It is allowed to use a rivet or a screw-nut pair.
When making a pump sleeve, the PVC pipe is cut from the narrow side to a length corresponding to the immersion depth of the pump. The prepared valve is placed in the socket. Reliability of fixation is ensured by fastening with self-tapping screws.
According to the diameter of the polypropylene pipe product, a hole with a cross-section of 25 mm is drilled in the plastic plug. The element is placed at the opposite end of the sewer pipe.
Manual pump.
Trying not to disturb the rigidity of the structure, several large holes are formed in the rod. A tee with an outlet is placed in the upper part of the sleeve.
The movement of the piston in the upward direction helps to displace the liquid. Through the holes, water is supplied to the side spout.
For the next step you will need used silicone containers.
An empty can with a cut-off spout is preheated to a high temperature, inserted into the internal cavity of a plastic sleeve, and placed on the valve.
When carrying out the procedure, it is necessary to comply with the diameters of the PVC pipe and the container that previously contained the silicone composition.
Assembly of the piston is completed by cutting off the excess part of the cylinder. A union nut is used as a fastening element.
To make a homemade pump rod with a side spout, it is recommended to use a 24 mm polypropylene pipe, 60 cm longer than the length of the sleeve. A check valve is inserted into the heated end of the product. Without waiting for the structure to cool completely, fix it with a screw clamp.
The final stage is the assembly of the pump device. The pump unit rod is inserted into the PVC casing, and the sliding support, represented by a plug, is secured using a coupling fitting. A tee located inside the sleeve allows the piston to direct water through the holes in the PPR pipe into a special outlet. After connecting the hose, it becomes possible to use a hand pump to pump liquid.
What you need to make a pump
To make an aquarium pump with your own hands you will need the following components:
- 20 cc syringe;
- Silicone tube, with a diameter approximately slightly smaller than the diameter of the syringe;
- Electric motor 3 or 5 volts;
- Some other materials. In particular, you will need caps from 1.5 liter PET bottles (3 pieces), a piece of thin plastic, you can take from a CD box.
As for the tools for making a homemade aquarium pump, you will definitely need a hot glue gun, a cordless screwdriver and a small drill. You will also need a sharp knife and scissors to cut all materials. So, let's go.
Piston well pump
Scheme of a piston well pump.
The technical device is used in the construction of autonomous water supply systems from shallow wells up to 8 m .
In the internal space of the cylindrical body, the piston forms a vacuum zone, which ensures easier water intake from an individual source.
Novice craftsmen can make their own hand-held well pump.
For production you will need:
- 1 m of metal pipe with a cross section of 100 mm;
- rubber seals;
- 2 metal disks to create a piston;
- 2 valve mechanisms.
The tightness of the design ensures the efficient operation of the piston unit, increasing the productivity of a homemade device for pumping water.
Unit sleeve design
Sleeve design diagram.
To ensure high productivity, it is necessary to select a housing with a flat and smooth surface of the internal walls. It is allowed to use a truck engine liner that has the specified characteristics.
A reed valve is installed in the center of a steel disk corresponding to the size of the well head. You can install a factory-made water valve device. The finished bottom is connected to the lower part of the body using a welding machine.
To give the homemade product an aesthetic appearance, the sleeve is covered with a lid on top.
During manufacturing, it is necessary to form a slot-like hole for the piston rod.
Pump piston construction
Diagram of a piston pump.
A rubber gasket up to 1 cm thick is placed between 2 metal discs. A bolt tie is used to secure the structure.
The excess membrane protruding along the edges of the product acts as a seal. A rubber rim fills the gap between the piston and the sleeve, ensuring the tightness of the homemade pump housing.
The stage is completed by installing the valve and welding the ear to connect the stem.
Making a petal valve from rubber
Operating diagram of a reed valve.
A small hole is cut in the center of a round rubber gasket larger than the water inlets.
It is designed to secure the membrane disk over the inlet slots using a special washer.
During the suction process, the edges of the rubber are raised, allowing the liquid to fill the device.
Reverse down pressure forces the petal to lower, ensuring a tight seal at the inlet openings.
Final assembly and installation
To secure the pump, it is recommended to cut a thread on the bottom of the sleeve and the head of the well. This procedure will facilitate the dismantling of the pump unit for repairs and service activities, without compromising the reliability of fixation and the tightness of the structure.
After installing the top cover, a handle is attached to the rod. Electrical tape or rope, applied in tight turns to the end of the holder, will ensure comfortable operation of the homemade product for pumping water from an autonomous source.
Stopping the fluid supply indicates insufficient sealing of the connections. Restoring the tightness of the fastenings will allow the system to return to functionality.
Pump assembly and installation diagram.
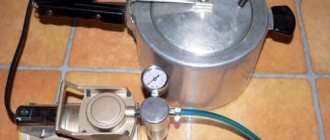
Vacuum Pump Manual
Guide to using a vacuum pump
The procedure for using a vacuum pump will be discussed using the example of pumping water from an aquarium. In general, the features of using such equipment remain almost the same for most situations.
Prepare the necessary equipment. You will need:
- pump core;
- tee;
- nozzle and fitting.
Insert the nozzle into the tee hole. You can first make it from a tube of a suitable size. Next, you need to screw the fitting onto the faucet with a pre-threaded thread, and then tighten the length of the hose. It is not recommended to use a hose longer than 100 mm.
Manual pump with direct spout
Manual pump with direct spout.
The manufacturing technology is similar to a pump with a side spout. The differences lie in the simplified design of the sleeve and the exclusion of the tee with outlet from the list of materials.
The rod is made from a single piece of PPR pipe; holes are not drilled. The outlet device is connected to the tubular product.
Most owners of suburban areas with autonomous water supply prefer to install pumps with a side spout.
This design option for the pump unit has a significant drawback. The liquid being poured out moves together with the rod.
Minor improvements to the sleeve allow you to correct the direction of water movement, ensuring ease of use.
Wave energy pump
The first option involves mounting a corrugated pipe with a suspended log on the mast. The parameters of the wooden element are determined experimentally, according to the rigidity of the corrugation.
The directions of operation of both leaf-type valve mechanisms inserted into the tubular product are the same. Water is taken when the float is immersed, accompanied by some stretching of the corrugated pipe. When the log fragment moves upward, the corrugation contracts, which helps displace liquid from the internal cavity.
In the second version of the homemade design, the brake chamber diaphragm is used as the main functional part. In this case, the valves operate in opposite directions.
An elastic membrane divides the housing into 2 compartments, fastened with a screw connection. The air compartment is not sealed and does not participate in the work process. The second part is filled with water.
The handle used to control the pumping of liquid is connected to a rod mounted in the center of the diaphragm.
Wave energy pump circuit.
An inlet valve is mounted on the suction pipe, and an outlet valve on the pressure pipe. Valve devices operate in antiphase.
By pointing the handle down, the rod is raised simultaneously with the elastic membrane. The rarefaction zone formed under the upward-moving diaphragm facilitates the filling of the water chamber with liquid. When the handle moves downward, water is pushed out of the compartment.
Manufacturing of a liquid ring vacuum pump ↑
To assemble this homemade device, you need to take a cylindrical body, place a shaft with an impeller equipped with small blades inside. Organize a water supply to the unit body, which will cause the blades to rotate. In this case, the liquid, under the influence of centrifugal force, will rush towards the walls of the unit. A vacuum is created in the center.
Important! Vacuum pumps of this type are most often used in factory equipment, as well as on agricultural machinery.
Deep piston pump
Structurally reminiscent of a standard manual piston pump. The parameters of the pump sleeve are determined according to the depth of the well. In some cases, the length of the rod exceeds 10 m.
The principle of operation is based on the use of a spring mechanism that returns the piston to its original position after being lifted by a special cable. Instead of a spring fixed at the bottom of the source, it is allowed to use a suspended load. The functions of the sleeve are assigned to the barrel of the water shaft.
To lighten the weight, it is recommended to make the rod from aluminum alloys. In this way, the problem of increased product length is solved.
Scheme of a deep piston pump.
American or spiral type
The use of river flow energy is the basis of the principle of operation of a spiral pump. For normal operation, the water flow must move at a speed exceeding 15 m/s at a depth of at least 0.3 m.
For manufacturing it is necessary to prepare materials according to the following list:
- rubber hose d 50 mm;
- clamps of the appropriate size;
- a piece of plastic pipe with a cross section of 150 mm;
- pipe reducer from a recycled sewer truck;
- wheel, supplemented with blades for efficiency.
The water intake, made of a polyvinyl chloride product with a diameter of 150 mm, is connected to 1 end of the flexible hose. The opposite edge is put on the gearbox. It is allowed to use industrial equipment.
The hose pipeline is fixed to the wheel with clamps. It is recommended to fasten in a spiral manner.
The liquid enters the intake and moves along a spiral path, providing the required pressure. The lifting height is determined by the speed of the water flow and the immersion depth of the water intake pipe.
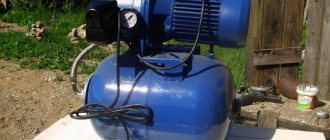
Water pump from compressor
An efficient pumping unit of the simplest design is assembled from a working compressor. For a homemade device you will need 2 pipelines - for air and water.
The manufacturing technology is simple. Summer residents who are not familiar with the construction profession are able to cope with the work on their own.
In the lower part of the water pipe, located at the bottom of the source, a hole is formed that is larger than the diameter of the air duct. The air pipeline is inserted into the formed hole and connected to the compressor.
Under the influence of atmospheric pressure, water is pushed out of the system.
The principle of operation of a water pump from a compressor.
DIY aquarium pump
First of all, you will need to prepare a syringe. Take a sharp knife and cut off the part of the syringe where the needle is inserted. The hole should be adjusted as tightly as possible to the size of the silicone tube, so the main thing here is not to overdo it.
After this, take a small piece of silicone tube (10 centimeters) and insert it into the prepared hole. To prevent leaks, generously cover the gap around the tube with a hot glue gun.
Next comes the turn of making a homemade pump turbine for the aquarium. For this purpose, you need to take 2 caps from PET bottles, and then connect them together, again, using a heat gun.
In one of the plugs you will need to make a hole for the tube, and in the other a slightly larger hole for installing the motor. Another hole will be needed from the end part of the plugs glued together; half of the syringe with a tube will be attached to it.
Gear water machine
The basic design element is a gear pump that pumps oil into trucks or agricultural machinery. The best option is to connect the pump to the power unit of the washing machine.
The required suction force is generated by the gears even in the absence of water. For self-production, pulleys and belts are used to provide the required number of revolutions.
Detailed description of the meaning of Gear Pump.
Shukhov wick pump
The wick is woven from cotton threads with a total thickness of 6 mm, covered with a special sheath. When the rope gets wet, it wraps around the satellites.
A spring located on the gear presses the wet string against the gear. The pressed water enters the receiver. An electric motor with a power of 10 kW is sufficient to power the system.
Detailed diagram of the Shukhov wick pump.
Washing machine device
Using a centrifugal pump, a homemade drainage pump is made from an old washing machine, allowing you to pump water from a depth of up to 2 m.
In addition to the household appliances, you will need:
- valve device of petal type;
- flexible rubber pipeline;
- isolation transformer.
Using a washing machine to make a drainage pump.
It is possible to use a ready-made valve from a washing machine with minor modifications. One of the holes must be plugged using a lid from a plastic flask.
The upper end of the hose is connected to the pump. The opposite edge descends into the source. A petal valve is first mounted on the underside of the flexible hose.
To start, you need to fill the pipeline with water and connect the transformer.
Remaking a Chinese pump
Surely many have been burned by purchasing Chinese-made brushless pumps. The devices are not bad, but they often break down: the very filling of the pumps is covered - the electronics, filled with epoxy resin. A Chinese rocking chair lasts a maximum of two weeks on a solar collector. Having become a little more familiar with the operating principle of the device, you can remake Chinese water pumps with your own hands. It will turn out as in the saying “If you want it to work as it should, do it yourself.”
Chinese pump
How to make a water pump from a Chinese broken product? First of all, disassemble the pump and look at the assembly diagram. One of the parts needed to assemble a new device is an impeller; it is difficult to make it yourself.
A new homemade water pump is assembled from a powerful Soviet-era engine, a coupling and a Chinese-made impeller. The creation is installed on the solar collector, and the issue with the pump disappears for a long time. It will work productively.
Important! A converted pump for a well with your own hands will need to be protected from dust, which is a common cause of breakdowns of propulsion equipment.
The completed unit is attached and tested in action. This homemade pump perfectly pumps water from a depth of two meters. It will last for several years of reliable operation, given the way it works cyclically.
For seasonal irrigation, devices with a minimum of wearing parts are mainly used:
- self-made asynchronous centrifugal pump;
- three-phase brushless unit.
In terms of popularity, the design of a centrifugal electric pump for water surpasses many pumping devices for similar purposes.
Making a pump for pumping water, if you figure it out, is not at all difficult. Made with your own hands, it will become a reliable and effective means for household needs: watering, drawing drinking water from a well. Such a technically simple design will help reduce electricity and water consumption.
Homemade for a small stream
Homemade diagram for a small stream.
2 buckets are rigidly connected through blocks. The drainage system is made of galvanized steel. A leash with a cable is attached to a metal product. To reduce wear, a polymer gasket is used.
The principle of operation is based on pouring liquid from one bucket to another. A crank mechanism is used to transfer energy to the pump.
Bicycle wheel pump
Manufacturing technology is based on the use of the following elements:
- PVC bends and polymer pipes for sewer networks;
- 2 bicycle wheels of different diameters;
- small gear;
- several ready-made piston designs;
- nylon fiber rope;
- rod for fastening.
Water pump using a bicycle wheel.
A sleeve made of plastic sewer pipe is immersed in the source. An outlet is installed on top to drain water. A small satellite made from a rim of smaller diameter is installed below. The larger bicycle wheel is fixed at the top of the structure.
The pistons are evenly distributed along the entire length of the nylon twine and secured to the cable. To ensure normal operating conditions, it is necessary to pass a homemade pumping unit through the sleeve. The rope acts as a connecting link between the pulley and the bicycle wheel.
When the gear rotates, water is captured by pistons attached to a string. The device lifts the liquid upward, allowing the water flow to be directed to the outlet. To facilitate the use of such a pump, it is recommended to install a bicycle drive in the system.
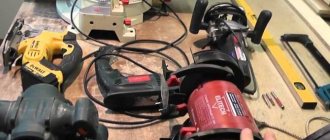
How to make a hand pump
Do-it-yourself manual water pump, review of the best homemade products
A water pump is very necessary in the spring and summer season. To make a manual water pump with your own hands, just look through thematic pages on the Internet. The solution can be found by exploring several options. Preference is most often given to Soviet-era designs; they are many times more reliable and better built than today’s ones.
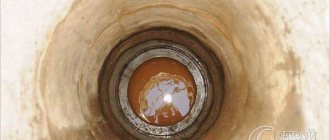
Homemade column
So, how to make a hand pump for a well for an eight-meter well? For this you will need a welding machine and used materials.
Main details
- five-liter carbon dioxide fire extinguisher with a wall thickness of 5 mm;
- two three-quarter flows - one for the spout (on the side), the other for the water intake (below);
- sealing rubber;
- half-inch pipe - 1 meter;
- two valves;
- a pond with a diameter of 14 mm for the rod so that it fits perfectly into the head of the fire extinguisher;
- lever 12 mm thick, 28 mm wide and 70 cm long;
- basic support post 12 mm thick, 28 mm wide;
Additional elements are also used:
- a frame measuring 7x30x25 cm on which everything is attached;
- mounting bracket 4x35 mm;
- steel handles for carrying the structure;
- M8 bolts for attaching the lever arms.
Three-quarter size surges are taken to increase the passage and reduce the load when pumping water. You can make them half an inch in size. The leads are welded to the pump housing (fire extinguisher). But first the body itself is made.
Description of the manufacturing process
The principle of operation of the pump is to create a vacuum suction of well water, on this basis a device is created.
- The bottom of the fire extinguisher is cut off. Between its body and the frame a sealing rubber is placed, pre-cut to the size of the body. In this case, the structure is attached to the base in four places using corners. Bolts and washers are used for fastening. To simplify things, you can simply burn holes in the metal on which the rod runs. This hole is central and must be made carefully using a welding machine;
- A thread bend is welded to the rod and a return piston is screwed in, playing the role of a check valve in the system. A five-millimeter metal circle with 10 mm holes for the passage of water is used as a piston. On top of it, a cuff cut from ordinary sheet rubber is placed on a rod of the same diameter;
- The entire installation is supported on support legs, which are fastened with M12 bolts. The legs are screwed into nuts welded to the frame. The design is completely collapsible;
- After all welding work is completed, the pump is primed and painted.
The rod is rigidly connected to the handle. When the rod begins to move, the cuff rises up, and water, seeping through the holes of the piston, rises to exit through the side outlet (column spout). The pumping handle should swing freely left and right.
The pump pumps out approximately two to three liters of water at a time. Such a pump for pumping water is useful for drawing water from a reservoir such as a well or a well.
For information. All pumps use the basic forces of nature to move fluid. Once the moving parts of the pump begin to move, the water is pushed out to the side.