Types of pumps for water from a well
Progress does not stand still and, along with manual ones, there are also electric pumps. They are also very popular among people living outside the city, but a simple device driven by muscular force is not losing its position yet. What is the secret of such popularity and longevity? Most likely, in low price and energy savings. This can also include independence from external water supply networks and the absence of any fees for pipeline maintenance.
Electrical device for extracting water
Types of pumps for a well or well are divided according to the principles that underlie their operation:
- piston;
- rod;
- deep.
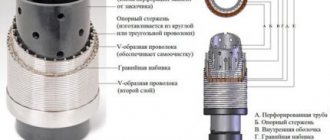
Shukhov wick pump
The wick is woven from cotton threads with a total thickness of 6 mm, covered with a special sheath. When the rope gets wet, it wraps around the satellites.
A spring located on the gear presses the wet string against the gear. The pressed water enters the receiver. An electric motor with a power of 10 kW is sufficient to power the system.
Detailed diagram of the Shukhov wick pump.
The essence of the piston device
A hand pump for a well is probably indirectly familiar to anyone from childhood. These are the devices that are used to inflate bicycle tires. Pumps that create the highest outlet pressure are unlikely to be suitable for supplying water to a well reservoir from deep wells. The maximum depth of groundwater at which it is possible to use a manual piston device is 8 m, and the height of the column itself, installed on the surface, is usually 70–100 cm.
Hand pump for well
The principle of a manual piston pump is as follows:
- When at rest, the piston is at the bottom of the cylinder, the disc valve is closed, and another valve located on the piston itself keeps the liquid from flowing from the upper chamber to the lower part of the pump.
- As soon as the lever is pressed, the rod begins to pull the piston. A vacuum space is formed between it, the walls and the bottom of the cylinder, into which water begins to flow through the hole that opens after lifting the disc valve.
- As the piston moves upward, the valve located on it is closed, due to which the water that was in the upper part of the column rises to the level of the outlet tap and pours out through it.
- When the piston reaches the top point, the created vacuum begins to pull it down. This opens the piston valve, allowing water to flow into the top of the cylinder.
- Under water pressure from above, the piston continues to move downwards, and the disc valve closes, preventing the flow of incoming water into the well.
The peculiarity of such a pump is that the inlet hose must be rigid, and the column itself is installed directly above the well. You understand that this entails certain inconveniences for home owners: it is not very pleasant to walk with a bucket across the entire site if groundwater is not found near the house.
Wave energy pump
The first option involves mounting a corrugated pipe with a suspended log on the mast. The parameters of the wooden element are determined experimentally, according to the rigidity of the corrugation.
The directions of operation of both leaf-type valve mechanisms inserted into the tubular product are the same. Water is taken when the float is immersed, accompanied by some stretching of the corrugated pipe. When the log fragment moves upward, the corrugation contracts, which helps displace liquid from the internal cavity.
In the second version of the homemade design, the brake chamber diaphragm is used as the main functional part. In this case, the valves operate in opposite directions.
An elastic membrane divides the housing into 2 compartments, fastened with a screw connection. The air compartment is not sealed and does not participate in the work process. The second part is filled with water.
The handle used to control the pumping of liquid is connected to a rod mounted in the center of the diaphragm.
Wave energy pump circuit.
An inlet valve is mounted on the suction pipe, and an outlet valve on the pressure pipe. Valve devices operate in antiphase.
By pointing the handle down, the rod is raised simultaneously with the elastic membrane. The rarefaction zone formed under the upward-moving diaphragm facilitates the filling of the water chamber with liquid. When the handle moves downward, water is pushed out of the compartment.
How do rod units work?
This hand pump for a well or well, although it contains the principles of a piston device, is slightly improved. And this opens up the possibility of pumping liquid from a depth of a maximum of 30 m. The peculiarity lies in the special design of the piston, equipped with a special rod (and the name comes precisely from this modification).
Rod unit for pumping liquid from depth
As always, increasing the complexity of the design leads to a decrease in strength. The main disadvantage is the frequent breakdown of these same rods. Here, however, everything depends on the manufacturer, who is responsible for selecting high-quality materials and careful assembly. The second negative point is that the design of the pump itself is quite cumbersome, and this causes certain difficulties during installation.
This unit works in exactly the same way as a piston unit, but the difference is that it is not the pipeline through which water flows that is inserted into the well, but the entire pump body to the level of artesian waters. That is, the reservoir holds much more liquid than a simple piston pump, and water can be drawn from a greater depth. This means that the presence of harmful impurities entering the water at shallower depths is excluded.
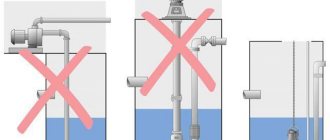
Nuances of choosing pumps
The most important property of any pumping unit is its performance, which determines how much water the pump can pump in a certain time. Productivity units: liters per minute, or cubic meters per hour.
Another very important characteristic of the pump is its maximum pressure. This value determines the maximum height to which the pumping unit is capable of moving water. The performance and pressure of the pump are characteristics that will certainly be useful when designing a water supply system. In addition, it is necessary to imagine what the future water consumption will be.
Consumption depends on many factors: the number of consumers, the number of specialized equipment (washing machine and dishwasher), the number of bathrooms and their location, as well as the hydraulic resistance of the water supply system.
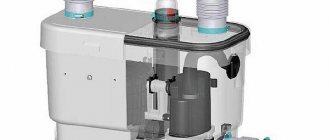
Pumping station design diagram
Design errors can affect the quality of the home's water supply, which can lead to discomfort for residents or serious damage.
The most popular pumps for use in private homes are German Grundfos units. The line of equipment of this brand is very diverse, so every summer resident or owner of a country house will choose a model to suit their parameters.
It should be noted that pumping units wear out very much at the time of start-up. To minimize wear, it is necessary to provide hydraulic accumulators and automation in the system. A hydraulic accumulator is simply necessary if the flow rate of the well does not correspond to the performance of the pump. If the water in the area contains a lot of sandy impurities, it is best to use diaphragm pumps, because sand can cause damage to the pumping unit.
Vibrating and vortex pump models have the smallest dimensions.
Vibration pump device for a summer residence
If you plan to pump water for your home from a depth of more than forty meters, then it is best to choose a centrifugal type of device consisting of several sections. If we consider water pumps for wells, the cheapest are vibration units, which can be easily integrated into an automatic water supply system.
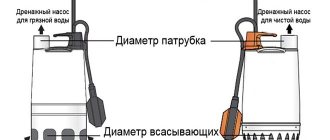
As noted above, a very important parameter for choosing a pump is the diameter of the pipes.
In cases where a narrow pipe is selected for the system, the hydraulic resistance increases, which will force the pressure of the unit to increase.
Some developers, in order to save money, underestimate the size of pipes.
However, this saving will entail the purchase of a more expensive pumping unit capable of creating the necessary pressure. Therefore, it is completely useless.
If the system was designed for a specific pipe diameter, and the installation was carried out using a smaller diameter, you can end up with the following: the pump unit will overheat and often fail.
When purchasing a well-type water pump, you should understand that it uses the water in which it is immersed to cool it, so you should choose its size relative to the well. It is also not recommended to install such units in a well.
For normal cooling, a specific supply power is required, which is indicated in the technical data sheet. The stronger the water flow, the better the heat transfer.
Features of the deep well pump
This hand pump for a well or well is not much different in appearance from piston pumps: the shape, piston and principle of operation are exactly the same. The only peculiarity is that the exhaust pipe and the rod connected to the piston have a length that is significantly longer than the same parts in the above-mentioned models. If necessary, the size of the rod can be increased to more than 30 m.
Deep well pump
The most inconvenient thing is that the piston will have to be raised and lowered only by muscle force. The vacuum created to suck water from the well is only enough to raise the water to a certain height. Further movement is carried out only by additional external forces. So, despite the unlimited possibilities of drawing water from any depth, this type is not popular.
How to choose
The most common reason for purchasing a hand pump is the low cost of such designs compared to other types of mechanisms. But when choosing, you should be guided by other parameters:
- Well depth. This parameter is the main one when selecting the described devices. Manual mechanisms are divided into 2 types. The first type is mechanisms that are designed to lift water from a depth of up to 6 meters. The second type of hand pumps is designed to lift water up to 30 meters. Rod devices are used to lift liquid from 30 meters.
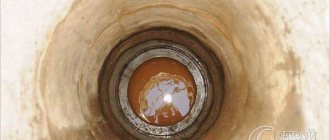
- Well diameter. This parameter must be at least 10 cm. It is with this diameter that any pump can be installed in the well.
- Degree of pollution.
- Device weight and dimensions. These parameters are important during transportation of the device, as well as during its installation. Weight can vary from 4 to 130 kg.
- Purpose of installation. Before purchasing a mechanism, you need to find out exactly whether the purchased device will need to be connected to other equipment or whether it will be used separately.
- Installation method. Many people install stationary products. But in some cases it is better to purchase portable equipment. Using portable mechanisms, you can take water for household needs from a reservoir, and for drinking from a well or borehole.
- Operating time. There are models that are intended only for use in the warm season. Others may work all year.
- Appearance. If the mechanism is installed in the garden, it can also perform a decorative function. With the help of a properly selected device, you can make the site more individual and beautiful.
By purchasing a pump according to the described criteria, you can choose a more suitable option for your site.
How to make a hand pump for water from a well with your own hands - step-by-step diagram
Step 1: Making the Case
For the base you will need a piece of metal pipe, the diameter of which must be at least 8 cm and the length - 60–80 cm. In this case, the thickness of the cylinder walls can be any. The main condition is the smoothness of the inner surface and the absence of corrosion on it. It is best to process it on a machine. The slightest irregularity will affect the operation of the piston and its wear.
Step 2: Constructing the Covers
The cylinder must be closed on both sides. To do this, you need to cut out two “rounds” from plastic or metal that can tightly cover the diameter of the pipe. Considering that you will be operating a homemade pump in winter, it is preferable to use metal to avoid the cover rupturing when icing occurs. The presence of at least one (top) threaded cap can be considered an absolutely ideal solution. This will greatly facilitate the operation of the pump in case of possible breakdowns. Holes must be made in the middle of the lids. The top one is for the rod, the bottom one is for the disc valve.
Step 3: Additional parts on the body
A drain spout should be made at a distance of approximately 20 cm from the top edge of the cylinder. It is usually made from a small piece of pipe, the diameter and length of which can be selected independently at your discretion. It would also be useful to attach it to the bottom of the flange, thanks to which it is possible to secure the assembled structure to the surface.
Step 4: Piston Assembly
The material for making this part can be any. Wood, plastic, metal - it all depends on how the master himself sees the conditions of its operation. Just don’t forget about winter, as well as the properties of some materials to expand and swell when exposed to moisture. Also, do not overlook the need to make a hole for the piston valve. The next condition is that the diameter of the piston must be such that its edges adjoin the inner walls of the housing as closely as possible. Be that as it may, you need to additionally equip this part with one or two rubber rings to eliminate this gap.
If such a decision is considered reasonable by the device designer, grooves that support the seals can be machined on the piston itself.
Step 5: Installing Valves
The production of these parts is possible both from rubber, silicone, and from metal and plastic. It all depends on the imagination of the designer. The main thing is to adhere to the principle of moving “in one direction.” Thus, the valve attached to the bottom of the pump must freely admit water drawn from a well or well and at the same time reliably close the inlet and withstand the pressure of the piston moving downwards. And vice versa: the piston valve must work flawlessly, admitting liquid into the upper part of the pump when the piston lowers and reliably closing the hole when it tends to the upper position. A little hint: devices that resemble a riveted shape do an excellent job of performing such functions.
Step 6: Equip the inlet pipe
This part of the pump must be welded to a hole that is drilled in the bottom of the device and equipped with an inlet valve. You can do it a little differently: cut a hole in the bottom of the unit corresponding to the diameter of the pipe and provide it with a screw thread. Then assemble the valve that shuts off the outlet from the pipeline directly on it. All that remains is to make a thread on the outside of the pipe and simply screw the pump housing onto it. A prerequisite for this part of the unit is the ability to withstand significant temperature changes and corrosion resistance. The best material for pipes is hard plastic or steel.
Step 7: Mounting the Handle, Stem and Bracket
Now we have almost assembled the water pump with our own hands. You need a comfortable handle; it is attached to a bracket rigidly fixed to the outside of the case. The main thing is that the lever arm must be such that it is possible to lift the piston without much effort. The place where you have to grasp it with your hand can be equipped with a rubber or silicone pad. The rod must be securely fastened to the piston inside, and its outer end - using a hinge with the end of a long handle. Now operating your homemade pump will be easy and convenient.
- Author: Mikhail Malofeev
Rate this article:
- 5
- 4
- 3
- 2
- 1
(2 votes, average: 1.5 out of 5)
Share with your friends!
Liquid overflow pump
The simplest design is made from available materials.
The following components will be needed:
- 2 plastic flasks (one with a lid, the other open);
- a piece of PVC pipe of the appropriate diameter;
- special hose for water overflow.
Self-manufacturing of the pump begins with a reed valve. The first step is to cut out a circle from the gasket in the plastic bottle cap. The diameter of the circle should be smaller than the neck of the flask. During the circumcision process, a small sector is left in its original form.
The simplest design of a pump for overflowing liquid.
An 8mm hole is formed in the center of the plug. The next step is to insert the partition into its original position and screw on the cut neck of the plastic product. When twisted, the membrane is clamped, creating a petal-type valve device.
A second bottle with the top cut off is secured on top of the polymer pipe inserted into the finished valve. The result is a structure resembling a funnel. The final stage of making a simple pump yourself is connecting the outlet hose to the second end of the plastic pipe product.
Manufacturing options
It is not difficult to make a manual water pump with your own hands. To do this, first consider how much water you will need.
The video in this article will help you in your work and from the photo you can clearly see such equipment. Below you will also find instructions on the rules for performing this work.
Making a pump
We assemble a pump for overflowing water with our own hands from improvised means. Despite the fact that the design itself is primitive, it is very convenient if, when working in the garden, a large amount of water is needed, for example, for irrigation.
So, the pump is assembled in 10 minutes, and for this you will need:
We use plastic bottles
- Hose,
- A pipe and a couple of necks from plastic bottles.
Pump assembly:
- The gasket must be removed from the cork, trimmed by 2 mm so that it is smaller than the diameter of the cork itself, that is, the cork segment should be 3 mm.
- Drill a 10 mm hole in the center of the cover.
- Then install the petal in the lid and screw in the prepared neck of the plastic bottle so that it presses the segment that remains. The valve is inserted into the stem tube, then the second half of the cut plastic bottle is put on.
- We put on the outlet hose (see Pump hose - how to choose and use it correctly) from the other end. A self-made device works with several clicks along the axis of the rod when the intake part with the valve is in the water.
- As long as there is a difference in levels, the liquid flows by gravity.
Attention: The water rises by immersing the rod in the barrel. This pump can be called a negative cost product, since it only requires time and household waste disposal.