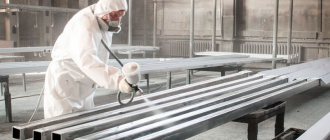
The topic is very interesting, as is its history. And in Rus' it developed quite rapidly. It all started with the fact that craftsmen from Germany were invited to the arms factory in the city of Zlatoust. In those days they reached the highest level, and they had no equal in the world of masters of this craft. They were offered excellent living conditions, and without hesitation they moved to Zlatoust in 1815.
Zlatoust, weapons factory of the 19th century.
How engraving developed in Russia
A whole street of new houses was built, and each settler was given a considerable salary, as well as a workplace at the factory. A little later, just a couple of years later, their first students began to appear, the Germans began to pass on their knowledge and secrets of engraving. Including gilding through fire. The students were quite literate and already had some specific skills.
Modern factory logo.
And literally in a matter of months they adopted all the techniques of German craftsmanship. And they started working on their own. One of the students, Ivan Bushuev, decided to try his own methods of engraving; the technique was changed almost radically.
And over time, they began to call it Zlatoust. Ivan Nikolaevich can be considered the progenitor of the Russian school of engraving. Already in 1823, the Germans themselves asked to be fired from the factory, recognizing that new developments were much better than what they could do.
These are Russian men, literally in 5 years, the students surpassed their teachers.
There were difficult times for the plant, but it never stopped its activities. In the 19th century, numerous awards received at world exhibitions are proof of this.
Today, hand engraving is gradually fading away as a craft, but there are still followers of this art.
Why use engraving
Industrial engraving is gaining momentum, all manufacturers brand their products on the knife blade. But handmade work, which contains various drawings and images, is, to be honest, not in the best position today. But such products can be very highly valued.
Today, mostly hand engraving implies a certain “chic” and status of the product.
Example of products after engraving.
Engraving on the knife gives it uniqueness and originality. And such items mainly end up in the hands of collectors. Today, very few craftsmen perform hand engraving, but it also needs to be done correctly. Not just any way.
Laser engraving can be found in any shop selling souvenirs; with such a machine, for a reasonable price, you can process a blade, such as “To my dear friend” or “Beloved grandfather”. But no one will offer you handmade work. Therefore, a true hand engraver is “worth his weight in gold” today.
Old School Engraving Techniques
Handmade by a master.
Today, hand engraving on a good blade, made using ancient methods, is very rare. Such a knife can be considered a bladed weapon that has artistic value.
Even the state did not stand aside, and an amendment to the law “On Weapons” was adopted. The very principle of engraving violates the integrity of the product, there is no escape from this.
To do this, most products are hardened after work by the craftsman. But this even becomes a plus; gold and silver inclusions take on a magnificent appearance. Quite often, coating with printing ink is practiced, which gives the engraving a richness of shades and shadows. Let's try to look at the three main methods of the old school of masters:
- Coinage (plate engraving). It has a rather rare application today; casting has come to replace it. It can be called rough-shaped modeling, done using hammer cutters. After casting a rough shape, the master gets to work and the result is the ideal figure originally conceived.
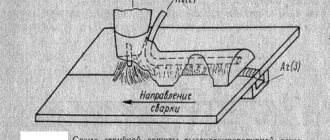
Chasing work. - Planar. In the production of edged weapons, this technique is not very common. It is more used to decorate sheaths. The technique is that two or more planes are created to achieve the correct shadow impression. In this case, the image will seem to stick out from the overall picture or, conversely, that it is deepened.
An example of flat engraving.
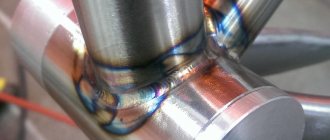
Most often, hunting knives were not depicted with animals or birds of prey, but, on the contrary, the theme was of plant origin, which had its own sacred meaning. For example, the oak tree symbolized power, the lotus symbolized immortality, and the palm tree symbolized peace and victory. - Reztsovaya. This technique was originally used to decorate firearms. But knifemakers gradually adopted this technique. It so happened that the main products of such engraving were edged weapons. In the old days, craftsmen used a basic cutter called bulino, of Italian origin. Now, of course, there are many auxiliary tools, but the principle of action remains the same.
Chisel engraving, master at work.
The main principle of image transmission is cutting into steel, at different angles and with different forces. And many craftsmen prefer to work with a needle; it can convey any texture, any theme.If you go a little deeper, there are three types of technicians. Linear, dotted and mixed, each master chooses the most suitable option for himself, but in reality, for a complete picture, they use all types at the same time.
The materials on which engravings are made can be completely different. Typically, for all these types of art, craftsmen use a “diamond-shaped” cutter, a steel needle, and a spitztichel with a cross-section similar to a triangle with rounded edges. Well, of course, they use various dyes, pencils, magnifying glasses and many other auxiliary little things.
Basic archaic engraving techniques: chisel engraving
The first of three types of engraving that we will talk about today. Its historical name is bulino, after the name of the main cutter used in the Italian school of engravers. Of course, now a larger number of tools are used to implement it, but the principle itself has remained unchanged: the master conveys the texture of the depicted object and the play of light and shade, cutting the surface of the metal with pressure of varying strength and at different angles. Moreover, working with a thin needle is even more preferable here than with a regular cutter: it allows you to more accurately depict small details that are common in hunting themes - for example, the texture of animal skins.
Once upon a time, the cutting technique was used mainly to decorate guns (this is how it happened historically), and then it was mastered by masters of knife art, and so well that it is now associated, first of all, with bladed weapons, and not with firearms. It is applied mainly to metal parts of sheaths and handles: bolsters, crosshairs, rivets, etc. Although occasionally this type of engraving is used on the blade holomen themselves.
There are three types of this technique: dotted, linear and mixed - from the names it is clear what one or another type looks like. Each master decides for himself personally which technique to work in, but for the most part he has to combine them.
Modern Engraving Techniques
With the advent of modern equipment, engraving has become quite commonplace. And it does not require a lot of time for training and for the work itself. Using these methods, you can apply a photo, company name, name, or congratulatory text, or even a photograph, to almost any surface. There are 4 main types of application methods:
- Mechanical pantograph machine.
Mechanical. This method differs in that a special machine equipped with various cutters directly, under human control, applies a given image to the blade.In fact, this is a CNC machine. Two types of cutters are used: diamond for harder steel, and simple hardened for stainless steel. Another option for mechanical processing is working with a pantograph.
This is a special mechanism that does not operate on software, but directly by the human hand. But for such work, you need to know well the properties and characteristics of different metals, so as not to spoil the knife blade.
- Sandblasting .
In general, a sandblasting machine is a special machine that, thanks to air pressure, has the ability to throw out small particles of abrasive materials with pinpoint precision. Sandblasting machine. Thanks to this approach, the work looks three-dimensional. First, a sketch is made on a hard surface and placed on the engraving site. Then fine sand is supplied under pressure and, “biting” into the metal, the sand leaves a mark. The depth of the pattern depends on the size of the abrasive mixtures. This method is used both on metal and on the handle of the product. - Application laser engraving, is considered one of the budget options. The use of infrared rays affects carbon dioxide molecules, evaporating metal particles.
An example of laser engraving.
To work with harder grades of steel, yttrium-aluminum radiation is used. Another type of radiation is fiber, which is considered the most powerful. Essentially, the principle is that the laser beam evaporates particles of material and thus leaves a mark. - The result of galvanic etching.
Artistic electrochemical etching. The method is that the desired element is immersed in a galvanic bath with a special etching solution. The metal is covered with a special film with a pattern, and during a chemical process, it peels off and the desired image remains.To obtain greater depth, the master periodically removes objects from the bath and glues those areas that are already ready. The second name of the method is galvanic.
Modern equipment, unfortunately, has turned the former art into an everyday activity. But there is no need to be sad.
All modern methods will never be able to surpass manual work. And let’s hope that the business of the “experienced” will not fade away.
Subjects of images and inscriptions
Today, thanks to the widespread use of modern engraving methods, it is most often ordered as an addition to a gift. They ask to place congratulatory texts, memorable dates and words, and even photographs on blades and various other materials. It happens that poetic lines are ordered on both sides of the blade. Engraving is also done on the handle.
Examples of drawings for engraving.
Where they depict artistic calico or order images of various predatory animals. A fairly common occurrence is an image of the logo of the company to which the gift will be presented. In principle, the list of drawings, pictures and texts is unlimited. The main thing here is imagination; if you have an idea, they will help you develop it in an engraving salon.
Laser engraving and laser sublimation
This engraving is done everywhere and literally in 15–20 minutes: usually, even in small towns, there are a couple of points where you can leave a knife and in half an hour get it back with the desired inscription, emblem, design, and so on. The prevalence of the method is facilitated by the relative cheapness of the equipment and the small amount of space required for its placement. The general principle of operation is this: a laser (light) beam evaporates part of the metal so that this trace becomes visually noticeable: the most powerful lasers cut through the metal completely - this is what ultra-precise and ultra-thin laser cutting consists of. True, this equipment itself can be either simple and limited in scope of use, or more multifunctional.
CO2 laser engravers are precisely the budget category. Most likely, this type of equipment is located in the shopping center nearest to you, where, among other things, they print on mugs and T-shirts. These engravers do not have a particularly strong beam, and they work mostly on wood, plastic, leather, etc. - that is, in our case, on hilts and sheaths. True, with a special coating, if one is applied to the metal parts of the knife, for example, on enameled brass, they also quite successfully do engraving. Such engravers received the CO2 marking due to the fact that the long infrared radiation with which they work is produced by carbon dioxide molecules.
A completely different type of radiation is found in engravers of the YAG, vanadate laser and fiber laser categories. Their operating wavelength is designed to work with metals of the highest strength and hardness. The most powerful last type (and at the same time transportable and allowing for high-resolution drawings) is a fiber laser.
These lasers are good in their niche, but they cannot produce color images, because they work exclusively with the evaporation of metal. To apply color to a steel surface, you need a laser sublimation method - a printed transfer is placed on the metal or handle material, which is evaporated by a laser. As a result, the transfer pattern remains on the surface forever. Actually, this is the same technology that is used to create images on mouse pads, mugs, and T-shirts.
How to engrave a knife at home
Quite an interesting topic, try engraving at home. It’s clear that in order to make it an old-school technique, you need to study it for more than one year. But more modern options, for example, the galvanic version, may well be suitable for making at home.
Etching in an aqueous solution actually does not require much expense, but in order to apply a really beautiful design, you will have to practice a lot.
Required materials and tools
If the choice fell on chemical etching of metal, then do not forget about safety precautions when working with chemical reagents. You will need the following materials:
- container, preferably glass;
- 2 wires, plus and minus, for supplying electricity to the water;
- battery from any large electrical appliance;
- saline solution;
- gloves;
- glass glasses;
- nail polish;
- spoon;
- tsaponlak.
A little advice, you can find an image you like on the Internet and print it on plain paper. Or if you have a good imagination, draw it yourself by hand. Carefully cut out a stencil that will be useful for applying to metal. Or you can order ready-made stencils on the Internet, as shown in this video:
The process of applying the inscription
Electromechanical etching process steps:
- Electrolyte preparation. Pour water into a jar (glass) and stir until completely dissolved. This must be done carefully; the quality of the engraving largely depends on the solution.
- Preparation of the workpiece. Apply varnish to the metal according to the area of the image. After the varnish has dried a little, draw the outline. Any sharp object is suitable for this - a toothpick, a needle, a thin awl. This is done so that in the places of the lines the metal is scratched, as it were, for direct contact with the electrolyte. Those who do not like this method may “scratch” the lines after the varnish has completely dried.
- Place the electrodes in the solution. To “-” attach a second metal object, the so-called blank, to “+” - the workpiece, in this case a knife.
- Apply voltage. The time for the entire operation will have to be determined intuitively, at a glance. When the etching depth reaches the required level, the charger can be turned off. As a rule, the entire process lasts no more than five minutes.
- Remove the product from the jar and remove the varnish with any solvent. Rinse the finished knife under water and wipe dry. Engraving is ready!