What will be needed to create it?
This material will give an example of assembling a neutral-type ceramic crucible. This type is one of the simplest. In addition, a steel vessel is quite impractical. What will you need to make a crucible for melting lead with your own hands:
- fireclay clay - 7 parts;
- finely ground fireclay - 1 part;
- 10 tablespoons of silicate stationery glue.
How to make a crucible for melting lead with your own hands?
As children, many of us were engaged in stripping lead from old batteries in order to further melt it into rings or pendants.
At that time, no one was interested in the rules of melting, and therefore tin cans, held by a “hoop” of freshly picked twigs, served as a vessel for this action. Nowadays, many people who want to melt down any material take this more seriously. And they often have a question: how to do this so as not to spoil anything around and not leave yourself a couple of memorable burns?
From this material you will learn how to make a crucible for melting lead with your own hands. And drawings of an approximate result can be seen above.
But first, a definition.
What is a crucible?
It’s easy to guess that this is the most common vessel in which various metals are melted. More precisely, not quite ordinary. Since its task is to withstand not only the melting temperature of the material, but also its own heating temperature at the time of processing.
The types of this tool are divided according to the category of raw materials that need to be processed. At the moment, there are the following types of crucibles for melting lead:
- ceramic neutral type;
- ceramic graphite type;
- graphite;
- cast iron;
- steel.
Attention! The last three types are absolutely not suitable for use in an induction furnace. This is explained by their complete absorption of EMF energy.
Now you can proceed to the direct instructions for creating a crucible for melting lead with your own hands.
What will be needed to create it?
This material will give an example of assembling a neutral-type ceramic crucible. This type is one of the simplest. In addition, a steel vessel is quite impractical. What will you need to make a crucible for melting lead with your own hands:
- fireclay clay - 7 parts;
- finely ground fireclay - 1 part;
- 10 tablespoons of silicate stationery glue.
Where can I find the ingredients?
To obtain ground fireclay, you can crush fireclay bricks in a faience mortar. It is easy to find in a hardware store, specialized stores selling medical equipment, or in a pharmacy.
It is also worth making sure that you have a mill for grinding fireclay. It's easy to build it yourself.
How to make a mixture for a neutral type ceramic crucible?
First you need to prepare the form of a homemade crucible for melting lead. This is done according to the following algorithm:
- Dry clay is mixed with ground chamotte until a homogeneous consistency is obtained. It is recommended to make 20 revolutions in the fireclay mill.
- As soon as the required state is achieved, you can unload the mass and begin mixing by hand, adding water little by little. The mixture, in the right condition, will form a lump and will not stick to the skin or leak through your fingers.
- Now you need to add silicate stationery glue.
- Mix the whole mass thoroughly. It is worth noting that this is the most difficult and time-consuming stage. Continue processing until a homogeneous consistency is obtained.
- The next step in creating a crucible for melting lead with your own hands will be to remove air from the finished mixture. It is necessary to ensure that not a single bubble remains in it. Otherwise, the crucible will burst when overheated. To avoid this, the air must be knocked out.
- Spread a film on the hard floor (never use newspapers!).
- Now the fun begins. To eliminate all the air from the workpiece, it is necessary to throw it onto the film with maximum force. Do this until the bubbles stop coming out of the mass. After that, throw 10 more times (more is possible).
- After the procedure for removing air from the mixture has been completed, it can be stored. To keep it for as long as possible, you should use glass containers with a hermetically sealed lid.
Attention! Do not store the workpiece in a plastic container or wrapped in several layers of film. It will dry out in a couple of weeks and will be unusable!
Making a crucible for melting lead with your own hands
To give the prepared mass the required shape, you can choose one of the options presented below. They look like this:
- use a collapsible or destructible plaster mold;
- blind yourself.
Which option to choose is up to you. The last stage of creating a crucible must be performed strictly according to the specified algorithm:
- After the vessel has been formed, it must be dried.
- As soon as it dries, place the workpiece in a muffle furnace. Set the temperature to 800 degrees and bake for one or two hours. This temperature is necessary so that the glue can melt and firmly bind all other components together. If the temperature is lower, the crucible will fall apart during the first operation in the furnace due to the temperature of the contents. If the temperature is higher, it will fall apart before the end of firing.
The resulting form can withstand heat of 1600 degrees. If the materials have been properly processed and milled, it will last up to 30 meltings.
Inductor assembly
The heating element of the crucible arm at home is usually an inductor. It has a cylindrical shape with a cavity inside. A homemade crucible with metal shavings is placed in this cavity. The inductor is made of fire-resistant material , inside it there is a wire winding, most often copper wire is used. Using a special generator, current is supplied to this winding, which creates an electromagnetic field. Which, in turn, creates an eddy current in the crucible and in the metal placed in it. They melt the chips. The inductor itself is assembled from 4 vacuum tubes with a parallel connection. Such an inductor can be connected to a regular outlet.
There is another option for assembling an inductor with your own hands from an electromagnetic core and two layers of winding. The first layer is 10 turns of copper wire with a thickness of 4 mm, and the second is one turn, the material for which is a metal plate with a cross-section of 15 * 5 millimeters. The electromagnetic core is U-shaped and consists of a set of steel plates. The first winding is made around the plates, which is placed in an insulated housing; the secondary winding connects the core and metal bars , between which there should be a distance equal to the dimensions of the crucible. This entire structure is placed in the furnace body.
So, we get a furnace in which the inductor is located. Wires go from the inductor to the socket. A crucible is placed in this furnace in such a way as to enclose the bars. If it is placed correctly, a buzzing sound will be heard, indicating that tension has appeared and melting has begun. If there is no sound, then use the handle to move the crucible until the circuit is completely closed.
Read also: Metal handrails and railings for stairs
Physical features of melting homogeneous metals
Brass is a multicomponent alloy based on copper and zinc. It may also contain some other components - tin, lead, iron, nickel, manganese. Copper acts as the main substance, while additional components improve the physical properties of the material (strength, elasticity, electrical conductivity, corrosion potential). Melting of single-component and multi-component alloys has many differences. Therefore, before considering the issue of melting brass, it is necessary to consider the features of melting a homogeneous metal based on copper.
In physics, smelting is a procedure in which a solid metal turns into a liquid state. To melt copper, it must be heated to a temperature of 1.085 degrees Celsius. Typically, heating is carried out with a small temperature increase (~1150 degrees), since in practice copper alloys with the addition of alloying substances are often used, which increases the melting point.
Heating at the chemical-physical level
- Copper atoms are in a solid state before heating. On a chemical level, this means that they form a strong crystal lattice that is resistant to deformation and retains its shape upon impact.
- When heated, the potential energy of copper atoms increases, which leads to a deterioration in the strength of the crystalline structure of the material. However, the material retains its hardness because the crystal lattice is not destroyed (although it becomes less dense).
- When the temperature reaches 1.085 degrees, the copper atoms receive an excess amount of energy, which causes the crystal lattice of the alloy to disintegrate. At the physical level, the alloy changes from a solid to a liquid state.
- Now several situations are possible. Let's consider the first situation. If the material continues to be heated, it will retain its liquid state. At a temperature of 2.567 degrees, copper goes into a gaseous state (that is, the liquid begins to boil). In metallurgy, evaporation of copper is very rarely performed, since it has no practical benefit.
- But another situation is also possible. If liquid copper is not heated after melting, then the liquid will gradually begin to cool. This will cause the material to return to a solid form. At the chemical level, the crystal lattice will re-form.
One simple conclusion can be drawn from these theoretical calculations. For one-component compositions, the crystallization temperature and melting temperature are the same. In practice, it is simple to regulate the melting procedure - you just need to reduce or increase the temperature of the fire. During work, it is also necessary to monitor the distribution of fire over the entire area of the metal object. If the temperature distribution is uneven, some components will be in a liquid state, while others will be in a solid state.
Making crucibles
Now it's time to make your own melting crucible. From the above it is clear that it makes sense to make crucibles with your own hands:
- Steel;
- Ceramic neutral;
- Ceramic graphite.
There is nothing special to say about steel crucibles - they are just a steel vessel with a welded handle. Steel crucibles are used for melting low-melting metals; sometimes - zinc for hot galvanizing with quality up to 3+. Steel crucibles for lead, tin and zinc are only suitable for melting one specific metal, because... after 1-2 melts they themselves are covered with it from the inside.
Ceramic neutral
The composition of the mixture for forming a neutral ceramic crucible is 7 parts of fireclay clay, 1 part of finely ground fireclay (to a fraction of <1.5 mm) and 10 tbsp. spoons of liquid glass (silicate office glue) per 1 liter of dry mixture. Ground fireclay in small quantities can be obtained from pieces of fireclay bricks crushed in an earthenware mortar (sold in hardware stores, medical equipment stores and some pharmacies). You don’t mind spending money on coolness - you can buy agate ones at a souvenir store, they are more durable. If you are going to cast metal regularly and quite a lot, or make crucibles for sale, then perhaps it would be better to use a chain or ball mill for grinding fireclay.
Fireclay mill
Construction of a homemade mill for grinding fireclay
Finely ground chamotte is part of the raw material for molding both neutral and graphite crucibles, and the quality and durability of the crucible largely depend on it, and crushing chamotte using artisanal methods is very labor-intensive and does not produce a completely good-quality material. The structure of a chain mill for mineral raw materials is shown in Fig. on right. Material – steel. Chains – 4; they are hung crosswise so that they sag horizontally by approx. by 1/3 of the tank diameter. An option instead of chains for 1 broken fireclay brick is 2-3 handfuls of balls from the bearing. New store-bought chains will cost more than chains, but old ones from broken bearings are quite suitable. Any drive: manual, electric. Both chain and ball mills are capable of grinding fireclay into dust like cement; To obtain certain fractions, the mill is stopped earlier. To prevent dust from forming, the mouth of the tank is covered with something during grinding. To grind a brick, simply drop it from a height onto a hard floor and load the resulting pieces into the mill.
Preparing the molding material
Mix dry clay with ground fireclay until completely homogeneous (uniform). The ideal option is to scroll 15-20 times in the same mill; if it is spherical, then you don’t have to throw balls into the tank. Unload the mixed mass and add a little water (1.5-2.5 parts), mixing by hand until it reaches the consistency: clenched in a fist, sticks together into a lump, but does not stick to the skin and is not pressed between the fingers. Add liquid glass, also stirring until completely homogeneous, this is the most labor-intensive step.
Deaeration
Just one remaining air bubble in the ceramic crucible mixture can cause the crucible to burst due to heating. Therefore, you need to knock the air out of the mass. To do this, lay a clean film on the hard floor; newspaper, as some manuals advise, is not necessary - the mass will accumulate from paper fibers.
To knock out the air, the entire lump of mass is thrown forcefully onto the floor many times. Practically - after the bubbles have stopped jumping out of the flopping mass, at least 10 more times.
Storage
For storage, the beaten mass is placed in a glass container with a hermetically sealed lid. In plastic, and especially when wrapped in several layers of film, the mass dries out in a few weeks and cannot be restored, but in glass in a cool place it is stored for more than six months.
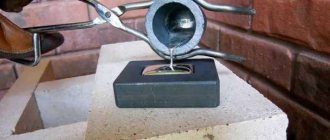
Usage
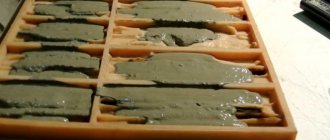
Crucibles from the resulting mass are simply sculpted by hand or molded in a destructible plaster mold or in a collapsible one, as described below. The molded crucible is dried, and, which is absolutely necessary for this mass, after drying it is annealed in a muffle furnace for an hour or two at a temperature of 800 degrees. It is at this temperature that the liquid glass will melt and firmly bind the other components. Below - the crucible will collapse during the first melting; higher – during annealing. This is a very significant drawback of this technology, because The muffle furnace equipment is not cheap or simple, although it is also possible to make it yourself. The maximum operating temperature of the resulting crucibles is up to 1600 degrees; resource, with high-quality grinding of chamotte - up to 30 melts.
Graphite
Manufacturing technology of graphite crucibles for melting any metals, incl. black scrap, using any heating method, is well described in an article by the author A. Ramir from 2006 (see dendrite-steel.narod.ru/stat-ramir-3.htm). A. Ramir, apparently, is self-taught, but even more credit to him - his products fully correspond to good industrial designs. However, firstly, his article was rewritten many times by rewriters who clearly did not cast metal in their lives. Secondly, you can’t always get to it in a search, and for some reason the drawings are not downloaded, although they seem to be freely distributed. Thirdly, there is something to add to A. Ramir’s materials, no offense to him. One of the rules of engineering is that in a good design there is always something to improve. Therefore, we will repeat and supplement the main points of this publication.
Drawings of crucibles from the mentioned article are given in Fig.:
Drawings of crucibles for melting metal
The maximum weight of melted steel is indicated in kg; it must be recalculated for another metal. The main difficulty in this case is the manufacture of the flask - the round shell of the mold. Its inner surface is conical, otherwise the finished crucible cannot be removed after molding, so A. Ramir used turned flasks.
How to choose the right clamp for clamping the mold shell for a crucible
Meanwhile, a flask for any of these forms can be made from a piece of plastic pipe. It is secured in 3 places, at the bottom, in the middle and at the top, with screw clamps, and heated from the inside with a hairdryer. By tightening the clamps, the surface is not completely conical, but the flask will be removed from the crucible. You only need to use worm-drive clamps (see figure on the right) or their homemade analogues. Any other clamp deforms the pipe across. The flask from it will most likely come off the crucible, but it will not last long or will crack during the first melting.
The composition of the mixture used by the author is 7 volume parts of ground fireclay, 3 parts of pottery or oven clay and 1 part of ground graphite. A. Ramir also gives a recipe with 2 parts of graphite, but in terms of reducing power this is clearly too much, and the likelihood of cracking a crucible from a 7:3:1 mixture will be reduced to zero if the fireclay is crushed into dust in a mortar or ground in a mill (see above) .
It is necessary to soak the fireclay brick, as A. Ramir advises, only before crushing it using the artisanal method he described. The dry components are mixed until completely homogeneous in the specified sequence (fireclay, clay, graphite) and mixed with water with continuous stirring until the consistency is as described above. There is no need to knock the air out of this mass, because... it is de-aired during the molding process. The mixture is not stored, so it must be prepared immediately before making the crucible.
Forming a crucible for metal melting
To form the inner surface of the crucible, you need to carve a block from hard wood (filled with gray in positions 1-5 of the figure), sand it and, very preferably, walk over it with leather until the surface is completely smooth. In the center of the surface of the block that forms the bottom of the crucible, drill a blind hole and insert a toothpick or, better, a round smooth plastic stick from an ear picker into it. The match that A. Ramir used is not the best option - when pulled out, it often breaks, and as a result the product is damaged.
Note: the use of any lubricants when forming the crucible is unacceptable - they will be absorbed into its material, and the crucible will burst from heating.
The mold is filled with the mixture in layers of 15 mm, and each layer is compacted with a wooden tamper. This is the most critical stage: bubbles and uneven compaction of the mixture are unacceptable. When approx. remains to the top of the flask. 12 mm, the mixture is compacted with an already turned lid with a hole for the rod in the center, pos. 2. The mixture is added in layers of 1-2 mm until the gap between the very tightly pressed lid and the upper edge of the investment box reaches 1-1.5 mm, pos. 3. If the gap is larger, part of the mixture can be taken away. Next, the lid is removed and the rod is carefully pulled out of the block using pliers, the lid is put back and the mold is turned over. A handle is attached to the bottom of the block with self-tapping screws and, carefully turning it back and forth, it is pulled out of the casting.
Note: if the rod is not inserted into the bottom of the block, it will be impossible to remove it without destroying the casting - the vacuum under the block will not work.
The formation of a crucible with a flat bottom (which is 1.2 kg) has its own peculiarities - you can’t just pull it out. Therefore, when the compacted mass rises to the flat top of the block, a circle of toilet or filter paper is placed on it.
Now the hole from the rod and minor defects in the inner surface of the crucible are sealed with the same mass. It must be completely smooth, otherwise the probability of destruction of the crucible during melting is quite high, so after correcting the defects it must be smoothed out. The best way to do this is to line it with toilet paper (item 4), insert a block (item 5), and turn it several times.
All that remains is to remove the flask. To do this, it, together with the crucible, is turned over again into the working (for the crucible) position, a round wooden block is placed and the flask is carefully pulled together, pos. 5 and 6. If the flask is plastic, then its protruding upper edge is slightly bent outward in several places with your fingers; Most likely, the flask will come off like clockwork after this.
And finally, the finished casting is dried. Equipment – kitchen stove with oven. The casting is placed upside down on a baking sheet and placed in the oven. They heat for half an hour on the lowest gas, then another half an hour on medium (the temperature according to the built-in thermometer is about 150 degrees) and another 2 hours on full. After this, turn off the fire and leave the casting in the oven to cool until tomorrow morning. Do not open the oven during the entire drying period!
Before use, the crucible must be checked for hidden cracks. To do this, hold it by the bottom with your fingertips and tap it with your nails in a circle from top to bottom. Every knock should ring. If somewhere it doesn’t ring, it’s a defect, you can’t melt with this. Annealing is not required for a crucible manufactured using this technology. It rings everywhere - you can immediately melt in it.
To come in
Already registered? Sign in here.
There are currently 0 users on the page
There are no users viewing this page.
It's actually not that difficult. Now it takes me 30-40 minutes to make one crucible. But at one time, quite a lot of time had to be spent on production technology. I still haven’t gotten around to writing a proper article, maybe in the future, but for now I’ve transferred the material from the album to LiveJournal, because I get a lot of questions, mostly the same ones.
Attention. For now you can see the pictures here Watch Let's get started:
And so, to make a crucible, you will need: a piece of plastic water pipe, as far as I remember, the diameter is approximately 105 mm (the outer part of the mold), two wooden disks (the bottom of the mold and its lid) made exactly to the size of the inner diameter of the plastic pipe (you can take plywood but I recommend a thickness of at least 20 mm), the inner part of the mold is made into a cone and the bottom is completely rounded (in diameter it should be made not perfectly round, but slightly oval, only 1-2 mm, I’ll explain why later), three clamps corresponding to the outer diameter plastic pipe, three medium-length self-tapping screws (depending on the thickness of the wooden circle (the future mold lid), two long self-tapping screws (they will be needed to pull out the inner mold).
Read also: Review of Belmash woodworking machines
You will also need fireclay clay, fireclay chips made from fireclay bricks (for one crucible with a lid it takes me about half a brick
The pipe must be sawed along its entire length (this will make it easier to remove the finished crucible)
From the side of the future bottom of the mold, we make cuts as in the figure, about 6-10 in total to a depth of approximately 20-25 mm. (they will help firmly secure the bottom of the mold
We install the bottom and secure it with a clamp.
We install the middle clamp, but do not clamp it completely, just so that in the future the walls of the mold do not creep apart, leaving a gap of about 1 mm.
Now you need to cut 4 paper circles to fit the internal size of the mold; they will prevent the mixture from sticking to the bottom of the mold and to its lid)
Place one of the circles on the bottom of the mold.
Now let’s get started with the mixture; it must be mixed very thoroughly. I use a composition consisting of approximately 60% fireclay chips, 30% fireclay clay and 10% charcoal. I mix it first in dry form, then with water; you don’t need much water so that the composition just holds its shape as in the picture.
Further, in order to save the nervous system during subsequent attempts to remove the crucible from the outer mold, I recommend placing a sheet of paper between the walls of the mold and the mixture. (The first experience of removing the finished crucible from the outer mold took me 2-3 hours and naturally ended in nothing, so I highly recommend using a sheet of paper)
Before forming the bottom of the crucible, it is necessary to measure the distance from the bottom of the mold to its upper edges. As the mixture is compacted, these measurements will need to be repeated until the required bottom thickness is achieved. (Looking ahead, I’ll say that I tried the scheme and vice versa, when the bottom of the crucible is compacted last, and the edges are made first. In principle, this does not matter, in both cases the result depends on how well you compacted the mixture, and are there any voids in it)
After the bottom is ready, we place the inner part of the mold in the center and begin to compact the future walls of the crucible.
It is necessary to compact it very carefully, this is a guarantee that all previous and future work will not be in vain. It is better to add the mixture in small portions.
They compacted it. Next we place another cut out paper circle on top.
Close the top lid of the mold. There should be three holes in it, as in the inner part, through which self-tapping screws will connect the mold lid with its inner, central part.
We wrap the screws. Why three screws? The one in the middle centers the lid, the two side ones are the main ones and the entire load will fall on them.
Now two more large screws.
Next, the most difficult thing is to fix the form horizontally and insert any long object between the large screws (as shown in the figure) and begin to gradually rotate the inner part of the form (for this it was necessary to make it oval). This way the inner part of the crucible expands, which will then allow you to pull out the inner mold.
When it starts to rotate freely, it can be pulled out. Usually the inner walls of the crucible are quite smooth after this.
We remove all the clamps.
We take the crucible out of the mold; usually there are no problems with this.
Inner surface with imperfections at the junction of the bottom and walls that have not yet been puttied.
As for the lid of the crucible, everything is simple here, we secure the bottom in the same shape with a clamp, again put a circle of paper, tamp the mixture and close the lid, having previously placed another sheet of paper on top. Then we press either with a clamp or a hammer. It turns out like this pancake, and when it dries, we drill a hole of about 6-8 mm in the center with a drill.
It turns out like this crucible.
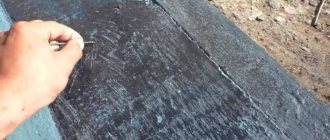
Having loaded the contents, cover the outside of the crucible with fireclay clay.
Well, that’s all, all that remains is to put the crucible in the oven.
Now for the most common questions: What can be melted in this crucible? I made this crucible for melting damask steel, the melting temperature of iron is 1535 degrees, I did not melt pure iron, it usually holds nails and electrodes, that is, about 1400-1500 degrees. I won’t say how long, but half an hour, an hour – for sure. Naturally, all metals and alloys with a lower melting point can be melted in a crucible. Try it. If something goes wrong, experiment with the composition of the mixture. I haven’t tried to heat it at more than 1500, it doesn’t allow me to bake.
Is it possible to melt copper, brass, bronze, etc.? Answered in the previous question.
How can you heat the crucible? In what ovens? I have a homemade coal furnace, I have done more than one melt, and I have never had any problems with the crucible. Again, I repeat, compact the mixture properly, a lot depends on this. You can also use a propane burner or a furnace using fuel oil (but I haven’t tried it myself), much will depend on the thickness of the walls of the crucible; the thicker it is, the more reliable it is, but it’s also more difficult to heat the contents, and the higher the energy consumption. Just remember to heat it up gradually; if you heat the crucible only on one side, it will crack any crucible, even a graphite one.