Cementing steel at home
A certain impact on steel allows you to change its basic operational properties. Most often, chemical-thermal treatment is carried out, which is called steel carburization. It involves both heating the part to rearrange its atomic lattice, and introducing the required chemical elements. Cementing steel at home with graphite or another medium was practically not carried out a few years ago, but today it is possible. Let us consider the features of this process in more detail.
Heat treatment: how best to harden iron at home
This is a heating process followed by further cooling to change properties. We place a regular alloy in the furnace, and take out a hardened one, which is less susceptible to external deformations. What is it for? During primary processing, for example during stamping, cutting or casting, internal stresses appear inside the alloy, which have a very negative effect on the strength characteristics and increase brittleness. There are four types of heat treatment:
- Annealing. Necessary for the formation of ferrite and pearlite. It consists of heating in a furnace to 680-740 degrees, when the recrystallization threshold has already passed. As a result, old molecular bonds break down and new ones form. Then follows some exposure at a temperature of 400-500, at the end - cooling, slow, together with the heating element and simply open doors.
- Normalization is similar to the procedure for relieving internal stress, but heating is higher and cooling is much faster.
- Hardening. The main process that occurs is a change in grain size, which leads to the desired results. Cooling is very rapid, often in water or oil.
- Vacation. It comes in several modes. Let's talk about it separately.
General information about the steel carburization process
In order to carry out similar metal processing at home, you should consider the features of thermal effects on steel in more detail.
Among the features of cementation, we highlight the following points:
- Cementing involves heating products in a liquid, solid or gaseous environment, thereby changing the operational properties of the surface layer.
- Due to this procedure, the carbon concentration increases, which increases the strength and wear resistance of the steel.
- Experts recommend cementing low-carbon steels that have a carbon concentration of approximately 0.2%. An example is a knife blade, which is made from low-cost steel.
- The part can be heated to a wide range of temperatures. Cementation of metal at home takes place at a temperature of about 500 degrees Celsius; in workshops equipped with special equipment, this figure can reach 1200 degrees Celsius and higher. Note that the heating temperature is selected in accordance with the concentration of carbon and other impurities.
- The thermal process under consideration changes not only the chemical composition of the steel, but also its atomic lattice and phase composition. In essence, the surface receives the same characteristics as during hardening, but it is possible to control them in a narrow range and avoid the appearance of various defects.
- Carbon penetrates into the steel structure very slowly. Therefore, for example, cementation of a knife at home takes place at a speed of 0.1 millimeter in 60 minutes. In order for the knife blade to withstand mechanical stress, it will be necessary to harden the layer with a thickness of about 0.8 millimeters. This point determines that heat treating a knife or carburizing a shaft at home will take at least 8 hours, during which the required temperature must be maintained.
Cementation of stainless or other steel is a more complex process compared to hardening, but allows one to achieve higher performance qualities.
Rules for quality hardening
There are a few more simple rules that allow you to harden a knife at home to the highest possible quality.
- Before you begin surface or deep hardening of a knife made of a certain grade of steel, you can select the modes for performing such a technological operation using plates made of the same material. The first plate is used to more accurately select the required heating temperature. To do this, the metal plate must be heated unevenly: one part to the maximum temperature, the second to the minimum. Then the heated plate is dipped in water or oil and, after complete cooling, it is clamped in a vice, broken and the metal is examined for fracture. High-quality hardened metal, if the temperature conditions were selected correctly, should have a coarse-grained structure.
- The next stage of experiments with metal plates is the selection of the optimal cooling medium. Using various cooling media (water, oil, liquid lead, etc.), harden the plate to such a state that, when clamped in a vice, it breaks at a deflection of 30°. After this, it is necessary to temper the plate, also selecting various cooling media and temperature conditions. As a result of this operation, you should ensure that the plate, clamped in a vice, breaks at an angle of deflection of 45°.
- To avoid the appearance of surface cracks on the blade of a hardened knife, the product must first be annealed. When performing such a technological operation, for which it is desirable to use a muffle furnace with a temperature controller, the following rules must be adhered to: the knife is heated as long as possible, slowly and evenly.
By following these simple recommendations, you can even harden a knife correctly at home, resulting in a strong and durable tool with excellent cutting properties.
Classification of the environment in which steel carburization takes place
Carburization of a knife or other product can take place in the following environments:
- Solid.
- Gas.
- In the form of a paste.
- Electrolyte solution.
- Fluidized bed.
Cementation of metal at home with graphite is most often carried out. The most widespread is the solid medium due to the fact that it is not necessary to ensure high tightness of the furnace.
Gas is used primarily in industrial production, as it allows achieving the required results in a minimum period.
Do-it-yourself steel cementation process
When setting up a chemical-thermal treatment process at home, the method of cementation in a solid medium is chosen. This is due to a significant simplification of the task of equipping the premises. Typically, a solid carburizer is made using a mixture of barium or calcium with charcoal, as well as sodium carbonate. The salt is ground to a powder and then passed through a sieve.
Cementation of steel in a solid carburizer
Recommendations for creating a solid mixture are as follows:
- The first method is to use salt and charcoal, which are mixed thoroughly. If you do not use a homogeneous mixture, then there is a possibility of the formation of stains with a low carbon concentration.
- The second method involves the use of charcoal, which is poured on top with salt dissolved in water. After this, the coal is dried to obtain a mixture with a moisture content of about 7%.
For knives and other products, the second method of producing carburizer is most suitable, since it allows you to obtain a uniform mixture. Cementing steel at home with graphite also involves creating a mixture using several technologies.
Cementation is carried out in special boxes, which are filled with prepared carburizers. The structure must be airtight, for which the cracks are sealed with clay. It is recommended to achieve high tightness due to the fact that when the carburizer is heated, gases are released that should not enter the environment. The box itself should be made of heat-resistant steel that will withstand high temperatures.
The process of carburizing steel in a box at home has the following features:
- The part is placed in a box with the mixture. The thickness of the solid carburizer layer is selected depending on the size of the workpiece.
- The stove is being installed.
- The initial heating of the furnace is carried out to a temperature of 700 degrees Celsius. This heating is called through heating. The uniform color of the steel from which the box is made indicates the possibility of moving on to the next stage.
- The next step is to heat the medium to the required temperature. It is important to ensure uniform heating of the surface of parts with complex shapes, since significant problems may arise if the atomic structure is unevenly rearranged.
Cementing steel in a box at home
Today it is possible to carry out a similar procedure at home, but difficulties arise in achieving the required temperature.
The lack of necessary equipment leads to a significant decrease in the quality of the resulting products, as well as an increase in holding time.
How to harden steel over an open fire
As mentioned above, you can harden steel at home, using an open fire for heating. Naturally, such a process should begin by starting a fire, in which a lot of hot coals should form. You will also need two containers. You need to pour mineral or synthetic oil into one of them, and ordinary cold water into the other.
In order to remove hot iron from a fire, you will need blacksmith tongs, which can be replaced with any other tool of a similar purpose. After all the preparatory work has been completed, and a sufficient number of hot coals have formed in the fire, objects that need to be hardened can be placed on them.
The color of the formed coals can be used to judge the temperature of their heating. Thus, coals whose surface has a bright white color are hotter. It is also important to monitor the color of the fire’s flame, which indicates the temperature regime in its interior. It is best if the fire flame is colored crimson rather than white. In the latter case, indicating that the flame temperature is too high, there is a risk of not only overheating, but even burning the metal that needs to be hardened.
Heated steel colors
The color of the heated metal must also be carefully monitored. In particular, black spots must not be allowed to appear on the cutting edges of the tool being processed. Blue discoloration of the metal indicates that it has softened greatly and become too flexible. It cannot be brought to such a state.
After the product has been calcined to the required degree, you can proceed to the next stage - cooling. First of all, it is lowered into a container with oil, and this is done often (every 3 seconds) and as sharply as possible. Gradually the intervals between these dives increase. As soon as the hot steel loses its brightness, you can begin to cool it in water.
Steel tarnish colors
When cooling metal with water on the surface of which droplets of hot oil remain, care should be taken, as they may burst into flames. After each dive, the water must be agitated to ensure it remains cool at all times. A training video will help you get a clearer idea of the rules for performing such an operation.
There are certain subtleties when cooling hardenable drills. So, they cannot be lowered flat into a container with coolant. If you do this, then the lower part of the drill or any other metal object that has an elongated shape will cool sharply first, which will lead to its compression. That is why it is necessary to immerse such products in coolant from the wider end.
For heat treatment of special grades of steel and smelting non-ferrous metals, the capabilities of an open fire are not enough, since it will not be able to heat the metal to a temperature of 700–9000. For such purposes, it is necessary to use special furnaces, which can be muffle or electric. If it is quite difficult and expensive to make an electric furnace at home, then with muffle-type heating equipment this is quite feasible.
Gas Application
In mass production, a gaseous environment is used. Surface saturation with carbon can only be carried out using a sealed oven. The most common composition of the gas environment is the substances obtained from the decomposition of petroleum products.
The procedure has the following features:
- Continuous conveyor ovens with increased isolation of the working environment should be used. They are very rarely installed at home due to their high cost.
- The workpieces are placed in the furnace, after which the medium is heated to the required temperature.
- After heating the furnace to the required temperature, gas is supplied.
There are quite a lot of advantages of this technology:
- There is no need for lengthy preparation of the gas environment.
- The process involves short holding times, which reduces the cost of maintaining temperature.
- The equipment is compact and does not take up much space.
However, there is a significant drawback, which is the inability to install equipment and set up the process at home. The profitability of cementation at home when installing such equipment is ensured only with a significant increase in the batches processed.
If you find an error, please select a piece of text and press Ctrl+Enter.
source
Hardening the cutting edge of a knife
We go along the edge with a file, while paying attention to the dull sound and slight grinding of the metal. Everything indicates that the knife is made of ordinary steel and has not been previously hardened.
For hardening you need graphite. It is best to obtain graphite from graphite brushes of a generator or brushed electric motor. Of course, I haven’t tried it, but you can also get graphite rods from AA batteries or simple pencils. In general, we grind this graphite into powder in any way. There is no need to grind it too much, without fanaticism.
Next, I need a metal base on which the graphite powder will lie. I took a piece of galvanized drywall profile.
The knife edge hardening process also requires a power source. Ideally, this is a pulsed DC welding machine set to minimum. You can also try to repeat the process using another source, 30-60 volts AC or DC. There is another dangerous option: using a 220 V network directly, in series with an incandescent lamp, but this is already fraught, so I do not recommend it.
Pour in graphite. We connect the plus of the welding machine to the base of the substrate, and the minus to the knife. We set the inverter to minimum settings and turn it on. We begin the process of hardening the edge. To do this, very carefully run the edge of the knife along the graphite pile. Our task is: first, to prevent the blade from touching the base. And the second thing is to prevent the graphite from burning. In both cases the blade will be damaged.
Ideally, the blade should be moved slowly, and the graphite should sparkle and flicker. Naturally, you don’t need to lower the knife too much. As soon as you notice the contact area heating up, immediately lift the knife.
The whole process does not last long, about 5 minutes. During this time I managed to walk along the entire length of the blade several times.
Knife hardening result
We take the file and shuffle the blade like the first time. A ringing sound is immediately audible, indicating the high hardness of the metal. Plus, the edge is practically impossible to process.
Leaves notches, be healthy! We knock on a steel nail.
The result is excellent - not a scratch on the knife.
At the end, the author cut the nail with a knife, hitting it with a hammer.
source
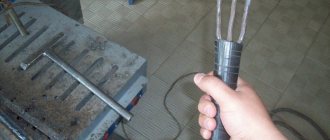
How to electric-harden metal using graphite powder. Electrical hardening.
Topic: how to harden a knife yourself using electric current.
It is known that metal can be hardened, this gives it additional strength. Hardening involves heating the metal to a certain temperature and then cooling it. This process changes the internal structure of the metal, making it stronger. Although at the same time the metal loses another of its properties, namely flexibility and ductility. Here the choice is yours: what do you need from the metal, its increased strength (but at the same time fragility increases) or flexibility (stiffness decreases).
The classic method of hardening metals is conventional heat treatment in flames, hot coals, gas furnaces, etc. But the temperature can also be increased due to electric current. Hardening is done uniformly. To ensure this, there is one interesting way using graphite powder. As you know, graphite conducts electricity quite well, in addition to this it is resistant to high temperatures. It is these two qualities of graphite that make it possible to harden metal with electric current using graphite powder.
I decided to try electrically hardening a small metal knife (homemade) and organized the following. So, I needed a power source, graphite powder, wires of sufficient cross-section, a metal substrate, and a small knife itself. As a power supply, I used a regular step-down transformer taken from an old color TV. Its primary winding is designed for a voltage of 220 volts, and I rewound the secondary winding to a voltage of 80 volts (in the end this turned out to be not enough, about 100 volts are needed).
To harden metal with electric current, sufficient current is needed. The cross-section of the secondary winding on my transformer was about 1.5 mm. But for larger knives it is better to have a larger cross-section. Next, I took a metal substrate onto which I poured graphite powder. You can make the powder yourself from a piece of graphite (grind off any graphite brush from an electric motor with a large file). I connected one of the wires coming from the secondary winding of the transformer to this substrate. I connected the second wire to the knife itself, which I hardened. The cross-section of these wires must also be at least 1.5 mm.
The electric hardening of the knife itself with current was done as follows. Having applied voltage to the transformer, I took a knife and carefully began to move its tip along the graphite powder. Many small sparks began to jump between the tip of the knife and the graphite powder, indicating electrical contact in the circuit. I also made sure that while driving the knife through the graphite powder, I did not have the knife in direct contact with the metal substrate. Such contact would create a short circuit. Nothing particularly terrible would happen here, but it’s better not to allow it. As a result, the tip of the knife gradually warmed up. This was proof that this method of hardening metal works fine if everything is done correctly.
PS I want to warn those who are not particularly familiar with electrical engineering. When performing such work, electrical safety precautions must be observed. A voltage of about 100 volts is quite dangerous for human life. And the currents during such work are not small, which can cause thermal burns. So before organizing electrical hardening of metal, take all safety measures and be extremely careful and attentive when working.
Hardening a knife - description of the technological process and sequence of actions
There is no need to talk about the indispensability of a knife. It is in every home, and we use this item every day. It is also interesting that this device has been an integral part of human life for thousands of years, despite this, the need for it does not decrease.
Both then and now, people were worried about the same issue - metal processing. Nowadays this is done more when creating blades, but knife hardening is also of interest to owners, although not many.
Brief contents of the article:
Peculiarities
The classical process of steel hardening has always been accompanied by high temperatures, in which polymorphic transformation of the steel occurs. At the same time, heating was always accompanied by sudden changes in temperature, because at a certain stage, the steel was always cooled in water.
Temperatures affected the structure of the metal, since when it increased strongly, the structure of the crystal lattice on its surface changed, and the sharp temperature change produced by water strengthened it. In this regard, the technology for hardening knives today is not much different from that which was used for swords and blades a thousand years ago.
This technology has always had one serious drawback. With a sharp change in temperature, the metal became much harder, but at the same time, it suffered greatly in terms of strength.
If this is a problem, you need to still heat the metal, but then gradually reduce its temperature. In this case, the steel will not become brittle enough.
Subtleties
If you have started hardening knives at home, then you should know that not every knife that comes into your hands is suitable for temperature testing.
This method is optimally suited for products in the production of which stainless steel was used. This may be a high content, or it may be an alloy containing stainless steel or nickel, for example. These knives are much stronger than their high carbon steel counterparts.
In addition, hardening can be carried out over the entire area of the blade, or can be used in a separate area that needs increased strength. The first type is called global, the second was called local.
Knife material
All types of steel consist of simple iron to which carbon is added. This is a common alloy for kitchen knives. If you add other metals to it, such as vanadium, chromium or molybdenum, the properties of the knife will change. Photos of hardening knives from a variety of materials can be found on the Internet without any problems. Some people have even used this process on Damascus steel.
The problem here is that hardening is good for types of steel that contain a sufficient amount of carbon. If there is not enough of it in the alloy, the knife after hardening will become stronger and harder, and it will begin to undergo corrosion, for which Damascus steel is so famous for its protection.
Graphite hardening
Graphite cementation is a very simple but effective way of surface hardening a knife with your own hands, which is best suited for strengthening some part of the blade.
To do this, you will need graphite, which can be obtained from simple AA batteries. You need a metal platform on which the hardening process will take place. A simple profile, which is used when working with drywall and other finishing work, is good for this.
We will also need a constant power source. An excellent option would be a welding machine, the power of which should be set to the minimum level. If this is not the case, you can try a similar option that will be able to provide you with about 50 volts of DC voltage. I strongly do not recommend using a 220 volt network.
Any instructions, including those for properly hardening knives, must begin with preparation. Once you have all the necessary components, you need to prepare your workspace.
We take the profile, pour our graphite onto it, it should turn out to be a small mound. You need to connect the positive cable of the power supply to the profile, but the negative cable needs to be connected to the knife.
Before asking the question of how you can harden a knife yourself using graphite, you should know that after turning on the power source, you should not let the knife and the profile come into contact. An arc will form, and in general nothing good will happen.
This method is good for hardening the edge, which gradually comes into contact with graphite. To do this, after everything has been done above, you need to turn on the power source and apply voltage to our parts. The knife must be gradually drawn along the graphite with the edge of the blade.
When this happens, rest assured that you will see the hardening process in person. This needs to be done gradually and carefully. If you touch the profile, the process is ruined. If you keep the edge in graphite for a long time, it will catch fire and the hardening will be ruined again. In both situations, the blade will be damaged beyond repair.
It is correct to conduct hardening with slow, gradual and short movements. Visually, it is very clearly noticeable when graphite begins to heat up strongly and spark. When you see this, you need to raise the knife. The blade should not be dipped very deeply into graphite; it is best to do this only with the cutting edge.
For a small knife you will need about five minutes to harden its edge. This process is delayed precisely due to the burning of graphite, which must always be avoided. As you can see, there is nothing complicated in this process, you just need to follow the instructions and work carefully.
source
Peculiarities
The classical process of steel hardening has always been accompanied by high temperatures, in which polymorphic transformation of the steel occurs. At the same time, heating was always accompanied by sudden changes in temperature, because at a certain stage, the steel was always cooled in water.
Temperatures affected the structure of the metal, since when it increased strongly, the structure of the crystal lattice on its surface changed, and the sharp temperature change produced by water strengthened it. In this regard, the technology for hardening knives today is not much different from that which was used for swords and blades a thousand years ago.
This technology has always had one serious drawback. With a sharp change in temperature, the metal became much harder, but at the same time, it suffered greatly in terms of strength.
If this is a problem, you need to still heat the metal, but then gradually reduce its temperature. In this case, the steel will not become brittle enough.
Basic processes
Usually, homemade blades made of steel or available improvised means that have lost their relevance (files, valves, etc.) are subjected to home hardening.
It is important to understand that only a blade that has undergone the correct hardening process will be as strong and wear-resistant as possible.
Weak hardening is fraught not only with the appearance of cracks on the blade, but also with its rapid dulling. If the knife has been hardened according to all the rules, then it will break only when deformed, the angle of which exceeds 45 degrees. In this case, the key to success is the correctly selected temperature regime, which must correspond to the selected steel grade.
Temperature selection
You should not assume that in order for a knife to be properly hardened, it must be kept at maximum heat, because more does not always mean better. The optimal temperature range for hardening can be determined using special summary tables that indicate the markings of the alloys. There is a simpler method of determination that does not require knowledge of the exact characteristics of the metal being processed:
- Temperatures from 757 to 950 degrees Celsius are suitable for hardening blades made of low-carbon steel.
- Processing high-carbon steel grades requires lower temperatures, ranging from 680 to 850 degrees.
- If the knife blade was made of an alloy containing alloying components, then the optimal range in this case would be from 850 to 1150 degrees.
To determine the degree of heating of the blade, a special measuring device called a pyrometer is used. But even if a novice craftsman does not have such an auxiliary device, this is not at all a reason to abandon the idea of hardening the metal for a knife, because the degree of heating can be determined using a regular magnet.
So, according to physical laws, a steel blade stops attracting a magnet if it is heated to the so-called Curie point - the peak point when high-quality hardening of the metal occurs. If you neglect this rule and overexpose the blade to the fire, then it will become too fragile and the chances of breaking or pricking it when used in everyday life will be much higher.
Technology and features of home heating
In order to harden a knife correctly, not only without damaging its blade, but also making it stronger and sharper, it is recommended that you familiarize yourself with the basic rules and nuances of this process. And the first recommendation is that instead of a blade, it is necessary to process another fragment made of the same alloy, conducting all kinds of experiments on it. This simple technique will help you choose the optimal temperature regime for heating and cooling without damaging the blade of your kitchen or hunting knife.
In addition, it is strongly recommended to pre-fire the metal blade by placing it in a special furnace (muffle). It is recommended to carry out such heating for as long as possible while maintaining the lowest temperature conditions, which will ensure uniform heating of the steel and protect it from the appearance of surface chips and cracks during further processing.
properly harden a knife from a file or any other element at home using the following available tools and tools:
- A heat source that can be used is an open flame (a fire or a gas burner), a muffle furnace, special hardening equipment (a forge) and an ordinary blowtorch. It is worth recognizing that hardening in a muffle furnace is the most productive, since it allows for maximum uniform heating of steel.
- Quite wide containers with water and special mineral oil, which are necessary for proper cooling of the hot blade.
- Forging iron pliers with long handles that will allow you to hold the part over an open flame. In order not to damage the knife handle when heated, especially if it is made of plastic or wood, it is recommended to temporarily remove the blade from it.
The hardening procedure should begin only after the flame acquires a rich crimson hue. If you use white fire, there is a risk of overheating due to the fact that the temperature of such a flame is the highest. In this case, it is necessary to ensure that no black or blue spots form on the surface of the metal product (not to be confused with tarnish, which is a thin oxide layer with characteristic iridescent tints).
Carrying out the procedure
The hardening process itself is so simple that, if desired, even the most inexperienced craftsman using his own home as a mini-workshop can handle it. And it is carried out in the following two ways:
- Different degrees of heat for certain areas. In order to maximize the service life of the blade, it is recommended to provide different temperature conditions for its cutting and neutral zones. That is, the area that will be sharpened in the future should be heated only once, and not to red, but to yellow, after which the test magnet is used. The same part of the blade that will not be sharpened is heated three times and each time to a purple hue (approximate temperature - 285 degrees).
- The second method involves uniformly hardening the blade three times over the entire area to a bright red color. In this case, in the intervals between hardening it is necessary to resort to cooling the blade, each time increasing the time it remains in the cooling substances.
The heating temperature of steel can also be determined by its appearance directly during the hardening procedure. So, there are 4 main groups of shades of hardened steel, by which you can understand what temperature it has warmed up to:
- Orange group - from 950 to 1000 degrees.
- The red group, which includes 4 subgroups - from 720 to 950 degrees.
- Burgundy - from 650 to 720 degrees.
- Red-brown and its 2 subgroups - from 530 to 580 degrees.
That is, the lighter the iron becomes, the hotter it is at this moment and vice versa.
When a smooth steel surface is treated by heating it, a thin rainbow layer of oxidation begins to form, called tarnish among experts. The color of this layer can also determine the temperature regime in the alloy, however, in this case, light shades will indicate a lower temperature in it. The color of the tarnish changes in a certain sequence, starting from light straw, brown and purple and ending with dark blue, light blue and graphite gray. Along with this process, the temperature regime also undergoes certain changes, varying in the range from 220 to 350 degrees.
Things will be a little different when hardening chromium steel, which has a higher temperature regime (from 300 to 700 degrees) while maintaining the same color range and sequence of changes in tarnish shades.
General information about the process
The first step is to understand the basics of heat treating steel.
The features of metal carburization include the following factors:
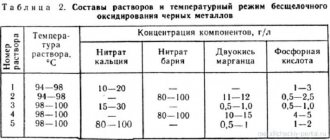
Thanks to the procedure, case-hardened steels become stronger, which increases the wear resistance and strength of the material; The operating properties of the metal are changed by heating the products in a liquid, gas or solid medium, which improves its characteristics; Parts can be heated to different temperatures; there is no limited constant or exact recommendations. At home, the cementation process takes place at a temperature of 500 degrees Celsius. In industrial conditions using professional equipment, the heating temperature in the furnace reaches more than 1300 degrees Celsius. You should know that the temperature is chosen taking into account the concentration of impurities and carbon. Professionals recommend cementing low-carbon types of steel (approximately 0.2%) at home. For example, a blade from an inexpensive kitchen knife made of steel or small parts. Carbon penetrates into the structure of steel rather slowly. Therefore, cementation of the knife blade in a home procedure occurs at a rate of no more than 0.1 ml per hour. In order for the same blade to withstand heavier loads, it is necessary to strengthen the layer with a thickness of up to 0.8 ml per hour
It is also important to understand that carburizing a knife or small shaft in a home workshop will take at least eight hours. In this case, you should maintain a certain temperature in the oven so as not to disturb the temperature regime. During the process of carburization, not only the property of the metal changes, but also its phase composition and atomic lattice
In general, the surface obtains the same characteristics as when hardened, but it is possible to control it over a narrow temperature range in order to avoid various material defects.
Carburizing stainless steel is a little more difficult, but at the same time it will qualitatively improve the characteristics of this type of metal.
Cooling and graphite hardening
The most important role in the issue of hardening blades is played by the cooling process, the correct implementation of which ensures the strength and elasticity of the metal product being processed. For these purposes, water and mineral oil are used, immersing the heated metal in which is accompanied by its cooling at different rates. Thus, in water, the cooling rate of steel is about 1 millimeter per second, while when the blade is immersed in oil, this figure doubles.
It is impossible to harden a stainless steel knife at home without a high-quality cooling procedure. And to carry it out, the following effective methods are used:
- When hardening a metal red-hot, it is recommended to immerse it in a container with oil three times, each time increasing the duration of the process. After final heating, the blade is immersed in a container of water, which must be slightly shaken immediately before immersing the hot steel. This should be done extremely carefully so that the oil heated to high temperatures does not splash around and burn the master and others.
- If it is necessary to heat a knife with two sharpened sides of the blade, then, on the contrary, the blade must be immersed in water and only then transferred to a container with mineral oil. In this case, the immersion time in water should not exceed two seconds. This simple technique will help make the knife blade very sharp and elastic.
- When zone calcination is carried out to ensure that the middle of the blade remains as elastic as possible, it is recommended to heat this area using a 10 mm metal rod, after which the blade is placed in boiling water for two hours, and then in ice water.
Knife hardening with graphite, which is ideal for processing homemade knives with thick blades, has proven to be no less effective. This technique, based on the heating of blades through a layer of graphite shavings, is most often used to improve homemade knives made from failed springs, beams, soldering irons and other tools that have lost their relevance.
source
Technological nuances of hardening
Hardening, which is a type of heat treatment of metals, is performed in two stages. First, the metal is heated to a high temperature and then cooled. Different metals and even steels belonging to different categories differ from each other in their structure, therefore their heat treatment modes do not coincide.
Heat treatment modes for some non-ferrous alloys
Heat treatment of metal (hardening, tempering, etc.) may be required for:
- its strengthening and increasing hardness;
- improving its ductility, which is necessary when processing by plastic deformation.
Many specialized companies harden steel, but the cost of these services is quite high and depends on the weight of the part that needs to be heat treated. That is why it is advisable to do this yourself, especially since you can do it even at home.
If you decide to harden the metal on your own, it is very important to correctly carry out such a procedure as heating. This process should not be accompanied by the appearance of black or blue spots on the surface of the product. The bright red color of the metal indicates that heating is occurring correctly. This video demonstrates this process well, which will help you get an idea of the degree to which to heat the metal subjected to heat treatment.
As a heat source for heating the metal product that needs to be hardened to the required temperature, you can use:
- a special oven powered by electricity;
- blowtorch;
- an open fire that you can make in the yard of your house or in your country house.
Hardening a knife on open coals
The choice of heat source depends on the temperature to which the metal to be heat treated must be heated.
The choice of cooling method depends not only on the material, but also on the results to be achieved. If, for example, it is not necessary to harden the entire product, but only a separate section of it, then cooling is also carried out pointwise, for which a stream of cold water can be used.
The technological scheme by which metal is hardened may include instant, gradual or multi-stage cooling.
Rapid cooling, which uses one type of coolant, is optimal for hardening steels classified as carbon or alloy. To perform such cooling, you need one container, which can be a bucket, barrel, or even an ordinary bathtub (it all depends on the size of the item being processed).