Sharpening chisels and plane blades can be compared to working out in the gym: we know it’s high time to do it, but we constantly find a reason to put it off until later.
The more often you sharpen your tools, the longer they will last. For this process to stop being a boring task, you need to choose the right tools and sharpening methods.
To begin with, it is worth familiarizing yourself with the main stages of such work, which are relevant for any of the methods.
EVERYTHING YOU NEED FOR THIS ARTICLE IS HERE >>>
First we form a chamfer
Before a sharp cutting edge is formed on the blade, the main bevel (the so-called primary chamfer) must first be formed. This stage, strictly speaking, is sharpening. Most chisel and plane blades have a primary bevel of 25° or 30°.
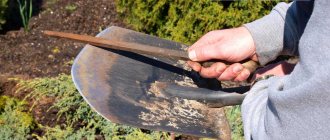
Sharpening creates a fresh beveled edge that is at right angles to the side edges and should not be dented, chipped or scratched. The fastest way to obtain a primary chamfer is to use a sharpening machine (electric sharpener), especially in cases where the damaged blade has nicks and a lot of metal needs to be removed (photo A).
The sharpener forms a concave chamfer (see diagram. “Two types of sharpening”).
Sharpening on an electric sharpener wheel creates a concave chamfer (left), while sandpaper or a flat stone creates a flat chamfer (right).
We recommend using an electric sharpener with a low rotation speed (no more than 2000 rpm) and abrasive wheels made of aluminum oxide with a grain size of 100-120 units.
The coarse silicon carbide wheels found on many sharpening machines are too rough for sharpening carpentry tools. To avoid overheating of the cutting edge and the appearance of so-called tarnish (a rapidly changing color of the oxide film), which indicates a decrease in the hardness of the steel, cool the tip of the blade more often by immersing it in water.
If you don't have a sharpening machine, the primary bevel can be formed using a sharpening trolley and a coarse abrasive stone or 100-320 sandpaper (see the previous article, “Tips from an Experienced Craftsman for a Beginning Woodworker”). This creates a flat edge (see Fig. “Two types of sharpening”), which allows you to get the same sharp cutting edge as a concave one, but the process takes more time, since you have to remove a lot of metal with less productivity (compared to sharpening machine).
Obtaining a cutting edge
It doesn't matter how the primary bevel on the blade of your tool is formed. Now you need to achieve real sharpness. (This step is called finishing.) To do this, increase the angle of your sharpening trolley by 3-5° and form another narrow edge along the edge of the primary chamfer, called a micro-bevel (see Fig. “Getting a micro-bevel”), using a set of stones or abrasive paper with a grain size from 600-1000 to 5000-8000 units (grit). The process of cutting wood is carried out only by the very tip of the blade (cutting edge), so there is no point in grinding the entire primary chamfer. This saves a lot of time and effort and also extends the life of your sharpening tools.
Figure 2. How to obtain a microbevel
After sharpening the main (primary) bevel to the desired angle, create a micro-bevel by raising the blade slightly so that only the leading edge touches the stone.
Know how to stop in time
As you refine your cutting edge, moving from one grit size to a finer one, you continue to remove metal and the edge becomes sharper. Fine abrasive grains not only remove marks (scratches) from previous, larger numbers, but also make the edge thinner, bringing it to a sharpness that allows it to easily penetrate the material. If you finish finishing too early, you will get a blade that will cut wood, but the surface being processed will not be clean, the cutting process will require more effort, and the cutting edge itself will become dull faster. The sharper the tool, the longer its cutting edge retains its working properties.
It is important to learn how to correctly determine the moment when finishing work should be completed. Once you start cutting wood, the sharp cutting edge will inevitably wear out.
The speed of its dulling depends on the properties of the wood and the characteristics of the operations performed. If you notice that the tool doesn't cut as easily or as cleanly as before (photos C and D), sharpen the cutting edge again by grinding the microbevel at the same angle. Start finishing with a medium grit (1000-4000 grit) and continue in the same order as before, finishing with polishing the edge with 5000-8000 grit abrasives.
After several (usually three to five) finishing touches, the microbevel becomes too wide, and grinding it takes more and more time. In this case, it is more profitable to re-sharpen the tool by forming a new primary chamfer, and then grinding the new micro-chamfer using finishing.
To accurately maintain the desired sharpening angle, use the device
To accurately sharpen the primary (main) chamfer or fine-tune a micro-chamfer, use a sharpening device (the so-called “trolley”) that holds the tool blade at the desired angle. We prefer the Veritas Mk.ll model, which allows you to sharpen a blade width from 6 to 73 mm at angles from 15° to 54° (these capabilities are more than enough for sharpening most carpentry tools), and the wide roller provides this device with reliable support on all tested us stones and plates. To work with the device, firmly secure the tool blade in it, following the instructions to maintain the squareness of its working part.
With the bevel of the blade and the roller of the trolley device resting on a stone or sandpaper, move them back and forth until the main bevel is completely flat. Start sharpening with coarse abrasives (100-325 grit), and then proceed to finishing (creating and polishing a micro-chamfer) with a consistent increase in the abrasive numbers (three or four grit levels from 600 to 8000 grit are enough with an approximate doubling of the number of each subsequent abrasive), not changing the position of the blade in the device. Stop finishing when the microbevel reaches a width of about 1 mm.
Photo A: Quick chamfering on a sharpening machine
Create a primary bevel on chisels and plane blades using aluminum oxide wheels, which are less prone to overheating of the cutting edges, and a rest to maintain the sharpening angle.
B: When working with a cart attachment, focus on keeping the roller and blade bevel in constant contact with the abrasive surface.
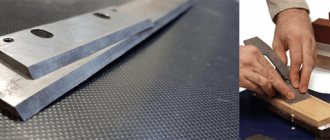
C: The blade of this plane, polished to a mirror shine on an 8000 grit stone, removes the finest shavings from the end of the board.
D: The sharpening of this blade was completed with 1000 grit abrasive, and instead of shavings, coarse sawdust is coming out of the tap hole, and there are chips on the end of the board. It would not hurt to refine it on two fine-grained stones.
Sandpaper and sharpening
What is required.
If you plan to form a concave primary chamfer using a sharpening machine, you will need 220 grit paper for finishing; 320; 600 and 1200, and for final polishing of the cutting edge, take paper with ultra-fine abrasive (2000-4000 grit).
Without polishing with fine abrasives, the tool will cut wood, but it will become dull faster. To create a flat primary bevel, add 1-20 grit paper. Additionally, you will need a flat surface to stick the paper to. You can use thick glass or a granite slab, but we find that a cut of 19mm MDF is sufficient for daily sharpening.
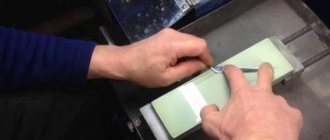
Adhere the paper to 75x200mm rectangular pieces of MDF (photo on the right) using spray adhesive. When the abrasive is worn out, simply throw away the scrap and get a new one.
How it works.
Place a rubber mat on your workbench to prevent your sharpening tools from shifting as you work. After forming the initial chamfer, before finishing, using different numbers of abrasives in the same sequence, level and polish the back of the blade (the area about 12 mm wide, immediately adjacent to the cutting edge).
Advantages of sharpening tool knives, etc. using sandpaper
- This method will be cheaper than others - the cost of sandpaper, glue and MDF will not damage your budget. Purchasing thick glass or granite slabs will require additional investment.
- Good quality sandpaper can be purchased almost anywhere.
- There is no need to wet the paper to achieve excellent results and there is no mess created during sharpening.
Disadvantages and cons
- Abrasive paper wears out quickly, especially when sharpening hard steel tools. Any of the four brands of paper we tested lost their ability to quickly remove metal within the first 30 seconds. After this, dull abrasive grains remained on the surface, and the paper became unusable after 5-7 minutes of work.
- If you sharpen regularly, you'll have to change the paper frequently, and the low initial cost can turn into an ongoing expense. And the price of paper with ultra-fine abrasive, necessary for the final polishing of the cutting edge, is much higher than usual.
Conclusion. If you only need to sharpen a few tools two or three times a year and want to minimize costs, the sandpaper sharpening method is most suitable.
Photo 2: Sharpening with sandpaper:
Simply throw away the piece of MDF board with sandpaper glued to it when the abrasive wears off, and you won't have to waste time cleaning a glass plate or granite slab.
Also read: DIY belt sanding machine
Sharpening on the Water Stone - how to do it correctly?
What is required. Three 1000 grit stones; 4000 and 8000 grit, which will cost about $150-200, will completely cover all your needs.
To form the primary chamfer, you can purchase a 220 grit stone, but a diamond plate will handle this much faster. A good way to save money is to buy combined (two-layer) stones that have two working edges with different grain sizes, and this will cost 20-30% less than several homogeneous stones.
How it works.
Use the sharpening trolley as described above, but soak the stones first. These rectangular bars consist of aluminum oxide particles tightly bound together with a binder.
Before starting work, the stones must be completely immersed in water for at least 15 minutes. During the process of sharpening and finishing, it is necessary to regularly add water to the surface of the stone to restore abrasive properties and remove metal particles.
Once a flat or concave primary bevel has been formed on the blade, proceed to finishing, starting with a 1000 grit stone and ending with 4000 and 8000 grit.
Advantages
- A set of three water stones will cost 30-50% less than the same set of ceramic or diamond abrasives.
- Water stones 4000 grit and coarser can be stored in water so they are always ready to use. However, fine-grained stones may collapse from constant exposure to water.
Flaws
- Water stones wear out quickly. The working surface becomes concave and grooves appear on it from sharpening tools, so it must be regularly leveled using a special stone, sandpaper or a rough diamond plate. How often you will have to resort to leveling depends on the chosen brand of stone. To ensure that the work surface is flat, always level the stones before each sharpening session.
- On some water stones, finishing is too slow, especially when the cutting edge needs to be refreshed.
- edge for the third or fourth time. We believe that after two honings on such stones, it is better to sharpen again to form a primary chamfer, and then make a new micro-bevel. (With Norton brand fine-grain waterstones, you can refinish the edge at least three times before renewing the primary bevel.)
- Water and a mixture of abrasive and metal particles form dirt, leaving difficult to remove stains on the workbench and cast iron machine tables.
- Wet or insufficiently dried water stones may crack in the cold.
Conclusion. Water stones are an excellent combination of performance properties and reasonable price, and working with them does not require special skills.
Photo 3: Sharpening on a water stone
Water stones should be immersed in water for 15 minutes before use. We place wooden slats underneath them at the bottom of a plastic container.
Parameters to be restored
Proper sharpening of a drill for metal allows you to normalize the following characteristics:
The apex angle that the edges make with the bridge. Initially, it depends on the quality characteristics of the processing material (hardness is as important as viscosity) and can be 60-150 degrees, and sometimes reach 180. In our case, it is necessary for it to become 116-118 0, accordingly, it needs lead to this indicator.
The angle of the axis and the cutting part - it must be half as narrow as the previous one, that is, 58-59 0, and symmetrical with respect to each side of the tool. Otherwise, uneven wear will be observed, which results in faster tool failure, as well as uneven edges of the finished holes.
Relief angle - should be fixed in the range 7-17 0 (depending on what the workpiece is made of); any deviation of the actual value from the nominal value must be corrected, otherwise the performance will decrease significantly, and a breakdown will not be long in coming.
The shape and length of the edges - it is important that they are equal, otherwise runout will inevitably occur, as a result of which it will not be possible to make holes of a strictly specified diameter. Dimensions (to determine symmetry) should be determined from the edge (top) to the central point of the jumper.
Abrasive ceramics and sharpening on it
What is required.
Get ceramic abrasive stones with a grain size of 1000, 4000-5000 and 8000 units. You should not buy coarse stones with a grain of 220 or 320 grit for sharpening the primary chamfer - they work slower and are more expensive than diamond plates of the same grit.
How it works.
Ceramic abrasive stones are similar to water-based abrasive stones, but they do not require soaking (in fact, they often break down when soaked). Instead, you only need to add a little water to the work surface from time to time for better gliding and removal of sludge.
Advantages and benefits of abrasive ceramics
- Shapton's Professional Series of ceramic stones and glass plates produce sharpness faster than water stones and produce a fine, polished cutting edge that is nearly impossible to achieve with other means. You can even save money by skipping the 8,000 grit stone and finishing with a 5,000 grit stone without noticing a significant difference.
- Glass plates with Shapton brand abrasive ceramics are twice as thin and have a glass backing, but perform just as well as full-size stones. At the same time, they cost 30-40% less.
- Most ceramic abrasive stones are harder and denser than water-based ones and wear out almost twice as fast, so they stay flat longer and retain high abrasive properties.
- Caring for such stones is easy - just rinse them with water and wipe dry.
Flaws
- The three ceramic stones we recommend will cost a decent amount (about $300).
- Naniwa brand stones turned out to be the least aggressive in our tests. They quickly became contaminated with metal particles, the working surfaces became concave, and they had to be leveled more often than other brands of ceramic stones.
Conclusion. In most cases, abrasive ceramics outperform water stones and sandpaper, producing ultra-sharp, polished cutting edges. Buying such stones will cost a pretty penny, but they will last you two to three decades. However, this also requires a means for sharpening (forming a primary chamfer).
Even completely dry abrasive ceramic stones only need to be slightly moistened with a sprayer before use.
The fine-grained Naniwa ceramic stones wore out so quickly that we had to stop finishing to get them even. If this is not done, the cutting edge of the tool will not be straight.
Don't mess with oil stones
Although they have long been the most common, their use is now considered impractical for three reasons.
- High price. These natural stones are becoming increasingly rare and expensive.
- Low efficiency. They do not cope well with sharpening and finishing blades made of modern hard steels, such as A2 in the blades of new planes, and very quickly become coated with metal particles.
- Dirty job. Think about what is easier and faster to remove – oil or water? Decide for yourself. Some modern abrasives do not require lubrication at all.
Related link: How to sharpen a saw correctly
Grinding whetstones: types, care features
Particularly widespread and popular is a device for sharpening knives in the form of grinding stones, which are convenient for sharpening a blade by hand. The undoubted advantages of using bars are that, firstly, they are light, convenient and do not require electromechanical equipment, and secondly, when using them, the edge of the knife does not overheat and the blades do not deform.
Devices for sharpening knives with your own hands in the form of bars are:
- ceramic;
- natural;
- diamond;
- Japanese water stones.
All of them are produced in different sizes and shapes and consist of a soft base - a matrix, on which abrasive grains-crystals are placed in a special order. They have a hard structure that is much stronger than machined steel. During sharpening, the matrix gradually becomes dull, and the spent deformed strong particles crumble, being replaced by new ones located throughout the entire thickness of the bar.
In order to use such a device for sharpening knives with your own hands and achieve the desired result, you need to take into account the fact that working with whetstones requires simple skills. Therefore, using an expensive bar will not be effective in the hands of an inexperienced beginner. You should start working with small-sized knives and non-massive bars, preferably in the form of a convenient “boat” shape. For convenient work, it is better to choose this device, the length of which is equal to or greater than the length of the blade.
Ceramic bars are made using abrasive particles of electrocorundum and silicon carbide. Their main feature is their low cost. When sharpening, particles of blade steel get into the bars, which subsequently clog the abrasive material. The bars should be cleaned regularly using powdered cleaners or liquid soap mixed with sand. Knives should be sharpened with stones using substances that lubricate the surface of the device - water or soap solution.
Japanese water stones sharpen any metal very efficiently and quickly, but their cost is quite high. They are made from solid oxides and carbides, evenly distributed in silicate. This device for sharpening knives is unique in that it grinds faster, but the sharpening is much more efficient.
In order to learn how to work correctly with this material, it is best to first watch videos for sharpening knives with your own hands. You should not work with this sharpening device without preparation, because it is extremely easy to damage both the material and the knife if handled improperly. For such stones, their storage process is specific, which consists of constantly keeping this knife sharpening device in clean, disinfected, regularly changed water.
The hardest and most durable device for sharpening a knife is a diamond whetstone, which is a metal or plastic base coated with the finest diamond coating, which practically does not wear off. Of course, a diamond stone is a rather expensive device, but it will last a very long time. There is no need to worry about the quality of this manual knife sharpening device; after its first use, the device will acquire the ideal characteristics of imparting excellent sharpness some time after grinding it in. The block is cleaned under running water.
Natural bars are made from quartz, garnet, chalcedony and sedimentary rocks. The most common stone for sharpening a knife is Arkansas stone, which can be seen in the corresponding photos and videos. It comes in hard, medium and soft textures and is used respectively for additional grinding and particularly sharp sharpening, sharpening knives, quick grinding and profiling of the cutting wedge. You should always work on such a stone using mineral oil, and clean it with hot water, a brush and soap.
In addition, you can use abrasive paper with fine grit and water-resistant characteristics to sharpen the knife. Cut into strips from 4 to 8 cm wide, it is fixed on a flat surface, which is stationary on the table. During work, water is used for sharpening, and after work, the paper is washed.
Diamond plates and sharpening tools on them
What is required.
There's nothing harder than diamond, and these diamond-coated steel plates can sharpen even the hardest tool steels with confidence and speed.
But we weren't able to get truly sharp cutting edges using these alone, so plan to supplement your arsenal with another finishing and polishing product.
We recommend purchasing a double-sided diamond plate approximately 200mm long.
Two working surfaces with different grain sizes allow you to significantly speed up the process of sharpening and initial finishing. Select a 1 20-325 grit insert to create a flat bevel, and the next step will require 1000-1200 grit. Or (if you are making a concave bevel with an electric sharpener) buy a 600/1200 grit double-sided insert. How it works. You move the blade of the tool over the diamond pad just like you would over any other abrasive stone or sandpaper. To prevent clogging of the abrasive layer, diamond plates require lubrication (ordinary water), but this does not create as much dirt as when working with water stones.
DMT DuoSharp plates (bottom left) have small holes in the steel backing where scraped metal particles accumulate.
These inserts are more aggressive than DMT Dia-Sharp, which has a solid surface coated with a dense layer of diamond grains and resembles diamond abrasive paper. Both plates must be moistened with water from time to time during operation. The Trend Classic Pro plate has a mesh pattern of small grooves on the surface that serves to drain dirt, but the oil sold with the plate is quickly consumed, and the working surface becomes more dirty than when using water.
A bottle of this oil is not cheap, but it is better to use water instead. (Although Trend recommends oil to protect the steel substrate from corrosion, we prefer to clean the plate and dry it after use.)
Advantages and Pros
- DMT diamond blades are much faster than other sharpening products we've tested.
- Double-sided plates will be a profitable purchase. DMT DuoSharp is available in four different grit combinations. The Trend Classic Pro only comes in 300/1000 grit, although the company does offer a 220 grit single-sided plate separately. Single-sided DMT Dia-Sharp inserts come in six grit grades.
Disadvantages and cons
- Trend diamond inserts are slower than DMT inserts, but they are still much more aggressive than sandpaper, water stones and ceramic stones.
- The aggressiveness of diamond abrasives leads to the appearance of deep scratches on the surfaces being sharpened, and the final finishing of the cutting edge has to be done using a fine-grained diamond plate (600-1200 grit) and a water or ceramic stone (5000-8000 grit). At the final stage, you can also use sandpaper (No. 2000-4000).
Conclusion. We recommend that you equip your sharpening kit with at least one diamond plate. They remove metal quickly, require no maintenance (other than rinsing) and can be used to smooth water and ceramic stones.
Photo 4: Using diamond sharpening plates
The working surface of diamond inserts may look different. The round recesses and grooves (left and right) collect particles of removed metal, leaving the abrasive clean. Other plates (in the center) do not have such properties.
What is the best way to spend money?
After purchasing an electric sharpener with a 120-grit wheel and a good sharpening trolley, we recommend purchasing a DMT DuoSharp double-sided diamond plate with coarse and fine grains (325/1200 grit), as well as Shapton glass-backed ceramic abrasive (6000 grit). This set will allow you to perform all sharpening and finishing operations. An electric sharpener will help quickly form a concave primary chamfer; a micro-chamfer is formed using the rough side of a diamond plate, ground on its fine-grained side and polished on a ceramic stone. During the last three operations, the reverse side of the blade is also ground. By using the most productive tools, you will spend less time sharpening and finishing tools and more time on carpentry.
Additional Information
Sharpening: sandpaper can't keep up with diamonds
We all want to finish sharpening as quickly as possible so we can get back to carpentry. To find out which method gets the job done the fastest, we tested more than a dozen different tools, from sandpaper to diamonds. Only a sharpening machine can create a new primary chamfer on a dull or damaged blade in record time, but if you prefer hand sharpening with sandpaper or a flat stone, choose a 120-325 grit abrasive. In our tests, coarse-grain diamond blades were more successful than other abrasives, completing the job in just a minute and a half. And even finer diamond grains remove metal faster than other types of abrasives. We conclude: to quickly form a flat primary chamfer, it is better to choose diamond plates.
Finishing: again, diamonds are the fastest
After sharpening the main bevel, the tip of the blade must be ground and polished to obtain a sharp cutting edge, and fine-grained stones or sandpaper are needed to fine-tune it. Comparing different 800-1200 grit abrasives, we recorded the time spent finishing the cutting edges, then the edges were dulled, and the procedure was repeated two more times (each subsequent finishing takes more time, since more metal has to be removed as the microbevel width increases) . As with sharpening, at the initial finishing stage, diamond plates turned out to be the fastest. All the brands of sandpaper we tested were effective only during the first minutes of finishing, so the sheets had to be thrown away after each use.
No need to remove the burr
It is customary for most craftsmen to turn the blade over during finishing after grinding the micro-bevel on each subsequent stone in order to remove the burr that inevitably forms. But this is not necessary if the back of the blade is polished. As you continue to fine-tune the microbevel at the same angle on smaller and smaller abrasives, you will eventually find that the burr will fall off on its own, revealing a sharp cutting edge.
On a note:
Miracle sharpening board
Many craftsmen are faced with the problem of fine-tuning a cutting tool to razor sharpness. If a knife or cutter is just a little dull, this problem can be easily solved thanks to a simple device.
Materials: board, piece of unpainted leather, 4-5 mm thick, epoxy glue, polishing pastes.
I mark the board and cut out the part. I like to do this with a small bandsaw: it allows you to cut very cleanly and along almost any curved lines. In addition, fine wood dust is formed, which I use to cover up defects in other products by mixing it with epoxy resin.
I clean the edges of the sawn board with sandpaper - the band saw cut is very high quality and requires only minimal finishing.
I make a hole for the hanger. And I apply decorations using a burning device (photo 1). I cut the leather part for the board according to the template. I glue it by pressing it using a piece of board and a clamp (photo 2).
I evenly cover the wooden part of the product with an alcohol solution of shellac. I attach the hanger. The work is completed.
When sharpening, I evenly apply GOI paste or polishing pastes and, with careful, uniform movements, bring the knife (cutter) to a razor sharpness.
By the way
It is convenient to store wood dust in a tightly sealed plastic container, such as an ice cream container.
© Author: Oleg Lipanov, St. Petersburg. Photo by the author
We sharpen a knife on a whetstone for $1.
Useful tips
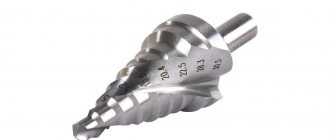
Subtleties of grinding A twist drill for woodworking has a centering tip, which allows it to be fixed at the moment it enters a material with a fibrous structure; accordingly, the configuration of the working part of the drill is quite complex. Therefore, when grinding it, the device is fixed horizontally, and the drill is positioned so that the centering tip is adjacent to the outer edge of the grinding wheel. The direction of rotation is indicated by an arrow.
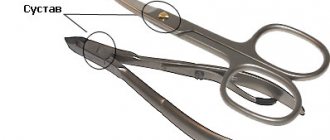
Sharpening scissors Professional scissors (medical, hairdressing, etc.) are sharpened by professional craftsmen, but their simpler analogue - household scissors - can be regularly polished by a home craftsman. Without periodic grinding of the blades, scissors will not be able to properly cut paper, cardboard, etc. materials, but will only crush them. As with pruning shears, when grinding household scissors, only the outer side of each blade is processed.
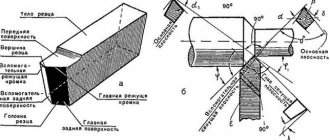
Chisel-scalpel: processing secrets An impact-cutting tool in the form of an elongated rod with a working part sharpened in the form of a blade and a flat butt plate for striking with a hammer or mallet at the other end is intended for making nests and grooves in the brick and concrete walls of a house. The working part of the scarpel chisel is sharpened on both sides, but for greater tool life, the cutting edge is slightly dull. When sharpening and grinding (grinding wheel grit - 80), both edges are not joined into a corner, leaving a slightly noticeable flat strip between them.
HOW TO CORRECTLY SHARPEN A KNIFE - DETAILED STEP-BY-STEP PHOTO
It would seem that what could be easier than sharpening a knife? Unless you hammer in a nail. Many people are convinced of this, but sometimes they get disastrous results. In fact, this is really not difficult, unless, of course, we are talking about an exceptional or exotic knife, but it is important to know a few basic rules in order to avoid serious mistakes.
The first typical mistake is the longitudinal movement of the blade during sharpening. Almost all sharpeners that are sold in every hardware store are designed in a similar way. You can achieve acceptable sharpness with their help, but the work will be of little use - soon you will have to repeat sharpening, again and again, until the blade becomes completely unusable. It is more correct when the knife is moved not along, but across, with the cutting edge forward, as if “cutting off” a thin layer from the sharpener. In this case, an ordered microstructure is formed on the cutting edge. resembling a ser-raitor at high magnification. This is what factory sharpening looks like. When cutting, such a file literally “bites” into the material.
Owners of grinding wheels with a high-speed electric drive make another mistake. On such a machine it is convenient to sharpen axes and shovels, chisels and chisels, and if it’s knives, then only very simple ones. The thing is. that the thinnest cutting edge instantly overheats when sharpened on a machine, but the blade of a real knife is hardened. The metal is tempered, and hardening disappears. The knife will be damaged forever; it will not be possible to harden it again at home.
We will need a whetstone. Now there is plenty to choose from; the price of products from famous manufacturers can reach hundreds of dollars. On the other hand, there are still connoisseurs of cheap Soviet-made bars, which can still be found at flea markets. Arkansas or waterstone are not necessary for most applications and require specialized skills. Inexpensive double-sided abrasive stones from China or Poland may be sufficient. made of aluminum oxide (electrocorundum), costing a couple of dollars apiece. Of course, they leave much to be desired, but you don’t mind throwing them away even after a little wear, and the flatness of the bar is of paramount importance for high-quality sharpening.
The lightweight Buck QuickFire folding knife (model 0288BKS with a 7-centimeter blade), which was used mainly for sharpening pencils, needed sharpening, and although it still copes with this task successfully, it no longer shreds paper in weight, and the heavier Tramontina tourist knife Camping (model 26003/106, blade length - 140 mm), “registered” mainly in the kitchen and has no longer even cut bread normally.
The former's blade is made from a high-carbon variety of budget-friendly 420 martensitic stainless steel, which is specially heat-treated by Paul Boss, a specialized hardening firm, making it comparable in performance to much more expensive grades of knife steel.
Nothing is known for certain about the material of the second blade. The manufacturer only indicates that it is stainless steel. Over several years of merciless use, the polishing has not faded or been scratched, which indirectly indicates the good quality of the steel itself.
Most likely the same 420. These knives only shred a sheet of paper on a clothespin, so they need sharpening.
First of all, we will seal the blade with tape, of course, leaving the cutting edge exposed. This will avoid damage from accidental contact of the side surface with the abrasive. Practice shows that such a precaution is not superfluous even with experience - polishing is scratched by corundum from the slightest unsuccessful touch.
Next, we select the sharpening angle. For ordinary knives it is about 20-30°. To do this, we “try it on” by applying the cutting edge to the block at different angles. You need to feel and “catch” the correct angle with your hand and then strictly hold it throughout the entire sharpening process.
If a good steel knife becomes dull too quickly, you can try increasing the sharpening angle. Conversely, if the desired sharpness cannot be achieved, you can try to reduce the sharpening angle. However, you shouldn’t change it unless necessary: it is set by the manufacturer based on the parameters and purpose of the knife.
We sharpen each side in turn evenly along the entire cutting edge. The duration of sharpening depends on the steel of the blade and the properties of the whetstone. Most often, 10-20 movements or even less are enough. You shouldn’t press the blade too hard against the block, but it shouldn’t slide either.
It is useful to polish a sharpened cutting edge a little, then it will last longer
until the next sharpening. It is convenient to do this on a piece of old leather belt, placing it wrong side up on a flat board. When polishing, the knife should move with the butt forward. GOI paste will speed up the work. if you first rub the belt with it, but it is important to stop in time so as not to rub the microscopic teeth formed during sharpening on the cutting edge. With polishing paste, this moment is easy to miss.
In conclusion, we will clearly verify the satisfactory sharpness of the knife. Let’s use the test to “shred” paper by weight. Everything is predictable - the “tank” has returned to its former strength; Well, we don’t expect a clean cut of sheets from the Tramontina, but the knife is again suitable for excellent service in the kitchen.
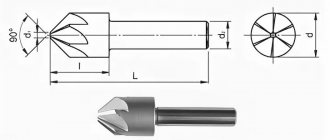
Methods for sharpening a drill for metal to obtain the correct back plane
Methods are classified according to how the back of the head is treated. Today the following variations are distinguished:
- Single-plane – relevant for small rods (up to 3 mm in diameter); you need to make 1 surface, at an angle similar to the back one and selected within 15-25 0.
- Dihedral - in the back of the head, 2 planes are sharpened with varying degrees of intensity; the first, generally adjacent, is at 7-17 0, the second is at 25-40 0. Then the intersection edge as a result of this execution passes at 0-40 0; Ideally, it should be 25-30 0 for materials of high hardness and 35-40 0 for medium and soft ones. Remember, if you increase it, you will reduce the axial force, weaken the wedge on sharp slopes, and worsen heat dissipation and strength.
- Conical - as it is performed, the back of the head becomes curved, since the rear angle gradually increases, and immediately from the blade. It is narrowest on the cutting part, where it ranges from 7-17 0 (the specific value depends on the workpiece itself). To achieve success in the process, it is worth twisting the shank of the rod from top to bottom.
There are other methods, for example, screw factory sharpening of a drill for metal, and this is carried out mainly on machine tools; There is also a cylindrical one, although it is much less common. There is also a manual method - elliptical: for it, just like for the shaped one, you will need abrasive wheels of a specific (indirect) profile.