Which hiller is best for a walk-behind tractor?
Modern manufacturers of agricultural machinery are trying to meet the ever-increasing demands of users, so each brand produces specialized hillers that are fully adapted to the specifics of a particular manufacturer’s walk-behind tractor. For example, for the Neva, MB 2, MB 1 and Agro units, you can purchase the following types of additional assistants:
Hillers for potatoes for walk-behind tractors, having a clearly marked working width
Such an object is considered one of the simplest and has another name - lister. It is used for processing narrow row spacing, the width of which does not exceed 30 cm. As for the design features, the hitch consists of several wings fixed relative to each other. This option is suitable for low-power walk-behind tractors (about 3.5 hp). A thin stand provides additional protection for the device from overloads. The negative aspects of such a development include the impossibility of working with wet soil, since the soil simply sticks to the wings, preventing the equipment from performing its task;
Hiller with variable working width
The main advantage of this type of tool is the ability to adjust the processing width. With its help it will be possible to process rows of completely different sizes. Suitable for more powerful machines, because it consumes more energy. Often such devices have the form of double-row hillers, which allow the necessary operations to be performed with even greater efficiency. For adequate operation, it is necessary to place the lugs of the walk-behind tractor on extensions;
Disc hiller
It is considered the most convenient, since it can be used to properly prepare furrows for planting seeds. A feature of the part is the placement of the dump disks at a certain angle. The productivity of use is much higher than that of the previously discussed models;
Dutch type hiller
A specific feature of the development of such a plan is the rotation of the wings in several planes. It seems that the lower edge of the wings follows the contour of the crest. This approach allows you to perform care more productively with minimal energy expenditure. Financial inclusion is also a significant plus;
Active plan propeller hiller (rotary)
The technical device allows you to perform the hilling procedure efficiently, throwing soil directly to the roots of the plants. An important point: you can work with such a device in the second forward gear of the walk-behind tractor, which not every car can boast of. An increased gear will allow the hiller to rotate at a speed of 160-180 turns per minute, due to which the soil is “thrown” from the rows to the rows themselves.
Features of operation and maintenance
Installing a hiller on a walk-behind tractor requires compliance with the rules for adjusting the angle of attack and depth of immersion, and it should be smaller compared to a plow. Wheels and a hitch are installed on the hiller, after which it is connected to the main unit. The walk-behind tractor is placed on a flat surface, while the hiller is lowered and connected by means of a hitch.
When installing attachments, the operator tries to ensure that the hiller stand is positioned vertically. This is the position that is necessary to correctly set the optimal angle of attack. After this, the hitch is lowered to the ground or even slightly deeper into it
It is important that the equipment is positioned below the lug support
Before starting the main work of plowing or hilling the land, it is necessary to carry out a test run in a small area
It is important to work in good weather, having first checked the sharpness of the working elements. In addition, before starting work, it is necessary to assess the condition of the soil
Along with this, it is necessary to determine the optimal speed of work, since a correctly selected indicator will contribute to greater efficiency and quality of work. For example, if the speed is high, the hiller will simply throw the earth in two directions instead of creating a hill and a furrow. When the equipment goes too deep into the soil during operation, the stand must be tilted forward by lifting the toe.
When it is necessary to plant potatoes using a hiller and walk-behind tractor, you must first make marks with a distance of approximately 65 cm. After this, create furrows and lay out planting material in them. After this, the wheels need to be replaced with rubberized ones, setting the wings to the widest position. Having placed the unit between the rows, they walk the entire row with a walk-behind tractor, covering the planted potatoes with soil.
Setting up the disc hiller primarily involves its correct direction relative to the furrow. The device must be positioned parallel to the beds with a given angle and working width.
This is what will determine the depth of tillage (furrow depth). If a moving-type hiller is installed on a walk-behind tractor, it is necessary to adjust the width and height of the ridge.
In the disk model, you can adjust the processing width. To do this, the lower points of the disks are moved to the sides by approximately 40–70 cm (the specific value will depend on the row spacing). When setting up, make sure that the disks are positioned symmetrically with respect to each other.
The soil is treated with such devices three times per season:
- when the seedlings grow to 15 cm;
- when they grow to 23–25 cm;
- at the moment of flowering.
Disc hiller design
Externally, a disk hiller looks like a frame on two wheels with two disks suspended from it. These devices can perform several tasks : soil cultivation before sowing crops and after harvesting, inter-row cultivation, hilling. You can install such a hiller on a walk-behind tractor or cultivator.
The disc hiller includes :
- T-shaped leash;
- two screw lanyards (they regulate the angle of rotation of the disks around the vertical axis);
- two racks;
- two disks.
Thanks to the adjustment of the racks, you can change the distance between the edges of the disks.
This allows you to set the width between the rows as needed (from 35 to 70 cm). It is also necessary to set the disks to equal rotation angles (this is done by adjusting the lanyards). Without this, the hiller will pull to the side. The inclination of the disks to the vertical is not adjustable and is almost always constant.
For walk-behind tractor wheels, a diameter of about 70 cm and a width of 10-14 cm are recommended. In this case, the wheels will not damage the plants during hilling.
Recent Entries
Chainsaw or electric saw - what to choose for the garden? 4 mistakes when growing tomatoes in pots that almost all housewives make Secrets of growing seedlings from the Japanese, who are very sensitive to the soil
Attachments for planting potatoes with a walk-behind tractor
Attachments to a walk-behind tractor are used to perform various tasks, such as planting, weeding or hilling crops. To plant potatoes with a walk-behind tractor, a hiller or a mounted potato planter is most often used. These devices differ from one another both in appearance and in the way they are used. The second option can be called more automated. Let's look at them in more detail.
PHOTO: akimov-ip.ru There are a great variety of attachments for walk-behind tractors
Related article:
How to plant potatoes with a walk-behind tractor and hiller
A hiller is a device for a walk-behind tractor that is capable of making furrows in the ground. Their depth is adjusted by the operator. The hiller can be single-row or double-row. Planting potatoes in the ground using a hiller can be called partially automated. After all, after the furrow is ready, you need to manually place the seed material into it, and then cover it with earth. Of course, the hiller successfully performs the most difficult work (manually digging holes), but planting, especially if the area is quite large, will take a lot of time. That is why most often a device such as a potato planter is used for such purposes.
PHOTO: agro-ambar.ru Potato planter speeds up the process significantly
Potato planter: principle of operation with attachments
The potato planter allows you to fully automate the process.
If we divide this attachment into parts, we can distinguish 4 main ones:
- a hopper into which seed material is poured;
- mechanism for feeding it;
- loosening plow;
- mechanism that fills the furrow.
When using a potato planter, it is only important to correctly install the attachment on the walk-behind tractor and adjust the depth dimensions. If everything is done as it should, the operator will only have to pour the seed into the hopper, start the walk-behind tractor and monitor its operation, setting the direction of movement
The potato planter, which will be pulled by the walk-behind tractor, will independently make a furrow, place seed material in it and cover it with soil. In terms of time, we can say that on average the operating speed of a potato planter is about 12 acres per hour. Small errors may be due to the density of the soil, the model of the walk-behind tractor, or the size of the seed material.
PHOTO: mup-apu.rf Such equipment can be made with your own hands
In order for the reader to understand the process, we suggest watching a short video about planting potatoes using a walk-behind tractor.
Watch this video on YouTube
However, it is not enough to plant potatoes on the plot. During the season it will need to be hilled, weeded, and then also dug up. Let's look at other equipment for the walk-behind tractor that will help perform these works.
Kinds
Hillers are attachments that help hill up plants. In addition, a similar attachment is used to create furrows, place seeds in them, and then cover them with loosened soil. Hillers can be of different types.
- Listernye. They are a model with a constant row width, that is, two fixed wings look like a monolithic structure. With the help of such an attachment, hilling occurs with the formation of a row 20-30 cm wide. A cultivator equipped with lister equipment does not change the width of the soil, and therefore the row spacing will have to be adjusted to the existing equipment.
- At the nozzle with a variable cutting width, the working knives have an adjustable design and are able to move, changing the width between rows at the discretion of the owner. For such an attachment, the cultivator must have a capacity of at least 4 liters. With.
In this case, disc hillers can be considered more effective. Anyone who has tried to work with them is unlikely to prefer other equipment
When choosing disk attachments, you should pay attention only to high-quality models made of alloy steel of the largest sizes. Their bulk ridges are much higher.
The Dutch type hiller does not have the same performance as a disk hiller, but it is much better than conventional equipment, since the wings are capable of moving not only when turning, but also vertically.
- An active (propeller) hiller can compete with a disk hiller in terms of efficiency. With the help of its propellers, it loosens the soil and grinds weeds. Its mounds are of better quality and airier.
- A plow-shaped hiller is often used for working with potatoes. It can be single-row or double-row, that is, it differs in the number of rows processed. With a two-row hiller, the work is more intense and it is more difficult to control. Its wheels should be changed to lugs with a larger diameter.
Kinds
Manual and automated hillers can be divided into the following types:
disc is a simple tool suitable for one person;
It is clear that disc options are easier to use; they are also often automated by coupling with motor vehicles. The ridges of the earth after the disc hillers are higher. There is also a negative point in these devices - the price. Compared to a plow hiller, it is four times higher. Externally, the tool looks like a frame with wheels on which disks are suspended. The distance between them can be changed in accordance with the width of the rows. The discs are set at a certain angle, which is not recommended to be adjusted relative to the vertical. Without a constant equal distance between the circles, the tool will pull sideways.
The simplest type of hand plow has a predetermined working width, wings (ploughs) shifted relative to each other, which are motionless. This is convenient if the row spacing has already been determined and the tool fits them. Another advantage of hillers with a fixed working width is the ability to use them with light cultivators weighing up to 30 kg. The advantage lies in its compactness, and the negative side lies in the limited work in wet areas. Here the tool will stick in the soil.
A hiller with variable working width is the most common option. The adjustment mechanism is simple, but it allows you to move or extend the wings, adjusting them to the desired width to the row spacing. The tool can also be automated, but only with heavy walk-behind tractors. The wings of such a hiller push the earth in both directions at once. After the tool passes, the part falls back into the line that it cuts. For a more efficient harrowing process, a more powerful walk-behind tractor is required, otherwise pulling the hiller will seem harder than working with a hoe or hoe.
Let's look at the features of each of them.
They have a fixed soil width and are used on very light motor cultivators with a power of up to 4 horsepower. Capable of cultivating beds measuring 25-30 centimeters in width, they are equipped with two side wings and a thin stand. The stand protects the equipment from overloads and mechanical damage.
This tool can only be used on dry soils, since adhered soil will interfere with the operation of moving structural elements. There are lister devices with adjustable tillage width. They are installed on motorcycles with higher power – from 4 horsepower. Such units can be safely used on wet soil.
Propeller
The principle of operation is the activity of the propeller parts. Under their influence, the soil is first dug up and weeds are removed, and only then the beds are loosened. These modifications are mainly practiced for motor cultivators with front-wheel drive and two speeds. This is due to the fact that at second speed the power increases to 180 rpm.
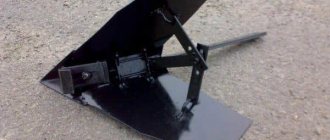
Double (2-row)
It cuts two furrows before planting crops, and is also used for hilling and loosening the soil. Includes a frame on which 2 hillers are fixed. When cultivating land, it significantly saves time, since it has two working elements. Mounted on a walk-behind tractor using a hitch. Due to the fact that such a device requires a lot of resistance to operate, it is used in conjunction with lugs.
Read more: Grapes in Memory of a Surgeon variety description
Rotary active
Instead of wheels, this implement is equipped with rotors with screw-type teeth. Demonstrates high performance when creating, loosening and hilling potatoes. Suitable for use with 3-speed units (two forward and one reverse). In the first gear, the implement hills up the plantings, and in the second gear it also removes the soil from the space between the rows of plantings.
Single row
The most common type. Suitable for use with light soil types. Cutting ditches is carried out after completion of the preparatory loosening of the soil using a cultivator.
Technology for planting potatoes with a walk-behind tractor
Tips for correct landing of Pro, Viking, Crosser, Patriot, Cayman walk-behind tractors:
- The row spacing when planting potatoes with a walk-behind tractor should be from 55 to 65 centimeters.
- The furrows must be made even, this will simplify the care of the root crop.
- Before planting, you can fertilize the soil.
- The distance between tubers is 25-30 cm.
The depth of planting potatoes under a walk-behind tractor is 10-12 cm.
When planting potatoes with a walk-behind tractor, make the distance between the rows the same. Watch the track width, it should be uniform. When cutting furrows, try to make them even. If necessary, pull the ropes to navigate along them.
Let's consider the main methods of planting: using a hiller, a mounted element - a potato planter, planting under a plow, planting in a ridge.
How to plant correctly with a hiller, at what distance and depth
To plant using a hiller, wheels with lug elements are placed on the motor cultivator. A Tarpan motor cultivator is a good choice. The furrows are being cut. Potatoes will have to be planted manually. After disembarking, replace the lugs with standard rubber wheels.
Rearranging the wheels is necessary in order not to injure the seed. The track width is left the same - 55-65 centimeters, and walk along the furrows again. The walk-behind tractor will fill the row with soil and compact the seed.
Planting with a hiller is a less expensive option. The unit should only include metal and rubber wheels and the hiller itself. The inconvenience lies in manual planting of potatoes. For large sown areas, a mounted planter for a walk-behind tractor is used.
This method is considered the least labor-intensive. The unit includes:
- A conveyor is a kind of conveyor that supplies seed.
- Furrow maker, for laying furrows.
- Dispenser for feeding potatoes at certain intervals.
- Disc hiller that lays and fills furrows.
How to plant with a potato planter
By planting potatoes with a walk-behind planter, you can save three times as much time as when planting with a hiller. The process is completely mechanized. Potatoes are planted and hilled at the same time. The potato planter has its disadvantages.
Firstly, seed material should be selected more carefully. The tubers should be the same in size. Young shoots are not very long. Otherwise, the seed will be injured during planting. Secondly, this planting method is more expensive.
Together with a walk-behind planter, you can use a special device to simultaneously apply fertilizer to the hole, along with the seed.
Planting with a plow
You need to install lug wheels and a plow on the walk-behind tractor. The soil is prepared by loosening using a milling cutter. The plow for planting is inserted into the ground to the depth of the spade bayonet.
It is more efficient for two people to board. The first one controls the walk-behind tractor, and the second one places the potatoes in the furrow. The work is done promptly. During the first passage of the row, seed material is laid. And during the return journey, the sown furrow is covered with soil from the newly plowed one.
Landing on ridges
Planting potatoes in ridges with a walk-behind tractor is practiced in areas where groundwater is located very close to the surface. To do this, you should use a walk-behind tractor to form ridges 15–20 cm high. The tubers are planted in the ridge. This option is only suitable for well-moistened soils.
Self-production
Lister hiller
Then their seams are welded and processed to create a perfectly smooth surface. In the future, these tools can be used for single-row tillage. You can make two such devices, which can later be used for double-row processing of potatoes.
Disc hiller
Manufacturing stages:
- Old lids need to be sharpened along the edges.
- Next, using a hammer, we bend the disk elements: one side should be convex, the other concave. This is done so that the device can calmly rake the soil and sprinkle the plants with it.
- Tarleps, racks and a T-shaped leash must be fastened together with special fastening bolts and welded.
- Disc wheels are connected by adapters.
- Disc elements must be installed so that the space between them is the same as the distance between the rows.
- The tarlap allows for regulation of the vertical rotation angle of the disk elements.
- As a result, the entire device is fastened through a leash to the walk-behind tractor bracket using bolts with flat washers and a locking element.
So, the disk hiller is assembled. It turns out that you can easily assemble it yourself using scrap materials. In this case, you can save a decent amount of money.
A disc hiller for a walk-behind tractor is a convenient and necessary thing in agriculture for hilling, loosening, planting potatoes and other agricultural plants. It will provide convenient and comfortable work when digging up large areas of land. You can easily make it yourself. The main thing during manufacturing is to follow the entire sequence of actions. As a result, you will get a convenient tool that will serve you for a long time.
Basic selection rules
When choosing equipment for hilling potatoes, you need to proceed from the following parameters:
- Growing area. The larger it is, the more complex the tool needed: on 3-5 acres of dacha you can work with a hoe or hoe - but on larger areas more complex mechanisms are needed.
- The propulsion device used. For manual hilling, you can use a simple sheet or disk hiller, but for a walk-behind tractor you need a specialized attachment. For industrial cultivation (starting from 20-30 acres or more), you can either use special models of hillers for a tractor or at least a horse - or use a simple plow with ordinary shares: they are worse than normal hillers - but more affordable.
- The soil. The heavier it is, the more often you need to hill up the potatoes - and the greater the need for a special tool. On the sandy soil of the eastern Belgorod region, an ordinary hoe is enough - but just forty to fifty kilometers to the east, on the dense clayey chernozems of the Voronezh region, it is already advisable to use a specialized hiller.
PLANTING POTATOES WITH A MOTORBLOCK USING A DOUBLE-ROW HILLER
So, we have prepared the garden, now you can start planting potatoes with a walk-behind tractor. To do this, instead of cutters, we will install lugs, having first put iron extensions on them.
On the Neva-MB2 it is necessary to remove the wings before doing this. We remove the central stop from the walk-behind tractor and hang the hitch in its place.
Everything is done very simply, just insert metal pins into the holes. We attach a two-row hiller to the hitch. Before this, we make the distance between the hillers equal to 65 cm, this will be the width between the beds.
Let's mark the garden with a special marker that we will make with our own hands.
To do this, screw short pegs to a long wooden handle with self-tapping screws so that they resemble a rake. In total you need 3 pegs, the distance between them will also be 65 cm. Take a marker and draw stripes with it. To maintain the distance, you need to let the outermost peg follow an already drawn line.
Let's adjust the cultivator to the marking and press the first speed to cut the furrows.
Using the hitch, you can change the position of the hiller, thereby increasing the depth of processing. To do this, you need to tighten the adjustment knob. Having reached the end of the garden, we turn around and go in the opposite direction.
You can put one hiller into an already made furrow, or you can, if the soil is soft, follow the marked lines. Having cut as many furrows as necessary,
Let's start planting potatoes. We throw the pre-sprouted tubers into the bed, maintaining a distance of 35-40 cm between them.
Before this, it would be good to treat them with a special composition against the Colorado potato beetle, it is called Prestige. Looking ahead, let's say that the method works, the beetle is not on the leaves for a long time. But when the drug stops working, a few larvae still appear.
Having planted the potatoes in the furrows, we will begin to fill them up. Before this, on the hiller we will increase the working width of the wings, spreading the blades as far as possible, if the design of the equipment allows this. Let’s place the equipment opposite the ridges and, at first speed, cover the potatoes with earth.
This operation requires some skill, since you have to control two ridges.
To make it easier, you can remove one hiller and place the second in the center.
Instead of lugs, we will install rubber wheels. Let's direct the cultivator in the center of the ridge and fill up the potatoes in the same way, bed by bed. If you do not have a two-row hiller, all the work of planting potatoes with a walk-behind tractor can be done in a single row. But for this, the width between the ridges must be made equal to 70 cm. This size is optimal. At the end, if there are any unevenness, we will correct the beds with a regular hoe.
Watch the video
Making a hedgehog hiller with your own hands
Making your own hedgehog weeder for a walk-behind tractor will be more difficult than a disk or list type hiller. Therefore, before starting production, it is worth preparing more thoroughly by watching several video and photo instructions for various “homemade products”.
First, from sheet steel 5-8 mm thick, using a grinder, you need to cut 2 circles with a diameter of 27 cm and 2 circles with a diameter of 6 cm, level the edge and sand it well. Having determined the center of the large disks, cut circles of smaller diameter (about 15-16 cm) into them to form rings. In order to cut out the inner circles, you will need a plasma cutter or drilling machine. The edges of the rings and the resulting middle discs should be leveled and cleaned. Drill a hole of about 2 cm in small disks; a drill and a metal crown are suitable for these purposes. Using a drill and a metal drill, you need to drill holes for attaching the spikes. There are about 15 pieces in the rings, 10 in medium disks, 5 in small disks. Next, use a grinder to cut the edges of the disks and rings to the holes. The blanks should be shaped like gears. Now you need to make the hubs. For this, a steel pipe with a cross-sectional diameter of 25 mm and 4 bearings suitable for the inner diameter of the pipe are suitable. Use a grinder to cut 2 pieces of pipe, grind the edge and inner surface on both sides, insert bearings. The middle disks in the center are bored on a lathe to the diameter of the hubs. The disc should fit tightly onto the hub, but can be removed without additional tools. On a lathe, make thrust bushings (boots) covering the bearings. Two bushings should match the diameter of the axles, and two should fit the 10mm bolt. We start the assembly with the axle, put the bushing on it, then the bearing, spacer bushing and bearing with the hub. A bushing with a smaller hole is placed on top, and the entire structure is secured with a bolt. The second hub is assembled in a similar way. You can start cutting tenons 6 cm long. For them, take steel wire with a diameter of 12 mm and cut it at an angle of 45° from one end. The number of such blanks needed is equal to the number of cutouts for them prepared on the disks and rings of the future hiller. Grind down the uneven cut edges of the tenons using sandpaper. Weld them to the discs and rings. The “hedgehog” assembly stage includes installation of rings on the hubs (using templates: a bushing and a washer welded to it along the inner diameter of the rings), medium and small disks
You should pay attention to the fact that all the spikes “look” with the cutting edge in one direction, in the direction of movement. The installed parts are fixed by welding. Make spacer rods from wire with a diameter of 12 mm and weld them to the spiked parts, 6 for each hiller
Remove the templates, adjust the disks and weld everything again. Weld mounting bushings to the free end of the axles. Paint the structure to prevent corrosion. For the resulting “hedgehogs”, a frame from a disk hiller will be used, under which it is necessary to make brackets from a rod with a diameter of 30 mm and homemade bushings with a hole for a 16-mm bolt. Screw the hillers with bolts.
Knowing the principle of making homemade hillers, we can draw a conclusion about which hiller is the best at work and which one is easier to assemble. The technology used is the same, with the exception of small details for each type of hiller. The setup of the device depends on the assembly method and type of equipment. By not buying factory plows, but by making them yourself, you can save money.
What hillers for a walk-behind tractor do you use for cultivating potatoes or other vegetable crops?
Mechanized care of potato beds
For better potato growth, it is necessary to hill them, that is, sprinkle the stems with loose soil. During the season, this procedure is performed 2-3 times:
- The first hilling is carried out when the height of the bush is 15 cm, i.e. in the middle - end of May. The height of the ridge should not exceed 10 cm.
- The potatoes are earthed up the second time when the plant height reaches 20–25 cm, i.e. two weeks after the first earthing up.
- After 10–14 days, you can repeat the procedure again. Now try to pour the soil as high as possible.
The most convenient way to hill potatoes is with a walk-behind tractor with a disk hiller.
Hilling potatoes with a walk-behind tractor significantly reduces the amount of time spent on this type of work. They do this as follows:
- A hiller is installed on the walk-behind tractor, the angle of attack (rotation) of the device is adjusted and the depth of its immersion is adjusted.
- Rubber wheels are replaced with lugs.
- The unit is installed exactly in the center of the row spacing.
- Movement is carried out at the lowest speed of the walk-behind tractor.
Video: hilling potatoes with a walk-behind tractor
Motor or yourself?
Hilling can be carried out in half a row (top right in the figure at the beginning), when each bed is wrapped with earth in 2 passes, and immediately in a row (bottom left in the same place). Hilling in 2 passes in half a row is useful only for individual crops grown on a thin fertile layer under conditions of insufficient moisture: the depression on the crest of the dump prism serves as a moisture trap. Effective hilling of potatoes is carried out only immediately in a row.
Manual hilling by one worker is only possible in half a row on light, loose, poorly moistened soils, up to a width of 30-35 cm. Already for hilling potatoes on ordinary garden soil without mechanical traction, at least two are needed (item 1 in the figure below ): the front one creates the actual traction, and the rear one maintains the furrow and the depth of cultivation. A great exercise for feminists who want to prove themselves no worse than vile male harassers. But liberal-tolerant ladies prefer public events, online or in kind. Maybe because there is no useful work to be done there? And for something useless you can bargain for more payment, because... 100% reliable criteria for assessing unproductive work are impossible in principle. But let's get back to the topic.
Possibility of manual and mechanized hilling depending on the source of traction
Having a walk-behind tractor with a power of 0.5-1 kW at your disposal will make it possible to hill potatoes in a row, pos. 2 in Fig. Motoblock Neva, etc. will pull a 2-body hiller for a working width of up to 0.8 m, pos. 3, according to the pattern 0.5 row + 1 row + 0.5 row. On any mini-tractor you can attach a 3-body hiller of the same type (item 4), for processing 0.5 + 1 + 1 + 0.5, or a 2-body hiller for processing 1 + 1. Labor productivity increases, per 1 pass, 2-3 times compared to hilling in a row, but the cost of purchasing special equipment increases significantly. Therefore, further we will focus on how to make a hiller for a walk-behind tractor with your own hands, with the possibility of using it “by gravity”, and how to make a manual hiller for small areas, approx. up to 20 acres.
Note: although mounted implements for mini-tractors are generally not the topic of this article (mini special equipment is purchased by competent, already prosperous owners), but if you suddenly got a tractor, below we give a video on how to make a 3-row hiller for a mini-tractor yourself. tractors:
And about the results of his tests:
Disc or ploughshare?
In large-scale agricultural technology, at least 10 types of hillers are used. There are hundreds of patents for this type of mounted implements for cultivating land, and more are being added. But, taking into account the capabilities of home technologies and the requirement to work also on human muscular traction, the choice of prototype turns out to be small: it is a hiller or a general-purpose plow, or a disk for potatoes. For more information on both, see below, but for now let’s see in what conditions which one is better suited. The most important of them is the granulometric composition and physical properties of the soil. If your plot is on loose, non-sticky sandy or sandy loam soil (which, as you know, is best for potatoes), then you can, without further ado, build a manual mini-hiller for light soils, which you can work with alone, see for example. video:
or a manual hiller for light soils, which may have to be pulled by two people:
In all other cases, you will have to take into account the features of weapons of pre-selected types. For a plow hiller they are:
- The required traction force depends relatively weakly on the type of soil - two moderately developed people pull a single-body plow hiller with a body of type 2 (see below) over medium-moistened black soil, but it is quite large - you cannot pull this tool alone.
- The second worker driving the furrow must be quite experienced, otherwise the implement’s share may “dive” and get stuck in the ground or move to the side and cause a blemish.
- The plow hiller is multifunctional, because You can install a variety of working parts on its frame, see fig..
Replaceable working parts of the plow hiller - The maximum grip of one body (share) does not exceed 400-450 mm.
- A plow hiller is of little use for hilling potatoes on light, loose soils—the raised soil crumbles. The blade prism is obtained with a height of less than 250 mm and with a hollow along the ridge, while a blade for potatoes is needed with a height of 300-350 mm and with a sharp ridge.
- High hilling in 2 half-rows (2 passes along each row spacing) is impossible - the ploughshare tears the roots of the plants.
- Having stumbled upon a stone, a thick root, etc., the plow hiller clings to it and gets stuck.
- When traction from an agricultural winch driven by an internal combustion engine over heterogeneous soil, processing flaws are inevitable.
- Technologically, the plow hiller can be completed entirely at home.
The disc hiller has a mark. peculiarities:
- The worker's qualification requirements are minimal: a correctly configured disk hiller (see below) automatically maintains the specified processing parameters.
- On light loose soils, the traction force required is less than for a plow.
- On medium and heavier soils the situation is opposite.
- On silty, heavy alluvial, etc. The disc hiller will not last on sticky soil and neither will the tractor - the engine will stall, the hitch will break or the implement will break.
- On soils that are optimal for potatoes, high hilling immediately in a full row with a sharp prism ridge is possible manually.
- The working width of a single-row disc hiller is up to 630-650 mm.
- High hilling in 2 half-rows is possible: discs running close to the root ball either roll over the roots or damage them imperceptibly for the plants.
- Having encountered an obstacle, the working parts roll over it. A small mistake is possible, but there is no forced interruption in work.
- When pulled by a winch, with an internal combustion engine or electric, it works just as well as when pulled directly.
- For manufacturing, you need purchased or custom-turned components, see below.
Finally, you need to take into account the fact that potatoes are an excellent insurance crop for any type of farm. Potatoes cannot be called a record holder in terms of profitability, but the demand for “second bread” is stable, and the shelf life of potato tubers makes it possible to sell the crop with the highest possible profit. Therefore, a significant share of the total area is allocated for potatoes in complex agricultural enterprises. Which one exactly is a matter of economics in relation to specific local conditions, but first of all it makes sense to make a disk hiller. The exception is the case if your area on the ground is above average gravity, and you have not yet acquired mechanical traction.
Instructions
In fact, planting potatoes using a walk-behind tractor is not difficult. You must clearly follow certain instructions and you will definitely succeed.
Site preparation
Planting potatoes using a walk-behind tractor is carried out only after the soil has been processed. First, the site needs to be plowed and then booked. This will allow the soil to become saturated with oxygen and become lush. To plow the soil, special cutters or a plow are used.
To chop the breasts, you can use a walk-behind tractor or a regular rake. Of course, the second option is suitable if the garden plot is small. There are models of walk-behind tractors that loosen the soil while plowing to a depth of 20 cm. So sometimes there is no need to make a reservation
When preparing the site, it is also important to understand which vegetables can be planted after which
The video shows the preparation of the site for planting potatoes:
Processing should be done from the edge of the area. Then plow 2 m of soil, which is located perpendicular to the furrows. If you want the entire garden to be plowed to the same depth, then use a plow to grab part of the already prepared soil.
Now you can outline the rows. In order for potatoes to grow well, it is necessary to achieve free row spacing. A distance of 60-70 cm must be maintained between the rows. Everything here is determined by the type of potato. When the holes have been prepared, the potatoes are planted directly using a walk-behind tractor. You can also use fertilizers, but this article will help you understand how to prepare fertilizer from quail droppings.
Preparing the unit
Before performing work, you need to prepare the motor cultivator itself. Instead of cutters, lugs will have to be mounted on the machine. But instead of the central stop, a hitch should be installed there. All these activities are completely easy to carry out. Now install metal pins and a double-row hiller into the existing holes. You can set the required row spacing on it.
To plant tubers, you need to use a distance of 65 cm. If you decide to use other types of hillers, then they should be installed in the same way according to the instructions.