Measurements during the design and manufacture of threaded connections
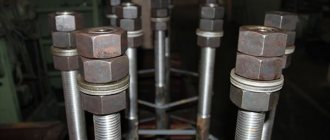
The “bolt-nut” type connection is one of the most common in mechanics. When designing and manufacturing structures, the problem of how to measure a bolt with a caliper is often difficult.
Before starting work, it is worth remembering that the main dimensions of a bolt/nut are the length of the product and the diameter of the thread. A standard bolt of any design does not require such measurements. It’s a different matter when the bolt is made at home, or you need to measure the fastener without dismantling the connection. The following situations are possible here:
- Between the head and the opposite end of the rod there is a plane or part/plate, the dimensions of which do not allow the insertion of the measuring jaws of a caliper. In this case, using the main measuring scale and a depth gauge (sometimes called a “Columbic”), the height of the head, the thickness of the washer (if any), the thickness of the intermediate element and the height of the part protruding from the opposite side of the joint are determined. The obtained result is added up, and then, according to the tables of correspondence between the lengths of the rod and the “turnkey” dimensions that the bolt has, the standard size of the fastener is determined.
Measuring internal threads and imprinting threads
Thread pitch measurement
Thread inspection devices
For comprehensive control and measurement
external metric threads use rigid limit ring gauges (GOST 17763-72 and GOST 17764-72), as well as threaded clamps. Internal threads are controlled using thread plug gauges (GOST 17756-72 and GOST 17759-72). When using threaded plug gauges and rings, the pass gauge acts as a complex meter. A no-go gauge is used to measure the limiting size of the average diameter.
Ring gauge M 1.1x0.25 6h PR for complex control and measurement of external metric threads
During element-by-element inspection
the outer diameter of the bolt is checked with any instruments that are usually used to control the diameter of shafts. And the inner diameter of the nut is used for hole control.
To control the average diameter, contact and non-contact methods are used. The first is based on the use of micrometer inserts or three wires.
Measuring mean diameter with thread micrometer inserts
A thread micrometer with inserts is used to measure the average diameter of a triangular thread with profile angles of 60 and 55 degrees. The measurement is carried out in the range from 0 to 350 mm. For each 25 mm interval, either a separate micrometer or special interchangeable anvils are used.
Threaded micrometer MVM-50 GRIFF with inserts for measuring average diameter
The standard kit includes two inserts: a prismatic one, which is placed instead of the micrometer heel, and a conical one, installed in the hole of the micrometer screw.
The micrometer can be equipped with one of five sets of inserts, which are selected depending on the pitch of the thread being tested: 0.4–0.5; 0.6–0.8; 1–1.5; 1.75–2.5; 3–4.5 mm.
Monitoring the thread pitch and profile angle using indicator measuring instruments
The thread pitch and profile angle are measured using microscopes and projectors. In this case, the average diameter of the internal thread is controlled:
- indicator devices with sliding half-plugs;
- indicator devices with sliding inserts;
- horizontal optimeters using measuring arcs with ball measuring tips.
It is convenient to measure the dimensions of parts during processing using an indicator device. Thanks to the special design of the stop bar, this device allows you to install the indicator holder in a convenient place. The device is universal and can be used both for boring and turning.
Indicator device for active dimensional monitoring during lathe processing
The use of indicators and setting rings with the nominal size of the hole being machined reduces the time for preliminary operations and ensures high accuracy in measuring the internal dimensions of the thread.
When processing holes, the cutter is adjusted according to the indicator to remove the first chip with an allowance of 0.1–0.2 mm per side. After this, the indicator readings are measured, and the first chips are removed. The resulting hole size is measured with an indicator device adjusted to the setting ring with the nominal hole size. When setting up, the indicator device is set to zero.
After measuring the hole, they determine which layer of metal needs to be removed to obtain the final size of the hole. Then, according to the indicator, the cutter is installed under the boring of the finishing hole. This measurement method simplifies boring holes according to accuracy classes 2 and 3.
If the batch of parts is large, it is more convenient to first perform preliminary boring of all products with an allowance of 0.3–0.5 mm per diameter, and then complete the finishing boring in one pass with a rigid cutter. The use of indicator devices allows you to work confidently and with great accuracy. However, the indicator does not eliminate the need to use maximum calibers. Measuring the thread with a gauge is a mandatory procedure that is required for final size control.
Measurements of the dimensions of the pattern on the protectors
How to measure tire tread if you need to assess the degree of wear? A depth gauge will help, which takes measurements along the entire tire tread. It should be taken into account that wear is almost always uneven, and the number of measurements should be at least 3...5, and on evenly distributed areas of the tire tread for assessment. Before measurements, the tire should be thoroughly cleaned of dirt, dust and fragments of small stones stuck inside.
Measuring tire tread with a digital depth gauge
Sometimes you need to solve the problem of how to measure the tire tread with a caliper to determine the degree of uniformity of wear. This establishes the wear of the tread tires not only in depth, but also along the radius of transition from the circle of protrusions to the circle of depressions. They do this. The depth of the pattern on the new tire tread is measured, and then the linear size of the visually changed zone on the used part. The difference will determine the degree of wear and help you make the right decision about replacing the wheel.
All measurements are made with a depth gauge, which must be installed strictly perpendicular to the tire tread.
Measuring tread wear with a Columbian
Diameter measurements
How to measure diameter with calipers? There are parts with a constant and variable cross-section along the length. The latter include, in particular, reinforcing bars. How to measure the diameter of reinforcement with a caliper? It all depends on the reinforcement profile, which can be:
Measuring the inner diameter with a caliper
It is easiest to measure such reinforcement parameters in the second case. First, use external measuring jaws to determine the height of the protrusions of the profile, and then use a depth gauge to determine the size along the depression. Measurements must be taken in two mutually perpendicular directions, since reinforcement, and even not produced at specialized enterprises, often has an oval cross-section. After this, the most suitable value is found using tables of standard reinforcing profiles (special accuracy is not required here). How to measure the diameter of reinforcement with a caliper if it has a different type of profile? Here, instead of the diameter of the protrusions, the diameter of the protruding part of the crescent-shaped notches is determined, and then proceed in the same way as in the previous case.
Measuring the outer diameter of a pipe
When measuring the internal dimensions of pipes, use the internal measuring scale of the tool. How to measure the thickness of a pipe with a caliper, especially if the gap is small? It is enough to calculate the difference between the outer and inner diameters and divide the result by two.
Screen thread gauge for Android
Even an ordinary smartphone can replace a thread gauge in everyday life. To do this, you need to download the Android application “Thread pitch meter. Thread gauge" from the developers of the Smart Tools toolkit. Simply apply a screw to the screen, look for the exact match of the turns and find out the pitch. Various types of threads are available in the mobile application: metric, inch and pipe standards.
Determining the size of a fastener is often difficult. Without the necessary knowledge and skills, it will take a lot of time to select the appropriate hardware. At first glance, it is enough to find the thickness, length and diameter of the product. But even when choosing simple bolts and nuts, various questions arise.
The main parameters by which the type and size of the fastening element are determined are length, thickness and diameter (in some cases, height).
The diameter of the product is indicated by the letter “D”; it can be written in both capital and small letters (from the abbreviation “diameter”). Accordingly, length is “lenght”, so the letter “L” is used for the designation. For thickness, the concept of “stoutness” - “S” is used. If you need to specify the height, then the letter “H” is indicated, which means “high”.
Let's move on to some features that are encountered when measuring the main types of hardware.
Linear dimensions measurements
How to measure linear dimensions using a caliper? It all depends on the material of the part/workpiece. For rigid elements, the product is pressed tightly against some support plate, after which the measurement is taken with the external measuring jaws of the tool. You must first determine the suitability of the existing type of caliper for use. For example, the main measuring scale on the rod should be less than 25...30 mm longer than the part (taking into account the own width of the jaws). When using a depth gauge, this value is even smaller, since the length of the frame should also be taken into account (for the most common tools 0-150 mm and an accuracy of 0.05 to 0.1 mm, this parameter is taken to be at least 50 mm).
Read also: What can be made from a screwdriver motor
How to measure the cross-section of a wire with a caliper? Non-metallic products are flexible, and therefore significantly distort the result obtained in the usual way. Therefore, a rigid steel part (screw, nail, piece of rod) should be inserted into the cambric, and then the cross-sectional diameter of the wire should be determined using external jaws. Do the same if you need to find out the internal size of the wire.
Wire diameter measurement
The question - how to measure a chain with a caliper - is often asked by cyclists, since chain wear, defined as the distance between its adjacent links, makes it possible to decide whether to replace the product. The outer jaws are set at a distance of 119 mm and inserted into the link, after which they are stretched to the sides until further increase in size is impossible (to facilitate the work, the chain can be pre-loaded with a tensile force). The deviation from the original size will show actual wear, which must then be compared with the maximum allowable.
If you find an error, please select a piece of text and press Ctrl+Enter.
Vernier calipers belong to the class of universal high-precision measuring instruments. This device is designed to determine the external and internal dimensions of small parts, hole depths and other parameters. Knowing how to measure with a caliper, you can easily establish the linear values of any objects, including threaded connections on hardware.
Methods for measuring wire diameter
In order to calculate the cross-sectional area of a conductor, you need to know its exact diameter. There are several ways to measure wire diameter. These include measurements:
- Using a caliper: to do this, you need to understand the principle of operation of a caliper and be able to take readings from its scales. In this case, the use of an electronic measuring device allows you to simplify measurements - it will show the exact diameter value on its screen.
- Using a micrometer: This device gives a slightly more accurate reading than a mechanical caliper, but it also requires some skill to take correct and accurate readings.
- Using a regular ruler: this method is suitable for those who do not have measuring instruments such as a caliper or micrometer in their arsenal. Measuring the conductor diameter using a ruler will not be very accurate, but it will be possible to roughly estimate the diameter.
To measure the diameter of the conductor, first of all, it is stripped of insulation with a knife or stripper. Next, if a micrometer or caliper is used, the wire core is tightly clamped between the jaws of the device and the size of the conductor is determined using the scales of the device. When using a ruler, the insulation is removed to a distance of 5-10 cm and the core is wound around a screwdriver. The turns of the conductor should be pressed tightly against each other (approximately 8-20 turns). Next, the length of the wound section is measured and the resulting value is divided by the number of turns - you get a more or less accurate diameter value.
Features of using a caliper
The convenience and ease of use of this tool determine its widespread use not only in the industrial sphere, but also at home. There are three types of calipers: vernier, dial and digital, differing in their design. The first option is the most popular. Such a tool has a mechanical structure, so there is nothing to break there. With careful handling (it is necessary to protect the device from deformation and rust), its service life is practically unlimited.
The Vernier scale allows you to measure with a caliper like a micrometer, that is, up to tenths of a millimeter. The design of the instrument provides for the possibility of fixing the measured object both from the outside and from the inside, due to which the probability of error is reduced to zero.
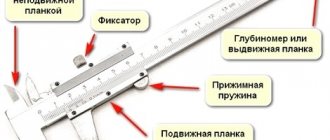
Structural elements of devices
To understand how to measure with a caliper, you need to understand its design. The instrument received its name in honor of the rod on which the main scale is located. An additional scale is a vernier, designed to determine tenths or hundredths of a millimeter when it is necessary to obtain the most accurate results.
The design of a mechanical vernier caliper consists of:
- rods with main scale;
- movable frame with Vernier scale;
- sponges for measuring internal surfaces;
- sponges for measuring external surfaces;
- depth gauge rulers;
- screw for fixing the frame.
Some models have a dual scale that allows you to measure with a caliper in both millimeters and inches. The remaining design elements, as a rule, do not differ.
How to correctly measure external surfaces with calipers
To obtain accurate data on the external dimensional parameters of an object, it must be fixed using the lower jaws of the tool. This operation is performed by first expanding the jaws to a slightly greater distance than the size of the part being measured, and then moving them until they stop at the surface of the product. After the lower jaws of the caliper are securely fixed on the outer surfaces, the control point on the moving scale will take a certain position on the main scale and will show the size of the part.
Measuring threaded connections
Determining the dimensions of the internal and external surfaces of parts is a simple operation and familiar to many from school labor lessons. But not everyone knows how to measure a thread with a caliper.
This procedure may be required in different cases, for example, if the bolt is non-standard or it is necessary to measure the fastener without dismantling the threaded connection. Below are examples of how to measure bolts and nuts with calipers in various situations.
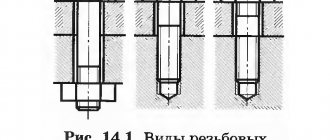
- Determining the length of the bolt screwed into the part. This operation is performed using a depth gauge. The height of the bolt head, the thickness of the washer (if any), the thickness of the intermediate part and the height of the part of the bolt rod protruding from the back side of the part are measured sequentially. The obtained values are summed up, after which the standard size of the fastening element is determined using special tables for matching the lengths of the bolts and the sizes of their turnkey heads.
- Determination of thread diameter. This parameter is measured by the protrusions, and not by the grooves of the thread. A bolt is placed between the jaws of the caliper in a vertical position and measurements are taken. If the obtained indicator does not correspond to the standard dimensions indicated in the table, use a depth gauge to measure the thread depth. After this, double the value of the second is subtracted from the first result and thus determine whether part of the thread profile was cut off. Damaged hardware must be replaced.
- Measuring the thread diameter of a bolt that is completely “recessed” into the part, without dismantling the connection. For this, the external scale of the caliper is used, through which the dimensions of the head and the diameter of the circumference of the protrusions are established. Next, the part is identified using tables.
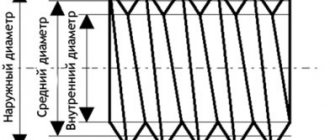
- Measuring thread pitch. Using a caliper, determine the height of the bolt shank and its outer diameter, and then count the number of threaded turns on it. The relationship between these indicators will be the tangent of the thread angle.
- Measuring the thread diameter of nuts. This operation is carried out using the internal jaws of a caliper. When using some models of tools, it is necessary to add to the obtained value the thickness of the jaws, which is indicated on the rod.
Read also: How to find out which generator is on your car
Measuring fasteners. Size of bolts, nuts, screws, studs, cotter pins
The main parameters that determine the type and size of fasteners are: diameter, length and thickness (or height). Most of today's Russian-language reference books, drawings and design documentation use symbols borrowed from the English language and alphabet. Thus, the diameter of a fastener is usually denoted by a large or small Latin letter “D” or “d” (short for Diameter), the length of a fastener is usually denoted with a large or small Latin letter “L” or “l” (short for Length) , the thickness is denoted by the capital or small Latin letter “S” or “s” (short for the English Stoutness), the height is denoted by the capital or small Latin letter “H” or “h” (short for the English High). Let's look at the features of measuring the main types of fasteners.
Bolt Measuring
Bolts with metric threads are designated in the documentation in the format MDxPxL , where:
- M - metric thread icon;
- D is the diameter of the bolt thread in millimeters;
- P - thread pitch in millimeters (there are large, small and especially small pitches; if the pitch is large for a given thread diameter, then it is not indicated);
- L is the length of the bolt in millimeters.
To determine the type and size of a particular bolt, you need to visually establish its type by comparing the bolt design with one of the standards ( GOST, DIN, ISO ). Then, having found out the type of bolt, sequentially determine all the listed dimensions. To measure the bolt diameter, you can use a caliper, micrometer, or a straight edge.
The accuracy of a certain external thread diameter is controlled using a set of “PR-NOT” (pass-no-go) gauges, one of which should be easily screwed onto the bolt, and the other should not be screwed on at all. The length of the bolt can be measured using the same calipers or ruler.
A tool such as a pedometer is commonly used to determine the thread pitch on a threaded fastener.
You can also measure thread pitch by measuring the distance between two threads using a caliper.
However, the accuracy of this method is satisfactory only for large thread diameters. It is more reliable to measure the length of several thread turns (for example, 10) with a caliper (or, in extreme cases, a ruler) and then divide the measurement result by the number of measured turns (in the example, by 10). The resulting number must coincide exactly (or almost exactly) with one of the values of the thread series of thread pitches for a given thread diameter - this reference value is the desired thread pitch. If this is not the case, then most likely you are dealing with an inch thread - determining the thread pitch requires further clarification. Depending on the geometric configuration of the bolt, the method of measuring its length may differ, and all bolts can be conditionally divided into 2 groups:
- protruding head bolts
- countersunk bolts
Taking readings
First of all, it should be noted that the accuracy of the readings depends on the cleanliness of the surfaces of the part, therefore, before measuring with a caliper, it is necessary to remove dirt and grease from the products.
Having fixed the tool jaws on the part, a control line is found on the main scale, located to the left in close proximity to the zero line of the vernier. This will be the size of the surface being measured in millimeters.
Next, readings are taken in fractions of a millimeter. This operation is performed by finding the division closest to the zero line and coinciding with the line on the bar scale. As a result of adding its serial number and the division price of the vernier, the required indicator is calculated. For the most popular models of calipers, the division price is 0.1 mm.
The total value of the instrument reading is obtained by summing the results in whole millimeters and in fractions of a millimeter.
Rules for using vernier calipers
In order for a measuring instrument to serve faithfully for many years, it is necessary to follow simple rules for its operation and storage. First of all, mechanical damage that may occur as a result of a fall or force should be avoided. In addition, during the process of measuring parts, the jaws of the caliper must not be allowed to skew. To prevent this from happening, they must be fixed in a certain position on the part being measured using a locking screw.
The device should only be stored in a soft case or hard case. The second option is preferable, as it can provide protection from accidental deformations. The place for storing the caliper must be chosen in such a way that sawdust from various materials, dust, water, chemical mixtures, etc. do not get there. Plus, the threat of heavy objects falling onto the tool must be eliminated.
After each use of the caliper, it must be thoroughly wiped with a clean, soft cloth.
Naturally, we should not forget about observing safety rules when operating this device. At first glance, it does not pose any threat to health, but this is not entirely true. The fact is that the ends of the jaws for measuring internal dimensions are quite sharp, so you can easily get hurt if handled carelessly. Otherwise, the tool is completely safe.
When performing any carpentry or plumbing work, you need to know how to measure with a caliper, as well as be able to use it. This common universal metric tool is used to take internal and external linear dimensions from a part. The caliper allows you to measure diameters (internal and external) and the depth of the hole.
How to measure a nut
Most nuts have metric threads. Measuring the thread diameter will require a little more steps than in other cases. If possible, it is recommended to check the size of the bolt or screw used for it rather than the nut itself. This way you can achieve a more accurate result.
The value obtained after measuring the internal thread is an indicator of the internal diameter din.
In order to accurately determine the diameter of the metric thread of the hardware, you will need to find out the correspondence between din and the outer diameter of the bolt used. This is done using a special table.
Accuracy is controlled through the use of certain pass-fail gauges. One part should connect well with the nut, the second part, on the contrary, should not.
The nuts differ in appearance, and it is easy to determine upon detailed inspection. To find out the standard of the fastener, you may need to measure the height of the hardware, since there are high, low, extra high and other options.
Turnkey dimensions are also used to classify hex nuts. This is explained by the fact that hardware also differs in its types.
To accurately measure the thread pitch, it is possible to use the method considered in the case of a bolt. You will need a thread gauge or you will have to count the number of turns at the required interval.
Determining the dimensions of inch nuts
To check the thread dimensions of an inch nut, you need to examine the threads of the bolt or other hardware used with it. If you don’t have a suitable one at hand, but have information about the presence of an inch thread, then use the appropriate thread gauge. Do not forget to divide the resulting value by 25.4 mm.
Determining washer dimensions
For washers, a short designation in the form D is used, which stands for the diameter of the metric thread of the hardware used for the fastener.
To accurately measure indicators, a ruler or caliper is suitable. The result is a value that is slightly higher than the figure in the notation. This is explained by the fact that free movement is required during installation, which requires a small gap.