What does a measuring instrument consist of? Let’s get acquainted with the device
The instrument in question has a simple design, which simplifies the features of its operation. Using a caliper you can measure the dimensions of any parts, workpieces and elements. The design of this simple device includes the following components:
- The measuring ruler is the main component of the device in question, which is also called a rod. There is a scale on one side of the rod, the markings of which are 1 mm. The length of the measuring ruler depends on the caliper model. Instruments with a length of 150 mm are considered standard, but there are devices smaller and larger that are designed specifically for measuring small parts and vice versa, only for large workpieces
- Measuring frame - a movable element is attached to the ruler, due to which it is possible to carry out the corresponding measurements. In the internal structure of the device there is a spring that serves as a clamp for the frame. On the front of the frame there is a scale called a vernier, which is the basis for taking measurements. This scale has 10 divisions, which have a width of 1.9 mm. To fix the movable frame, a clamping or locking screw is provided in the design of the tool. This screw is used to ensure that the frame does not move after the measurement has been taken.
- Fixed jaws are elements that are part of a measuring ruler. The jaws have open and closed shapes, which makes it possible to measure not only external but also internal dimensions
- Movable jaws - have a similar design to fixed jaws, only they are part of the measuring movable frame. Due to the movable jaws in contact with the fixed ones, measurements of the part are taken
- The depth gauge ruler is an additional element that is part of the movable frame. The ruler is hidden inside the instrument and extends when the movable frame is moved. It is intended for measuring the depth of a part.
Few people know that calipers come in different types, and the option presented above is the most popular, simple and inexpensive. We will find out further what types of calipers there are and how they differ.
How to use a vernier caliper
The scale can be secured with screws. In this case, the measurement accuracy can be adjusted using testing equipment.
Measuring jaws
The surface of the measuring jaws is in direct contact with the object being measured in the figure, pos. 5.
Outward jaws (4) are used to measure internal grooves, diameters, groove widths and other dimensions from inside the part.
External jaws (5) with a working surface inside are more versatile. In addition to taking dimensions, they can be used to make markings, for example, to lay parallel lines.
Some calipers do not have rear jaws, usually those larger than 250mm.
To measure the internal size of such a caliper with measuring jaws, it is necessary to take into account the design feature (it has its own width), when taking scale readings, it is necessary to subtract 10 mm (this point must be indicated in the instructions, and applies only to mechanical devices).
Depth gauge
It is a retractable rod directly connected to a movable frame. The tip of the depth gauge is checked in the factory. Just like the surface of the sponges, it cannot be treated with abrasives.
The depth gauge (item 6) is designed to measure the depth of cavities, as well as protrusions on which it is impossible to fix the measuring jaws (for example, gear teeth).
Types of calipers
Before figuring out how to measure with a caliper correctly, you should understand the types of this measuring tool. Manufacturers produce the following types of devices in question:
- Vernier - they are designated by the letters ШЦ, and are a mechanical measuring instrument that has a main scale on a fixed ruler, as well as an additional one on a movable frame (depending on the model, there may be one or two scales on the movable frame). They are called vernier due to the scale on the movable frame, which has a gradation in fractions of millimeters. Almost every craftsman has universal vernier calipers, which are easy to use if you have the knowledge, but they have a drawback - a large error
- With a dial or pointer - they are designated as ШЦК, and they differ from vernier ones by the presence of a round dial, which is located on a movable rod. A special gear mechanism for transmitting force allows you to obtain accurate measurement results. Based on the main markings, millimeters are determined, and fractions are calculated on a circular scale
- Digital or ШЦЦ - on the measuring frame, instead of a dial, there is a digital display that displays the measurement results. If in vernier and dial devices you need to take measurements yourself, then in digital calipers the corresponding indicators are displayed. These are the most high-precision and expensive measuring instruments that are used in areas where high accuracy is important
Vernier calipers according to design and purpose are classified into the following types:
- ШЦ-1 - working or measuring jaws are present on both sides, and they are designed to perform measuring actions on the internal and external diameters
- ШЦ-2 - jaws, which are designed for measuring internal and external diameters, are combined and also have the same dimensions. The flat surfaces of the meters are located inside, and the cylindrical surfaces are located outside. On the reverse side of the rod there are edges that are intended for marking work. These edges are well ground. Devices of the ShTs-2 type have a micrometer frame, which makes it possible to increase the accuracy of the measurements taken.
- ШЦ-3 - have one-sided placement of measuring jaws, and such tools are intended for taking measurements when working with large parts and workpieces
The types of tools under consideration are designed to identify the dimensions of different parts - pipes, bolts, nuts, wires, fittings and other types of workpieces. The most practical are vernier models, and the most accurate are digital devices. The difference in price between vernier and digital ones is significant, so a mechanical caliper is quite enough for the farm, which you need to learn how to use correctly before using it.
Modifications of calipers, how to measure correctly
According to the method of taking readings, there are the following types of instruments:
Vernier caliper
A vernier scale is an additional scale, the movement of which along the main one increases the measurement accuracy to 0.05 mm (item 7).
All measurements are performed mechanically. The operator, according to the instructions and accuracy class, calculates the readings, combining the main scale and the vernier markings. An example for taking readings with a caliper with an accuracy class of 0.1 mm.
The units of millimeters are determined to the zero mark of the vernier scale. Then we find the combination of the millimeter mark closest to the beginning of the scale and the marks on the auxiliary scale.
The combined mark corresponds to a tenth of a millimeter after the decimal point. If perfect alignment is not achieved, the next two risks are taken for it.
An example for taking readings from a device with an accuracy class of 0.05 mm.
Read also: DIY jack clamp
The units of millimeters are read in the same way as in the previous example. After the decimal point, the distance will be a two-digit number (hundredths of a millimeter with an accuracy of 0.05).
There is no point in making calipers with a more accurate scale. It is not clear how to work with such a device using the eyes. And the cost increases with increasing accuracy.
For more accurate positioning, the movable measuring frame is often equipped with an adjusting screw. This allows you to smoothly move the jaws towards the part being measured. This addition is especially important when measuring soft objects.
Vernier caliper with dial
The same as noninus - refers to mechanical measuring instruments.
This tool makes it easier to read values, which saves a lot of time. There is no need to combine marks and calculate the true value. Measurement with a caliper with a circular scale is available for people with low vision to work with precision instruments.
Whole millimeter values are still read from the main linear scale. But tenths (or hundredths) are displayed on the pointer instrument.
Technically, the instrument is not very complicated, which has a favorable effect on its cost. A roller connected to an arrow moves along the rod. The mechanism has the ability to fix the arrow to save the value after the measurement.
Digital display
The measurement is carried out mechanically, but the information is read out in digital form.
Instead of a moving measuring frame, a housing with an electronic module moves along the rod. All movements, with the accuracy specified in the specification, are displayed on the liquid crystal display.
One part is taken as a standard, then the caliper is zeroed. The second part is measured relative to the standard.
Real-time reading, instant perception. Perhaps the most convenient option. More advanced (and therefore expensive) models are equipped with a memory of the last measurement result.
Instrument error does not depend on the method of presenting information. If the “wheel-rod” pair has precise articulation and is made of high quality, you don’t have to worry about accuracy. Cheap Chinese fakes may have a high error . If the product was manufactured at a specialized factory, feel free to use it.
Operating a caliper - basic rules and recommendations
Before measuring the diameter of a pipe or performing other measuring manipulations, the instrument should be checked for suitability for use. Dial-type calipers often suffer from malfunctions. It is enough to drop them once for them to display with a large error or completely fail. Any measuring instrument must be checked before measuring. The principle of the inspection is as follows:
- Take the tool in your hands and bring the jaws together. The gap between the contacting jaws should be almost invisible. If the gap is large, then the instrument is unsuitable for use.
- When bringing the jaws together, the scale on the movable frame and the fixed ruler must match. If they do not match, the measurements will be inaccurate
- Clean the device from dirt, if any. If there are signs of rust on the body of the instrument, it must be removed, otherwise it will affect not only the accuracy of measurements, but also the performance of the device
A caliper is a modernized ruler that allows you not only to measure dimensions, but also to obtain accurate readings. Not many people know how to take measurements using a caliper. How to use the device is taught at school, but this knowledge is quickly forgotten, especially if you do not pick up the device for a long time or even use it in a single case.
Read also: Wiring a wobbler for pike in the fall video
How to use a caliper correctly step by step instructions
After checking the instrument for serviceability, you can begin taking measurements. It is also recommended that before starting work, make sure that the instrument’s error is acceptable, otherwise, you will need a device with greater accuracy.
This is interesting!
The error value is indicated on the device itself. If it is a mechanical tool, then the error value is indicated on the movable frame (usually this value is 0.05 mm or 0.1 mm). For dial and digital devices, the error is insignificant.
Measuring external surfaces
If you need to find out the size of the outer surface or, in simple words, measure the thickness of an object, then you need to spread the jaws to the required amount, and then place them between the element being measured. Next, the jaws should be combined until they are in tight contact with the walls of the part being measured, for example, it could be a brake disc.
The jaws must be positioned strictly parallel to the surface of the workpiece. Then you can calculate the resulting value. If the visibility of the scale is low, then you should use a locking device to secure the position of the jaws in the appropriate position.
- The division on the main scale (fixed part), which is combined with the zero mark of the scale on the movable frame, is the reading in millimeters
- There are no problems with measuring the main readings, unless the zero mark (stroke) of the vernier stops between two values, for example, 23 and 24 mm. In this case, you will need to count tenths of measurements. These tenths of mm are also counted and if the zero value of the vernier indicates a specific value, for example 23 or 24 mm
- To calculate tenths of mm with a caliper, you should find a line on the vernier scale that coincides with the mark on the main measuring scale. Moreover, it is very important here to find marks that match (align) exactly. The coinciding value of the stroke on the vernier scale is tenths of millimeters
- If several lines on the vernier scale coincide with the main one, then it is necessary to take into account exactly the value that is closer to zero
A photo example of taking measurements with a vernier caliper is shown below.
After measurements, you need to read the readings correctly. For example, if the zero stroke is located between the values 26 and 27, then the value 26 mm is taken into account. Next, tenths of millimeters are identified. For example, the strokes are aligned at value 7 (vernier scale), then we obtain a value for the thickness of the part equal to 26.7 mm. As you can see in the photo above, there is nothing difficult when working with the tool. Measurements of external diameters, such as pipes, pistons, rings, etc., are carried out in a similar way.
The procedure for carrying out measurements, checking serviceability
Before work, check the technical condition of the caliper and, if necessary, adjust it. If the device has warped jaws, it cannot be used. Nicks, corrosion and scratches on working surfaces are also not allowed. It is necessary that the ends of the rod and the depth gauge ruler coincide when the jaws are aligned. The instrument scale must be clean and easily readable.
- The caliper jaws are pressed tightly against the part with little force, without gaps or distortions.
- When determining the outer diameter of a cylinder (shaft, bolt, etc.), make sure that the plane of the frame is perpendicular to its axis.
- When measuring cylindrical holes, the jaws of the caliper are placed at diametrically opposite points, which can be found by focusing on the maximum scale readings. In this case, the plane of the frame must pass through the axis of the hole, i.e. Measurement along the chord or at an angle to the axis is not allowed.
- To measure the depth of a hole, a rod is placed at its edge perpendicular to the surface of the part. The depth gauge ruler is pushed all the way to the bottom using a movable frame.
- The resulting size is fixed with a locking screw and the readings are determined.
How to Measure the Inner Diameter with a Dial Caliper
The principle of measuring the internal diameter of workpieces, such as nuts, washers, rings and other similar parts, is that other jaws on the tool are used, which are located in the upper part. When moving them apart, the stops are located not inside, as when measuring external dimensions, but outside. The measuring principle is as follows:
- You need to take the part in one hand, and the caliper in the other
- Place the jaws inside the hole of the part to be measured. Moreover, this must be done so that they are located in the center of the workpiece
- Move them all the way to the walls of the workpiece, and fix the result using a locking screw.
- Next, calculations are made. For a vernier device, the principle of identifying readings is the same as when measuring the thickness of a part. If a pointer (dial) caliper is used, then the readings are determined in the following way: the whole value is revealed on the main scale, as in the case of a vernier instrument, and tenths and even hundredths of millimeters are shown by the arrow on the dial. There is no need to calculate anything here, and obtaining not only tenths, but also hundredths of mm, makes the tool more accurate
If the hole size is small and the jaws cannot be placed in it, then you need to use a ruler or small caliper.
What can you measure with a caliper?
1) External size of the part (item)
For example, using external measuring jaws you can measure the outer diameter of a pipe:
2) Thickness of the part (object)
For example, you can also measure the pipe wall thickness using jaws for external measurements:
3) Internal size of the part (item)
For example, using internal measuring jaws you can measure the internal diameter of a pipe:
4) Depth of the part (object)
The caliper has a special depth gauge that allows you to measure the depth of the part:
How to measure depth with a digital device
Let's look at the features of measuring depth with a digital caliper. To do this, you will need a retractable depth gauge, which allows you to determine not only the depth of the hole in the part, but also the size of the protrusions. The measuring principle is as follows:
- Extend the bar by moving the movable frame
- Sink it inside the workpiece until the end of the plank touches the bottom
- The end part of the stationary part of the tool must rest against the upper part of the workpiece (this point must be taken into account, since the accuracy of the readings depends on it)
- Make the appropriate calculations on the scale. If you have a digital instrument in your hands, the results will be displayed automatically in millimeters. For vernier and pointer instruments, deductions of values are carried out according to the instructions, as described above
Many people don’t know how to use a caliper, even if they have to deal with this need almost every day. Based on the instructions, it is necessary to remember the principle of measurement and the correctness of the reading, which will allow you to obtain accurate results on which the technological process depends. Features of measurements with calipers are shown in the video below.
How to measure threaded connections with a device
Few people know, but the tool in question can also measure threads on bolts and other fasteners. The thread is measured in order to select the appropriate nut for the fastener. Thread measurements are carried out along its protrusions on the bolt. To do this, the bolt (the entire length) should be fixed between the jaws and the readings taken.
To determine the thread pitch value of a bolted connection, you will need to perform the following manipulations:
- Measure the outer diameter of the bolt with a device
- Also measure the height of the rod excluding the cap.
- Count the number of turns
- To find out the thread pitch, you need to divide the resulting value of the rod length by the number of turns. For example, if the length of the rod is 20 mm and the number of turns is 10, then 20/10 = 2
Every craftsman needs to have a caliper on his farm, especially if he is repairing a car or other equipment, carrying out welding work, or installing communications in the house. In order for a tool to serve for a long time and efficiently, it requires proper care.
How to measure a piston with a caliper
The question of how to measure the piston with a caliper remains unresolved. First, let's find out why it is necessary to measure this part. The piston is one of the most important parts of internal combustion engines. During operation, the piston heats up to extremely high temperatures, and when heated, metals tend to increase thermal expansion. This increase is minor, but it plays a very important role.
You need to measure the diameter of the piston with a caliper in order to find out its conical part. The conical zone is the part that is located from the finger to the top. It is this part that must have a conical design, which will allow the piston to work effectively in the internal combustion engine system. If the piston has the same diameter along its entire length, then it should be bored. The gap between the piston and the cylinder walls should be no more than 0.045-0.05 mm. The taper of the piston should be 0.3 mm.
It is almost impossible to measure such indicators using a caliper, since high accuracy and low error are required. For such purposes, a micrometer is used, which differs from a caliper in that it allows you to measure dimensions with high accuracy. If it is necessary to measure the length, depth of the groove and other parameters, then a caliper is used for this. How to measure a piston using a micrometer is shown in the video below.
Read also: Types of taps for internal threading
How to use a caliper - general rules
First of all, it is necessary to remember that this device belongs to the class of high-precision devices. Therefore, all moving parts must be clean and lubricated.
Measuring planes affect the measurement accuracy, so harsh mechanical influence is unacceptable. Corrosion or adhered dirt (paint) increases the error tenfold.
Instructions on how to use a caliper
How to measure various workpieces is shown step by step in the illustration.
- External measurements , the properties of the device are especially well used when working with round workpieces;
- Internal measurements . Such accuracy as that of a caliper cannot be achieved by any mechanical device;
- Depth measurements . Simply pull out the depth gauge and take readings from the scale or device;
- Measuring ledges . This type of work is generally inaccessible to other measuring instruments, especially with such accuracy.
We have discussed the basic and universal types of calipers. In addition, there are a number of narrow-profile devices. Most of these operations are performed with a universal device, but a specialized device is always more accurate.
Universal caliper with an error level of 0.1 mm. Equipped with a depth gauge. Columbus or Columbus - this is what the masters usually call him, he got his nickname from.
The presence of a fine-tuning device for taking precise dimensions is an important addition to this measuring device.
Higher accuracy class of the device. Therefore, an adjustment screw was added to the structure.
Depth gauge. It has wide supporting lips and a retractable ruler. Longer scale, as well as a different type of internal jaws.
Read also: Charger circuit with desulfation
Shtangenreysmas. A marking device that takes advantage of the "side effects" of a caliper.
And for home use - use a station wagon!
To secure the material, watch the video on how to use a caliper, detailed instructions.
How to increase service life
Having figured out how to measure with a caliper, you also need to find out the features of caring for the instrument. The tool is made of stainless steel, so it will serve for a long time. Many manufacturers save on manufacturing, so after just a few years of using the device, some signs of corrosion appear on it. To prevent corrosion on the surface of the measuring instrument, store it in a dry and warm place. This is especially true for devices with an electronic display, in which the battery quickly runs out when storing the device at temperatures below +5 degrees.
Typically, “barbells” are sold together with covers—plastic, wooden, and others—that will prevent negative impacts on the instrument. If dust, dirt and other debris gets on the device, they must be removed, for example, with a blow gun. It is also necessary to lubricate the moving element with engine oil, which will extend the life of the device. When choosing calipers, you need to take into account their quality and not buy the cheapest options, since they not only have a high error, but also a short service life.
Vernier calipers are used to determine outer and inner diameters, linear dimensions, depths of grooves and holes, and distances between shoulders. Some modifications allow markings to be applied to the surfaces of workpieces. The tool is used to measure workpieces in mechanical and metalworking production areas, to control the production of wear surfaces when repairing equipment, and due to its ease of use, it is used in home workshops.
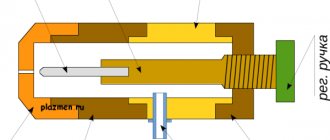
Vernier caliper design
Shown in Fig. 1 caliper type ШЦ-1 consists of:
- Barbells.
- Framework.
- Measuring scale.
- Upper lips.
- Lower lips.
- Depth gauge.
- Vernier scales.
- Clamping screw.
The choice of caliper for a specific task is determined by the dimensions, design features of the part and requirements for dimensional accuracy. The tools differ in the following parameters:
- Measuring range . The length of the scale on the rod ranges from 125 to 4000 mm.
- Accuracy . Common modifications have an error of 0.1, 0.05, 0.02 and 0.01 mm.
- Functionality . There are calipers with and without a depth gauge.
- The number and shape of measuring surfaces. The jaws of single-ended and double-ended instruments are available in flat, pointed or rounded shapes.
- The design of the reading device . It can be vernier, mechanical, clock type or electronic.
Vernier calipers are made of wear-resistant tool steels, and their measuring surfaces can be reinforced with carbide tips. To mark parts, cutters are installed on non-sharpened jaws (Fig. 2), complete with holders and clamping screws.
Measurement order
The tool and part need to be prepared for work: remove dirt, bring the jaws together and make sure that the readings correspond to “0”. To measure the outer diameter or linear dimension you must:
- spread the sponges by moving the frame;
- move until it fits snugly against the countersurfaces;
- fix the position of the frame with a locking screw;
- bring out a caliper to evaluate the results obtained.
To measure the internal size, the jaws are brought to “0” and then moved apart until they come into contact with the countersurfaces. If the design features of the part allow you to see the scale, then the readings are read without fixing or removing them.
To measure hole depth:
- by moving the frame, the depth gauge is extended;
- lower it into the hole to the bottom and press it against the wall;
- move the bar until it stops at the end;
- fix with a locking screw and remove.
The accuracy of the results depends on the correct positioning of the jaws relative to the part. For example, when determining the diameter of a cylinder, the rod must intersect or cross with its longitudinal axis at a right angle, and when measuring the length, it must be positioned parallel. In calipers of the ShTs-2 and ShTs-3 types there is an additional frame, which is movably connected to the main micrometric adjusting screw (Fig. 3). This design simplifies tool positioning. When taking measurements, the additional frame is fixed on the rod, and the position of the main frame is adjusted by rotating the micrometer screw.
Instructions for using calipers (Columbus)
Calipers
is a linear measuring tool used to measure the external and internal dimensions of parts, including depth, with an accuracy of 0.1 mm.
It is not possible to measure the diameter of a drill, a self-tapping screw, and the dimensions of other small parts with sufficient accuracy using a ruler. In such cases, you need to use a caliper, which allows you to measure linear dimensions with an accuracy of 0.1 mm. Using a caliper, you can measure the thickness of sheet material, the internal and external diameters of the pipe, the diameter of the drilled hole, its depth and other measurements.
Vernier calipers come with a reading of the measured value using a ruler and vernier, a dial type and a digital indicator. Professionals also call a type of caliper with a ruler for measuring the depth of holes “Columbus”.
An affordable and highly reliable caliper with a vernier type ShTs-1 with a measurement range from 0 to 125 mm, which is quite sufficient for most cases. The ShTs-1 caliper additionally allows you to measure the diameter of holes and depth.
A Chinese-made digital plastic caliper is currently on sale for less than $4, the photo of which is shown below.
A plastic caliper, although its jaws are made of carbon, can hardly be called a measuring instrument, since it is not certified and therefore the accuracy of 0.1 mm readings declared by the manufacturer is not guaranteed. In addition, with frequent use, the plastic will quickly wear out and the reading error will increase.
A plastic caliper, if its readings are accurate, is quite suitable for rare home measurements. To check the caliper, you can measure the shank of the drill, on which the size or diameter of the electrical plug pin is stamped.
The design and principle of operation of a vernier caliper
The classic caliper is designed as follows. A movable frame is installed on the measuring rod using grooves. In order for the frame to fit tightly, a flat spring is installed inside and a screw is provided to firmly fix it. Fixation is necessary when carrying out marking work.
The bar has a metric scale with 1 mm increments and numbers indicate centimeter divisions. The frame has an additional scale with 10 divisions, but with a pitch of 1.9 mm. The scale on the frame is called vernier in honor of its inventor, the Portuguese mathematician P. Nunes. The rod and frame have measuring jaws for external and internal measurements. A depth gauge ruler is additionally attached to the frame.
Measurements are taken using a clamp between the jaws of the part. After clamping, the frame is fixed with a screw so that it does not move. The number of millimeters is counted on the scale on the rod to the first vernier mark. Tenths of millimeters are counted from the vernier. Which stroke from left to right on the vernier coincides with any of the scale marks on the rod will be tenths of a millimeter.
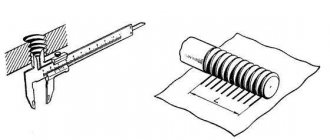
As can be seen in the photo, the measured size is 3.5 mm, since from the zero mark of the scale on the rod to the first mark of the vernier there were 3 full divisions (3 mm) and on the vernier the fifth mark of the vernier mark coincided with the scale mark of the rod (one division on the vernier corresponds to 0.1 mm measurements).
Examples of caliper measurements
To measure the thickness or diameter of a part, you need to spread the jaws of the caliper, insert the part into them and bring the jaws together until they touch the surface of the part. It is necessary to ensure that the planes of the jaws when closing are parallel to the plane of the part being measured. The outer diameter of the pipe is measured in the same way as the size of a flat piece, only the jaws need to touch diametrically opposite sides of the pipe.
In order to measure the internal dimension in a part or the internal diameter of a pipe, the caliper has additional jaws for internal measurements. They are inserted into the hole and pushed apart until they touch the walls of the part. When measuring the internal diameters of holes, the maximum reading is achieved, and when measuring parallel sides in a hole, the minimum reading is achieved.
In some types of calipers, the jaws do not close to zero and have their own thickness, which is usually stamped on them, for example, the number “10”, although the first mark of the vernier is at the zero mark. When measuring internal holes with such a caliper, 10 mm is added to the readings on the vernier scale.
Using a Columbus-type caliper with a movable depth gauge ruler, you can measure the depth of holes in parts.
To do this, you need to completely extend the depth gauge ruler from the rod and insert it all the way into the hole. Bring the end of the caliper rod all the way into the surface of the part, while not allowing the depth gauge ruler to come out of the hole.
In the photograph, for clarity, I demonstrated how to measure the depth of the hole by placing the ruler of a caliper depth gauge on the outside of the pipe section.
Examples of marking parts with calipers
The caliper is not intended for drawing marking lines on materials and parts. But if the jaws of a caliper for external measurements are sharpened on a fine-grained emery wheel, giving them a sharp shape, as shown in the photograph, then marking with a caliper will be quite convenient.
You need to remove excess metal from the jaws very carefully and slowly, avoiding discoloration of the metal of the jaws from strong heating, otherwise you can ruin them. To speed up the work, to cool the sponges, you can periodically dip them for a short time in a container of cold water.
In order to measure a strip of sheet material with parallel sides, you need to spread the jaws of the caliper, focusing on the scale to a given size, guide one jaw along the end of the sheet, and scratch a line with the other. Since the caliper jaws are hardened, they do not wear out. You can mark both soft and hard materials (copper, brass, steel). Clearly visible risks remain.
Using sharply sharpened caliper jaws, you can easily mark a circle line. To do this, a shallow hole with a diameter of about 1 mm is made in the center, one of the jaws rests against it, and a circle line is drawn with the other.
Thanks to the refinement of the shape of the caliper jaws for external measurements, it became possible to accurately, conveniently and quickly mark parts for their subsequent machining.
Reading results
Vernier scale
The number of whole millimeters is counted from the zero division on the staff to the zero division of the vernier. If they do not match, then the size contains fractions of a millimeter corresponding to the accuracy of the tool. To determine them, you need to count on the vernier from zero to the line that coincides with the mark on the bar, and then multiply their number by the division value.
Figure 4 shows the dimensions: a – 0.4 mm, b – 6.9 mm, c – 34.3 mm. Vernier division value 0.1 mm
By hourly indicator
The number of whole millimeters is counted on the bar from zero to the last mark not hidden under the frame. Shares are determined by an indicator: the number of the division on which the arrow stops is multiplied by its price.
Figure 5 shows the size 30.25 mm. The indicator division value is 0.01 mm.
By digital display
There is no need to count here, the size is shown on the display.
To determine the internal size taken with a tool with radius measuring surfaces (lower jaws in Fig. 3), their thickness, which is indicated on the fixed jaw, is added to the readings on the scale. To calculate the outer size taken with a caliper with cutters (Fig. 2), their thickness is subtracted from the readings on the scale.
Marking
A regular caliper with pointed measuring surfaces copes with basic marking operations. By pressing one jaw against the side of the part, you can use the tip of the second to draw a line on the surface perpendicular to it. The line turns out to be equidistant from the end and copies its shape. To draw a hole, you need to mark its center: the recess serves to fix one of the jaws. Any technique of descriptive geometry can be used in a similar way.
Carbide tips and cutters leave noticeable scratches on parts made of steels with a hardness above 60 HRC. There are also narrow-profile calipers designed exclusively for marking.
Why do measurement errors occur?
The most common errors that reduce the accuracy of measurement results with a working instrument:
- Excessive pressure on the frame causes misalignment relative to the rod. The same effect is obtained if, when measuring with the lower jaws, the caliper is brought together by the upper jaws.
- Installation of jaws on fillets, chamfers and roundings.
- Distortions during positioning.
- Instrument calibration violation.
The first three mistakes most often arise from lack of experience, and go away with practice. The latter must be prevented at the stage of preparation for measurements. The easiest way is to set “0” on an electronic caliper: there is a button for this (in Fig. 6 the “ZERO” button). The hour indicator is reset by rotating the screw located at its bottom. To calibrate the vernier, loosen the screws securing it to the frame, move it to the desired position and fix it again.
Deformation of the caliper elements and wear of the measuring surfaces make the tool unsuitable for use. To reduce the number of defects in production, calipers undergo periodic verification by metrological services. To check the accuracy of a tool and acquire skills at home, you can measure parts whose dimensions are known in advance: for example, drill shanks or bearing rings.
Read also: Professional olimp ru self-training