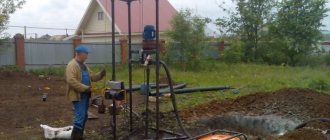
To provide water to a private home, wells are installed on the site. Drilling your own mine is expensive, but you can do the drilling work yourself.
To do this, you need a tool that cleans the well from contaminated water at the bottom of the shaft. A bailer is used to drill a well, with the help of which a whole house will be provided with water.
A do-it-yourself bailer is a completely affordable hydraulic device that requires small investments during construction.
Making a bailer for drilling
We will step by step consider the creation of a ball and petal bailer.
To assemble the ball fixture
you will need a metal ball, the diameter of which must be at least 2/3, but not more than 3/4 of the diameter of the internal cavity of the pipe section. You can either buy it or make it yourself. In the latter case, prepare a rubber ball of the required diameter, cut it in half and fill the halves with a mixture of small shot and waterproof adhesive, and after the composition has dried, sand the hemispheres and glue them back into a ball. Next, the bailer is assembled according to the following scheme:
- Weld a washer in a circle to the bottom of the pipe section - it will act as the bottom.
- Place the ball into the pipe.
- At the level of 3 radii of the ball, install a limiter - drill two parallel holes in the pipe and thread it through the pin, welding their ends to the walls of the segment.
- Weld a steel grid to the top of the segment - it will hold the ball in the bailer.
- Weld a fastening arc onto the grille to secure the cable.
Reed valve
manufactured using the following technology:
- At the bottom of the pipe at a height of 1 cm, make two holes for the bolts and insert them, but do not tighten them.
- Screw the valve - an ellipse-shaped plate onto the bolts. Secure the valve at two points with wire. In this case, the fixation must be free so that the “petals” can move.
- After adjusting the position of the plate, bend it slightly and tighten the bolt nuts.
- Weld a steel grate to the upper end, and weld an arc for the cable onto it.
Well drilling
How to make and what materials will be needed?
Almost any owner who is familiar with tools and has skills in working with metals can build a bailer on their own.
To make the simplest design you will need the following materials:
- steel pipe (approximate diameter 5 and length 60 cm);
- metal ball, 4 cm in diameter;
- a flat washer for making the bottom (its inner part should have a funnel shape for a tighter fit of the ball);
- steel wire;
- thick nylon cord or metal cable (the length is selected depending on the depth of the well).
The work of assembling the structure consists of the following stages:
- A washer is welded to the bottom. If possible, you can put this makeshift shoe on a thread. It is better if the washer is concave not only on the inside adjacent to the ball, but also on the outside (looks like a concave funnel).
- At the place where the washer is attached, several metal protrusions in the form of a fang (up to 4-5 pieces) are also welded to ensure tight interaction with the soil at the bottom of the well.
- A wire is welded into the upper part of the body. There should be a lattice that prevents the ball (valve) from accidentally falling out. The handle in the form of an arc is also attached here. A cable or nylon thread will be attached to it.
- If there is no welding, you can drill a pipe and pass wire through the holes, making a mesh and a handle. The same action is carried out in the lower part of the workpiece - the shoe is secured with bolts through drilled holes (fangs, of course, cannot be made without a welding machine).
The main problem is the ball of the diameter the owner needs, which is not so easy to find. Experienced craftsmen advise ordering this part from a turner or using your ingenuity and making it yourself.
There are two fairly common ways to make a valve in the form of a ball:
In the first case, you will need a dense rubber ball (one made of polyvinyl chloride is also suitable), which can be bought at an ordinary children's toy store. After cutting the ball in half, it must be filled with a mixture of lead shot and epoxy glue. After the filler has dried, both parts of the workpiece are glued together, and the seam is sanded.
For the second option, you will need a plastic bottle from which an ellipse is made, having a diameter corresponding to the internal size of the pipe. The tighter the valve fits, the finer the sediment that can be removed from the bottom of the well.
Gelonding scheme with pump
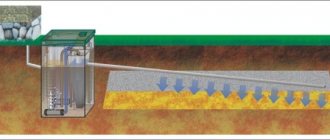
It is very difficult to remove the bailer to clean the well, even with the help of a winch. A significant amount of time is spent not on working in the well, but on raising, cleaning and lowering the bailer. A small upgrade will optimize the operation of the device. The reverse side of the pipe body should be tightly welded.
An outlet is made from it and a special fitting intended for the outlet hose is placed there. A pump is connected to the hose, which is designed to pump liquids with significant mechanical contamination.
This scheme allows you to avoid constantly raising the bailer to the surface and lowering it again.
In this case, contaminants from the bailer chamber will be removed using a pump. The bailer, equipped with a pump, simply needs to be raised and lowered to loosen and move the contaminated liquid into the chamber.
This cleaning method is effective in cases of heavy siltation or sand accumulation. For regular well cleaning, a bailer without a pump is suitable.
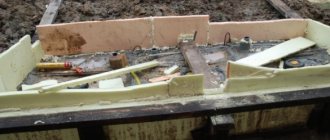
Image gallery Photos from Digging a pit before drilling Drilling the first meters with a bailer Homemade drilling rig Winch in drilling with a bailer
Calculation of parameters
Before starting work, prepare the most detailed drawing to prevent possible errors. Especially if the well cleaning bailer is being made for the first time.
The dimensions of the structural elements are individual - for the possibility of application in certain conditions when working with a specific shaft. When making a tool, we try to take into account the following nuances:
- The ellipse blank for the petal valve should have a minor axis of symmetry slightly smaller than the internal diameter of the bailer, and the major one should be 20 mm longer than the minor one.
- The diameter of the ball valve sphere should be 10–15 mm less than the internal diameter of the product or cover up to 75% of its cross section.
- When determining the diameter of the bailer, you should start from the internal dimensions of the casing. The recommended gap between the walls of the device and the shaft is 20 mm. Consequently, the outer diameter of the pipe used will be 40 mm smaller than the inner size of the casing. An increase in the gap makes the work of such a tool unproductive; a decrease leads to damage to non-ideal barrel walls and possible jamming of the device.
- 2–10 mm is a sufficient wall thickness for the housing pipe.
Features of use on different types of soils
When drilling sandy soils with a bailer, it is necessary to use casing pipes - without them the well will fail. When drilling in such soils, you need to ensure that the projectile does not go deeper into the sand without a casing pipe for more than half its length. This can lead to a collapse, the bailer will fall asleep, and you will not be able to pull it out.
To make it easier to pass sand, water is poured into the well, it prevents landslides and makes work easier. If during work the sand is compacted and not grabbed, use a chisel.
They work with quicksand sands only by constantly deepening the casing pipes. Moreover, only if the aquifer is located below the quicksand layer, otherwise the well may turn out to be inoperative.
To pass quicksand, a bailer of at least 2 meters long is used. It should have a flat, well-fitting valve with a leather sealing gasket. You need at least two people to work: when pulling the bailer out of the quicksand, you need to turn the casing pipe, lowering it down. The faster the casing is lowered at this moment, the faster this layer will be passed. At first the casing is lowered easily, then it becomes more and more difficult. Sometimes there comes a time when they stop moving completely. In this case, almost the entire pipe is filled with sand. In this case, the pipes are lowered under pressure. To do this, a platform is installed on the pipe on which a load (sandbags) is placed. And all this happens together. Usually this method is quite effective.
When passing through pebble and gravel layers, a chisel is used in conjunction with a bailer. First, a chisel is lowered into the shaft, crushing the rock, then it is removed with a bailer. The bailer on such soils rises only 5-10 cm, the blows are small and frequent.
For faster passage, a platform is made on the casing pipe, the worker does not stand on it. It is located above the well, gradually raising and lowering the bailer. As the soil is collected, the casing pipe is lowered under the weight of the worker.
In viscous clay soils it is possible to work without casing pipes. If the clay is too dense, first they also use a chisel, loosening the soil by about 50-70 cm. Then it is removed with a bailer. A flat valve with a rubber or leather seal is also used.
If the clay is dry and dense, each time you pull out the bailer, pour several buckets of water into the well. Once water appears from the aquifer, there is no need to add it from above.
If the rocks are very soft, sometimes the valve is removed. And they drill only with the pipe itself, raising it 2-3 meters above the bottom and dropping it.
Operating principle
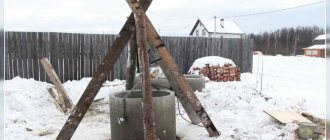
It should be noted that bailer drilling is used on sandy, clay and gravel soil. It is necessary to make a tripod in such a way that the projectile rises as high as possible.
The essence of this mechanism is as follows:
- with the help of a strong cable, the heavy bailer is raised to its maximum height;
- the cable is released, and under its weight it hits the ground, as a result of which the soil breaks and falls into the chute through the opened valve;
- then the projectile rises, under the pressure of the clogged soil the valve closes and holds it inside;
- he again sharply throws himself on the ground, this is repeated several times until the pipe is completely clogged;
- after this, the pipe rises to the surface and the soil is shaken out through the upper edge;
- Then everything happens according to the established pattern.
Thus, with each blow, the structure sinks deeper into the ground. This work continues until the desired water layer is reached. As a result, a new shaft is drilled or the finished well is cleaned from clogging with a bailer. This method requires significant physical effort, but it is considered effective and does not require financial investment.
To make work easier, it is recommended to use an electric drive to lift the impact element upward.
Features of use on different types of soils
When drilling sandy soils with a bailer, it is necessary to use casing pipes - without them the well will fail. When drilling in such soils, you need to ensure that the projectile does not go deeper into the sand without a casing pipe for more than half its length. This can lead to a collapse, the bailer will fall asleep, and you will not be able to pull it out.
To make it easier to pass sand, water is poured into the well, it prevents landslides and makes work easier. If during work the sand is compacted and not grabbed, use a chisel.
They work with quicksand sands only by constantly deepening the casing pipes. Moreover, only if the aquifer is located below the quicksand layer, otherwise the well may turn out to be inoperative.
To pass quicksand, a bailer of at least 2 meters long is used. It should have a flat, well-fitting valve with a leather sealing gasket. You need at least two people to work: when pulling the bailer out of the quicksand, you need to turn the casing pipe, lowering it down. The faster the casing is lowered at this moment, the faster this layer will be passed. At first the casing is lowered easily, then it becomes more and more difficult. Sometimes there comes a time when they stop moving completely. In this case, almost the entire pipe is filled with sand. In this case, the pipes are lowered under pressure. To do this, a platform is installed on the pipe on which a load (sandbags) is placed. And all this happens together. Usually this method is quite effective.
When passing through pebble and gravel layers, a chisel is used in conjunction with a bailer. First, a chisel is lowered into the shaft, crushing the rock, then it is removed with a bailer. The bailer on such soils rises only 5-10 cm, the blows are small and frequent.
For faster passage, a platform is made on the casing pipe, the worker does not stand on it. It is located above the well, gradually raising and lowering the bailer. As the soil is collected, the casing pipe is lowered under the weight of the worker.
In viscous clay soils it is possible to work without casing pipes. If the clay is too dense, first they also use a chisel, loosening the soil by about 50-70 cm. Then it is removed with a bailer. A flat valve with a rubber or leather seal is also used.
If the clay is dry and dense, each time you pull out the bailer, pour several buckets of water into the well. Once water appears from the aquifer, there is no need to add it from above.
If the rocks are very soft, sometimes the valve is removed. And they drill only with the pipe itself, raising it 2-3 meters above the bottom and dropping it.
Types of tools for impact drilling: choosing a design ↑
With your own hands, you can make a bailer for a well with a solid or perforated body. The choice of the type of shaft depends on the soil in which you have to work: for viscous clay, supersaturated with moisture, you need to make a longitudinal cut along the top of the pipe in order to more easily push out the mass extracted from the well. If the base layer is dry and sandy, it is better to use a solid pipe: such soil is poured out by simply turning the projectile over.
Blind walls and tool with hole for viscous soil
Main elements of the device:
- Shoe with cutting edge.
- Valve mechanism with limiter.
- Housing with protection in the form of a mesh or bridge under the top edge.
- Handle or eyelet.
The structure can be assembled using welding or threaded connections. Threading is preferable if there is a need to frequently use the bailer for different sources: the shoe and valve can be connected to pipes of different lengths.
The design of the valve system depends only on the availability of materials for manufacturing and the choice of the craftsman. There are 3 types of mechanisms:
- Ball valve.
Cone-shaped base with metal ball
- Flat folding.
There are ready-made folding flat valves with threads of different diameters on sale.
- Petal.
Transverse hinge with two hemispherical petals
Using a bailer when drilling
When constructing wells in loose, clastic, granular rocks filled with water, you can also use a bailer. True, in this case the tool is made longer (up to 3-4 m) in order to capture and lift more rock in one go. The valve is made of steel plate.
Leather or rubber is used for compaction. Instead of a cable, drill rods are used, for the manufacture of which rods are taken from gas pipes with a diameter of 33, 42 or 48 mm. There are known cases when drilling a well with a bailer using the impact method was carried out using wooden rods equipped with metal tips. To make drill rods, thin-layered spruce, ash, oak or larch were used.
As you can see, you can make a bailer for periodic cleaning of a shallow well on your own. Although factory models are also available for sale. Using this device, you can maintain the well in good working order and not leave your house without water. Remember that constant water intake prevents the well from silting, which means you will have to clean it less often.
If it is not possible to connect a water supply to a country house, a well is used for water supply. But the matter is not limited to just drilling it; the well must be cleaned periodically.
Otherwise, siltation, sand and rust deposits will reduce its productivity, i.e. debit. If there is no desire or opportunity to use special means, then a well cleaning bailer will be the optimal solution. Moreover, it is easy to use.
Drilling a well with a bailer: a complete overview of drilling technology using the percussion-rope method
How to provide your own plot and home with enough clean water? Sometimes the simplest answer to this question is the construction of a well. If hiring a crew is expensive, but you have the skills and desire to work hard, you can drill it yourself. The methods by which you can extract water from the depths of Mother Earth vary.
Among them, drilling a well with a bailer takes a very worthy place. Most often, jelling is used in combination with the rotary core method to extract loose, incoherent rocks: sands, gravel deposits. It happens that without using a bailer it is completely impossible to lift destroyed soil from the face.
We will talk about how drilling operations are carried out using a bailer. Here you will learn how to competently drill a water intake well on a suburban area using the simplest homemade drilling tool. Taking into account our recommendations, you will arrange a water source at minimal cost.
How to properly clean a well with a bailer
Using a long and strong cord (cable), a bailer is lowered into the well, reaching the very bottom. Then raise the instrument half a meter from the bottom surface and sharply lower it. In this case, the ball, jumping up under the influence of water hammer, opens a hole in the bottom of the bailer, through which water mixed with sand and silt enters the pipe. The ball then descends and closes the hole. To fill the bailer more completely, similar movements are repeated three to four times, after which they begin to slowly and smoothly, without jerking, lift the tool upward. The contents of the bailer are poured out and it is lowered back into the well. To facilitate the work of lifting the bailer, you can construct a gate.
Using the method described above, a well bailer with a ball valve is manufactured. This valve design allows water with fine suspensions of silt and sand, as well as small pebbles and pieces of rust to rise upward.
There are, however, other ways to make a valve. For example, a flat valve:
The design of the flat valve of a homemade bailer - everything was also done independently and from improvised means!
Welding reinforcement for fastening the cable, with the help of which the bailer is lowered and raised from the well
To construct such a flat valve, you will need welding and tools that any craftsman has. Some people manage to make a valve even from a plastic bottle.
Using a homemade bailer for cleaning and drilling water wells
To clean a clogged source without damaging it, you should check the condition of the casing before starting work. The bailer is carefully lowered on a cable. If the casing is inclined or damaged, the tool will touch the walls. In this case, it is better to invite masters.
The device is suspended on a steel cable above the well. They drop sharply to the bottom. Raise and repeat the slaughter several times. The clay-filled tool is lifted and emptied.
Sometimes, when the source is heavily contaminated, water is supplied under pressure to the source to soften and lift the silt plug from the bottom.
Clean the well until sand and clay stop filling into the bailer after impact.
For drilling, work is performed in the same order. With a homemade bailer you can walk up to 15–20 m of soft rock in a few days.
It is necessary to monitor the fastening: if the projectile breaks, it will not be possible to remove it from an unequipped well. It is very difficult to work with such a tool in hard rocks and rocky soil.
It is better to organize water intake with the help of specialists: craftsmen will complete the work in a day, and the owner will receive an equipped source with a stable flow rate and clean water.
Features of drilling with a bailer
Drilling with a bailer is a popular, although rather labor-intensive, method of creating a well. Not every device of this type, suitable for cleaning a well, can cope with the excavation of a large amount of dense soil. For drilling, you should use a fairly long bailer - about four meters.
To drill a well with a bailer, fairly large devices are used, up to four meters long. The use of such heavy devices requires special lifting equipment
Here, a type of petal valve is more appropriate, which is a plate that is fixed with a special spring. With its help, a gap is created in the body, the area of which is almost equal to the cut area of the bailer. This allows you to pass the maximum amount of soil into the bailer body for each dive.
Removing dense soil from a long and narrow bailer is not always easy. To simplify this task, a special window is made in the upper part of the pipe, designed for more efficient and quick cleaning of the device. If you have to drill sandy rocks, it will be easier to release the bailer.
To drill a well using a bailer, you need a device with a large clearance at the bottom and a body long enough to remove a lot of soil at one time
When drilling with a bailer, different types of rocks have their own characteristics. Here are some useful tips:
- On sandy soils, the bailer should not be immersed more than 10 cm without a casing. In general, the casing is supposed to be 10 cm ahead of the bailer.
- When drilling sandy soil, water is pumped into the shaft to further strengthen the walls.
- If wet sand is excessively compacted during the work and does not fall into the bailer, use a special chisel.
- The casing is immersed continuously during drilling.
- For quicksand, use a bailer two meters long or more with a reliable flat valve and a leather seal.
- When lifting the bailer on the quicksand, you need to not only lower the casing, but also turn it; this work is more convenient to do with two or three people.
- If the casing pipe does not fit into the shaft, it is lowered under pressure, for which a platform is placed on top on which a load is placed.
- When drilling layers of gravel and pebbles, sometimes alternate the use of a chisel, which breaks large inclusions, and a bailer for excavating broken soil.
- On dense sediments, the bailer is raised only 10-15 centimeters, and movements are made frequently.
- When drilling dense formations, the casing is deepened hydraulically or someone periodically stands on a platform mounted on the casing.
- Dry layers are softened by supplying water to the mine.
- On very soft plastic soils the valve is not always needed; the rock remains in the bailer even without it.
- The bailer must be raised after drilling every 0.5 - 0.7 m, so as not to tear when lifting the body filled to capacity.
As with other drilling methods, when using a bailer, you should take into account the individual characteristics of the soil on which the work is being carried out.
The correct strategy and timely casing of the borehole walls usually allows you to successfully create a working well.
You may also be interested in information on how to flush a well after drilling.
Maintenance, tips for proper use
Before you begin cleaning, visually assess the well. If it is narrowed, seriously silted, or if its walls are severely damaged or deformed, this can become a problem. In such cases, it is worth using the tool with hooks welded to it: if it breaks, you can get it out without much difficulty.
Also, be sure to check the projectile itself: whether its surfaces are smooth, whether the cable on which it is suspended is strong, whether it moves up and down freely (it is important that it does not jam).
If possible, try to use a winch mounted on a tripod. This will not only make the work easier, but will also allow the device to move along a strictly vertical trajectory.
When you watch how to clean a well with a bailer yourself, the videos give an idea of each stage of the process, but usually their authors do not tell what to do next. We correct this defect: after solving the issue, you should thoroughly clean all the cavities of the instrument, removing any remaining contaminants. The “window” in this case becomes a real salvation - it makes care easier.
And finally, you should regularly check the condition of the stored projectile, that is, at least once every 4 months, see if it is in order.
Features of operation on different types of soils
Be sure to consider the nature of the soil:
- On sand, it is necessary to provide a supply of liquid to strengthen the walls of the sleeve and first of all immerse the casing, making sure that it is always 10 cm in front.
- On quicksand, a flat valve is useful; it is more reliable, and the shaft pipe should be turned when lowering.
- On pebbles and gravel, it is worth additionally using a chisel to break large stones with it.
- On old deposits it is necessary to make frequent movements with the tool, with a small amplitude of 10-15 cm.
- In dense formations it is also necessary to use hydraulic equipment.
Features of making a bailer
Much depends on the diameter of the well. When drilling a well with your own hands (this is most often practiced in local areas or summer cottages), a model with a ball valve is sufficient. If the cross-section of the trunk is large, then the bailer should have a shoe. A flap valve is usually installed in it.
It is advisable to connect the shoe to the main pipe not by welding, but by a threaded connection. This will greatly simplify cleaning the bailer from accumulated dirt.
There should be teeth at the bottom end of the device. They are either cut out or welded on (for models with a shoe). They are designed to loosen silt layers when lowering the bailer to the bottom of the well. Without them, it is impossible to achieve complete cleaning of the barrel and proper water pressure. It is necessary to take into account that the height of the teeth should not be large (up to 10 mm), otherwise a lot of soil will not get into the bailer, and the work on servicing the barrel will take a long time.
If the soil in the area is clayey, then it is advisable to make the window for excavating rock narrow but long, almost along the entire bailer. Otherwise, it will be very difficult to remove the viscous dirt that has accumulated inside during the process of cleaning the well through the top.
To prevent the ball from moving too far from the bailer inlet, a plate stopper is welded on the inside of the pipe. Otherwise, the entire loaded mass will begin to fall out of the pipe, since the inertia of the valve will not allow the “input” of the device to be closed in a timely manner.
Sometimes a handmade bailer is not heavy enough.
How can you increase its mass?
- Install a partition at the top of the bailer. For example, weld a metal “penny” to the inner walls. And pour a portion of concrete mortar on top.
- For the bailer, choose a pipe with a wall thickness of at least 8 mm. As a rule, this is enough to avoid artificially weighting the device.
- Hang a weight on a rope in front of the bailer. The only thing that needs to be taken into account is that all connections must be movable.
Design and principle of operation of the bailer
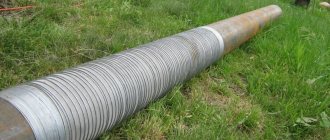
The tool is made of an iron cylinder 1-2 m long. At the top of the column, a loop is welded to secure the cable and a dense wire mesh is installed to protect against accidental release of the well contents. At the bottom, the pipe is equipped with a valve and a cutting element.
Cleaning of the barrel begins after dismantling the pump. When working with a bailer, the principle of gravity is used. With a sharp movement, the drilling cylinder is dropped into the well, and its sharpened teeth begin to loosen the mud layer. To lift the product, use a winch with a drive or a block.
After the lower valve opens, the mass fills the space, after which it closes and the device is pulled to the surface. For greater efficiency, the process is repeated several times, and then the pipe is cleaned of layers of silt and dirt. The duration of work depends on the degree of contamination of the well.
DIY bailer
If you have a welding machine and some skills in working with iron, you can make a bailer with your own hands in a few hours.
DIY bailer with a ball valve (without turning)
This version of the ball valve is assembled from spare parts that can be purchased in stores. A water pipe with a diameter of 89 mm was used for production. We also purchased a concentric adapter 89*57 mm, and a ball from a bearing with a diameter of 60 mm.
Everything you need to make a bailer with a ball valve
The ball fits perfectly inside the adapter and gets stuck there. But it doesn't fit tightly. To make everything fit better, the inner surface of the adapter is sanded - it fits almost perfectly.
This is what everything looks like half assembled. Below on the right is a photograph of a ball in the transition - this is how it will be inside
The narrow part of the transition is inserted into the pipe and welded. The ball is thrown inside, a stopper is welded. And the final touch is to make an attachment for the cable or twine. That's it, the do-it-yourself bailer is ready.
You may be interested in reading about how to purify water from a well.
How to make a bailer yourself at home
If you need to clean a well, but you don’t have sheet metal or welding tools for serious work on hand, there is a solution: a bailer with a valve made from a plastic bottle.
Homemade bailer with a valve from a plastic bottle
This option is suitable for cleaning a well, but not for drilling. You need a bolt, the length of which is slightly longer than the diameter of the pipe for the bailer, and a nut. Having retreated two or three centimeters from the edge of the pipe, one opposite the other, two holes are drilled. Their diameter coincides with the diameter of the bolt.
The valve is cut out of plastic. It is an ellipse. The smaller diameter of the ellipse is equal to the diameter of the pipe. You need to cut it very precisely so that when inserted inside it fits snugly against the walls. The cut valve in the middle will be attached to the bolt; for this, four holes are made in the plastic through which the wire is threaded. How it all comes together is shown in the photo below on the left.
Only such a fastening, as in the photo above, is very unreliable. After a few hits, your projectile may come off, and you will have to figure out how to get the bailer out of the hole. The best fastening option is one-piece, without seams or twists. How to do this will become clear if you watch the video. By the way, there is an important thing there - how to make hooks so that, if necessary, you can pull the bailer out of the well.
Instructions: how to make a reliable bailer yourself
To make a reliable bailer for cleaning a home water well, you will need:
- Thick-walled pipe (wall thickness 4 mm), steel rod or piece of reinforcement, bolts with washers.
- Metal ball, steel cone.
- Grinder for cutting metal, sharpening edges.
- Durable steel wire or handle hook.
How to make a case
You can use a piece of cast iron or steel pipe as the tool barrel. The cast iron structure will have to be connected using special welding, so it is better to take a thick-walled gas or water pipe.
The wall thickness should not be less than 2 mm, the optimal wall cut is 4 mm. The length depends on how you plan to lift the projectile. If manually, a length of up to 100 cm is sufficient. It should be taken into account that the weight of the raised wet soil will be added to the weight of the device. If you have an installation with a winch, you can significantly increase the length: you do not have to fully lift the tool too often.
It is necessary to pay attention to the condition of the pipe: the section must be absolutely straight, without bends. The top and bottom parts are cut off. If you plan to connect the body with other elements by welding, then the edges are aligned. For threaded connections, you need to cut a thread inside the bottom edge.
A hole is cut out in the upper part of the body. If there is no special tool, holes are drilled on the wall along the contour of the window and a piece of steel is knocked out with a chisel.
Ball valve: assembly from improvised means
How to make a bailer equipped with a ball valve for drilling sand wells? Requires a ball and a steel cone. A metal ball is difficult to find on sale: you can order it from a turner or make it yourself. The first thing you need is to determine the diameter. The sphere should move freely inside the housing, its diameter should be 1 - 1.5 cm less than the internal diameter of the pipe.
For self-production, select an ordinary children's ball. Cut into two halves. Each is filled with cargo: pieces of metal, shot, fishing tin weights. Fill with waterproof glue. After the adhesive composition has dried, the hemispheres are removed from the blanks and glued together.
A limiter is installed inside the housing, which will prevent the sphere from flying out of the pipe. It is enough to weld a metal finger inside the top of the pipe.
Rules for the design of flat and reed valves
It is much easier to make your own bailer with a folding (flat) valve. Steel, plastic, and even hard, thick rubber are used as the locking surface. But it’s better to make a metal circle: there will be no risk of tearing or breaking, and you won’t have to interrupt work to repair the tool.
A circle with a slightly smaller diameter than the inner diameter of the body is cut out of steel. A folding mechanism is being prepared, which can be welded directly onto the inner wall of the lower part of the pipe.
Two identical thick metal wires with ears are placed on a piece of rod or fittings to freely lift the valve. The top edges are welded or bolted to the valve base.
Cutting edge: manufacturing rules
The lower end of the body must be turned into a sharp tool for cutting into the ground. With a well-sharpened tool it is much easier to iron a well with your own hands. There are 2 design options for the cutting edge: flat and petal-shaped in the form of protruding teeth. The flat edge is carefully sanded along the outer edge. The inner edge is ground inward, giving the edge a cone shape. The surface is sharpened. If possible, it is better to harden the steel: after such treatment, the tool will not become dull or break for a long time. If teeth are formed, then the edges are processed in a similar way, but each element is processed separately. After hardening, you can treat the cutting edge with a protective primer or paint. After finishing the work, check whether there are any protrusions on the outer surface: if struck, the tool can damage the wall of the casing pipe.
Stopper and handle: the final stage
The upper part of the water well bailer must be equipped with fasteners for fixing the hook. You can drill two holes and use strong steel wire instead of a handle.
The second option is to weld a transverse piece of reinforcement inside the upper edge, equal in length to the diameter of the pipe. In this case, the handle will also be a limiter.
If hanging fasteners are installed, a metal mesh with large cells is fixed at the end of the pipe, or thin reinforcement is welded crosswise. On sale there are ready-made steel eyes on pipes of different diameters - you can buy a ready-made reliable hook.
Making your own bailer for cleaning a well
The basis of the bailer design is a pipe, the correct selection of the dimensions of which affects the efficiency of the well cleaning process. How to choose the right pipe for a bailer:
The main dimensions of the pipe for the bailer are its outer diameter and the length of the cut, because the smaller the gap with which it enters the well pipe, the better the walls will be cleaned, but at the same time, insufficient clearance between the walls of the well and the bailer can cause it to jam. The length of the bailer for the well is an equally important dimension, because a short pipe will move with large distortions, and its excessive length significantly makes the structure heavier and can cause the bailer to jam when distortions in the water intake pipe are detected.
The outer diameter of the bailer for cleaning wells must be selected a couple of centimeters smaller than the diameter of the well, and the length of the bailer can vary from 60 cm to 1.5 m depending on its outer diameter.
The wall thickness of the pipe for the bailer is an additional size, which can be 2-4 mm, but it significantly influences the cleaning process, because The thicker the wall, the heavier the bailer, which significantly increases the piercing inertia. But a thick pipe with a significant length can lead to excess weight for trouble-free lifting, because you must not forget that the bailer for cleaning the well will be filled with silted liquid.
The well bailer can be manufactured with different structural valve systems:
- A ball-shaped valve is the most reliable design, the manufacture of which will require finding a metal ball of suitable diameter (at least 2/3 and no more than ¾ of the internal diameter of the bailer). Such a ball is either specially sharpened on a lathe, or “mined” from a suitable bearing or scrap metal. To make the valve, the front (piercing side) is plugged with a powerful metal washer with a conical seat for the ball. The washer is securely welded into the recess of the pipe from the working (piercing) edge at a distance of 3-5 cm.
- The reed valve is quite effective, but short-lived, because due to the large mass of debris being lifted, it can be damaged. The reed valve can be made of thin spring metal or polymer. The easiest way to make such a valve is with the operating principle of curtains, i.e. the plate located inside the pipe is cut out in the form of an oval, due to which the “curtain”, arching from the center to the edges, rests against the walls of the bailer. The valve “curtain” is attached to the pipe in the center, and its ellipsoidal edges ensure the passage of mud flow in only one direction.
The bailer for the well must not only be precisely matched in overall dimensions to the water intake pipe being cleaned, but also have some design features:
- It is recommended to sharpen the piercing edge of the pipe in such a way that the sharpening is one-sided on the inside, which will ensure easier cutting of build-ups from the walls and easier penetration into the depths of the silted section of the pipe.
- On its way, the bailer may encounter solid inclusions, which can quickly dull the sharpened edge, so it is recommended that the working edge of the bailer be thermally hardened.
- To prevent the ball valve and large debris, which can cause the bailer to jam in the well when it is lifted, from coming out from the back of the bailer, a large mesh or fine grate must be securely secured there.
- To control and lift the well bailer, a powerful (large diameter) rod is welded inside from its rear side, to which the lifting cable is securely attached.
- In cases of expected large siltation of the well, to speed up and facilitate the cleaning process, the bailer for the well is modernized: the back side is tightly welded with an outlet (fitting) for the vacuum pump hose for pumping sludge or thickened liquids with mechanical inclusions. Such a system makes it possible not to carry out multiple lifts of the bailer, but only to raise and lower it, while the softened sludge is promptly removed from the well, which allows for high-quality cleaning of the water intake.
Separately, it is worth noting that before the initial lowering of a long bailer, in order to avoid its jamming in the well, a visual examination of the integrity of the structure of the water intake pipe is carried out to ensure the absence of severe deformations.
Valve systems for bailers
The design of a well bailer involves the presence of a valve that holds silt deposits inside the container. If the locking part fits tightly to it, the cleaning efficiency increases. In the manufacture of the instrument, 2 valve designs are used - in the form of metal flaps (petals) or a ball.
Valve diagram for bailer.
Ball valve manufacturing
The mechanism consists of a metal funnel-shaped washer and a heavy round element that closes its mouth. The cavity in the valve must be wide, since it is intended to capture a large volume of dirt. If necessary, the hole is bored as far as the diameter of the ball allows.
It can be made on a machine using drawings, or you can make it yourself from improvised means, for example from a hollow rubber ball. The product is cut into 2 halves, and then both parts are filled with epoxy glue mixed with shot or parts of old bearings. The finished fragments are glued and polished. The ball size should be about 60-75% of the casing diameter.
If the bailer is immersed in the shaft, the mud flow puts pressure on the valve flaps and they rise, allowing the contents of the shaft to flow into the pipe. As the cylinder is lifted, the compacted layer of dirt causes the plates to descend and block the bottom of the column.
Reed valve design
Stages of manufacturing a reed valve.
The element has a simple design and looks like an oval plate divided by a transverse pulley. Most often, such dampers are made of polymer or thin metal sheet.
The product is installed in the center of the column, due to which it bends towards the edges and rests against the walls of the chamber. For a better fit, the pipe is equipped with a leather or rubber seal. One variation of this type of valve system is closed by a steel spring.
The device operates on the principle of curtains. When the device is lowered into the shaft, soil pressure is applied to the flaps, and they rise, while the internal space is filled with a mud mass. When rising, the sedimentary rock puts pressure on the plates, they lower, blocking the passage channel and preventing dirt from escaping out. The main disadvantage of such valves is rapid wear due to high mechanical load.
DIY bailer
If you have a welding machine and some skills in working with iron, you can make a bailer with your own hands in a few hours.
DIY bailer with a ball valve (without turning)
This version of the ball valve is assembled from spare parts that can be purchased in stores. A water pipe with a diameter of 89 mm was used for production. We also purchased a concentric adapter 89*57 mm, and a ball from a bearing with a diameter of 60 mm.
Everything you need to make a bailer with a ball valve
The ball fits perfectly inside the adapter and gets stuck there. But it doesn't fit tightly. To make everything fit better, the inner surface of the adapter is sanded - it fits almost perfectly.
This is what everything looks like half assembled. Below on the right is a photograph of a ball in the transition - this is how it will be inside
The narrow part of the transition is inserted into the pipe and welded. The ball is thrown inside, a stopper is welded. And the final touch is to make an attachment for the cable or twine. That's it, the do-it-yourself bailer is ready.
You may be interested in reading about how to purify water from a well.
How to make a bailer yourself at home
If you need to clean a well, but you don’t have sheet metal or welding tools for serious work on hand, there is a solution: a bailer with a valve made from a plastic bottle.
Homemade bailer with a valve from a plastic bottle
This option is suitable for cleaning a well, but not for drilling. You need a bolt, the length of which is slightly longer than the diameter of the pipe for the bailer, and a nut. Having retreated two or three centimeters from the edge of the pipe, one opposite the other, two holes are drilled. Their diameter coincides with the diameter of the bolt.
The valve is cut out of plastic. It is an ellipse. The smaller diameter of the ellipse is equal to the diameter of the pipe. You need to cut it very precisely so that when inserted inside it fits snugly against the walls. The cut valve in the middle will be attached to the bolt; for this, four holes are made in the plastic through which the wire is threaded. How it all comes together is shown in the photo below on the left.
Only such a fastening, as in the photo above, is very unreliable. After a few hits, your projectile may come off, and you will have to figure out how to get the bailer out of the hole. The best fastening option is one-piece, without seams or twists. How to do this will become clear if you watch the video. By the way, there is an important thing there - how to make hooks so that, if necessary, you can pull the bailer out of the well.
Read about organizing autonomous water supply from a borehole or well here.
Final assembly of the bailer
At the final stage, the lower edge of the bailer is sharpened. This is explained by the need to remove layers from the walls of the trunk. Most often, one-sided sharpening is performed from the inside of the cut. Rapid wear of the cutting part prevents heat hardening. If you have a welding machine, sharp rods or a piece of metal are welded to the lower edge of the pipe.
The upper part of the cylinder is equipped with a wire loop to secure the cable. It should be positioned so that the structure remains in an upright position. Changing the trajectory of its movement can cause the tool to jam and damage the shaft.
To protect against spontaneous release of soil, a metal or wire mesh is used, which is welded on top of the bailer body. Then the structure is connected to a cable or rope or nylon cord. To increase work productivity, a lift with a block installed directly above the well is used.
Before immersing the bailer into the shaft, you need to make sure that there are no unevenness or damage on the walls of the shaft.
Bailer assembly diagram.
Bailer design
A bailer is a piece of pipe up to 4 meters long. A shoe with a valve is installed at the bottom of it. In large-sized shells, flat valves are installed, cut from a steel sheet with a rubber seal, strips of leather, sometimes without a seal. Those that are smaller in size and diameter use ball valves. These devices are also called mechanical bailers - they work due to gravity.
This is a homemade bailer with a flat valve - one of the options for its design
Through a window in the upper part of the body, rocks are removed, which are stuffed there during drilling of a well or its cleaning. When drilling viscous rocks - clay or loam, you have to make the window long and narrow - almost the entire length: it is very difficult to remove such a load through a small hole.
Flat valve designs for homemade bailers
A ball valve is easier to make. The diameter of the ball should be equal to approximately half the diameter of the pipe (a little more is possible). A washer is installed in the lower part, the internal diameter of which is smaller than the diameter of the existing ball. At a certain height inside the bailer (three or four radii of the ball), a limiter is welded - it prevents it from rising too high. If this is not done, most of the soil that gets inside may spill out (pouring out). This is due to the excessive time it takes for the weight to descend and close the hole in the bottom.
Design of a bailer with a ball valve
At the bottom of the pipe in both versions, fangs are sometimes welded or cut out, or the edge of the pipe is ground off, making it sharp. This breaks up the soil or silt better. But due to too high fangs, too little soil gets inside. When using a ball valve, the length of the fangs should be such that the ball does not protrude. The same picture - a small amount of soil collected at a time - can also be observed in bailers with a flat valve. In this case, reduce the depth of the shoe.
A too small internal hole in the washer installed on the bottom with a ball valve can lead to the same result. The solution is to squander it.
A loop or bracket is made in the upper part of the bailer, to which a cable or rope can be secured. Using this rope, the projectile is removed from the hole, and it is lowered back on it.
You might be interested in reading “How to make an antenna for a summer house with your own hands.”
Best tool
The most effective way to clean is with a bailer. This tool is used as a cleaning device and as a device for drilling wells located in loose sandy soils.
The device looks like a pipe with a cutting edge at the bottom and a valve located inside. The cutting edge is made slightly wider than the main body to make it easier to grip the ground. When taking soil or sand from the bottom of the well (when cleaning it), the valve is in the open position. The filled pipe is pulled up, and under the influence of gravity the valve slams shut, providing a secure grip. After this, the bailer can be pulled out by the cable attached to the top and the dirt can be poured onto the surface.
To operate in an aquifer, the valve must be equipped with rubber seals. In this case, it becomes possible to extract silt and liquid mud.
The cutting edge of the lower part is always attached to a shoe, which is screwed onto the main body using a thread or attached in some other way.
Standard dimensions of the device: height from 70 centimeters to 3 meters, diameter from 7 to 16.8 centimeters. The diameter is selected depending on the internal size of the well. For free movement, a gap of 2-3 centimeters is left between both diameters (devices and wells).
DIY well bailer device, options and manufacturing schemes
The lack of a centralized water supply pushes residents of private houses to drill wells on their own plots. Agree, without water in the house it is difficult to call staying in it comfortable. But well drilling services are quite expensive. It’s good that at least there are devices that allow you to drill a well on your own site.
One such device is a bailer. This is an effective and relatively simple drilling tool for cleaning private water sources from bottom contaminants. With its help, you can even drill a fully usable well yourself. Such a hydraulic structure will require a minimum of funds. And if it is done with your own hands, then the costs will not shake the family budget at all.
In this material we will talk about the structure and operating principle of the bailer. Let us dwell in detail on what tools and materials are required for its manufacture. In the article you will find step-by-step instructions for assembling the bailer, as well as videos that clearly demonstrate the structure and principle of operation of the bailer.
The principle of operation of the design
The jelling method is used for digging or cleaning wells in loose or loose soils (sand, clay). Thus, the well is cleared of dirt and silt, and the volume of water increases.
The operating principle of this device is called shock-rope. It is thrown down, in flight it picks up speed due to the force of gravity, and hits the ground. The destroyed rock gets inside the tool, and the valve closes, preventing it from spilling back out.
Operating principle of the bailer
At one time, 200–300 grams of earth gets inside the device, so it is raised half a meter and the throw is repeated. This continues until the entire pipe is filled with rock. Once this happens, it is pulled out, turned over and cleaned. Sometimes too little soil gets into the tool. This usually happens due to low weight. In this case, the device must be weighted by placing a weight on it or concreted the top of the pipe.
Drilling and cleaning a well using the jelling method is a rather lengthy task. It can take several weeks to create a well. Cleaning, depending on the amount of work, may require several days or may take a week. To speed it up, you can use a tripod with a block system.
Bailer with ball valve
Bailer with a ball valve It is worthwhile to dwell separately on how to assemble a bailer with a ball valve. For this you will need:
- Pipe of the appropriate diameter.
- For the bottom, it is necessary to use sufficiently thick metal, which will allow you to mill a conical hole to the diameter of the ball used.
- For all standard wells, a valve mechanism with a ball is used, the diameter of which is about 40 mm. A professional milling machine can handle the manufacture of such an element without any problems; if this is not possible, then you can use available materials, which we will discuss below.
- To prevent the ball from floating up when the bailer is immersed, a clamp-limiter of the floating height is welded onto the inner surface of the pipe.
This design has a single, but very important advantage. The design does not include any swivel joints, so the reliability of this check valve is somewhat higher.