Not all owners of summer cottages and private houses have the ability to connect to centralized engineering systems. For this reason, they are forced to solve many problems on their own. To ensure a comfortable existence away from civilization, owners have to think about organizing the disposal of household waste. For this purpose, some buy ready-made containers, others build structures from reinforced concrete or concrete rings. However, some owners choose another popular material - brick. This work is not very simple, but such a sump storage tank can still be made independently. If the owners have not yet made a decision, then it would not hurt them to find out what a “do-it-yourself brick drainage pit” is, what difficulties await the craftsmen, and what kind of design they will receive as a result of this operation.
Pros of use
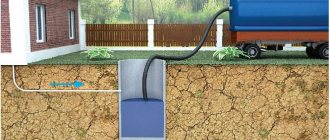
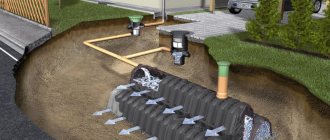
Scheme of a cesspool with a drainage layer
The principle of constructing and using a cesspool is very simple - all the waste from the house flows into it, after filling it is cleaned with vacuum cleaners and the process begins again. The advantages of brick construction include:
- a simple device that a novice master can perform;
- you can make any convenient shape;
- The drainage pad device cleans drains and increases the time of use.
This design is not without its drawbacks: it may cause an unpleasant odor, a short service life and a frequent need to call the vacuum cleaners. This makes it not the best option.
Stages of work
Layout
First, they plan how big the septic tank will be and how the sewer pipe will go. To plan the volume, take into account that on average a family of 3 people needs a hole of 8 cubic meters. Next, they calculate how much pipe will be needed and plan how it will go. Avoid gas pipes and cables buried in the yard, otherwise they may be accidentally damaged.
After marking the site, you need to dig the pit itself.
The next stage is the most labor-intensive - digging and forming a pit. First, take measurements of the future hole with a tape measure and place pegs in the corners, which are connected to each other with thread. A bayonet shovel is used to dig a hole, and a shovel is used to throw out soil. Do not immediately throw away the remaining soil, as it will be needed when compacting the pillow.
Selecting a location
Where to place the cesspool
To ensure that the cesspool does not cause trouble and functions normally, when planning a place for it, you should take into account sanitary standards:
- the distance from the house should be 5 m;
- the distance from a well or other source of drinking water should be 30 m, for sandy soil - 50 m;
- the depth of the pit is no more than 3 m, otherwise the sewer truck will not be able to pump it out to the very bottom, since it will not have enough pump power;
- there must be a distance of one meter to the neighboring area. The need for periodic cleaning of the pit requires provision for the possibility of access by a sewer truck. The volume of the cesspool should be calculated based on the number of residents of the house. When choosing a location, pay attention to the topography of the site, because sewage will move through the pipes by gravity. For unhindered movement, a straight highway running at a slope to a lower point is preferable. The location of groundwater plays an important role - it should not fall into the cesspool and fill it, moreover, at a high level, dirty water will mix with it, seep into the soil and pollute underground sources.
Video: do-it-yourself brick cesspool
When constructing a pit, you need to take into account several factors: the depth of groundwater, the proximity of drinking water sources, and the expected volume of wastewater. Errors during the construction of a brick cesspool can lead to the appearance of an unpleasant odor on the site and contamination of water in nearby wells. Therefore, it is better to entrust the work of creating a septic tank to a team of professional workers.
Central sewerage is undoubtedly a benefit of the modern world. But the benefit is not always available. At a summer cottage or in the private sector, installing such a sewerage system may not always be accessible or economically feasible. But this does not mean that you have to give up comfort. A brick cesspool will come to the rescue. This is a practical and reliable way to provide convenience without connecting to a central sewer system.
To create a durable structure, you should choose red or clay bricks.
Organizing a cesspool is the most common method of local sewerage. It is extremely simple and easy to implement. All sewage and wastewater from the kitchen, bath or toilet flows through pipes into a storage tank - a brick pit located on your site. As it is filled, it is cleaned on its own or with the help of sewer trucks. With proper care it will last for many years.
The advantages of a brick cesspool include environmental friendliness. All sewage is effectively cleaned by septic tanks independently or transported to special drainage stations by sewer trucks. The soil in the pit is not polluted, since all small volumes from economic activities are cleaned naturally with the help of bacteria living in the soil. This provision is relevant only for small volumes, up to 1 cubic meter.
A brick cesspool is easy to install; even a novice builder can build it.
The bricks of the cesspool are located underground, they are hidden from view, so the evenness of the masonry does not matter much. An undoubted advantage is the independence from the type of soil or groundwater level.
But the drainage pit also has disadvantages, such as the possibility of unpleasant odors. Therefore, the cesspool must be cleaned regularly and special preparations must be used to accelerate the decomposition of waste. Under constant and prolonged exposure to water, brickwork turns into clay, so its service life is about 15 years without repair. If bricks are replaced with concrete inserts during operation, the service life of the cesspool can reach 50 years. The constant call for sewer trucks is another disadvantage of pits. On average, specialists come 1-2 times a week, otherwise the drainage pit may become silted, which will lead to great effort and loss of time to clean it.
Design options
Cesspool with concrete bottom
Depending on the volume of wastewater and the groundwater level, the design of the cesspool is chosen. It can be quite simple to implement and inexpensive in cost, like a brick pit without a bottom or a permanent structure with a concrete base.
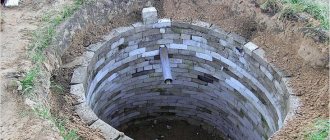
Pit for a cesspool
The construction of a leaky pit makes it possible to rarely use the services of vacuum cleaners, since most of the wastewater goes into the soil after filtration. The main limitation is the volume of water used daily; if its amount exceeds 1 m3, then such a device will not cope with it. To construct a pit, it is necessary to dig a pit according to the calculated size. Its bottom is covered with a drainage layer consisting of crushed stone of various fractions, broken bricks and sand. The thickness of the base is made at least 20 cm. The walls are laid in a checkerboard pattern with spaces between the bricks, which helps the liquid escape. To construct a pit, it is not necessary to purchase new bricks; you can use used ones. Such structures have a short service life because they quickly silt up and stop absorbing liquid, and are then covered with earth. Large crushed stone is poured into the pit around the masonry. Along the perimeter of the pit, a trench is dug under a concrete belt to cover it. The sides of the formwork will be brickwork and an earthen wall; this gap is filled with concrete. The top can be covered with the selected floor slab.
Wall masonry
A permanent pit with a concrete bottom and waterproofing walls. Construction consists of several stages. The main labor costs are for excavation work. You have to dig a pit of the required volume; for a family of three it will be at least 1.8 m3 (200 l per day × 3 × 3 = 1800 l). The shape of the pit can be round, square or rectangular; its choice does not affect efficiency. The design needs a slight tilt towards the placement of the hatch. After the foundation pit is ready, its base is filled with sand and compacted to create a cushion. Next, the bottom is poured with concrete to a height of 10 cm. Brick laying is carried out in a checkerboard pattern on a sand-cement mortar; it should be 25 cm thick.
It is necessary to leave a hole for the drain pipe.
It is necessary to provide a hole for the drain pipe in advance
The inner surface is plastered and covered with layers of waterproofing. A clay castle is made around the finished pit.
How to build a brick cesspool
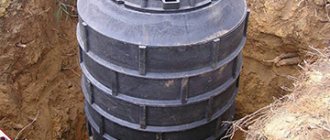
Before constructing a drainage pit, the groundwater level must be determined. If it is high (closer than 3-2 m from the surface of the earth), there is a high probability of contamination of water or soil. In addition, the drain structure may collapse due to being washed out. Therefore, it is advisable to use a plastic storage container here.
Important. The cesspool cannot be in line with a well or other water intake. It must be above this level.
- Make a pit of a rectangular or square shape. Level the walls of the pit, remove roots and large debris.
- Cover the bottom of the hole with a 20 cm layer of sand, pour water over the sand and compact it.
- If the bottom is drainage, lay geotextiles on the sand, and then 0.5 m of crushed stone.
- At the same time as the pit, sewer trenches for pipes are also prepared, their bottom is also covered with sand. Pipes are laid below the soil freezing line or above, but with the use of insulation.
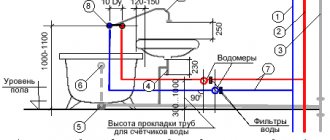
It is important to choose the optimal location of the holes through which the drains will flow into the pit. To do this, the sewer pipe is laid at an angle of 2 cm by 1 m.
Two ways to construct a pit
- Drainage option
Such a pit is constructed if the volume of wastewater is small - no more than 1 m 3 per day. A sump with a filtration bottom does not require frequent maintenance with vacuum cleaners. Another advantage of this design is durability; a pit with drainage can last 20 years or more.
There are gaps in the masonry walls through which water seeps into the ground
If there is more drainage per day than the filtration layer can pass through, the gaps between the drainage elements will become clogged with silt, and the bottom will spontaneously seal. As a result, wastewater will not be able to reach the soil and will overflow the sump. To prevent this from happening, you need to correctly calculate the expected volume of waste.
Another reason for the ineffectiveness of a sewer pit is the freezing of the soil in winter. In this case, water will also not seep deep, an odor will appear and the time for emptying the pit will be significantly reduced.
The principle of operation of the cesspool is simple; wastewater in it is purified by settling
- Sealed sump
Experts advise installing a sealed sump. A pit with a concrete bottom does not pose a danger to drinking water wells or to the soil. However, the costs of such a design will increase.
For the base, use a ready-made concrete slab or fill the bottom with a 15 cm layer of concrete. A four-centimeter cement-sand screed is laid on top of the concrete.
The laying is done in a checkerboard pattern. The walls are plastered on both sides with cement-sand mortar. Additionally, the structure is insulated with bitumen mastic.
Necessary materials and tools: shovel, pegs, rope, ladder, tape measure, level, trowel, as well as bricks, cement, crushed stone, reinforcement, roofing felt.
It is important to know which brick is best for a cesspool. Red ceramic has increased resistance to moisture, and therefore it is more preferable compared to white sand-lime brick.
White silicate brick masonry quickly deteriorates due to the low moisture resistance of the material. The service life of such a pit is 5-7 years
The brickwork is made with a shift of half a brick. The thickness of the masonry should be equal to the thickness of the brick.
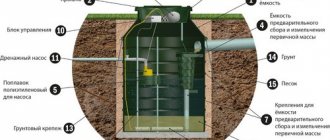
Advice. It is better to arrange a two-chamber cesspool with an overflow. By separating the fractions, the wastewater will be purified more efficiently. Thanks to the use of biological products, odors will not penetrate into the area.
- Floor installation
Two-chamber sump design
The best way to cover a hole is to use a reinforced concrete slab. You can buy it or make it yourself.
To make your own ceiling you will need: reinforcement, boards, polyethylene film, concrete, as well as a tape measure, rope, level.
- First they make the formwork. To do this, build a wooden box on a flat area not far from the finished pit. The ceiling should protrude 30 cm beyond the boundaries of the pit. Using a level, check the bottom of the ceiling.
Creating a floor with a hatch
- The inside of the formwork is lined with film, so that the slab can then be easily separated from the formwork.
- The height of the slab is usually 15-20 cm. The width is about 1.5 m. If the pit measures 2 * 2 m or more, it is better to make two slabs 1 m wide. When making formwork, you need to create a mold for the hatch (60 cm in diameter) and for the ventilation pipe (120 mm in diameter).
- Film is placed on the formwork.
Advice. Sometimes a corrugated sheet is used as formwork; it is not removed after the concrete has hardened; it gives the ceiling additional strength.
- For the reinforcing mesh, rods with a diameter of 8-12 mm are used, cells of 15 cm in size are created.
- The mesh is tied with soft wire. Mounting loops are made in the corners, with the help of which the slab can be lifted.
- Then concrete is prepared from 6 parts crushed stone, 4 parts sand and 1 part cement. Add enough water to obtain a medium-thick solution.
- Using a shovel, concrete is placed into the reinforcement. In hot weather, concrete is moistened with water.
Waterproofing
With significant daily water consumption, a large volume of wastewater is generated. To receive them, a design is required that prevents contaminated liquid from entering the soil. To ensure the environmental safety of the cesspool, a structure with a concrete bottom and protection from a layer of waterproofing is used. Bitumen mastic is the most common material used to waterproof a cesspool. The work is carried out on finished masonry that has dried after plastering. For the first primer layer, bitumen is heated and mixed with kerosene. The liquid solution is applied to the brick wall. After drying, the procedure is repeated; you can apply the bitumen with a roller or brush. Without waiting for complete drying, fiberglass is applied to the still sticky surface. Bitumen waterproofing is again applied on top.
There is a more modern material - bitumen emulsion, which does not require preheating; for priming, it is enough to dilute part of the composition with water.
Construction of a cesspool
To reduce the water resistance of the brick and extend the service life of the cesspool, the walls are covered with a layer of waterproofing - bitumen mastic or modified bitumen. It is applied only to dry brick surfaces. Floors are another important nuance in construction. To ensure reliability, the cesspool must be overlapped on all sides by at least 50 cm. Reinforced concrete slabs or tightly laid logs are used as overlaps. At the same stage, the location for the hatch is determined (a hole with a diameter of about 70 cm). The hatch serves not only to pump out sewage, but also to release methane, an explosive gas formed as a result of chemical reactions of decomposition of organic waste.
The ceilings are covered with waterproofing material (polyethylene, roofing felt) and covered with soil, slag or soft clay. The layer thickness is 30-40 cm. To avoid freezing in winter and unpleasant odors in summer, the manhole cover is made double. One is level with the ground, the other is at the floor level. The free space is filled with slag, foam plastic, mineral wool or expanded clay. The top hatch must be completely watertight. Creating a brick cesspool is not at all a difficult task, the implementation of which will bring the comfort and convenience of civilization to your suburban area with a minimum of effort. Remember to regularly clean your cesspool and it will serve you for many years.
Not all settlements located at some distance from the city are equipped with a central sewer system. A brick cesspool allows you to solve almost all problems associated with the drainage of waste liquids from the house. It is incredibly easy to build and operate, and is also one of the most affordable options for organizing waste pits.
The main advantage of a brick cesspool is the simplicity of its design. This drainage container can be round or square. The depth depends on the required volume, the standard value is 2 meters. The earthen walls are strengthened with brick blocks, depending on whether the pit is closed or open; The bottom is arranged in the same way.
Photo example of a multi-chamber cesspool
Sewer pipes are connected from the house to the tank. At the places where they are connected, pipes are led out from the brick walls. This allows for a hermetically sealed connection between the branches.
Advantages of a brick cesspool:
- High tightness. During the shelf life, draining effectively protects the soil from the penetration of feces or poisonous liquids into it;
- Resistance to aggressive external factors. Cement and ceramics perfectly withstand aggressive environmental influences; they are not afraid of temperature changes or pressure from earth masses. Unlike more elastic, polymer structures, brick structures do not need to be additionally insulated or protected with a metal casing;
- Ease of arrangement. To build such a drain pit, no special knowledge is required. The basic requirements for depth and wall thickness are given in publicly available standards. To organize joints, a standard cement mixture of M500 concrete is used;
- Affordable price. The cost of a brick drainage pit (subject to independent work) is an order of magnitude lower than constructing a plastic tank or metal barrel.
But a brick drain structure also has some disadvantages. In particular, this is a short service life. Cement and ceramic bricks under prolonged exposure to high humidity and aggressive compounds decompose within 15 years. After this period has expired, the reservoir will begin to leak waste into the ground and groundwater, which can poison them.
A brick pit silts up very quickly. Many craftsmen solve this issue by organizing multi-chamber drains. In this design, solid waste remains in the “black” compartment, and the liquid flows into the “finishing” settling tank. This will allow you to significantly save on sewerage services.
Video on the topic:
Initially, you need to choose the right place to place the drain. According to the law, for any violation of the construction or use of a cesspool, the homeowner will be required to pay a fine. What requirements does SNiP put forward for the construction of a closed brick pit?
:
- The minimum distance from the fence or fence must be at least 8 meters. In this case, it is permissible for the hole to be located no further than 3 meters from the highway or any other road;
- A distance of 15 meters is maintained from the facade of a residential building;
- If there is a well, a well or a reservoir on the site, then you need to retreat from them from 20 to 50 meters. According to the latest SES requirements: the farther the better;
- To preserve the health of the soil, a distance of 30 meters is maintained from the vegetable garden or fruit-bearing garden.
Failure to comply with any of the listed requirements is equivalent to a violation of environmental safety. As a punishment, you will have to pay several thousand rubles for a secondary violation. In the future, the amount will increase several times.
Installation of ceiling and hatch
Floor installation
Densely laid logs or reinforced concrete slabs are used as flooring. The transition beyond the walls of the cesspool should be 0.5 m on all sides. The size of the hatch is 70 cm. Waterproofing material is laid on top of the ceiling; for this purpose, roofing felt is the optimal choice. Installing a double manhole cover will protect the pit from freezing in winter and from spreading odors during hot periods. The first cover of boards is installed flush with the ground, and the second - at the ceiling level; it must be protected with waterproofing. The distance between them is filled with insulation or expanded clay.
A cesspool is easy to install, but its importance for comfortable living in the house is simply enormous.
Construction of a cesspool
Choose a place so that a sewer truck, which has impressive dimensions, can drive up to the pit.
If, after weighing all the pros and cons, you still decide to use a brick, you should follow a certain procedure. Firstly, the choice of location is important. A cesspool, according to current sanitary standards, cannot be located closer than 5 m to residential buildings and 2 m to the fence. In addition, the drainage pit should be located below the level of the drinking water source and as far as possible from it. Failure to comply with these standards can lead not only to fines from regulatory authorities, but also to the risk of contamination of the water, and with it both animals and people. In addition, ensure that sewage disposal equipment can approach the cesspool at a distance closer than 4 m, otherwise the hose will not be long enough. To build a brick cesspool you will need:
- Bayonet shovel with long and regular handles;
- Scoop shovel with a long handle and special sides;
- Roulette;
- Pegs for fencing and markings;
- Ladder;
- Master OK;
- Building level;
- Buckets.
The cylindrical shape of the tank is considered the most resistant to ground movements, which means there is less risk of wall destruction.
It is important to determine the size of the drive. Its depth cannot exceed 3 m, otherwise there will be difficulties with pumping. The width of the cesspool is usually 1 m. A mandatory design feature of the storage tank is a significant slope of the bottom towards the intended hatch. Digging a pit is the most labor-intensive part; it can be made easier by hiring special equipment like an excavator. The top fertile layer of soil can be used in the garden plot. Be sure to leave approximately 1.5 cubic meters of earth in order to fill the ceiling and provide protection from freezing.
A sand cushion 10-15 cm thick is placed at the bottom of the pit, the same amount of concrete and a screed (up to 4 cm) of cement and sand are poured on top. You can use a ready-made reinforced concrete slab, placing it at an angle of 45 degrees. The cesspool is most often made square or rectangular. The walls are erected by laying half a brick or a quarter of a brick in a checkerboard pattern on a sand-cement mortar. It is best to tie every 4th and tying rows with strong cement mortar. The total thickness of the beams is 12 cm, and the masonry is 25 cm.
Photo
Laying out the walls
Construction from broken bricks
Jumpers for ceiling installation
Part of the cesspool is made of masonry cells