Are you hesitant to build a full-fledged bathroom in your dacha, but have decided to limit yourself to amenities in the yard? Agree, it would be great if this building was convenient to use and looked decent, and not only did it not rain on your head during your visit? But on the way to realizing your plan, you need a drawing, but you don’t know how to execute it correctly?
We will show you how to make a comfortable restroom out of an ordinary rural toilet. To do this, it is worth building not “by eye”, but according to a pre-developed project. In the article we have selected the simplest solutions, providing them with detailed diagrams and drawings. We also looked at popular types of closets for dachas, their features and types of materials used for construction.
In fact, you don’t have to make a drawing of a country toilet yourself; you can use the ready-made solutions given in our article. Decide on key features of the restroom, such as the materials used and the presence of a cesspool, and then choose a toilet model that you like. To help the novice designer, we have provided a detailed video on creating a drawing.
Selecting the appropriate project type
To design a drawing, you need to decide on the type of toilet. This may be a toilet with or without a cesspool. In addition, the cesspool can be used for the benefit of the household and compost can be produced in it.
A building with a sealed container instead of a cesspool would be appropriate in an area where groundwater is located too close to the surface of the earth.
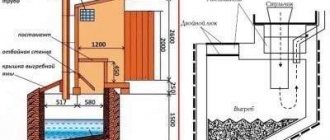
No. 1 - classic country toilet with cesspool
The most common and familiar design of a simple toilet for a summer house is a model with a cesspool. The principle of this design is simple: all waste falls into a deep hole, which is located directly under the toilet booth.
If the cesspool is full, they call a sewer man who pumps out all the sewage, and the toilet can continue to be used.
This scheme for a country toilet is time-tested. Its main advantage is that the pit does not need to be maintained for quite a long time. If the toilet is used only during the summer season, you may not have to call a sewer at all.
Since a shower in a country house is just as necessary as a toilet, some try to combine these two projects into one.
If you build a summer shower in one part of the site, and a toilet house in another, you will have to do a lot of shoveling work, because a drainage pit is needed in both cases.
By combining amenities, you can significantly reduce labor costs for excavation work and the amount of materials required.
No. 2 - powder closet or toilet without a pit
A simple way to make a drawing of a toilet for a summer cottage is to design it according to the powder-closet principle.
This type of toilet does not require a cesspool; all waste goes into a tank directly under the toilet seat. This can be a plastic or metal tank or bucket.
Since the main problem with such toilets is an unpleasant odor, the sewage is sprinkled (powdered) with adsorbent substances, which protect the restroom from the appearance of a specific “amber.”
In toilets of this type there are always two containers: for collecting waste and for storing powder. Containers need to be cleaned regularly
Wood ash, peat, sawdust, and sand are used as adsorbents. By and large, a powder closet with peat is a homemade variation of ready-made industrial dry closets that use the same peat as a filler.
No. 3 - toilet with compost pit
Another option, ideal for a summer cottage, is a compost-producing toilet. As you know, compost is an excellent organic fertilizer for plants.
Natural fertilizer will never be superfluous, and special technology allows it to be produced at an accelerated pace from almost nothing.
In order for the compost to be saturated with oxygen, it must be loosened regularly. For this purpose, a special lever is provided for manual mixing.
The toilet is equipped with a compost pit. It is better if there are two of them, so you can use each of them in turn while the compost matures.
The pits are designed in such a way that the finished fertilizer can be easily removed. This additional functionality will appeal to those who are concerned about the environment.
How to make a cesspool?
In order for the bathroom to be built in the country according to all the rules, it is important to strictly comply with certain sanitary and hygienic requirements:
- the place for the toilet must be at least 20 m from the well;
- It is unacceptable to place a bathroom in the very center of the yard;
- when choosing a place for a restroom, you need to take into account that it is at least 1 m away from the border of the neighbor’s property;
- during the actual installation of the toilet, it is necessary to take into account the wind rose so as not to smell an unpleasant odor;
- When choosing a place for a restroom, you need to make sure that there is access for a sewer truck.
To comply with all hygiene standards, the following points must be taken into account :
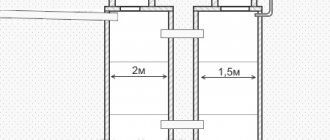
- The drainage pit must have a depth of at least 2 m;
- The waste pit is made with a square configuration, in which the length of each side should be 1 m. You can also make the pit in the form of a circle with an internal diameter of 2 m so that reinforced concrete rings can be installed there.
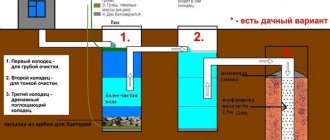
Among the possible methods of sealing a drainage pit, the installation of concrete rings provides the greatest reliability. This option is preferable for the following reasons:
- a structure made of reinforced concrete rings will not allow runoff to penetrate into groundwater;
- you will provide protection from contamination of the future harvest.
Using reinforced concrete rings for a cesspool, you can guarantee a high level of sealing of the sewage system in your country house.
A couple of decades ago, wooden boards or bricks were used to strengthen the drainage pit from the inside. Now, in order to reliably lock the drains, they use concrete rings and make the bottom based on a concrete screed. True, this option has one important drawback: to clean such a cesspool, it is necessary to use a sewer truck . However, if you do not use your dacha all year round, then you will not incur significant costs in maintaining the dacha bathroom clean.
Recent Entries
Chainsaw or electric saw - what to choose for the garden? 4 mistakes when growing tomatoes in pots that almost all housewives make Secrets of growing seedlings from the Japanese, who are very sensitive to the soil
Considering various options for installing a septic tank in the country, many owners choose a drainage system. However, this bathroom option is only advisable if the family uses water in small quantities. The fact is that if the rate of water consumption turns out to be high enough, this will create certain difficulties with waste disposal. In addition to this, when using the drainage system, the owner and his family members will constantly smell in the yard, since in this case there is a high risk of groundwater contamination.
In general, the drainage system is made according to the same scheme as described above. The difference is that it does not require the installation of a reinforced concrete slab; instead, the hole is filled with a layer of sand and gravel:
- the sand should be coarse-grained and about 10 cm thick;
- It is recommended to use granite crushed stone in a small fraction and cover it with a layer of 5 cm.
The upper part of the septic tank is covered with a coating based on thermally bonded geotextile. However, having decided to build such a septic tank, you need to take into account that environmental services have a negative attitude towards such structures.
Ready-made drawings and diagrams of a wooden toilet
Once you have decided on the material for the above-ground part of the toilet house, you need to develop drawings to find out how much material will be needed. It is important to detail every element so as not to miss anything important. In order not to reinvent the wheel, you can find a ready-made drawing.
The most commonly used models of restroom houses are:
- hut;
- mansion;
- birdhouse.
The scheme for constructing a wooden toilet in a country house is chosen based on practical considerations.
No. 1 - “hut” diagram with dimensions and description
A country toilet-hut is a compact and economical project. All structural elements have a simple geometric shape, which speeds up the construction process and simplifies the construction of the drawing.
Buildings may differ in size, materials used, complexity of design and design solutions, but the general design principle remains unchanged
Start with the front and back wall of the restroom. They make a frame in the shape of a triangle with several stiffening ribs in height. The length of the cross beam is 150 cm, the width of the vertical posts is 15 cm, the step between the intermediate posts is 30-40 cm.
The height of the corner posts is 177 cm, the intermediate posts are 287 cm. The inclined elements in this drawing are selected to be 312 cm long.
On the left is the back wall, on the right is the front, with an opening for the door. The same elements are depicted in spatial form in the corners
The design of the front wall differs in that the vertical posts are located at a greater distance from each other. This is due to the need to install an entrance door.
The distance between the posts will depend on the design of the door. Typically, an opening 70 cm wide is suitable. At the top of the opening, a ceiling is installed at a height of 2 m 15 cm.
The remaining geometric dimensions of the frame itself coincide with the dimensions in the drawing of the rear wall.
Drawing of the frame of a country toilet of the “hut” type. From a rectangular beam or from an edged board of sufficient thickness, you can construct a fairly strong one-piece structure
The walls are connected by longitudinal beams, each 122 cm long. Another cross beam 150 cm long is placed in the middle. The design of the main supporting structure is ready.
Start building the pedestal. Its height is selected in accordance with the wishes of the summer resident. The average size, suitable in most cases, is 50 cm.
Install 2 half-meter vertical posts at the level of the vertical intermediate posts of the rear wall. The vertical elements are connected by crossbars. Their size is also 50 cm.
This is the kind of neat toilet house you will get if you stick to this project. There is a hole above the door for ventilation
These sizes are suitable for a medium-sized toilet. It is worth noting that the useful height of the interior is 2.15 m. In this case, the total height of the building will be 3.5 m.
This is due to the fact that the roof slopes connect at a very sharp angle. The ceiling is sewn up at a height of 2.15 m, so the restroom will be warmer and more comfortable. Read more about the process of building such a toilet below.
No. 2 - drawing of a “birdhouse” with a cutting table
A more complex architectural form is a country toilet-birdhouse. This option is most common. The drawings show that the side walls are in the shape of rectangular trapezoids, and the rear and front parts are rectangular.
Unlike the “hut”, such a restroom is much more comfortable and spacious. More material will be required than for the previous version
To prevent the wood from becoming moist and deteriorating from constant contact with the ground, it is recommended to make the toilet slightly elevated.
Special runners for the base are installed, about 12-15 cm high. The drawing shows that the back wall is shorter than the front. The height of the latrine is 2.08 m at the rear and 2.78 m at the front.
As a roof, the author proposes to make a continuous flooring from an OSB sheet, on which soft tiles will subsequently be laid
Thus, with a building length of 1.72 m, the roof slope will be about 22 degrees. The width of the “birdhouse” built according to this drawing will be 1.45 m.
Design solution with insulation:
The drawing also takes into account the possibility of additional insulation of the roof with foam plastic. In this case, another tier of rafters is designed 20 cm below the main one
Each wall is designed and manufactured separately, and then they are connected to each other to form a spatial model of the restroom. Each of the walls is depicted in detail on separate sheets of the drawing.
A very important nuance is the plan for cutting the boards. This addition greatly simplifies construction.
On the facade drawing there is a design for the entrance door in two versions: when finishing the toilet with siding or a block house
Particular attention to the sizes of individual elements:
Some of the boards are sawn with an allowance of 50 mm, the rest with an allowance of 100 mm. The bevel is 15 degrees, the end board is adjusted on site
Opposite wall without window:
The left wall is designed similarly to the right one, but there is no window on it, so the drawing becomes even simpler and clearer
In addition to the walls, you also need to take care of the ceiling. In this case, only one ceiling is used - at the bottom of the toilet. The drawing shows the frame of this element and a table for cutting boards.
In addition, there is a plan for cutting a standard OSB sheet that can be used to cover the floor.
The antiseptic-treated timber is assembled using nails or studs. In the latter case, you need to pre-drill holes for fastenings
It is necessary to consider insulation:
The lower floor is also insulated with foam sheets. The author of the project proposes to lay 2 layers of polystyrene foam, 50 cm thick, and then sew up the thermal insulation layer with an OSB sheet
Rafter system drawing:
Building a wooden toilet involves a certain percentage of dimensional error. To achieve an accurate connection of the rafters with the support beams, cutouts are made in them already on site
A table of materials helps you create an estimate.
The table of materials even includes little things like door hinges or plugs. It shows that for glazing you need to purchase a 600x600 mm window block
The table of materials shows that the country toilet according to the project will be finished with siding on the outside. Roofing is at the discretion of the customer. Slate or corrugated sheeting, as well as roofing felt or tiles are often used.
Designing a brick toilet with drawings
The foundation for a brick toilet can be a reinforced concrete curb buried in the ground, or concrete blocks located at the corners of the structure.
A standard small cabin with a wall area of 8 square meters will require about 300 bricks to build. The calculation is approximate and very exaggerated, but for a general understanding of the process this information is enough.
Sequence of actions when laying bonded and treaded rows of brickwork. The walls of the toilet must be strong, because the building will be used for many years
For such a volume of masonry, you need to design about 60 kg of cement to prepare the mortar. The dimensions of a brick country toilet can be taken from the drawing of a birdhouse toilet.
If the wooden walls are made separately, then the brick outhouse is laid out in rows along the entire perimeter.
Cement mortar takes time to gain strength. If you lay out all the rows of masonry at once, the lower ones will bear a large load, under the influence of which the unset mortar will simply be squeezed out of all the seams.
To prevent this from happening, the laying is carried out in several stages. Optimally – 4-5 rows per day. Construction will be delayed, but the result will be much better.
Openings must be shown on the drawing in advance so that during the laying process you are not distracted by unnecessary calculations and adjustments
The roof can be pitched, as in the case of a wooden country birdhouse-latrine, or gable. Depending on this, the layout of the rafter mesh changes. The toilet is covered with the same slate, corrugated sheeting or other covering materials.
In addition to the listed types of closets, our website has an article on how to design and build a toilet with a shower. This is especially true if the territory of the summer cottage is not too large.
Options for outdoor toilet stalls
You can build a toilet stall from different materials. Most often, the basis of the structure is a wooden frame covered with OSB board, tongue and groove board, plywood or siding.
A toilet covered with planed boards looks neat and cozy
Moving away from the use of a frame and sheathing, the house can be built from mini-timber, thereby creating a picturesque imitation of a log house.
Lovers of natural wood can also be advised to use a blockhouse for cladding. It is cheaper than a massive log and is easily mounted on a frame. The walls of the toilet, lined with wooden herringbone paneling, look no less attractive.
Many dacha owners are not satisfied with the rustic appearance of the “birdhouse” toilet. Striving for originality, they erect luxurious log mansions on the plots for “solitary reflection.”
Bricks and blocks as materials for constructing latrines are still very popular. Whatever one may say, the capital structure will last for decades. Neither dampness, nor wind, nor sun will harm it.
If there are no facing bricks at hand, then the walls can be built from the remains of red and silicate bricks. High-quality plaster will hide uneven masonry.
The cabin, built from assorted bricks, is awaiting plastering.
Translucent polycarbonate can be used to cover the cabin from a metal profile. This material looks very aesthetically pleasing and is not afraid of moisture.
Sheet corrugated sheets are a practical and durable material for toilet cubicles. It can be placed on either a wooden or steel frame. The only condition is the internal lining of the walls with insulation. Without this addition, there will be a hot “oven” in the summer and a freezer in the winter.
The interior decoration of the cabin with plastic lining is laconic and hygienic
Straw blocks can be classified as unusual materials used for the construction of latrines. A cabin built from them is warm and cozy. Anyone who wants to amaze the imagination of neighbors and guests does not go to a construction site to buy materials. Having collected a certain number of empty bottles, he builds a toilet out of them, “to everyone’s surprise.”
In addition to rectangular and rounded structures, “huts” of different sizes are very popular.
There are two rational grains in this decision:
- The slopes of a steep roof replace the walls;
- The unusual appearance of the building adorns the landscape.
Very often the toilet becomes part of the utility unit. This solution allows you to place several rooms in one building. As a result, savings are achieved during construction (common walls) and the comfort of use increases (a warm toilet is always at hand).
Solid combination latrine with shower, lined with siding and covered with a hipped bitumen roof
Option for a brick toilet interconnected with a shower stall
Aesthetically, the combination of a log frame and a plastic slate roof in one outbuilding (toilet-shower) is not very successful
Some owners combine two toilets in the building: “for gentlemen and ladies.”