Features of working with metals
Metal is strong and durable, but requires certain efforts and the use of specific techniques when processing and joining parts. Almost any metal is used in the manufacture of crafts. The most common materials are steel, aluminum, copper, titanium, nickel and some other varieties. Purchasing new, quality material will be quite expensive, and therefore various metal scraps are used - sheets, plates, profiles (angles, pipes, special products), tin, as well as structural parts.
Safety precautions
Working with metals requires caution and safety precautions. Sheet material and nicks on workpieces can cause cuts, so gloves must be used. The workplace must be comfortable, parts must be properly secured to prevent injuries from falling. Only high-quality tools and reliable equipment should be used.
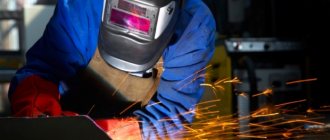
Particular care is required when carrying out welding work. When conducting them, protective equipment must be used - a mask or shield, a protective suit, thick mittens or gloves. The place must be equipped with reliable ventilation. Particular attention should be paid to fire safety measures. First of all, proximity to flammable materials is not allowed, and fire extinguishing agents must be at hand.
Any activity involving the processing and cutting of metals with rotating tools and equipment is quite dangerous. It should be remembered that the workpieces can heat up significantly, and metal shavings can fly away at high speed. Protective covers must be provided and eyes must be covered with goggles.
How to choose steel jewelry?
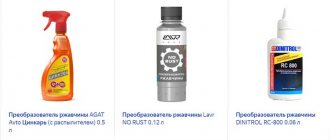
A high-quality accessory cannot cost less than 150 rubles if we are talking, for example, about a ring of a simple design. A temptingly low price tag is inherent in non-factory jewelry from China, Korea and other Asian countries, made from steel with unsatisfactory characteristics. Such a product can rust, darken, and break.
Steel jewelry is a product subject to certification. The seller must have a certificate that says “Piercing Jewelry” in black and white (this is true even if you are buying costume jewelry).
On a note! A steel ring, unlike a silver or gold one, cannot be enlarged (stretched) or reduced (compressed). Steel is too strong a material, so when buying jewelry it is better not to make mistakes with the size
Technological techniques
When making metal crafts, specific techniques are used:
- To give shape – forging (hot and cold), stamping, pressing.
- During processing – cutting, drilling, milling, turning and metalwork.
- The connection of structural elements can be achieved by welding, soldering, rivets, bolts and screws, and clamps.
To decorate and impart certain properties, embossing, heat treatment, engraving, oxidation, etc. are used. Metal crafts look great in the interior of an apartment, and can be used for the garden, cottage, decorating facades, and simply for making souvenirs and gifts.
Features of hot forging
With significant heating, the metal loses strength and becomes plastic, which is used in hot forging. To achieve this effect, different metals must be heated to different temperatures. Ductile metal is easily bent and shaped by mechanical action. The main disadvantage of this method is the need for a special furnace (forge), the cost of fuel for heating, and the increased danger of work. It is difficult to use in urban environments due to the need for a special room.
Equipment and tools required for hot forging:
- a forge capable of heating up to 1500 degrees;
- the anvil on which forging is carried out, weighing from 140 to 400 kg, depending on the dimensions of the workpieces;
- shperaks for decorative forging;
- a sledgehammer weighing at least 4 kg and a large hammer (handbrake) weighing 0.6-2 kg;
- mining tongs of several types depending on the shape and size of the workpiece;
- figured (shaped) hammers for giving workpieces an original shape;
- additional tools: chisel, bit, hammer, crimpers, smoothers, hooking, lowers, staples, nailer, forks;
- measuring tools - tape measure, calipers, blacksmith's square, metal ruler, calipers, templates and gauges.
To give the workpiece different shapes, the following techniques are used:
- Settlement is an increase in cross-section due to compression.
- Extraction - increasing the length while simultaneously decreasing the cross-section. It is achieved by striking with a sledgehammer or rolling between rollers.
- Flattening - giving a flat shape to a workpiece by hitting it with a sledgehammer and a handbrake.
- Flexible. For the required bending, shperaks, an anvil tip, and figured hammers are used.
- Twisting around the axis of the workpiece. It is carried out by fixing one end and rotating the workpiece.
- Cutting off certain areas to give the desired shape and size.
- Relief and pattern printing. It is provided with a chisel.
When hot forging, the heating temperature of the workpiece plays an important role, determining the degree of plasticity. For steel it can be in the range of 820-1200 degrees. The degree of heating can be controlled by changing the color of the metal. A light cherry or light red color indicates that the temperature has reached 800-900 degrees. When heated to 900-1100 degrees, the steel turns orange. With further heating, the color changes from dark yellow (1060-1150 degrees) to bright yellow (1200-1300 degrees).
Features of cold forging
You can also give the metal the desired shape by cold forging, that is, without heating. This is achieved using cold bending, pressing and welding. The main advantage of the method is that there is no need for a forge, which makes it possible to equip a workshop in an urban environment. An important drawback is the need to accurately perform the deformation, since it is very difficult to correct the error. In addition, during cold forging there are restrictions on the size of the workpiece and the hardness of the material.
Using cold technology you can create the following forms:
- Peaks or paws. This is giving a special shape to the ends of the workpiece. To do this, they are slightly flattened and then sharpened or rounded.
- Curls. Several options stand out. Baranka - bending the ends of the workpiece in one direction. To obtain a “chervonka”, the American dollar symbol is imitated. The “comma” figure implies an elementary curl at one end.
- Ring. A rod of any cross-sectional shape bends around a cylinder. If you wind it in the form of a spiral and then cut it, you will get several identical rings.
- Torsion. It is obtained by twisting a rod or strip around a longitudinal axis. The photo shows examples of torsion bars. A simple screw-shaped design is suitable for the grille. More complex elements (“lanterns”) are made from rods collected in a bundle.
When performing cold forging, the following tool is used:
- devices for bending pipes and rods (“benders”);
- “snail” for creating spiral curls;
- flashlight - a device for making torsion bars;
- “Wave” - a system of rollers that provides a wave-like bending of the workpiece;
- device for winding rings and springs;
- twister - a device for twisting a workpiece along an axis.
In addition to the listed specific devices, there is a need for sledgehammers and hammers, tools for cutting metal, crimping tools and a riveting machine.
How to make frosty patterns
Crystallit, or the creation of frosty patterns, does not take much time, but looks very impressive, reminiscent of ancient craftsmanship. The pattern effect is achieved by revealing the structure of the tin, reminiscent of crystals. It is best to use tin cans to create a frosty design, as they are coated with a layer of tin. In order for the design to appear, you need to heat individual parts of the metal over a candle. It is very important not to overexpose the metal over the fire, otherwise the product will be damaged. The tin layer should not burn, but only change.
You can create a frosty metal pattern by heating and melting tin on the surface of a metal plate.
You can use a burner, over the flame of which it is very convenient to move a sheet of tin. When the tin melts slightly, it appears shiny for a couple of seconds. There is no need to try to heat the entire sheet of metal evenly, as this will create a monotonous pattern. Even if you heat the sheet only in the corners, you will get unusual patterns.
After the heating procedure, it is necessary to sharply cool the sheet of metal by dipping it in cold water or spraying it. To enhance the effect, wipe the metal sheet with hydrochloric acid (15% solution) using a cotton swab tied to a stick.
If the sheet was slightly heated and the pattern did not work out, then you can erase it once with sandpaper, but when you try to clean it again, the tin will be completely erased.
You can use wax paint by coating only certain parts of the metal sheet and then heating it. In order for the design on the can to remain for a long time, it is necessary to cover it with a special varnish. You can also use colored transparent varnish, which will give the product even more originality.
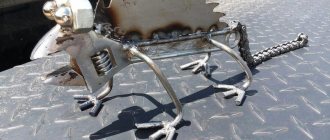
Forged crafts
Forged elements are widely used in the manufacture of elegant crafts for home and garden:
- Metal patterns. They can be produced either by hot or cold forging. Patterns are formed according to a pre-prepared template using one piece at once or assembled from several separate parts. When making it, it is important to decide on the design style. In addition, by choosing the hot forging mode, you can give the metal different color shades - from yellowish to purple tarnish.
- Decorative gates, fences, stair railings. The photo shows a gate of typical dimensions for a country house. They can be made by cold forging. First of all, drawings of each forged part and the entire assembled structure are developed. The composition uses basic forms characteristic of cold forging (peaks, curls of various types, torsion bars). The parts are connected using clamps and welding.
- Flowers. Using forging, you can create crafts in the form of various flowers. The photo shows a metal rose. Its petals and leaves are made of sheet metal 0.3-0.5 mm thick. You can use steel wire or rod for the stem. First, templates of parts are cut out of cardboard and transferred to metal. The blanks are carefully cut out with metal scissors. The burrs are removed. Forging the desired shape is carried out using a hammer. The edges of the petals are bent with round nose pliers. The petals are collected into a flower and secured at the bottom with soldering. The leaves and flower cup are attached to the stem with wire or clamps. For such a craft, it is recommended to select steel in which the carbon content does not exceed 0.3% and is free of chromium, sulfur and phosphorus.
Forging allows you to create crafts of varying complexity and sizes. Forged elements look beautiful on garden benches, on window grilles and simply fit into the interior of an apartment.
DIY metal candlesticks
A unique candlestick can be made using simple materials and tools:
- a metal strip made of sheet 3 mm thick, 40 mm wide, 400 mm long and a strip of the same metal 20 mm wide and about 500 mm long;
- a piece of metal sheet 2 mm thick, dimensions 100 x 100 mm;
- green paint;
- hacksaw;
- files – flat and round;
- hammer;
- drill with 6 mm drill bit;
- ruler, needle and core for marking;
- welding machine for assembling parts.
Candlestick - sketch
Part of bracket No. 1, which will be attached to the wall, is made of a strip with a cross-section of 3 mm x 40 mm, length 400 mm. The ornament of your choice is applied along the edge of the workpiece using a round file. A hole is drilled in the strip for hanging on a wall mount. The upper end of the strip can be bent using a hammer, holding the part in a vice.
A piece in the form of a circle is cut out of a sheet 2 mm thick to install a candle. This detail can be decorated with a flower, which is cup-shaped in the manner described in the previous section. A hole with a diameter of 6 mm is drilled in the center of the round part. Souvenirs made with soul and with your own hands require imagination and some skills when working with plumbing tools.
Next, bracket No. 2 is made with a cross-section of 3 mm x 20 mm and a length of about 50 cm. One of its ends will then be attached by welding to bracket No. 1. The second end is cut lengthwise into 100-150 mm. The ends are bent in different directions, they are given an arched shape. The resulting candle bowl is placed on the resulting stand and spot welded to the strips.
Now you need to think about how to attach the candle to the candlestick. For this purpose, you need to take a piece of rod with a diameter of 8 mm and a length of 35-40 mm. One end of the 10 mm rod is machined to a diameter of 6 mm. At the second end, a point is created on a lathe or using a file. The end with a diameter of 6 mm is inserted into the hole in the bowl of the candlestick.
After assembling all the parts, the candlestick is painted with metal enamel in a dark green color or patinated. If you like hand-made metal engraving as a decoration, then the easiest way is the electro-chemical method, which is accessible to everyone.
When welding high-strength steels, it is often necessary to resort to additional technologies. Do you need a strong metal door? Make it yourself! Detailed instructions in this article.
Do you want to do something useful for your home? Interesting information at https://elsvarkin.ru/prakticheskoe-primenenie/stroeniya-iz-metalla-dlya-doma-i-dachi/ link.
Art welding
People with welding skills are able to create real works of art from metals. A trend called art welding, based on the use of gas welding for the manufacture of sculptures and various decor, is becoming widely popular. Thanks to the use of this technology, by changing the heating mode, a play of color is ensured, and various shades become the basis for decoration. Real masterpieces are made from titanium, stainless steel and zirconium.
The photo shows the practical application of art welding. The procedure for creating a sculpture:
- production of wire frame;
- welding the body of a figure from pieces of titanium sheet;
- welding small parts and patterns;
- making a stand in the form of a tree branch and attaching a figure to it;
- deburring, additional processing and grinding.
Using artistic welding, you can create small souvenirs and large sculptures for landscape design. Rainbow stains on the metal surface from a thin layer of oxides provide a unique look.
Simple things made of metal
You don't have to cut the tin can, but simply decorate it with metal elements.
One of the simplest but most useful products is a metal box, which can be made from an ordinary tin can. To create a box you will need the following tools:
- sandpaper;
- scissors;
- ruler;
- pen and pencil;
- a solid base to work from;
- paper for creating a drawing.
First, you should remove the paint from the surface of the can using sandpaper, it is better to do this when the can is full. Otherwise, you will have to work more carefully, because if the metal gets wrinkled, you won’t be able to make a beautiful box.
Next, you need to cut the can so that you get a sheet by cutting off the bottom, top and cutting the can lengthwise. It is better to cut off all uneven edges immediately. After this, the sheet is placed on a hard surface and an image of the drawing is made on it in pencil. Then you can move on to creating the pattern itself, which can be anything, but symmetrical details look most impressive. The pattern is applied with a ballpoint pen, which easily presses through the aluminum, but to give greater texture, it should be drawn several times over each place of the pattern. After that, all that remains is to assemble the box.
A metal owl can be placed in the garden, which will not only decorate the area, but also scare away birds and mice.
If it is possible to use welding, then you can make a very beautiful metal owl, for the manufacture of which you need to stock up:
- paper;
- pencil;
- cardboard;
- scissors;
- thin metal;
- grinder;
- hammer;
- chisel;
- welding machine;
- washers and bolts;
- iron rods or wire.
First, the owl diagram is drawn on paper, then transferred to cardboard so that each part can be cut out separately. It is necessary to make eyes, a body consisting of feathers, wings, and a tail. Parts are cut out of metal using a grinder. Holes need to be made in the eyes large enough to accommodate the bolts. On each scale it is necessary to make notches in the form of feathers using a chisel. For the paws, you just need to weld the parts of the rod together. The owl's beak is made from a piece of bent metal. The beak and paws are welded to the owl last. It is best to coat the product with a special varnish so that it retains its beautiful appearance for a long time.
https://www.youtube.com/watch?v=uykkTLbPb1A
Application of coinage
Embossing is a special technique for creating a relief surface on metal. With the help of embossing, many dots are applied, which form a drawing or pattern. For amateur creativity, it is recommended to use thin metal sheets with a thickness of 0.1-1 mm. Aluminum, copper and brass sheets are best. You can apply embossing on tin, but on steel the relief has less volume.
Do-it-yourself embossing is done as follows. A design is applied to a metal sheet. The work is carried out on a hard surface, where a shock-absorbing rubber sheet with a thickness of about 10-12 mm is preliminarily laid. It is better to apply embossing to heated metal, which will gain additional ductility. A plasticine ball is rolled onto the surface to create a fat coating. Further along the contour, dots are stamped on the front side of the sheet. After the process is completed, the sheet is turned over, and the unpierced areas on the back side are slightly stretched to give volume to the design.
The pattern for embossing can be anything. Quite simple crafts in the form of tree leaves are popular. Similarly, you can create various patterns. For children's creativity (grades 4-5), it is recommended to make the first stampings on aluminum foil. It is quite pliable and can be pressed without hitting the stamp.
How to make a metal flower?
The technology for making a metal rose is not difficult to master. You just need to show patience and practical savvy.
To make metal jewelry by doing the work yourself, you will need a sheet of roofing iron, which is best annealed to give it plasticity and softness. Next, you need to mark five star-shaped figures on the metal. Four stars have pointed petals, and the fifth has straight petals. The diameters of the circumscribed circles of pointed stars: 12 cm, 10 cm, two 6 cm each. The figure with straight petals has a diameter of 8 cm.
The next step is to make three cylindrical mandrels with base diameters of 1, 1.5, 2 cm. The mandrel material can be hard wood or metal. The cut out star is placed on a slab of hard wood or lead. The mandrel is placed along the line connecting the center and tip of the petal. With light blows of a hammer, bend the metal of the petal around the mandrel. All petals are processed in this way. The smaller the diameter of the sprocket, the smaller the diameter of the mandrel you need to take for processing it.
Next, the mandrel with its end rounded end is placed in turn in the center of each sprocket and hit with a hammer. The stars should take a neat cup shape. Using pliers, you need to bend the tips of the flower petals outward at your discretion and desire. For the inner sprocket of the smallest diameter, leave the tips straight. The processing must be carried out in such a way that after its completion all the stars easily fold into each other. Metal flowers, skillfully created with your own hands, can be made not only in the form of a rose, but also any other flower. It all depends on your desire and imagination.
Next step. Cut leaves with embossed veins from metal. As a stem
you can take thick wire. Attach the blanks to the end of the stem and, for strength, grab them by spot welding with your own hands.
To give a flower a complete color scheme, it must be heated until red, cooled in oil and washed in gasoline. After all these procedures, the product will have a beautiful, very dark shade.
Easy craft options
Working with metal requires certain skills, and therefore you should start with simple crafts. The following easy options are offered:
- Owl . Using templates, the outline of the head, body, wings and other parts is applied to sheet metal. Using a grinder, the parts are cut out and the edges are cleared of nicks. Using a chisel, notches are made to imitate the plumage and main facial features. Holes are drilled at the location of the eyes and bolts are inserted. A metal piece is bent for the beak. Welding is required to connect all the parts. The craft is painted and varnished.
- Bench for a summer residence. The drawing of the craft is shown in the photo. The bench frame is welded from a steel profile in the shape of a rectangular pipe measuring 2x2 and 2x4 cm, according to the drawing. Boards 10-15 cm wide and about 2 cm thick are laid on the frame. The seat and back are formed.
The simplest crafts are made from tin. They can be made by children under adult supervision. Tin cans can be used as material. A design is applied to the straightened sheet using carbon paper, which is cut out with metal scissors or ordinary scissors. You can use a sharp knife. At the final stage, the crafts are painted. In this way you can create an interior wall of butterflies.
Master class: metal earrings without soldering
These are large, eye-catching earrings using the cold metal working technique: we will connect metal elements without soldering. The difficulty is "below average" because all the operations are simple, but I do not explain how to use a jigsaw or how to bend the wire into a ring.
0. What we need:
1) metal. Mine is sheet brass, but you can take copper, bronze, nickel silver, cupronickel, silver, nickel, aluminum. You may come across ready-made copper washers, they will work great :);
2) wire 1 mm thick - for earrings (it is best to put silver into the ears, you can use brass, bronze, copper and cupronickel, you can buy ready-made earrings made from hypoallergenic niobium, for example);
3) thick wire/rod for rivets;
4) metal tubes of various thicknesses. If you can’t find them at all (although they are sold in hardware stores), you can do without tubes;
5) a hand jigsaw with files (files are probably the only thing you have to buy in a jewelry store; their thickness will depend on the thickness of the metal to work with), but if you don’t use tubes, then you can get by with metal scissors and some strong tools cutters for thick wire (to be honest, I just don’t know what they use to cut it off - I always saw);
6) drills of the same diameters as the wire and tube that you will use for rivets + screwdriver and/or drill;
7) any hammers, steel block;
 round-nose pliers, two pairs of pliers/nose-nose pliers, preferably without notches;
9) if you use tubes, then to expand them you will need a steel ball (from a bearing)/cone/punch;
10) for processing the surface and edges: needle files/files, sandpaper, grinding attachments for a drill.
1. Let's start:
I didn’t have a sketch, I made it up as I went along