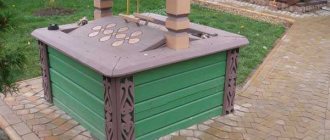
Everything that is built on the site of a country house, in addition to practical benefits, must also provide ethical satisfaction. Even an ordinary well can be designed in such a way that it becomes a decoration of the entire interior. For example, an excellent option is a wooden house over a well, which can be stylized as some kind of fairy-tale hut.
It is unlikely that anyone will like a pipe with a hose sticking out on the site. But most sand wells look exactly like this, introducing an imbalance into the interior of the entire site. Therefore, decorative design, from a design point of view, is simply necessary.
A wooden house will be an excellent decoration for a well
In addition, the above-ground arrangement is of practical importance - it protects the well and equipment from debris, and also insulates the structure in the winter.
Why do you need a well cover?
The shelter solves several problems at once:
- Prevents harmful effects of direct ultraviolet rays. If reliable protection is not provided, this will negatively affect the organoleptic properties of the water in the well.
- Additional protection against freezing in winter.
- Ensuring safety on the site (otherwise there is a risk that a child or pet will fall into the well shaft).
- Possibility of installing equipment for manual or mechanized lifting of liquid.
- Protection of a water source from accidental penetration of insects, household and construction waste, chemicals, etc.
In addition, a decorative well house is an important part of landscape design. Thanks to him, the building looks more attractive.
An important advantage of this design is that it is not difficult to make a house over a well with your own hands. For this, various natural materials are used, including natural wood, stone, for finishing - mosaic, porcelain stoneware , etc. If desired, the house can be given any look; it can resemble a fairy-tale mansion, a knight's castle, etc.
A simple solution - a pit
If it is not possible to spend significant amounts of money on installing a caisson, the problem can be solved in two ways: a pit is constructed and equipped, or a well adapter is installed.
The simplest solution from an installation point of view is a pit.
The pit is a recess dug around the wellhead, inside of which the shut-off valves of an autonomous water supply system are installed.
It is a simplified analogue of a caisson that simultaneously performs several functions:
- protects installed equipment from cold;
- protects the wellhead from precipitation and domestic waste;
- acts as a structure within which it is convenient to place a set of mechanisms that ensure uninterrupted operation of the pump.
Due to insufficient tightness of the structure, pits are not installed in areas with groundwater close to the surface. When their surface is marked at a depth of more than 5 m, the construction of a pit is a completely profitable and justified solution.
The pit is most often constructed from concrete rings or bricks, the inside is lined with insulating material, and the top is covered with a hatch or concrete slab
The only drawback of the design is insufficient tightness. The joints between concrete rings and brickwork can allow permeate water and precipitation and domestic waste to pass through. For this reason, it is not recommended to install a hydraulic tank and an automation system in the pit.
Types of houses and materials for their manufacture
When arranging a house in the country, you can choose the following forms of shelters :
- Classic gable roof with 3 corners. This is the simplest and most practical system; it is easy to make from scrap materials. There are other options - for example, a round log roof or a quadrangular structure. But even in its simplest form it protects against dust and precipitation.
- The canopy is combined with a gable roof. Such a system will be more complex, but its efficiency will be higher.
- Gazebo (open type house). In this case, the structure is installed on racks made of wood or metal. The gazebo itself at the base has any shape - square, octagonal, round.
- Log house This is a classic log house, the dimensions of which coincide with the parameters of a wellbore or a concrete ring well. Such houses come in different types - for example, with gable or asymmetrical roofs.
When choosing a type of shelter, you need to make a project. The dimensions are required so that the house protects the structure from external influences and at the same time is not too large - this will only complicate the maintenance of the system.
Wooden frame for making a house for a well.
Preparation of working tools and materials
During installation you will need the following materials:
- screws, nails, other fasteners;
- roofing material (ondulin, roofing felt, metal tiles);
- antiseptic impregnations;
- timber and edged boards;
- log, metal rods and chain for the gate;
- tools (a jigsaw - preferably an electric one, a plane, a hacksaw, etc.).
You may also need material for wall finishing using lining or block house.
Construction of a wooden frame
Wooden frame for a well.
The house is assembled on the basis of a frame made of boards and timber. To make the system durable, use a board with a thickness of 40 mm, and timber with a section of 80x100 mm.
This is a lightweight structure; it does not require a foundation, holes for posts, etc. The frame can be assembled directly on the ground and then installed on the head of a well or well.
The distance between the frame struts must be such that the structure can be accurately installed. This final stage of work is best done together.
The timber is cut to the calculated dimensions. First, the base is mounted, then the racks are attached to it. Self-tapping screws are used for this. After installation, the structure is secured using anchors or through bolts.
Cuts are made at the ends of the posts to install the gate. At the corners the frame is fastened with rafter elements. They are also made from timber, only with a cross-section of 50x50 cm. If finishing the house is not provided, it is recommended to treat the wood with impregnation and paint. After installation, be sure to check that the house has a strict vertical orientation and that there are no distortions.
A canopy is a simpler design. It is necessary to assemble a simple rafter system separately on the ground, which contains 2 beams and braces. The angle of inclination can be arbitrary, as long as the structure remains stable. At the last stage of the work, the flooring is made from boards, which are nailed to the frame from above.
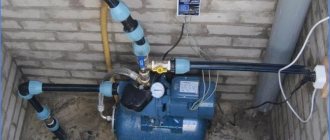
Winter option for constructing a well without a caisson, with a well adapter
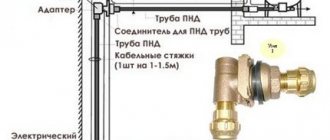
For houses with permanent residence, a pipe is laid from the well to the house and plumbing is connected. A borehole adapter is used for this. It is cut into the casing below the freezing depth. A submersible pump is attached to the adapter.
Water supply diagram from a well with an adapter
Advantages of a well with an adapter:
Disadvantages of a well with an adapter:
Materials and components for constructing a well with an adapter:
You will also need: stainless steel cable, cable clamp, tees, couplings, clamps, fittings, ball valves, plumbing bolts, insulation (linen), insulating materials.
It is recommended to use brass fittings such as Tiemme or Itap. It is highly undesirable to install fittings made of plastic.
Itap Brass Fitting
Special tools:
We wrote in detail about installing the adapter in the article Construction of a well with an adapter. In the same article you will find tips on how to make L-shaped and T-shaped rods for installation yourself. Here we will briefly list the stages of DIY installation.
Stages of work on installing a well with an adapter:
1. Dig a trench for the pipe. The optimal trench depth is 1.5 m, which is below the freezing depth for central Russia.
Trench for water pipe
2. Drill a hole in the well pipe. For drilling you will need a saw bit with a diameter of 40-44 mm. When drilling a metal pipe, the crown must be cooled with water. It is important to ensure that water does not get on the instrument.
Drilling a hole for the adapter in the casing pipe
3. Lower the threaded part of the adapter into the well and secure it. An L-shaped rod, which you can make yourself, is suitable for this. Place the end of the rod on the adapter, lower it into the hole and insert it into the drilled hole. Two workers are needed. One lowers the adapter and inserts it into the hole, and the other “catches” the thread from the outside and puts a rubber gasket on it, a ferrule and tightens the nut.
Installed threaded part of the adapter
4. Connect the pipe to the pump and to the adapter. Install a check valve on the pump. Then connect the pipe to the valve through the fitting. Connect the other end of the pipe to the removable part of the adapter.
Connecting a pipe to a well pump
5. Lower the removable part of the adapter with the pump into the well. To lower the adapter, use a T-shaped mounting wrench. You can buy it at a hardware store or make it yourself. To make a key, you need to take a 32 mm metal pipe and cut 1-inch threads at the ends. You need to screw a tee onto the upper end and make handles from scraps of threaded pipes. The finished key must be screwed into the removable part of the adapter, to which the pump is already connected. Then lower the pump into the well and connect the removable part of the adapter to the fixed part through the dovetail lock.
Homemade installation wrench made from metal pipes
6. Lay the pipe to the house and connect it outside to the adapter. The pipe must be connected to the adapter through a coupling.
Supplying a water supply pipe to a well
7. Stretch the electrical cable from the house to the well. Lay the cable in the same trench as the water supply pipe. To prevent the cable from breaking due to ground movements, place it in a 20 mm HDPE technical pipe.
Electrical cable in a protective tube. Instead of corrugated pipe, HDPE pipe with a diameter of 32 mm is now used.
8. Connect the electric cable and pump to the well cover. The cover has terminals for electrical connections.
EMS Well Cap Casing Pipe
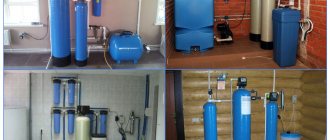
9. Install automation. Install and connect the hydraulic tank, relays and filters in the house. It is advisable to allocate a separate room (boiler room) for this.
Automation for a well in the house
The hydraulic accumulator, pressure switch and dry-running relay are connected through a five-pin fitting (five-pin).
The pressure switch turns on the pump when the pressure drops (the tap is opened) and turns off when the pressure rises (the tap is closed). Adjustable with screws. Usually set within 1.5-3 atm. The pressure switch is connected in series with the dry running relay. It turns off the pump if water stops flowing into it and the pressure drops.
10. Install water supply pipes throughout the house and connect plumbing. Pipes can be routed in one of two ways - through tees or through a manifold. For tee wiring, polypropylene pipes are used, for manifold wiring, pipes made of metal-plastic or cross-linked polyethylene are used.
Tee pipe routing
Construction of a water well without a caisson: do it yourself or in an installation company?
It is not difficult to equip a summer well with your own hands. As for the winter version with an adapter, it is more complicated. It is necessary to hermetically install the adapter itself, lay the pipe, install the automation, route the pipes around the house and connect the plumbing. More materials and components are needed and it is advisable to have experience in such work. If you are not sure that it will work out, then it is better to entrust the installation to professionals.
The Zagorod company carries out construction of wells with and without a caisson. We offer a summer version with a head or a winter version with a borehole adapter. We complete the work in 1 day, on a turnkey basis, with quality control and a 12-month guarantee.
Installation of a well gate with a handle
Scheme of a well gate with a handle.
Shelter is made for both wells and wells. In the latter case, you need to think about a device such as a gate for lifting water.
For it you need to take a log with a diameter of 25 cm and a length of up to 95 cm. Additionally, a metal rod is needed for the handle and stand to secure the structure.
The log is cleaned, leveled, the surface is polished, and the edges are joined with metal clamps to prevent possible deformation of the gate. Holes for the rod are made in the end parts.
Their diameter is up to 22 mm, and their depth is up to 50 mm. A straight rod is inserted into 1 of the holes, and an L-shaped rod (for the handle) is inserted into 2 holes. The finished structure is hung on racks. The metal chain with the bucket is wound at the last stage.
Manufacturing and installation of doors
A hinged door can be installed on the roof of the well, which facilitates access to the equipment. For production you will need boards. Their length should be 86 cm with a width of 21 cm.
Step-by-step door installation instructions:
- First, install the frame (frame).
- The door assembly is carried out taking into account the size of the resulting frame.
- At the bottom and top of the board, the doors are connected using bars.
- When the door is in a diagonal position, fix 1 more block, which will add reliability and strength to the door.
- Then the hinges are installed on the frame and door itself, after which you can hang the door leaf on the frame.
At the final stage, you need to install the handle, the valve and check how well the structure works. The door should open and close easily and not cling to the frame.
Door to the well house.
Detailed instructions for further actions
To carry out construction with your own hands, you need step-by-step instructions:
- the dimensions of the future building are marked along the perimeter of the well;
- holes are dug for corner posts, timber is installed according to the height of the proposed structure;
- The racks are leveled, sprinkled with gravel, sand and filled with concrete;
- after the concrete has hardened, you can begin building the frame;
- timber is used to tie the racks; to increase strength, metal corners and screws are used.
When tying, it is important to take care of the roof frame in advance. This will save time and simplify the design.
Finishing the house structure
After assembling the frame and erecting the roof, it is necessary to take care of finishing the building. To do this you will need:
- with the help of slats and lining they lath the walls of the house;
- high-quality insulation is installed on the inside of the walls;
- the lining itself is attached using special clips;
- the roof is sheathed, you can use tiles;
- the door and vent are installed;
- An electrical cable is supplied and a heating element is installed.
Dimensions in millimeters
Decorative elements are attached, the entire house on the well is varnished.