Properly created drainage is a kind of foundation on which the future health and well-being of all indoor plants, without exception, is based. The amount of moisture and air that is necessary to ensure the normal life of the flower will depend on it. Lack of drainage combined with improper watering is the most common cause of death of many indoor plants. So what is drainage?
Almost all beginning flower growers believe that drainage is the same expanded clay that is sold in stores. That it is enough to pour some of it on the bottom of the pot, and the job is done. This is a big misconception. Good drainage for a houseplant requires the correct amount of drainage material and a correctly selected and prepared pot for planting. The material of the pot, the number and diameter of the holes are an integral part of high-quality drainage.
Purpose of drainage on the site
What is drainage and why is it needed?
Drainage is a specialized network of drainage routes that serves to drain a site and remove water from buildings and structures. Soil drainage is a necessary measure for most sites. Moisture is not always a companion of exclusively swampy soils. The installation of a drainage system will be required in many situations: • the site is located in a swampy area; • high level of precipitation - heavy rains and dense snow cover;` • proximity to natural reservoirs - due to rising water levels, soil moisture increases; • the house is located in a lowland or at the foot of the hills - rain and melt streams flow down to the building and penetrate into the basement; • the predominantly clayey composition of the soil prevents the natural drainage of melt and rainwater.
Regardless of the ways it occurs, excess water brings many troubles to owners: • groundwater penetrates the basement and floods it; • penetration of moisture into the foundation leads to increased humidity and destruction of the structure; • excess water during rains floods home gardens and harms garden plants.
Depending on the conditions in a particular area, water can approach the building from below, from the soil layer, or from above - from rain or melting snow. Each case requires an individual way to deal with excess moisture. Therefore, it is necessary to choose a priority type of drainage or combine several types, combining them into a common drainage system. To do this, it is necessary to examine the terrain and soil characteristics, seasonal changes and weather conditions. After this, calculations are made and a drainage system is designed that can effectively drain excess water and protect the house and adjacent structures from moisture and flooding. Some types of drainage structures require special calculations and specialist intervention. Most drainages can be done independently.
What kind of drainage is there for indoor plants?
In fact, for drainage you can use any coarse or coarse-grained material that does not enter into chemical reactions when wet, is resistant to destruction, compaction, rotting, and has good water permeability. Typically used for drainage:
- Natural or similar materials - shards from ceramic products, pebbles, gravel, crushed stone, brick chips.
- Materials specially designed for drainage are vermiculite, agroperlite and drainage expanded clay with fragments of uniform size, sterile, and subject to special treatment. They are sold in garden centers and flower shops. In addition to the ability to optimally transmit moisture, they also have protective properties, cleanse the soil of toxins and heavy metal salts.
- If there is no “stone” drainage, it is replaced with polystyrene foam and its analogues. In addition to the drainage function, it also perfectly performs the role of protecting the earthen clod from hypothermia (but due to the difficulty of separation from the roots and poor water permeability, this option can be used only as a last resort).
Drainage for indoor plants. ©BootsNGus
Classification of drainage systems
There are several types of drainage structures adapted for drainage under various conditions and terrain features. First of all, drainages differ according to the principle of location and are divided into 2 categories: • surface - open channels of shallow depth, laid on the surface of the earth and designed to drain rain and melt water from the site, can be filled with crushed stone, covered with gratings or made in the form of small gutters ; • deep - they are a system of pipes that drain excess groundwater from the foundation of the house and adjacent structures, equipped with wells and drainage communications.
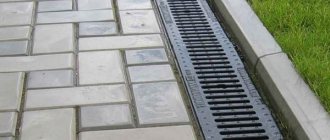
The main function of surface drainage systems is to remove rainwater from the site, which is why they are also called storm drains or storm drains. They differ in the design principle of construction and are: • point - with the location of water collectors under drainpipes with subsequent drainage through closed channels; • linear - drainage channels and gutters are also water collectors and can be completely open or covered with gratings; • combined - storm drainage system combining point catchment and linear water intakes connected into a common drainage system.
The simplest storm drainage is a system of gutters through which rainwater drains from the yard. More advanced and efficient designs require additional equipment - water inlets and waste catchers. The latter prevent clogging of drainage paths, retaining sand and dirt. Grids over gutters not only level the landscape, but also limit the entry of leaves and large debris.
What cannot be used as drainage?
The use of organic materials such as egg shells, tree bark, and nut shells is not recommended. They are susceptible to mold and rot, negatively affect the acidic composition of the soil and can lead to a number of diseases of indoor plants or even death.
It is undesirable to use sand, both fine and coarse, as drainage. It clogs the drainage holes, which leads to rotting of the root system. When using river pebbles, you need to wash off the sand from them.
Marble chips are especially unsuitable; when interacting with water, the soil greatly changes its acid composition and becomes sharply alkaline.
0
Back
Arrowroot: photos, types, secrets of growing and care at home
MORE
Types of underground drainage
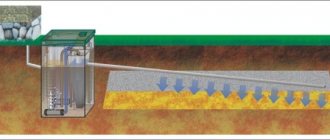
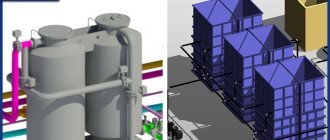
Deep drainage systems are designed to protect the foundation and premises of a house from groundwater and flooding. Structurally, underground drainages are divided into three main types: • layered - is an engineering structure consisting of a drainage pad and a drainage system, which ensures complete waterproofing of the building; • ring - consists of a ring of drainage pipes encircling the house at a distance of 1.5-3 meters, with drainage diverted into a storage well or natural reservoir; • wall-mounted - drainage pipes are laid directly along the perimeter of the foundation, no further than 0.5 meters from the wall and below the depth, with drainage discharged to the storage tank.
The reservoir type of drainage is the most complex and includes a drainage pad laid under the foundation and a drainage system consisting of pipes. It is used in difficult geological conditions and ineffectiveness of other types of drainage. Installation of this type of waterproofing can only be carried out before laying the foundation of the building.
The advantage of ring structures is that they can be installed at any time after the construction of the house. That is, if an existing building suffers from groundwater, and the walls and basement are regularly wet, installing a drainage system will lower the water level and rid the house of dampness. Wall systems are laid close to the perimeter of the building on a water-resistant soil layer. In this case, the drainage pipes should be located below the foundation level. The laying technology allows for parallel waterproofing of the foundation walls. Installation of drainage systems of this type is advisable when there is a closely located water layer.
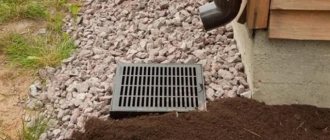
If the soil on the site is sandy, or the house is located on a hill, installation of an underground drainage system is not required. Under such conditions, soil water does not reach the level of the foundation and does not cause damage to structures. In this situation, you can limit yourself to installing a storm drain with the installation of water collectors under the drainpipes.
According to the method of installation, drainage systems are classified: • horizontal - with the location of drainage communications parallel to the surface of the earth at different depths; • vertical - complex projects, including water intake wells for forced pumping of water; • combined - they combine elements of the two previous types; their creation requires engineering design.
Installation of vertical and combined systems is a complex task, requiring precise calculations with the involvement of specialists and significant material costs. Most often, horizontal types of systems are used, including closed and open types of drainage, as well as their combination. Such structures can be done independently with minimal experience in excavation work.
Drainage materials
What other materials can be used in the process of creating a drainage system? How can you replace drainage for flowers at home? This question often worries flower growers. The information presented below will help you choose the most suitable material to create a drainage layer.
Expanded clay
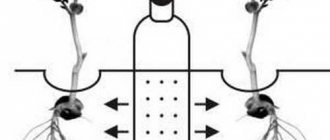
DIY drip irrigation for indoor plants
Lightweight porous building products are the most popular drainage material that can be purchased at any supermarket. To create a drainage layer, it is recommended to use the middle fraction of foamed and baked clay particles. The size of the average fraction is in the range of 5-20 mm.
The main advantage of expanded clay is the ability to accumulate moisture and the ability to release it as needed. The presence of expanded clay in the soil allows you not to worry about maintaining optimal water balance. In addition, experienced gardeners highlight the following advantages of drainage material:
- low cost;
- small weight;
- long service life.
Note! Expanded clay is endowed with the ability to change the acid-base balance of the soil. This feature can negatively affect the health of flowers.
Agronomists advise covering the soil surface with a small layer of expanded clay in order to eliminate overheating of the earth and prevent excess evaporation. At the same time, it is important not to cover the surface of the earth with a large layer of expanded clay, so as not to disrupt air exchange and not provoke the appearance of mold.
Broken brick
Red brick contains clay. That is why such a material will be an excellent analogue of expanded clay. Most often, finding red brick in a private yard is not difficult. Gardeners often use it to create a drainage system for indoor plants.
Drainage
Ceramic shards
Ceramic shards, along with fragments of dishes, are the most accessible material for creating a drainage system. The main advantages of broken dishes include:
- small mass;
- lack of ability to absorb and retain moisture.
Note! The disadvantage of this material is the presence of sharp corners. You can get injured while working with shards. It is best to carry out the process while wearing thick gloves.
Principles of operation and construction of the drainage system
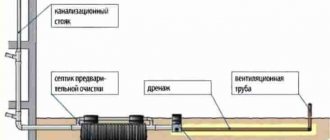
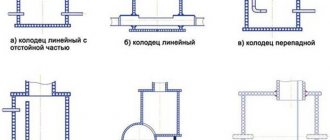
The principle of drainage on a site is to accumulate water from the surface or from the soil and redirect it to a storage well or natural reservoir. To do this, drainage communications are located at a slight slope to remove water by gravity. If the pipeline is laid more evenly, natural drainage will be difficult. The slope for sandy soil is 3 cm per linear meter, and for loam - 2 cm. With this value, drains will flow with minimal accumulation of silt, and the depth of laying pipes will not require an extra amount of work. The depth of the trench for the drainage pipeline depends on the level of the foundation and the passage of groundwater - the drainage should be lower and prevent water from rising. At the junction of the turning sections of the pipeline, inspection wells are installed, which are wide vertical corrugated containers with holes for pipe entry. At the lowest point of the site there is a storage tank to receive wastewater from the drainage system.
Drainage holes in a flower pot
With all the abundance of flower pots, one cannot help but notice that the vast majority of them are plastic pots. This is understandable, because they are lighter, easier to care for, and they cost much less. But every experienced gardener knows that the best container for a houseplant is the simplest, unglazed clay pot. Such a pot itself is part of the drainage system. The clay from which it is made perfectly removes excess moisture, absorbing it into itself, and allows air to pass through to the roots, allowing them to fully “breathe.” There is usually only one drainage hole in such pots, and in most cases this is quite enough. The situation is different with plastic pots. They are produced without holes at all, only with designated places for them, allowing the grower to decide for himself what diameter the drainage holes should be and how many of them are needed. And for each specific type of indoor plant they should be different. So for succulents, that is, plants that do not need frequent and abundant watering and constantly moist soil (cacti, aloe, Kalanchoe, etc.), they are made larger both in quantity and in diameter. The same applies to orchids. A good example of this is phalaenopsis. Experienced gardeners even make additional drainage cuts in the side of the pot when replanting this orchid. They allow you not only to better nourish the soil during watering, but also to remove excess moisture from the roots of the flower. The situation is different with moisture-loving plants. Contrary to the statements that are encountered that they do not need drainage, they cannot do without it at all. Even for the most moisture-loving plant, the soil should only be moist, and not soggy or waterlogged. The ability of such plants to grow in swamps in their natural habitat does not mean that they can exist in the waterlogged soil of a flower pot. The set of conditions for natural growth and cultivation at home are significantly different. Drainage for these plants is created more moderate. Consequently, fewer holes are made in the pot. It is impossible to give universal advice on the number and size of drainage holes. Everything must be taken into account. And the volume of the pot, and the age of the plant, and its size. But first of all, you must become familiar with the peculiarities of growing each specific type of indoor flower. During the growing process, you need to constantly monitor the condition of the drainage holes in the pot. They should not be tightly blocked with drainage material or soil. If this happens, they must be cleaned immediately.
By the way. Often, pots for hanging structures do not have drainage holes. Otherwise, excess moisture will flow onto the floor, furniture, etc. This is not a flagrant violation of the rules. But the layer of drainage material in this case should be much thicker than usual. Yes, and you need to monitor such plants more carefully.
Drainage composition and components
The basis of the drainage system are pipes of a special design - made of corrugated PVC and equipped with 1.5-5mm holes on the side surfaces to receive water from the soil. In addition, you will need connectors and containers for installing inspection wells. Wells are necessary to control the operation of drainage and clear the system of blockages. They are installed at all rotary joints and on straight runs at the rate of 1 unit per 40 m. A basic set of components for laying a drainage system: • drainage pipes; • containers for manholes; • capacity for storage tank; • mounting couplings and connectors; • drainage materials - sand and crushed stone; • special geotextile fabric. The amount of materials and pipe footage depends on project calculations and conditions at a particular site.
How to replace drainage for flowers
Special drainage for home flowers can be replaced with something that has similar properties. In this case, you don’t need to buy it, just go out into the yard or rummage through the pantry. Examples of a drainage system made from scrap materials:
- Brick . Before use, it is split into small pieces and calcined in a frying pan or in the oven. Sand-lime brick is more suitable for drainage construction, as it is able to absorb water, which it subsequently releases to the plant when the soil dries. The downside is the presence of sharp edges that can harm the roots.
- Gravel and crushed stone . Due to their large size, the use of these materials is advisable for creating a drainage layer in the garden. Only fine stones are suitable for indoor flowers. Before placing them in a pot, they are also calcined to destroy harmful microorganisms. The downside is that the stones are very massive, so they significantly weigh down the flower pot.
- Styrofoam . This is a cheap, porous material that can be used instead of moss. Before use, it must be torn into small pieces and disinfected with a dark solution of potassium permanganate. It doesn't have any special advantages. The downside is that roots grow through the foam.
- Cork . If you didn't throw away wine corks, you can cut them into bars and use them as drainage. Their properties resemble polystyrene foam, but it is more difficult for roots to break through the cork.
The available substitutes for drainage materials do a good job of their functions. Although they have more negative sides than special ones. But this does not prevent flower growers from using them for various plants.
Drainage system laying technology
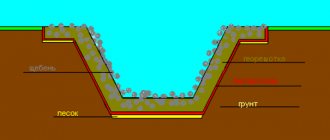
You can make a simple ring-type drainage system yourself, having basic knowledge about drainage design and minimal excavation skills. First, you need to draw up a project plan, calculate the layout of communications, footage and the number of required components - pipes, inspection tanks and the volume of bulk materials. After preparation, markings are applied to the site, along which trenches will be dug and system elements will be installed. The prepared trenches are compacted with sand, taking into account the degree of slope. Geotextiles are laid on the bottom, leaving free edges for closing. About 20 cm of crushed stone is poured inside the canvas to create a cushion, pipes are laid, covered with a 10 cm layer of crushed stone and the edges are wrapped. Containers for inspection wells are placed at the rotary joints. The ground underneath is compacted with sand and covered with crushed stone, after which a container is installed. A connection is made to the pipes and sealed. The general outlet is installed in a storage tank, the volume of which depends on the estimated amount of water and the expected frequency of emptying. After this, the drainage system should be filled with water to check its functioning. This should be done before the pipes and communications are covered with soil in order to promptly eliminate any identified deficiencies. After checking, the drainage is covered with a layer of crushed stone and soil, and then compacted. Regardless of the method of implementing the drainage system, independently or with the involvement of specialists, the main evaluation criterion is the quality of its drainage of excess water. If, despite the presence of drainage, the area remains wet and the dampness does not leave the house, this indicates mistakes have been made or the wrong type of drainage has been chosen.
How to make drainage
Before planting the plant in a new container, you should prepare everything you need. If the procedure is carried out correctly, then replanting will not be required in the near future , and the flower will quickly take root in a new place.
Step-by-step instructions for making drainage for indoor plants with your own hands:
- Make drainage holes in the bottom of the flower pot if there are none.
- Wash the container with warm soapy water, disinfect and dry.
- If necessary, rinse the material selected as drainage, treat it with a solution of potassium permanganate, rinse off its remains with running water and dry it. It is important to ensure that the particles are larger than the drainage holes. Otherwise, it is recommended to put a thin mesh on the bottom.
- Place a layer of the prepared component 1-5 cm thick at the bottom of the pot. If necessary, the drainage layer can be up to ⅓ of the height of the container.
- Wash the river sand, heat it in a dry frying pan, cool, pour it into a flower pot in a layer 1-2 cm thick.
- Pour soil substrate and plant the plant.
Manufacturing stages
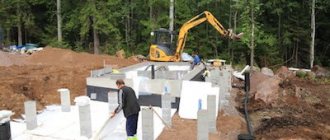
As an example, we can cite the stages of manufacturing wall drainage in a suburban area. Type of drainage system: deep.
- Development of a trench around the house. The excavation depth is 0.5 meters greater than the bottom point of the foundation.
- A circular trench is connected to a central trench, through which water will flow away from the site by gravity.
- The bottom of the canal is covered with sand, taking into account the angle of inclination towards the central trench.
- Drainage pipes are wrapped in geotextile to prevent silting.
- Geotextiles are laid at the bottom of the channel and covered with small or medium crushed stone. Then the drains are laid.
- The pipes are covered with crushed stone on top and covered with geotextiles.
- The remaining free space in the trench is filled with sand.
- The central trench is connected to the collector.
The correct choice of material and adherence to the technology for performing drainage work guarantee the effective removal of water from a cottage or other building. On a dry site, the house will last longer, and living in it will be more comfortable.