What is the difficulty of connecting copper and aluminum wiring directly
As is known, the cause of problems in the direct connection of copper and aluminum is electrocorrosion processes. In a dry environment, nothing will happen even with direct contact, but with increased humidity, a short-circuited galvanic cell is formed at the junction, in which the metals begin to play the role of a battery with a “plus” and a “minus”. The metal itself practically melts, resulting in a network rupture with a possible short circuit and insulation fire. Which in turn can lead to a fire.
In order to avoid this, various types of contact devices are used to indirectly connect copper and aluminum wiring.
All connection methods can be divided into 2 groups based on the presence of wire contact:
- There is direct contact between the wires: twisting, crimping, connection with rivets, strips.
- There is no direct contact between the wires: threaded fixation, connection with various types of terminal blocks.
Important! To connect aluminum and copper wires, it is recommended to use methods from the second group. It is allowed to use connections from group 1 provided that the copper wire is processed. For example, it can be tinned with solder.
Connection options
There are many options for connecting aluminum wires to each other.
One of the most common methods is the usual twisting of stripped contacts. Most people who do not have special knowledge in the field of electrical engineering use this method, considering it reliable. This is a misconception. Not all types of cable can be twisted, since they may have different cross-sections, which will create a vulnerable spot in the wiring after they are connected, as well as different brands of these cores. This method is not suitable for branching an electric line.
This method has a low level of reliability, as well as a high degree of fire hazard. When this method existed, there was not yet such a large number of various household electrical appliances that consume a lot of energy (washing machines, air conditioners, water heaters, two-chamber refrigerators, etc.). The simultaneous use of several powerful energy-intensive devices significantly increases the load on the network. Contacts with a small cross-section will not withstand increased voltage. For this reason, the twisting method has lost its relevance. It can be used for a temporary connection.
Soldering. For connecting or branching aluminum wires, this fastening method is considered one of the safest. To do this correctly, you need to tin the wire contacts
To do this, they are treated with molten rosin and then carefully sanded with fine sandpaper. Then the ends of the cables are pressed tightly against each other, and then rosin is gradually added
Soldering must be uniform to extend service life.
Welding. This connection method is not available to everyone. To do this, you need to have special knowledge and skills, have special equipment, to which not everyone has access. This method is very reliable, but is highly recommended for experienced welders.
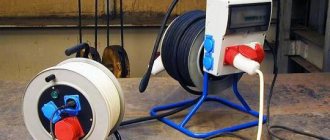
Contact clamps. This method is best for connecting aluminum conductors. In the same way, you can follow the wire branches if necessary. To do this correctly, you should strip the contacts from the braid by 2-3 centimeters, and then clean the metal using fine-grained sandpaper (0 and 1 grain is suitable). The exposed part will need to be rounded. The cross-section of this circle should be similar to the diameter of the clamping terminal. The resulting circle is put on the mover and tightened tightly.
A separate fastening method is connecting fittings or a SOAS-type clamp for steel-aluminum and aluminum cables. The oval SOAS clamp can be used to fasten two groups of wires: with a current load and mechanical tension along them, or only with a current load. Different brands of COAS clamp can be used depending on the wire brand, size, strength and weight. In addition to SOAS, the SAS type can be used to fasten steel-aluminum cores. For each type of such devices, there are special tables with corresponding indications and values.
SOAS-IP is used for overhead power lines. Bare wires can be connected by twisting using a SOAS-IP type clamp. The Oval OSA clamp is a fairly common type and can be purchased in most specialty stores, as well as ordered online.
When working with electrical wires, they must be de-energized, even if the voltage is not high. After completing the work, the exposed contacts must be insulated with special tape, placed in a rubber braid or in a protective sleeve. In masses with high humidity, the fastening will not last very long, and there is also a risk of getting an electric shock.
Twist
The main method of connecting wires at home, it is quite convenient in that it does not require special tools and equipment. But in the case of connecting aluminum and copper wires, this method must be used extremely carefully, observing the following conditions:
- A twisted connection is made by mutually twisting both ends of the wire with each other; wrapping the end of one wire around the other is not allowed;
- It is recommended to tin the copper cable with tin or solder before twisting; this point is especially important for stranded copper wire;
- A protective moisture-resistant coating must be applied to the connection between aluminum and copper wires.
There are three main types of twist: simple, bandage and groove twist. It should be noted that bandage twisting will give the best results. When performing twisting, it is worth considering that the number of turns directly depends on the diameter of the wiring, so for a wire up to 1 mm in diameter it is necessary to make at least 5 turns, for large sections at least three turns. In addition to moisture insulation, one should not forget about the electrical insulation of the twist; for this you can use special tips.
Twisting methods
High-quality twisting will last quite a long time, but only the use of an indirect connection can provide a true guarantee.
How to make a twist correctly
First you need to prepare the ends of the wires. To do this, remove the insulation at a distance of 3–5 cm from the edge of the cable. It should be noted that the heat-shrink tube is placed on one of the wires, before twisting, upon completion of all operations, the tube is moved to an open place and fixed there. After cleaning the ends, you need to twist the wires according to the proposed diagram. In this case, it is necessary to ensure that the cores are wrapped around each other, and that one cable core does not overlap another.
To make it easier to twist a multi-core copper cable, its cores can and should be tinned. It should also be noted that tinning copper in any case increases the reliability of the twisted connection. After twisting, the connection point must be coated with moisture-resistant varnish. Electrical insulation can be done using heat shrink tubing or cap caps with a soft clamp or cone spring.
Insulation of wire ends with caps with a cone spring
Important! Unless absolutely necessary, it is not recommended to use twisting to connect copper and aluminum cables. Currently, there are many safer and more reliable ways to combine copper and aluminum into one network.
Methods for connecting different wires
How to connect copper and aluminum wires:
- using another metal;
- preventing the appearance of harmful oxide plaque.
In the second case, special compounds are used that can protect the metal from the effects of moisture and oxidation. Pastes prevent the connection from breaking down. Another method of fire protection is tinning. Tinned stranded cable can be twisted with single-core aluminum cable. Special devices are also used for connection:
- Clamps. Used to connect to an aluminum riser in the driveway panel. Branch clamps have punctures or lack them. The device is equipped with an intermediate plate that prevents contact between two metals. Some clamps are treated with paste. Sometimes the use of special compounds is not required.
- Spring and self-clamping terminal blocks. Wires made of different metals can be joined and spliced using terminals that have sockets and partition plates that separate the aluminum conductors from the copper ones.
- Bolts. When making a bolted connection, a stainless or galvanized steel washer is placed between the wires.
Terminal blocks
Terminal blocks are:
- Disposable. Used when connecting wires in junction boxes and installing chandeliers. To insert the cores into the hole of the device, you need to make an effort. Even more difficult is removing the cable from the block.
- Reusable. There is a lever for fixation, thanks to which the cable can be inserted and removed several times. Terminals of this type are used when connecting stranded wires made of different metals. If the work is done incorrectly, the connection can be redone.
Installation is carried out as follows:
- the cable is cleared of its insulating coating;
- the veins are cleaned to a metallic shine;
- a lever rises on the reusable terminal block;
- the cleaned part of the wire is inserted into the hole in the block until it stops;
- the lever returns to its original position.
Crimping
In this case, tubular sleeves are used to reliably and safely fasten the wiring elements. To connect the cables you will need a press, mechanical, hydraulic or electric pliers. Installation includes:
- sleeve selection and tool adjustment;
- cleaning wires from braid;
- stripping the cores (sandpaper is used for this);
- application of quartz-vaseline composition;
- inserting the ends of the cables into the rivet;
- crimping (when using a simple tool, several crimps are performed over a short distance; when using a good tool, crimping is performed once);
- insulation of connection points.
The wires are inserted into the sleeve from opposite sides so that the joint is located in the middle of the connector. The cores can be inserted from one side. Connecting cables with a sleeve is sometimes replaced by using nut clamps, but the latter are less reliable. Over time, the rivet weakens, increasing the risk of fire.
Bolted connection
If the installation rules are followed, the method ensures durable fastening. To complete the work you will need 2 simple washers, 1 spring washer, a nut and a bolt. The wires are cleared of insulating material. The spring washer is placed on the bolt, which is inserted into a simple washer. The end of the aluminum cable is folded into a ring, which is thrown onto the bolt. After this, put on a simple washer and screw on the nut. Before starting work, the stranded wire is covered with solder.
Soldering
This is a reliable and technologically advanced method that ensures a high-quality connection. Before soldering, the conductors are cleaned of braid and oxide film. If necessary, the cables are tinned, loosely twisted, treated with flux and soldered. It is impossible to connect aluminum and copper wires using acid flux. The composition destroys metals, reducing the strength of the fastening. The junction is isolated in the usual way.
Crimping
In this case, a metal or plastic sleeve or tip is placed on the twisted connection, which is fixed to the connection with press pliers, a special crimping tool. Fixation in this case is carried out by crimping the connection with the sleeve material. The sleeves are a metal tube with insulation made of PVC materials. The nozzles are usually plastic caps into which the compound is inserted, after which the cap is crimped with press jaws.
Separately, it is necessary to note the connection using cap attachments with a clamping ring or cone spring. In this case, after twisting the wires, a cap is put on the twist, after which it is screwed onto the connection with rotational movements, after which it is simply crimped with pliers. In this case, a ring of soft metal inside the cap tightly compresses the junction. This crimping option is quite accessible for household use.
Crimping
Threaded fixation
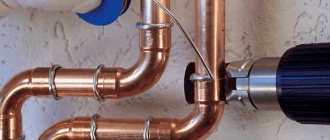
A reliable, although somewhat cumbersome, way of connecting copper and aluminum wiring is a threaded connection; in this case, the cores are clamped with a nut on a threaded base. In order to avoid direct contact, a washer is placed between the exposed ends of the cores.
The advantages of this connection method are simplicity and versatility. In this way, you can connect several electrical wires of different cross-sections. But at the same time, this type of connection is quite cumbersome, and it is also very inconvenient to isolate. But, at the same time, this type of connection requires only a bolt and nut.
First of all, the ends of the wire are prepared. The insulation is removed at a distance of 1–1.5 cm from the cut, after which rings with a diameter slightly larger than the diameter of the bolt or rivet are made from the exposed wires. These rings are used to attach the wire to the rivet or threaded part of the bolt. A spring washer is placed between the aluminum and copper cable; this is necessary to ensure that there is no direct contact between these metals. After which the connection is fixed by tightening the nut or a riveter.
It is worth noting that this option is suitable for splicing wires of sufficient length; when saving length, which is often found when connecting lighting electrical equipment to the short ends of an aluminum wire, as is often the case in old apartments, it is better to use terminal boxes.
Threaded connection
Features and secrets of using the crimping method
Sometimes in the process of installing and laying electrical wiring, the need arises to obtain a high-quality connection of wires. In this case, the connection of aluminum wires with copper is carried out by crimping using sleeves. Often, such a need appears at the stage of entry into electrical cabinets, switchgear, or when connecting a cable to an already installed unit, where there is no possibility of replacing copper with aluminum, and vice versa.
The presented type of conductor connection is characterized by high costs, since it involves the use of specialized equipment and tools. At the same time, in the process of performing repeated similar work, professionals often prefer this method.
Note! It is not recommended to fold conductors made of copper and aluminum in a direction parallel to each other, in other words, overlapping. The fact is that in such a case, copper and aluminum are in direct contact. In addition, it is better to avoid using bare copper sleeves in combination with a cable made of aluminum.
A reliable connection of aluminum wires with copper can be obtained using the crimping method using sleeves.
By crimping the wires with sleeves, a more durable and reliable contact is guaranteed. In a similar way, aluminum and copper conductors are fastened in production even with powerful consumers.
To perform such work, special aluminum-copper sleeves will be required. If a manual hydraulic press is not available, they can be compressed using a standard hammer and aluminum pads.
On a note! It is recommended to use such compression when performing crimping not only with sleeves, but also with tips. By the way, they can also be made half of aluminum and copper. This allows you to connect the aluminum wire to various devices with terminals or leads made of copper.
Often, aluminum-copper sleeves are used to connect cable cores that have a large cross-section. If the cross-section is insignificant, a pair of conductors is crimped with a single sleeve. In this case, it is better to run the wires end-to-end - on both sides.
Crimping of cable cores with a small cross-section is carried out with one sleeve.
Connecting copper and aluminum wires with rivets
The clamping of the wires in this case is carried out by a wedged rivet, consisting of a tube and a core, fixed with a rivet gun. To connect, prepared conductors with wound rings are placed on a rivet tube with a gasket - a steel washer. After which the rivet is crimped with a rivet tool, the core wedges the rivet tube, thereby compressing the metal cores among themselves, thereby fixing the cable cores.
The contact in this case is permanent, but at the same time strong and reliable. For this type of connection, you need a special tool - a riveter, and skills to work with it. This method is used mainly for working with wire breaks and splicing wire ends in hard-to-reach places.
Riveter and rivets
Connection using permanent connection
This type of connection has almost all the advantages of the first, threaded connection. The only difference is that there is no possibility of disassembling and reassembling the connection. This is because the fastener usually breaks during disassembly. To use this method you will need a special tool - a riveter. Today, this type of wire connection is often used for permanent connection of wiring in the thin walls of modern apartments, including when creating partitions. The main differences are speed, ease of use, and affordable price. The entire operating principle of this riveter is quite simple.
A metal rod pressed through an aluminum rivet with a tubular head is pulled in and also cut off. The rod itself has some thickening. The moment it is pulled into the tube it expands. The rivets themselves can be selected separately according to length and diameter.
Before proceeding directly to connecting the wiring, you need to do a little preparation, just like with a threaded connection. The diameters of the wire rings should be slightly larger than the rivets themselves. The average diameter is usually about 4 mm. The rivet must first be covered with an aluminum wire, then a washer and a copper wire, and again a washer. After this, the rod is inserted into the rivet gun and its handles are compressed. That's it, the connection is ready. This method, along with threaded ones, are considered the most reliable
Connection with two steel strips
You can connect copper and aluminum wires in this tricky way, which also requires pre-treatment of the copper wire with tinning: clamp the wires with two steel strips with bolts at the edges. Advantages of the method: the ability to connect several branches of wiring at once, without increasing the length of the bolt. In this case, the bare ends of the cores are placed between the slats. The method is applicable for wires of the same cross-section.
Important! The connection with two steel strips requires mandatory external insulation, as well as preparation of the copper wire by tinning.
Wire clamp with metal plate
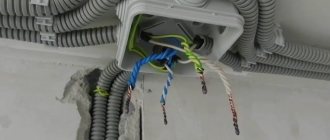
Terminal blocks and terminal boxes
Convenient and reliable connection method. The terminal block is a strip of insulating material in which sockets for wires are located. The wires are fixed in the sockets using clamping bolts. An important feature in our case is the absence of contact between the wires. To connect copper and aluminum wires, you only need a screwdriver.
The terminal box is a system of several separately located terminal blocks, combined into one structure and having several terminals.
Terminal box
The advantages of this connection method are:
- Easy to install, all you need is an electrician's knife to strip the ends of the wire and a screwdriver to tighten the screws;
- Reliability of insulation, very often when using a terminal block or terminal box, additional insulation is not required;
- Undemanding to the length of the wire; 1–2 cm of wire is enough to fix the wire in the terminal box.
At the same time, to install hidden wiring in the wall, the terminal block requires the installation of a distribution box. Without a distribution box, installation of hidden wiring is unacceptable. But in this case, you can use a terminal box for flush mounting.
When working with the terminal box, it is important to carefully fix the ends of the wire in the socket, especially for aluminum wires. This is especially important when installing the box outdoors or indoors where temperature fluctuations are possible.
Connecting wires with slip-on terminals
Widely used in household appliances and cars is the detachable connection of conductors using slip-on terminals, which are placed on contacts 0.8 mm thick and 6.5 mm wide. Reliability of fixation of the terminal is ensured by the presence of a hole in the center of the contact and a protrusion in the terminal.
Sometimes the conductors break off, and more often the terminal itself burns due to poor contact and then it becomes necessary to replace it. Typically, the terminals are pressed onto the ends of the conductors using special pliers. Crimping can also be done with pliers, but you don’t always have a new replacement terminal on hand. You can successfully use a used one by installing the terminal using the following technology.
First you need to prepare the old terminal for reinstallation. To do this, holding the terminal with pliers at the press-in point, you need to use an awl or a screwdriver with a thin tip to move the tendrils that compress the insulation apart. Next, the wire is bent many times until it breaks off at the point where it exits the press fit. To speed things up, you can trim this area with a knife.
When the wire is separated from the terminal, a needle file prepares a place for soldering it. You can completely grind it off until the remaining wire is free, but this is not necessary. It turns out to be a flat platform.
The resulting area is broken through with solder. The conductor is also stripped and tinned with solder using a soldering iron.
All that remains is to attach the conductor to the prepared terminal area and heat it with a soldering iron. The antennae that fix the wire are bent after soldering the wire to the terminal, since if they are crimped before soldering, the antennae will melt the insulation.
All that remains is to pull on the insulating cap, put the terminal on the desired contact and check the reliability of the fixation by tugging on the wire. If the terminal has come off, then it is necessary to tighten its contacts. A home-made terminal attached to a wire by soldering is much more reliable than one obtained by crimping. Sometimes the cap is put on so tightly that it cannot be removed. Then it needs to be cut and after installing the terminal, cover it with insulating tape. You can also stretch a piece of vinyl chloride or heat-shrinkable tube.
By the way, if you hold a vinyl chloride tube in acetone for about five minutes, it increases in size by one and a half times and becomes plastic, like rubber. After the acetone evaporates from its pores, the tube returns to its original size. About 30 years ago, I insulated the bases of light bulbs in a Christmas tree garland in this way. The insulation is still in excellent condition. I still hang this garland of 120 6.3 V light bulbs on the Christmas tree every year.
Connection with spring and self-clamping terminal blocks
Currently, both reusable and single-use terminal blocks and terminal blocks are produced.
- spring terminal blocks and reusable terminal blocks have a retaining spring that can be loosened by lifting a lever located on the device body. This allows you to remove or insert the wire without any effort. Lowering the lever securely fixes the cable cores;
- Single-use terminal blocks automatically clamp the wire when inserting it into the socket; removing the wire will require physical force, which can damage the clamping spring, so their single use is recommended.
Both reusable and single-use terminal blocks are produced in a wide range, including with a different number of connected wiring branches, designed to fix wires with a cross-section from 0.08 mm² to 6 mm². Including in the form of ready-to-install terminal boxes. This method of connecting aluminum and copper wires is currently the most optimal in terms of reliability and ease of use.
Section of the spring terminal block and placement of the connection in the junction box
Terminal boxes with spring clamps were first produced by the German company Wago, from which they got their name, but currently there are a large number of analogues, including counterfeit ones. For this reason, it is necessary to purchase spring terminal boxes only from electrical stores. When purchasing terminal boxes on the market, there is a high probability of purchasing low-quality products that do not meet the stated requirements.
Self-clamping terminal block WAGO
To fix the wires in the terminal box, it is necessary to prepare the wires; to do this, remove the insulation from their ends; the size of the exposed part must be at least 0.5 cm. After that, the open part of the cable core is inserted into the desired socket of the terminal box and fixed in it using a spring clamp or screw. It should be noted that mounting in a terminal box usually does not require additional insulation, but at the same time, when they are located in a wall, a distribution box is required. Thus, spring terminal blocks have a number of advantages over other types of connections due to ease of connection.
Self-clamping terminal block
Methods for connecting wires or cables to each other
The junction of two conductors must meet the following requirements:
- reliability;
- mechanical strength.
These conditions can also be met when connecting conductors without soldering.
Crimping
This method requires special equipment. Crimping of wires with sleeves is carried out for both copper and aluminum wires of different diameters. Depending on the cross-section and material, the sleeve is selected.
Crimping algorithm:
- stripping of insulation;
- stripping wires to bare metal;
- the wires need to be twisted and inserted into the sleeve;
- the conductors are crimped using special pliers.
Selection of a sleeve causes major difficulties. An incorrectly selected diameter will not ensure reliable contact.
Bolted connection
Bolts, nuts and several washers are used for contact. The connection point turns out to be reliable, but the structure itself takes up a lot of space and is inconvenient to install.
The connection order is as follows:
- stripping of insulation;
- the stripped part is laid in the form of a loop with a diameter equal to the cross-section of the bolt;
- a washer is put on the bolt, then one of the conductors, another washer, a second conductor and a third washer;
- the structure is tightened with a nut.
Using a bolt, you can connect several wires. The nut is tightened not only by hand, but also by a wrench.
Terminal blocks
The terminal block is a contact plate in a polymer or carbolite housing. With their help, any user can connect wires. The connection occurs in several stages:
- stripping the insulation by 5-7 mm;
- removal of oxide film;
- installing conductors in sockets opposite each other;
- fixation with bolts.
Pros - you can connect cables of different diameters. Disadvantages - you can only connect 2 wires.
Types of terminal blocks for multi-core and single-core cables
There are 5 main types of terminal blocks:
- knife and pin;
- screw;
- clamping and self-clamping;
- cap-shaped;
- "walnut" type clamps.
The first type is rarely used; they are not designed for high currents and have an open design. Screw terminals provide reliable contact but are not suitable for connecting multi-core cables. Clamp terminal blocks are the most convenient devices to use; their installation does not require special equipment. Cap-type devices are also often used, but unlike clamping devices, caps can be used repeatedly. "Nut" is practically not used.
Terminals in junction box (copper or metal)
Terminals are the most common connection method in a junction box. They are cheap, easy to install, provide reliable contact fixation and can be used to connect copper and aluminum. Flaws:
- cheap devices are of low quality;
- Only 2 wires can be connected;
- Not suitable for stranded wires.
Self-clamping terminal blocks WAGO
There are 2 types of Vago terminal blocks used:
- With a flat spring mechanism - they are also called disposable, since reuse is impossible. Inside there is a plate with spring petals. When installing the conductor, the petal is pressed out and the wire is clamped.
- With lever mechanism. This is the best connector option. The stripped conductor is inserted into the terminal and the lever is clamped. Re-installation is possible.
With proper use, Vago terminal blocks last 25-30 years.
Using Tips
For connection, 2 types of tips and sleeves are used:
- in the first, the connection is made inside the product;
- in the second, two electrical wires are terminated with different tips.
The connection inside the sleeve or tip is strong and reliable. There are also special sleeves for connecting copper and aluminum wires.
Soldering of electrical wiring lugs
The tips are connected to the wiring using a press. If it is not there, contact can be ensured by soldering.
The electrical wire and the tip inside are tinned, the stripped cable is inserted inside.
The entire structure on the contact must be wrapped with fiberglass tape and heated with a burner until the tin melts.
conclusions
In this way, it is quite possible to connect copper and aluminum wire, but it is necessary to take into account the location of the cable and the environment. Copper and aluminum can only be connected by twisting in a dry room. If the humidity in the room increases, this connection may become unusable and, moreover, cause a fire. The most optimal method today is to connect electrical wiring using spring terminal blocks.
The main advantage of this method is stable fixation in any environmental conditions. Despite all the advantages of a screw terminal block, threaded or rivet connection, when operating under conditions of sudden temperature changes, the contact under the screw may weaken. Due to the difference in temperature expansion of the metals of the wires. These changes may result in loss of contact or short circuit. Thus, with all the variety of methods for connecting copper and aluminum wiring, the safest method at the moment is the use of self-clamping terminal blocks.