Features of argon welding
The connection of metal surfaces occurs in the area of argon. The use of inert gas when welding metals is a kind of protective barrier against the oxidation process, which occurs as a result of interaction with oxygen in the surrounding air. It’s easier to say that inert gas covers the welding site from the penetration of oxygen into the area of the parts being joined.
All argon welding technology involves performing the work manually, semi-automatically and automatically. It is from the welding methods and the type of electrode used that the welding process modes are qualified.
Tungsten wire is used as a non-consumable electrode, which guarantees a reliable connection of metals.
general information
Argon welding differs from simple manual electric arc welding by the presence of a gas cylinder with argon and filler material. The remaining details of these methods are similar.
Argon arc welding (also known as TIG) necessarily involves the use of a tungsten refractory electrode, which ignites the arc. The seam is formed by an additive.
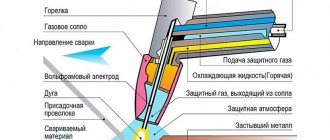
Tig welding itself is not complicated. Shielding gas is supplied from the torch to the weld formation area. Once the feed starts, the arc is ignited. To ignite the arc, the torch with the inserted rod is brought to the metal part.
At what point and why does arson occur?
This is done by the oscillatory mechanism. It charges the argon and directs its particles. This charge provokes the ignition of the arc.
The filler wire is fed into the welding cavity only after the electric arc has stabilized. It is moved either by the feeding mechanism or by the welder’s hand.
The metal is melted by an arc, and weld beads are formed from an additive. The latter melts simultaneously with the metal and merges with it into a homogeneous mass.
In the next block we will describe the assembly of the machine for argon arc welding and what is needed for it.
Connection technique
Knowing the basic rules of the work will make welding with argon much easier, and lessons for beginners will help achieve good quality welds.
Some practical advice from experienced welders:
- The quality of the connection of parts is significantly reduced by a long arc. The longer it is, the wider the seam will be and the shallower the melting depth. The non-consumable electrode must be placed in close proximity to the joint of the products.
- To create a deep and narrow seam, you need to achieve longitudinal movement of the torch and electrode. Even small deviations significantly impair welding. When welding with argon, special attention and accuracy must be observed.
- To prevent nitrogen and oxygen from penetrating into the welding zone, the electrode and additive must be in this zone, but under a layer of argon.
- Wire feeding is a difficult operation, since jerking leads to metal spattering. The input of this component is carried out evenly and smoothly.
- If the seam turns out to be convex and round in shape, then this indicates low melting of the metal, which indicates low quality of argon welding.
- To create a small weld and its smooth surface, the filler wire must be placed in front of the torch and at an angle to the plane of the metal. This condition will allow you to reliably control the entire argon welding process.
- To prevent nitrogen and oxygen from penetrating into the area where parts are joined, the welding process cannot be started and should not be completed with sudden movements. Work should begin 15–20 seconds after the gas is supplied, and should be completed before the burner turns off.
- The work must be completed by reducing the current strength with the rheostat included in the argon welding machine. If you simply move the torch to the side, you can open the access of oxygen and nitrogen to the welding zone.
The main requirement before work is high-quality cleaning and degreasing of the mating surfaces of the product.
Welding process technology
To obtain a high-quality product at the output, it is necessary to adhere to a clear technological map of the welding process. After completing the preparatory stage with cleaning the surface and connecting the working equipment to the network, it is worth paying attention to the type of metal used.
Argon welding technology
When welding is carried out using argon relative to aluminum, a wire made of the same metal is used; for stainless steel, it is also made of alloy steel. The strength of the operating current is determined by the thickness of the metal. For aluminum materials 3 mm thick, the current is 180 A, and one seam will be enough.
After checking the specified parameters and the serviceability of the equipment, the burner tip is adjusted, which is 1–2 mm thicker than the wire. Inert gas is supplied to the welding area 20 seconds before the arc is ignited, and its supply should be stopped no earlier than 10 seconds after the end of welding.
The wire and electrode must always be located in an argon environment, which will protect them from active oxygen. To form a narrow strip of the weld seam, it is recommended to move the torch in the direction along the axis of the weld pool without transverse manipulation.
At the final stage, you should not abruptly tear the electric arc from the weld - this will negatively affect its quality; You need to use a rheostat to reduce the current strength and, at this power, weld the crater. The wire or electrode is located as close as possible to the weld pool. The depth of the edges and the width of the seam are affected by changing the length of the arc. In order for argon welding to give the desired result, before starting work on the base material, you need to test the mode on an unnecessary part.
Argon welding diagram
Advantages of using this type of welding
Considering that argon welding is an effective method of joining metals that are difficult to connect to other types of joining, the advantages of its use are based precisely on this property. These include:
- Low heating temperature of the joined surface, which allows you to maintain the shape and dimensions of the part.
- Inert gas is denser and heavier than air, so it can protect the welding site well.
- The rather high power of the thermal arc contributes to the short-term nature of argon welding.
- The ability to focus the weld seam allows you to work in hard-to-reach places.
- Welding thin parts is easily possible due to the not very high temperature in the metal melting zone.
Disadvantages of argon welding
Like any other connection, argon welding has some disadvantages that must be taken into account when performing work. The main disadvantages of this connection:
- The presence of a draft significantly reduces the protection of the soldering area, so it is recommended to carry out work in enclosed spaces. Only in this case you need to take care of good general ventilation of the object.
- If it is necessary to produce a high-ampere arc, it is necessary to ensure cooling of the products being connected.
- The equipment belongs to the category of complex devices, so welding with argon is a difficult process for beginners. Only an experienced welder can make the correct settings.
Argon connection modes
In order for welding to take place efficiently, you need to choose the correct optimal operating mode. This action, as a rule, is only possible by specialists with extensive practical experience.
Conditions for correct selection of welding mode:
- The direction and polarity of the current directly depend on the properties of the metals being connected.
- The current strength is determined based on three main characteristics, namely polarity, diameter of the electrode used, thickness and type of material. It is in choosing this parameter that the welder’s own experience will be needed.
- The uniformity of the inert gas flow affects the argon flow rate. The flow when welding aluminum with argon must be pulsation-free.
Assembling a homemade argon apparatus
What do we collect from?
Do-it-yourself argon welding is assembled from very simple components. We will list the main components that you will need to assemble your argon welding machine yourself.
First, you will need a welding power source. In our case, this is an inverter-type welding machine. You also need an oscillator. Additionally, we will assemble a protection unit for our inverter. The minor components you will need are a welding torch, a gas cylinder with argon, a reducer, gas hose and cables. Let's take a closer look at each component.
About the current source
An argon apparatus is assembled on the basis of some current source. We chose a conventional welding inverter for these purposes. Of course, you can use a transformer or rectifier, but an inverter is preferable.
However, keep in mind that it is more difficult to make an argon apparatus from an inverter. If you take a regular inverter and connect an oscillator to it, the device will still not be able to work like an argon one. It will simply fail. So you will have to modify the inverter a little by adding a so-called protection block to the main circuit. The block is assembled on the same board as the oscillator, and the board is mounted in a separate housing.
There is another option. Inspect your inverter carefully. It may have a built-in TIG function. If this is indeed the case, then consider yourself lucky. The inverter does not need to be rebuilt. It is enough to connect a gas cylinder and a burner to it and you can cook. Such inverters are often designed for MMA welding, but are equipped with an oscillator and a protection unit. Therefore, the manufacturer makes it possible to use the device for TIG.
About the oscillator and protection unit
Let's assume that you have a regular inverter without the TIG function, and from it you need to assemble argon welding with your own hands. In this case, you will have to make an oscillator and a protection unit separately. Below is a convenient diagram.
It shows both the block and the oscillator. If you don't know how to apply this pattern, watch the video below.
About the burner and gas
Now about the minor components. You will need a gas burner, but not just any one. And specially designed for argon welding. It has a ceramic nozzle and a special holder for a non-consumable electrode.
You can assemble an argon burner yourself at home by purchasing all the parts online. But in our experience, this is a waste of time and effort. It's better to buy a factory one, it's not that expensive.
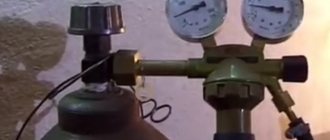
Argon should be used as gas. It comes in black or gray cylinders, so you won't get confused. But it is best to use gas from gray cylinders, since they contain pure argon. It is preferable for welding.
As for the capacity, a 10 liter cylinder will be enough for you to weld at home. It is quite light and compact, it can be brought to the country house or to a garage cooperative without any problems. For home use, it is better not to buy large 50 liter cylinders. You will have difficulty moving it.
About the reducer and hose
You will also need a special gas reducer. It is put on the cylinder and used to stabilize the pressure in it. The gearbox should also be argon, and not the first one available. For convenience, the gearboxes are painted the same color as the cylinders. So look for a gray or black gearbox.
Pay special attention to the hose. We recommend buying a ready-made one right away and not having to worry about assembling it yourself. A homemade hose will most likely be inconvenient and you will lose a lot of time searching and installing special connectors for connecting the hose to the cylinder and burner.
Assembling the device
So, all the components are assembled, you can get started. Do-it-yourself argon welding begins with connecting the oscillator + protection unit to the inverter. Look at the diagram above, everything is clear there. Take the ground and connect it to the positive terminal of the oscillator. Connect the cable coming from the burner to the negative terminal. If you weld aluminum, then swap these cables.
Next, connect the gas hose and the burner, install the reducer on the cylinder. Connect the burner to the sleeve with cable and gas hose. Then connect the hose to the reducer. Now you can turn on the inverter outlet. But for the oscillator, provide 6V power. Screw the reducer to the argon cylinder.
The gas hose must be connected to a reducer mounted on an argon cylinder. Connect the inverter to a 220 V network, and the oscillator to a 6 V power supply. Everything is ready. All that remains is to configure the device for correct operation.
Setting up a homemade device
Any home-made item or device needs proper adjustment in order for welding to take place more or less efficiently. Our homemade device is no exception. We will tell you about some features that need to be taken into account.
First you need to sharpen the electrode. You can use a special sharpener for this. The end of the electrode must be sharpened. If you use an unsharpened electrode for welding, the arc will be unstable and will not be able to concentrate at one point. So don't ignore this step.
Then you need to install the electrode into the burner and turn it on by opening the valve on the cylinder. Use the reducer to adjust the gas flow. It should not exceed 15 liters per minute. After adjustment, turn off the burner and stop the gas supply.
Part of the equipment
Before understanding the principle of operation of the device, it is necessary to familiarize yourself with the main components of the equipment. For high-quality welding you will need:
- Welding machine of any type with idle speed 60–70 volts.
- A power contactor that transmits voltage to the head from the welding machine.
- Oscillator. This is a device that converts standard voltage into a voltage of 2000–3000 V with a frequency of 150–500 kHz, which facilitates ignition of the arc.
- Ceramic burner.
- A device designed for blowing with argon.
- Container for inert gas.
- Additive wire and non-consumable electrode.
Assembling the device
Once you have all the components, you can begin assembly. First of all, connect the oscillator and the protective unit to the inverter apparatus. To understand how this is done, look for visual diagrams.
Connect the ground to the terminal of the oscillator device with the plus sign. Connect the cable that comes from the burner to the negative terminal. To weld aluminum, the cables must be connected in reverse.
Connect the burner to the gas hose and combine the cylinder with the reducer. Connect the hose with the burner to the gas hose and cables. Then connect the reducer and hose together.
Only after this can the device be connected to a regular power supply of 200 volts. The power of the oscillator should be about six volts. After all these steps, you need to configure the inverter equipment for argon arc welding technology.
How the device works
After preliminary cleaning of the surfaces to be joined and setting the desired welding mode, we take the wire in our left hand and the torch in our right hand. Using the gas supply button, which is located on the torch handle, we supply gas to the welding zone.
The electrode must be inserted into the burner so that it protrudes approximately 5 mm. We bring the torch to a distance of 2 mm from the welding surface. Then we turn on the unit and apply voltage to the electrode until an arc occurs. Argon at this time enters the welding zone.
With the other hand, the welder guides the filler wire into the gap, which melts to form a metal joint. Moving gradually along the seam, we completely weld the two parts.
Setting up finished equipment
A homemade argon welding installation requires the following settings.
- Sharpen the tungsten electrode on a sharpener until it looks like a needle. This is done so that the arc is concentrated at the end of the needle and does not “walk” in different directions.
- Take a torch and install a tungsten electrode into it. The diameter of the electrode must correspond to the collet in which it is fixed.
- Open the valve on the burner and adjust the required argon flow rate using the reducer (a flow rate of 12-15 l/min will be sufficient), then close the valve on the burner again.
- Turn on the oscillator and bring the torch with the electrode to the metal to which the ground cable is connected.
- When you press the power button, an arc should appear between the metal and the electrode at a distance of about 0.5 mm.
- Turn on the gas supply and press the button again. In this case, the arc should be ignited at a distance of 10 mm or more.
After carrying out the simple settings described above, we can say that the device with the TIG function is completely ready for work.
Difficulties of welding aluminum
Aluminum is considered the most common material in industry. Welding it is very difficult due to the oxide film, which has a higher melting point than metal. Before you start welding aluminum with argon, you must carefully study all the nuances of the joining process:
- The main mistake of novice welders is poor-quality preliminary cleaning of the metal. There can be no question of a good metal connection if there is dirt, dust or a grease film on the surface.
- The low melting point of aluminum and its high thermal conductivity require high energy consumption from welding with inert gas.
- Aluminum melts at a low temperature, to avoid damage to the material, you need to set the correct mode on the inverter.
- A welding machine for aluminum must have a special function that, before starting welding, supplies increased current to melt the film, and at the end, completely weld the crater.
Welding technique
It has an indirect relation to the design of the device, but as background information you need to know that when TIG welding, the shortest possible arc is used - about 2 mm.
The electrode is guided only in a straight line, without carrying out movements characteristic of MMA perpendicular to the direction of the seam in two planes. This achieves two goals - the argon flow does not leave the weld pool area and does not allow it to oxidize, and it becomes possible to make a very thin weld, almost invisible on the surface of the metal.
VIEW Welding machine on AliExpress →
Metal surface cleaning
The main condition for high-quality argon welding is good preliminary cleaning of the metal surface.
Cleansing is carried out in two ways:
- The chemical treatment method promotes the destruction of the oxide layer on the metal due to the action of a special solution. You can prepare such a composition yourself, for which you need to dissolve 50 grams of technical sodium and 45 grams of sodium fluoride in one liter of water. Next, you need to stir this mass until a solution is obtained. The surface is treated with this composition and then washed off with running water.
- The mechanical cleaning method involves treating the part with an iron brush or sandpaper. In this case, it is necessary to ensure that there are no inclusions of other metal on the surface of the cleaning tool, particles of which can significantly worsen the final result of the work.
Features of stainless steel welding
Stainless steel is a metal that has high corrosion resistance and great strength, and is widely used in all weather conditions. The special properties of this metal require special processing technologies for the product. It is the welding of stainless steel with argon that makes it possible to achieve good quality connections for such products.
The main problem when working with stainless steel is its cracking. In addition, there are other features:
- Due to the low thermal conductivity of stainless steel, during the welding process the temperature in the melting zone must be high, which creates a high risk of burning through the metal. To avoid such a nuisance, it is necessary to choose a lower current strength than that of ordinary steel.
- Stainless steel has increased linear expansion, so when welding, large casting shrinkage occurs, which can lead to the metal cracking. To avoid this, you need to create a larger gap between the parts of the product.
- Since stainless steel has a high electrical resistance, the electrode becomes very hot during the welding process, which also negatively affects the quality of the connection.
When welding discs with argon, it must be taken into account that an incorrectly selected temperature of the welding mode can lead to the loss of the anti-corrosion properties of stainless steel.
Connection using a semi-automatic device
The semi-automatic argon welding process significantly increases work productivity. The technology of using welding in semi-automatic mode allows you to obtain reliable and visually attractive welding seams.
The main nuance of semi-automatic welding is the need to use nickel in the welding wire. If it becomes necessary to weld a pipe with argon, then when the part is thick, carbon dioxide is also added to the protective composition, which improves the miscibility of the welding edges.
The semi-automatic welding process can be carried out using several technologies:
- pulse mode;
- jet transfer;
- short arc.
Safety precautions
When welding in an argon environment, you must follow the rules of safe work. Basically, they are not much different from the rules that must be followed when carrying out conventional welding, but there are some nuances:
- It is important to check gas cylinders for leaks, since the gas in them is under pressure.
- Do not allow argon to leak, because this gas is heavier than air and has no odor. Therefore, its gradual accumulation can lead to suffocation.
- Work in a protective mask, special shoes and clothing.
- Strictly follow electrical safety rules. The unit equipment must be reliably grounded.
- Particular attention should be paid to combating the possibility of fire. All flammable objects must be removed from the welding area.
- It is necessary to prohibit the presence of strangers in the welding area.
Remember that argon welding allows you to obtain a high-quality metal connection that cannot be made by other methods. A novice welder will have to put in a lot of effort and patience to master all the methods of argon welding.
