weld root - Part of the weld furthest from its front surface [Terminological dictionary for construction in 12 languages (VNIIIS Gosstroy USSR)] [GOST 2601 84] Topics: welding, cutting, soldering EN rootroot of weldweld root DE... ... Technical Translator's Guide
The root of the weld is the part of the weld furthest from its front surface. [GOST 2601 84] Term heading: Welding Encyclopedia headings: Abrasive equipment, Abrasives, Highways, Automotive equipment ... Encyclopedia of terms, definitions and explanations of building materials
ROOT OF THE WELD - the part of the weld furthest from its front surface (Bulgarian language; Български) root on shev (Czech language; Čeština) kořen svaru (German language; Deutsch) Nahtwurzel; Schweißnahtwurzel (Hungarian language; Magyar) varratgyök... ... Construction dictionary
WELD ROOT - the part of the weld furthest from its front surface ... Metallurgical Dictionary
weld root (metallurgy) - weld root The part of the weld furthest from its face surface. [https://www.manual steel.ru/eng a.html] Topics: metallurgy in general EN weld root ... Technical Translator's Guide
root - 3.2 root: A simple morpheme that acts as a base from which a word is produced by phonetic changes or expansion by compounding or adding affixes. Source... Dictionary-reference book of terms of normative and technical documentation
GOST 2601-84: Welding of metals. Terms and definitions of basic concepts - Terminology GOST 2601 84: Welding of metals. Terms and definitions of basic concepts original document: 47. Friction welding Welding using pressure, in which heating is carried out by friction caused by the relative movement of the welded... ... Dictionary of terms of normative and technical documentation
RD 03-606-03: Instructions for visual and measuring control - Terminology RD 03 606 03: Instructions for visual and measuring control: Asymmetry of fillet weld Discrepancy between the actual value of the weld leg and the design value, fig. A.48 Definitions of the term from various documents: Angular asymmetry ... ... Dictionary-reference book of terms of normative and technical documentation
RD 34.10.130-96: Instructions for visual and measuring control - Terminology RD 34.10.130 96: Instructions for visual and measuring control: Asymmetry of fillet weld (512) Discrepancy between the actual value of the weld leg and the design value, fig. PA 51 Definitions of the term from various documents: Asymmetry... ... Dictionary-reference book of terms of normative and technical documentation
STO Gazprom 2-2.3-251-2008: Assembly, welding, heat treatment and quality control during repair and modernization of hull technological equipment of OJSC Gazprom - Terminology STO Gazprom 2 2.3 251 2008: Assembly, welding, heat treatment and quality control during repair and modernization of hull technological equipment of OJSC Gazprom: 3.13 bead: Weld metal, deposited or... ... Dictionary of terms of normative and technical documentation
The modern welding process is a high technology with classification and quality criteria. Since the main final product is welding seams, they are also well described, classified and have their own quality criteria and methods of execution.
Welding standards in the form of GOSTs contain comprehensive information and symbols for options for a wide variety of purposes.
What is a weld seam
To begin with, let’s define the concepts of “welding seam” and “welding joint”, because some sources consider them to be one and the same thing, others separate the formulations.
The shortest definition: a weld is a permanent connection by welding.
The second option reveals the physics of the welding process as such: a weld is a section in which two or more parts are connected as a result of crystallization or deformation of a substance, or one and the other together. One way or another, it is more logical to take welding seams and joints as one and the same process.
One of the oldest and most famous standards among specialists is “GOST 5264 – 80 Manual arc welding. Welded connections." This GOST was put into effect back in 1981, it still copes with its tasks perfectly: the main types of welds, their sizes, structural elements and instructions on how to correctly lay a weld are clearly listed. An excellent example of a document that does not need adjustments over time.
Welding of pipelines. Type, technology and weld defect.
In this article we will consider pipe welding technology used on gas and high-pressure steam pipelines. And also what kind of defect occurs in the weld, and how to prevent it from appearing at the root of the weld.
Weld technology.
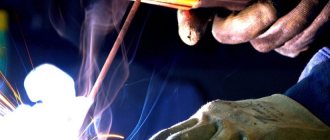
The use of electric arc welding is found everywhere in our lives; it is characterized by the reliable connection of metal pipes to each other.
Therefore, in our specificity, it is widely used in the heating system, because where there is high pressure and extreme temperatures, no other material will compete with this material. Such a system provides for the use of seamless pipes, and welding them together requires a special technology that must be strictly followed. It consists in welding the root of the seam. When welding pipes and equipment elements on a regular water supply, or, say, sewerage system, everything is much simpler. What I describe below directly concerns the steam system, and the process of installation on a high-pressure gas pipeline is similar to it. Are you, dear visitor, interested in such information? Then I invite you to familiarize yourself, I tried to present everything in simple language.
Type of weld.
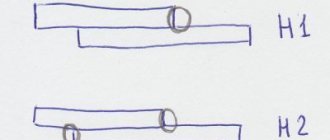
So, we have two pipes of the same or different diameters, let’s consider both options. In the first case, we connect the pipe to the outlet, and in the second, we need to cut a pipe with a diameter of 76 millimeters into a pipe with a diameter of 133 millimeters. In order for us to achieve absolute (I’m not afraid of this word) tightness of the welded joint, the weld will be double. First, we boil the so-called root of the seam, and then we will cover it with the second one. Let’s divide the whole process into several stages, each of them is important and is carried out without “jambs”; if something goes wrong, it is better to achieve “ideality” at the initial stage. In our case, the cheerful saying: “Maybe it won’t flow” will not work.
Preparation of welded surfaces.
Includes a thorough adjustment of them to each other. A chamfer is removed on both mating surfaces, ideally at 45 degrees to the pipe axis. It must be removed with the condition that the end is left flat, 2-3 millimeters wide.
Here and further, in order not to particularly search for suitable words, for clarity, I provide the post with photographs and a video.
In this photograph there is a marking on the end of the pipe, following the line of which we need to cut out an element, we call it “making a mustache”, or “cutting out a fish”.
And here is a picture of what the cut and processed surface of the workpiece looks like.
Joining of welded surfaces.
This photo shows a joint on tacks. Both planes of the surfaces have chamfers and do not touch each other, having a gap of 2-3 mm, this gap is necessary for penetration of the root of the seam.
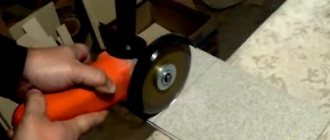
It is important that the elements being welded are coaxial; there can be no talk of any displacement relative to each other, otherwise the joint will be rejected. We put them out and grab them together. In case of unequal gap between the surfaces, which occurs when the pipe is cut unevenly, we modify it using a grinder with a cutting disc, achieving uniformity around the entire perimeter.
Pipes with a diameter of up to 50 millimeters are tacked in two places, but for larger diameters - at least three tacks, and you begin to cook from the logical location of the fourth. Already during the welding process, when reaching the next tack, it must be cleaned off.
Welding the root of the seam.
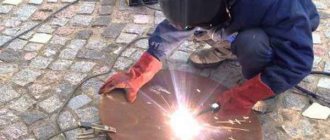
Everything is ready for penetration for the first time, which is what the welder does next.
Upon completion of running in the joint, it is the installer’s turn to work.
Selecting the root of the seam.
It consists of treating the welding area around the entire circumference to a metallic shine. Literally - there should not be a hint of unevenness of the groove, much less slag residues. All edges and irregularities are smoothed out, and the surfaces on both sides of the seam are also sanded to a metallic shine, about twenty millimeters in each direction. I do this using the same grinder, with a cleaning disk installed on it. While performing this stage, I noticed a defect - it’s time, it formed at the site of the welding “lock”. Here is a visual result:
If the installer notices this “jamb”, it is necessary to clean this place, until a gap appears, while providing for slopes of the chamfers of the surfaces being welded.
Point out the presence of a pore to the welder, he will “throw it in.” Then select the cooked area until it has a metallic shine. As I wrote above, bring everything to perfection.
After this, the welder can proceed to the next stage.
Overlapping the root seam.
Observing what he wrote above in the box, in paragraph 2, he rolls the joint in a circle. Without saving electrodes, the seam turns out “greasy”. Then the installer processes the seam using the same grinder with a grinding wheel. In general it looks like this:
Another important point here: when cleaning, “undercutting” of the welded surfaces is unacceptable; to prevent this, grind in one given direction - from the pipe to the seam. Here the places where “undercuts” may appear are marked in red.
If this “jamb” is present, the joint is rejected.
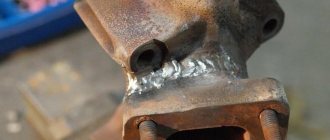
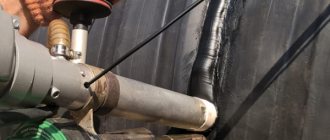
I'll add a couple more photos to the description. They have a welded joint between a pipe and a flange. On the outside of the flange, penetration is carried out in accordance with the entire process described above, that is, welding the root of the seam, removing it, covering it and cleaning it.
In addition to this, we also weld the joint from the inside of the flange:
Types of welding seams
Like welding methods, types of welding seams fall under a strict classification according to different criteria:
- The method of connecting parts;
- Position during welding;
- Seam length;
- Location of the force acting on the seam.
The most popular and important types of seams are grouped according to the method of joining parts:
Butt seams
Types of welded joints include both very popular methods and rare ones. Butt methods can be considered highly popular: they are used when welding sheet metal or pipe ends. The fundamental requirement for the butt method is rigid fixation of the parts to be joined with a gap of 1 - 2 mm, which is filled with metal during the welding process.
Welding process
Welding of the pipe under the clearance begins with tack welding at several points. Their number depends on the diameter of the workpieces, but not less than four in increments of 90˚. After creating the first point, the position of the pipes is adjusted if necessary. The tack should securely fasten the workpieces together. After welding all the points, the joint is cleaned again. Detected pores and poorly cooked areas are removed, as they will later become the cause of defects.
It is more convenient to carry out welding if the stuck pipes are in a semi-ceiling position. This will provide free access to the joint. A mark is placed on the bottom of the connection. Having retreated 1 - 3 cm from it, begin welding the root of the seam under the gap. The arc is struck at the bevel or its outer edge, but not at the surface of the pipe. On the ceiling part of the joint, the tip of the electrode is in the gap with a gradual upward movement. To form a return roller, the arc must burn inside the pipe.
When moving the electrode without lateral deviations, you need to ensure that both edges are melted. If only one side melts, you should stop and repeat the pass. An arc burning from the outside means that the joint has tightened. It can be cut through with a large current, but it is preferable to carefully expand it with a grinder. If the welded root weld sags, it means that the welding current is too high or the electrode is moving slowly.
If you imagine the end of the pipe in the form of a watch dial, then when leaving for 40 minutes the electrode begins to swing half the diameter between the edges. As a result, a technological window is formed through which the formation of the inner roller can be monitored. When welding thin-walled pipes of small diameter, it is only outlined, but you should not melt a through hole at this place. The electrode moves without oscillating movements, only the position of the holder changes to ensure arc stability at a minimum current.
After exiting for 50 minutes, the holder tilts away from itself so that the arc burns at the edge of the roller. There is no need to push the electrode into the pipe like on the ceiling, as burns may occur. To make the inner bead even, the tack is cut off when approaching the seam, and the edges are flared. The slag is knocked off the finished root, and the metal is cleaned to a shine with a metal brush.
Filling the cavity formed after the previous operation is performed with a short arc. To melt the edges, the electrode is guided along the edges of the weld pool. When working, you need to monitor the appearance of starting pores, which are formed when the arc is ignited during welding in the wind. They are ground to zero using a grinder. Experienced welders apply an additional seam at the top and bottom of the joint without touching the vertical.
Finally, a facing seam is applied to the cleaned filling. It is performed with uniform amplitude oscillatory movements without sudden jerks, making sure that the arc does not extend beyond the weld pool. To prevent the seam from collapsing in the middle, the electrode lingers on the edges for short moments. If it turns out to be too scaly, welding current is added. After welding is completed, slag is removed from the seam, and the thickenings formed at the points where the arc is ignited are ground. The surface near the joint is cleaned only with a metal brush.
Compare, evaluate
Of the above options, butt welding is considered the most reliable and economical. In terms of current loads, they are almost equal to whole elements that were not welded, in other words, to the base material. Naturally, such strength is achieved only with adequate quality of work.
At the same time, it must be remembered that the reliability and efficiency of the method does not mean that it is easy to implement. Requirements for edge processing, adjustment of many factors to the conditions of a specific welding, certain restrictions in application due to the shape - all this requires strict professional discipline.
T-joints (including corner ones) are also quite popular. They are especially often used when welding massive structures.
The simplest ones to perform are overlapping joints. They do not require edge processing, and general preparation is also much simpler. Very popular in welding sheets of small thickness (thickness up to 60 mm is allowed). Simplicity does not mean efficiency: excessive consumption of deposited and base metals is a common situation for such options.
Seams according to position in space
The next classification criterion is the position of surfaces in space. There are four such provisions:
- Bottom seams
- Horizontal
- Vertical
- Ceiling
If it were possible to choose, experienced craftsmen would choose welding in the lower position. This is the most convenient method, and the weld pool is better controlled. A suitable method for debut works of beginners - there are practically no difficulties here. But the other three spatial options are associated with technical nuances and special requirements for execution.
Choose, try, the main thing is that the bathtub does not tend to fall down. If the metal still drains, you need to reduce its heating - this can be done by increasing the speed of movement. The second option is to periodically tear off the arc so that the metal cools at least a little. The arc lift method is more suitable for beginners
In vertical connections, the same problem is the force of gravity, but here it is not the entire bath that tends down, but drops of metal. Usually in such cases they take a shorter arc. The seam can be welded in any direction. In the Welding Certification Regulations RD 03-495-02, these options are designated as “welding position B1” - vertical from bottom to top (this method is more convenient). “Welding position B2” is vertical from top to bottom, it is used less often, since strict control of the weld pool is required here.
The ceiling connection is the most difficult in the subgroup, which will require real skill. There are no other options in the position of the electrode - keep it only at a right angle to the ceiling. Make the arc shorter, the speed of the circular motion should be constant. In this case, the release of gases and slags is difficult, and it is difficult to keep the melt from flowing down. Even if the craftsmanship is at the proper level, and all technological requirements are met correctly, the ceiling method is inferior in strength and overall quality to welding seams in all other positions.
Weld defect.
Porina, and how to remove it, we looked at it, and now let’s explain the points due to which there is a high probability of its appearance.
Every welder should be aware of the first probability, because they undergo special training. The second and third are characterized by a conscientious attitude towards the performance of their direct duties. But on the last point in a little more detail: I had to face this problem, the welder is welding, I select the root, there is a porina - I clean it, he cooks again, I select - porina, I clean it, cooks - porina. Then they realized that the pipeline was long and on one side had a connection with the atmosphere, in general, until this connection was plugged with cotton pants, they did not come to a positive result.
Well, that seems to be all I wanted to tell you, I’ll wrap it up. If you follow everything described, you will end up with a perfect joint. No “luminary” will find reasons to reject it, and an x-ray will show compliance with the standards.
Here is the video promised at the beginning of the article, which I edited as clearly as I could:
I don’t stroke my pride, and I don’t consider myself a “master of the pen” at all; I only shared what I know from my experience. For those interested in deeper knowledge in this area, I can recommend studying the book, which can be downloaded by clicking on the picture below. The book is not free, but the price is not high, only 84 rubles; moreover, you have the opportunity to read a fragment for reference, and make a purchase only if you are interested. The book consists of 510 pages and has 234 illustrations. You can rest assured that the distributor is trustworthy; there will be no scam when transferring money, I checked it personally.
I recommend that blog guests subscribe to receive new blog articles; to do this, you just need to enter your email address in the form that will open when you scroll to the bottom of the page.
If you have any questions or have anything to add to the article, you are welcome to add it to the comments section. Good luck to everyone in the installation, best regards Andrey.
Click on the icon if you think this information will be useful to your friends.
source
We cook pipelines, special requirements
Only experienced, certified and highly qualified craftsmen are allowed to work with industrial pipelines.
Pipe connections belong to the vertical method with all the “vertical” nuances. The peculiarity lies in the angle at which the electrode is held, this is an angle of 45 degrees. The width of the pipe seam can reach 4 cm, it depends on the thickness of the pipe itself. There are separate standards for this type of welding, for example, GOST 16037-80 describes the dimensions of seams for various connections of pipeline structures.
II. Preparing the back side of the root of the seam
Depending on the cutting shape and the quality of the formed first roller on the reverse side, sample the reverse side to bare metal so that the end of the coated electrode along the entire length of the sample touches the “bottom” of the sample. The width (S) of the sample depends on the depth of the sample. The depth (h) of the sample depends on the quality of the formed return roller.
Rice. 36a - for V-shaped cutting, it is recommended to prepare a sample for an electrode with a diameter of 4 mm.
Welding is performed in one or two layers with an electrode with a diameter of 4-5 mm.
Rice. 36b - at h welding | Rating: 0.0
/
0
Total comments:
0
source