Wanting to make their bathroom more neat and convenient, many people decide to hide the water and sewer pipes when carrying out renovations. The best way to do this without transferring communications and with a minimum of dust is to build a box for pipes in the bathroom. You can assemble a plumbing box with your own hands; there are several options available for this.
Plasterboard box
The most common option for hiding pipes is to assemble a box from moisture-resistant plasterboard. This is due to the fact that ceramic tiles, which are most often used to decorate bathrooms, can then be glued onto the drywall. Let's consider the main stages of constructing a gypsum plasterboard box.
Stage 1: marking
Before starting to assemble the frame, markings are made at the installation site of the box. The initial mark is placed at a distance of 30–50 mm from the most protruding element of communications.
The frame stand is located at a distance of at least 3 cm from pipes and other communication units.
Next, using a level, a vertical line is drawn along the surface of the wall, indicating the line of fastening of the frame. A similar mark is placed on the other wall, as well as in areas where horizontal pipes are closed.
Note! It is advisable to select the size of the box for tiling in such a way that whole tiles are used to cover all protruding parts. In addition to saving tiles, this allows you to create a neat and complete cladding.
Stage 2: frame construction
Assembly of the frame begins with the installation of a guide profile, which is attached to the walls with dowels along the marking lines. The step between the attachment points is 20–30 cm. The guide profile is also attached to the ceiling and floor to form the angle of the frame and install the front pillar. To ensure that the corners of the frame below and above are located in the same plane, first the guide profile is attached at right angles to the ceiling. Then a plumb line is tied to it and a point is marked on the floor where the lower corner of the frame should be located.
A rack profile is screwed to the guide profiles located on the floor and ceiling with self-tapping screws, which is fixed with 3-4 horizontal jumpers for additional mounting rigidity.
Note! Reinforcing jumpers are mounted taking into account the future location of inspection hatches that provide access to valves and meters.
After assembling the vertical part of the frame, if there are horizontal pipes for them, the frame is assembled according to a similar scheme:
- A guide profile is attached to the wall and floor, which sets the dimensions of the future box.
- The front frame element is attached to the guides using jumpers cut from the rack profile.
All jumpers are also installed taking into account the location of the sewer outlet for connecting the toilet, inspection hatches and shut-off valves.
Stage 3: framing the frame
The finished frame is sheathed with moisture-resistant plasterboard, cut into pieces of the required size. GKLV is cut with a sharp knife: first, the cardboard is cut along the line on one side (with a slight penetration into the gypsum core), then the sheet is broken along the cut line and the cardboard is cut on the second side. The sheathing is fastened to the frame using black self-tapping screws in increments of 15–20 cm. The place where the inspection hatch will be installed is not covered with plasterboard or a hole is then cut out.
Note! It is advisable that at this stage the inspection hatch has already been selected by type and size and purchased so that you can immediately try it on for a tight fit.
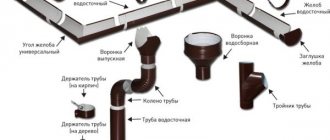
Types of hatches used for plasterboard boxes:
- Plastic hatches. They can be hinged, folding or sliding.
Plastic flap. - Push-type invisible hatches are installed before the cladding is completed and are fastened with self-tapping screws to the metal frame of the box.
Hidden push hatch. - A tile hatch with magnets is a popular design, which, if made independently, is cheaper than self-extending models.
Magnetic tiles are one of the types of hidden hatches
Stage 4: finishing
Before finishing the box, it is necessary to prepare it, this is done in the following sequence:
- All seams between the drywall are opened with a knife, then, along with the corners and other edges, they are sanded.
- The seams are filled with putty, and sickle tape is glued on top.
- The corners are also treated with a putty mixture and glued with sickle tape.
- After the putty has dried, the box is treated with a primer in two passes, with a break for each layer to dry.
A plasterboard box is most often faced with ceramic tiles: a continuous layer of tile adhesive is applied to the back side of the tile, which is smoothed with a notched trowel. The tile is applied to the drywall and pressed, then the next one is glued. Having completed the installation, the seams are rubbed using the usual technology, and the corners are covered with decorative elements of a color suitable for the finish.
Read more about laying tiles on drywall here.
How to hide pipes in a toilet - ways
How to close (hide) pipes in the toilet? There are two ways to remove pipes, as they say, out of sight.
Laying in wall or floor construction
Using this method, we not only hide the pipes, but also get maximum free space.
Before bricking up communications, they should be covered with thermal insulation made of foamed polyethylene, which will allow the pipe material to expand freely when the temperature changes.
Laying pipes in this way is possible only at the stage of major repairs.
When laying inside the floor, the pipes are placed in a screed; when laying inside the wall, a channel (groove) will need to be punched in the wall using a hammer drill. In the latter case, the installation process will not only be labor-intensive, but also extremely dirty and dusty.
There are a number of limitations with this method:
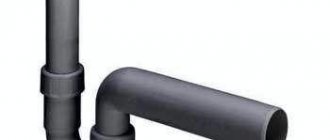
- You can only embed the pipe itself into the wall or floor - you won’t be able to hide the meter, fittings or filter in this way. If the embedded pipe consists of several sections, they can only be connected by welding - sealing threaded and other detachable connections (for example, using push fittings for metal-plastic pipes) is not allowed.
- The maximum diameter for pipes with this hidden installation option is 50 mm. Accordingly, the sewer pipe coming from the toilet (usually 110 mm in diameter) cannot be hidden in this way.
- Punching grooves in load-bearing walls is prohibited.
It should also be taken into account that risers with this installation method remain visible.
Pipes in the bathroom often spoil the overall appearance of the room, so many people try to disguise them. How to hide pipes in the bathroom - we will describe several methods of disguise.
We will discuss the procedure for performing pressure testing of the pipeline here. Safety measures when performing work.
The enamel in the bathroom wears out over the years, and in order to avoid purchasing a new bathroom, it is better to restore it. In this topic https://aquacomm.ru/cancliz/mnogokvartirnyie-doma/santehnika/kak-vosstanovit-emal-v-vannoj.html we will consider the main technologies for coating restoration: enameling, stacrylic, acrylic liner.
Camouflage through enclosing structures
In this case, it will not be possible to save space, but the following advantages are available:
- pipes and building structures are not affected (major repairs are not required);
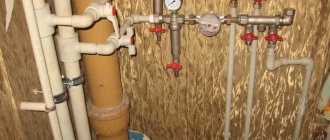
- you can hide not only the pipes themselves (including risers), but also all pipeline elements, including meters;
- there are no restrictions regarding pipe diameters or types of connections;
- it is possible to provide quick access both to the entire pipeline and to its individual sections or elements, for example, valves.
You can choose one of two options:
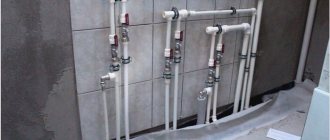
- Build a compact box along the pipes, leaving the dimensions of the room unchanged.
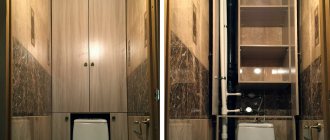
- Install a partition across the entire width and height of the room, so that all communications are behind it. At the same time, the room is somewhat reduced in volume, but it acquires a perfectly neat appearance: only smooth walls, without conspicuous boxes and “steps” (a box lying on the floor). Behind such a partition you can also hide the installation for a wall-hung toilet along with the flush cistern.
Installation must be done so that the pipes do not touch the walls of the box or partition, otherwise they will be wetted by condensation.
A convenient alternative to a stationary partition are roller shutters. They not only hide the pipes, but are also an interior decoration in themselves, as they look very stylish. But the most important advantage is the ability to access communications literally with one movement.
You can also resort to a compromise option - install the partition not up to the ceiling, but at a height of, say, 1.2 m. In this case, the enclosed space is also sewn up on top. Above the shortened partition you can place several shelves for storing tools, household chemicals, etc.
If you need to disguise the riser, you can only sew up the corner in which it is located. To do this, you can use just one plane, installing it diagonally.
Covering the structure with plasterboard
After assembling the frame, they move on to its sheathing.
- Measurements are taken from each plane of the frame, transferred to drywall and strips are cut out. The edges of the cut strips must be cleaned with sandpaper or treated with a roughing plane.
- Self-tapping screws and a screwdriver are used to attach plasterboard sheets to the frame. The distance between the fasteners is no more than 25 cm. The screws should be screwed in at right angles.
- To inspect the pipes in the toilet, a door is installed in the partition.
Implementation
To build a camouflage structure, you will need sheet materials, of which there is no shortage today. Let's look at the most accessible and common:
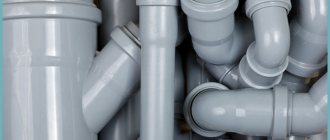
- Box made of PVC or MDF panels : in general, MDF is not designed for use in rooms with high humidity, but if the bathroom is separate, it can be used in the toilet - here the humidity remains within normal limits. Also, for a separate toilet, such a “water-resistant” material as laminate would be quite suitable. PVC panels are produced in sheets with a length of 260 to 600 cm and a width of 10 to 50 cm. The dimensions of the sheets must be chosen so that the amount of waste is minimal. The thickness is 5 – 10 mm and determines the strength of the product.
- Drywall box : this material usually serves as the basis for finishes such as wallpaper or ceramic tiles. Unlike the option described above, the gypsum plasterboard box is non-removable, so it should be equipped with hatches for access to valves and other pipeline elements. Working with drywall is considered more difficult than working with plastic or MDF panels. The material used in the bathroom must be moisture resistant.
- Plywood or OSB box : for a separate toilet, these materials are also quite suitable. Like drywall, they will need to be covered with something, but they are quite affordable.
- Box-cabinet : this design is ideal for masking risers and other vertical pipelines.
Compared to a regular box, it has two important advantages: it provides full access to the pipes and, being equipped with shelves, can be used to store a variety of small items.
Marking
It is performed directly on the ceiling, floor and walls of the toilet.
Accurate markings are the key to a strong and durable structure
It is done this way:
- there is the most protruding point on the communications, from which they retreat 3-5 cm and mark a line with a pencil;
- then take a laser level and draw a straight line between the ceiling and floor, passing along this mark. If you don’t have a level at hand, you can use a plumb line with a dye thread;
- the same actions are performed on the opposite wall;
- markings around the installation are made with a distance of 5 cm from the frame;
- then the horizontal surfaces are marked, for this we need a corner;
- we place a corner to the wall at the intersection with the floor and draw a line perpendicular to the vertical mark at an angle of 90 degrees;
- We perform the same actions on the other side;
- on the ceiling we do the same;
- draw a parallel line above the installation, level with a deviation of 4 cm.
The marking can be considered completed. We begin to install the metal frame.
Markings applied to walls, floors and ceilings
Materials
You should also prepare the materials from which the frame will be assembled.
For a box made of plastic or wood (MDF, OSB, plywood), you will need wooden blocks, and for installing drywall, a special metal profile is produced.
It consists of elements of 2 types - guides and rack profiles (marked with the designations UD and CD). The guide profile is designed for fastening to building structures.
To design corners and joints, you need to purchase corners and other profiles.
Fastening of frame elements and sheet materials is carried out using dowels and self-tapping screws.
Installation of profiles
To properly install a metal structure, you need to take the following steps:
First of all, you need to install the 26x27 guide profile on the floor. To do this, use metal scissors to cut the profile exactly to the size of the line on the floor;
- We screw the 27 x 60 rack profile to the wall, inserting it at the top and bottom into the guide sections. The pitch of the screws should be 15-20 cm, so the structure will be more stable;
- The second profile is screwed in the same way;
Screwed rack profiles to the walls
- Next, we fix the segment exactly along the line with dowels and nails to the floor, try to ensure that the segment does not shift during drilling, this can affect the quality and evenness of the box as a whole;
- Fasten the second section in the same way; if the edges of the profile get in the way, they can be bent with pliers;
To install the profile evenly to the floor, you need to set the level at an angle of 90 degrees. The base of the frame must be attached exactly according to the drawn markings so that one guide profile is tightly and evenly attached to the other
- The same steps need to be done on the ceiling;
- Now you can install the corner profile; it is secured at the top and bottom with small “seed” self-tapping screws;
Installed and fixed with self-tapping screws corner profile
Once this structure is ready, it needs to be strengthened with cross members. The jumpers should be 30 cm apart.;
It is necessary to use a building level to install a level metal frame. Screw the jumpers strictly parallel to the floor, this will help form a reinforced frame and secure the drywall well in the future.
At the same time, it is necessary to design reinforcement for the future installation of a technical hatch.
Pay attention to the video: how to make a frame from a metal profile
Sequencing
Let's take a closer look at how each type of box is assembled:
MDF and plastic
So, we make a box for plastic pipes in the toilet. Having decided on the dimensions of the box, they assemble the frame from the bars. If MDF panels are used, they should be screwed to the frame with self-tapping screws. To design external and internal corners, corner strips are used that will hide the fasteners.
To install PVC panels on the frame, you first need to secure (you can use a construction stapler) a special profile - corner and end strips. The PVC sheet must be inserted into the resulting grooves.
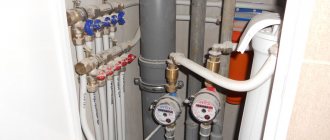
Pipes hidden behind the box
Plastic panels should be cut in such a way that each edge of the box consists of one fragment - this design will be stronger.
In the upper edge of the box, in an arbitrary place, you should make a hole and install a ventilation grille in it.
A small hole should also be drilled at the very bottom of the side edge. Thanks to it, a leak, if one occurs, will be immediately detected.
Drywall
Installation of the frame for the plasterboard box begins with screwing the guide profiles to the wall and floor.
Then transverse ribs made from a rack profile are inserted into them. Both profiles are fastened together with special fasteners - the so-called “crabs”.
You can also use a special tool – a notch – to fasten the frame elements together.
If the edge of the box is not solid, but is assembled from several fragments of plasterboard, the transverse ribs must be located at the place of their joints. Then the joints will need to be taped with paper tape.
Let us remind you that the plasterboard box is non-removable, so hatches must be secured to the frame opposite the valves and meters.
Special varieties are produced, on the doors of which it is convenient to stick tiles - this is in case the box is intended to be finished with this particular material. To prevent hatches from opening spontaneously, they can be equipped with magnets for cabinet doors and sideboards.
Drywall sheets are screwed to the frame with self-tapping screws, the heads of which should be recessed into the material by approximately 1 mm. Don’t forget to cut a ventilation hole on top, after which the walls of the box can be puttied and covered with finishing material - wallpaper or tiles.
Plywood and OSB
The frame, as in the first option, is assembled from wooden blocks, to which the sheet material is screwed with self-tapping screws. Since both plywood and OSB will have to be covered with facing material, this type of box can also be considered non-removable - it is necessary to install hatches.
Closet
The cabinet box is assembled from chipboard or OSB and differs from a regular box only in the presence of doors. You can make them yourself, but it is better to purchase ready-made ones at a furniture store. The ventilation hole, as in the box, is made from the top, but if the cabinet consists of several sections, it is better to arrange individual ventilation for each of them by drilling holes in the doors.
We design the door for the box in the bathroom
Access to the main plumbing facilities must be free. That's why we provided reinforcement for the technical hatch. Once the box is ready, you need to cut a hole for the hatch and install it. It is also worth thinking about ventilation so that there is no condensation inside the box.
Step-by-step process for installing a hatch in a plasterboard surface
If you want to install an invisible hatch, you should secure it before finishing, inserting it and securing it to the frame with self-tapping screws.
Simple plastic doors are installed on the tiles after the box has been lined.
Plastic hatch installed in a plasterboard box
Important! It is advisable to build structures based on the size of the finishing material: tiles, panels. It is advisable to adjust it so that you do not have to cut the tiles
Price issue
Here are the approximate prices for the main materials for the box:
- sheet of drywall: about 70 rub. per sq. m;
- PVC panels: RUB 120/sq. m;
- metal profile for installation of gypsum boards: guide (3 m) – 52 rubles, rack-mount (3 m) – 68 rubles;
- putty: about 50 rubles/kg (per 1 sq. m of gypsum board surface usually requires 1.3 kg).
Materials for a plasterboard partition with dimensions of 1.5x2.5 m will cost 1,300 rubles.
If you hire a master, you will have to pay an additional 416 rubles. (125 rubles per sq. m).
The task of re-arranging pipes in the bathroom is quite troublesome, but such work can be done independently. Laying out pipes in the bathroom with your own hands - a detailed description of the stages of work.
We will look at which filter for water purification is better to choose in this material.