You may have excellent skills in welding thick metal structures, but not all of these skills will be useful when welding automotive sheet metal. To use welding in body repair, you need to gain individual experience, taking into account the characteristics of the metal of car bodies. If you are familiar with gas and semi-automatic welding, this will help when learning and teaching welding of thin sheet metal.
There is one similarity between electrode and gas welding of thick metal and thin sheet automotive metal. In thick and thin metals, welded with high quality and strength, the seam looks equally smooth and beautiful.
Types of welding joints in body repair
Welding joints in auto body repair are divided into three categories: butt, lap, and lap and groove.
Butt welding is the most difficult for a beginner. But after practice and understanding of the principle, this connection is not difficult to make using a good MIG/MAG or TIG welder.
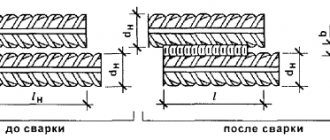
A butt joint is made when sheets of metal are butted edge to edge with a small gap between them. The gap is necessary because the metal expands when welded.
Overlapping joints are made with a slight overlap of sheets of metal on top of each other. In this case, the edge of one sheet is welded to the part of the sheet that it touches on one or both sides. This creates double the thickness of the metal where the sheets overlap each other.
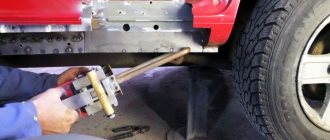
An overlap joint with a groove requires the use of a special tool to prepare one of the sheets. Next, the edge of one sheet is slipped under the flange of the other and welded. From the front it looks like a continuous sheet of metal. The bulge remains on the reverse side. The edges of the sheets are sometimes boiled on both sides to seal the joint.
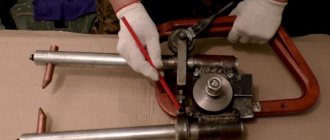
Tool for preparing metal for lap joints with grooves
There are a number of problems with lap joints and lap joints with grooves. One of which is the need to weld the joint twice if you want it to be airtight. The next problem is that when welding a joint on both sides, twice as much heat will be generated. This affects the deformation of the metal. As a result, we can say that there are no advantages when using an overlap welding joint. Their only advantage is that such a connection is easier to make for a beginner. The exception to the mandatory use of this type of connection is in cases where it is necessary to copy a factory overlap welded joint and when there is no access to create a butt joint.
Butt joints are preferred when applying metal patches and repair inserts.
How to choose a spot welding machine
To figure out how to choose spot welding, you need to remember seven basic parameters that you should pay attention to before purchasing. There are additional factors that play a role only under certain operating conditions.
Types of spot welding machines
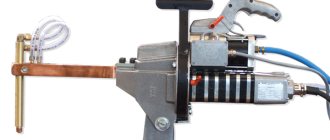
All equipment capable of spot welding is divided into two categories: portable and stationary. The first type has compact dimensions within 30x20x30 cm and weighs up to 16 kg. Such models are capable of welding metal with a cross section of 1.5+1.5 mm. The maximum value can reach 5 mm. Portable products are relevant for body repairs or production of large metal structures (doors, gates, shelving). The device can be moved around the product and welded.
Portable spot welding machine.
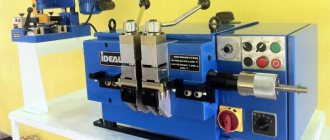
Stationary machines for spot welding are used in production. With their help, they assemble products that the operator can hold in his hands. In serial production, similar connections are created very quickly, which contributes to increased productivity. But such installations take up a lot of space due to their dimensions of 50x60x100 cm and can weigh up to 100 kg. A powerful current source allows you to weld metal with a total thickness of up to 8 mm.
Stationary spot welding machine.
Modes of exposure
Spot welding machines are capable of affecting workpieces using one of two methods.
Single sided spot welding
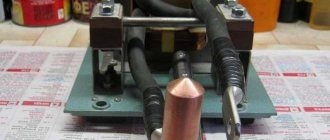
One-way mode is implemented in models called spotters. They are equipped with a gun with a rod and a reverse hammer, at the end of which there is a copper electrode in the form of a triangular star. Having grabbed the surface with electric welding, you can perform reverse blows, pulling out the dented metal.
Spotter for single-sided spot welding.
The one-sided mode of exposure is justified in case of difficult access to the reverse side of the structure (it is necessary to remove the door trim, dismantle the fender of the car), or when the product is too large. In this way, you can weld washers or a comb to the surface in order to act simultaneously on a large area, pulling all the elements at once using hooks.
Working as a spotter for one-sided spot welding.
Double-sided spot welding
Double-sided welding is used to join sheet metal with an overlap. For this purpose, the devices are equipped with pliers that grip the product. The maximum distance of the connection point from the edge of the structure depends on the extension of the consoles. This parameter can be from 12 to 50 cm. In such devices, the lower console is stationary, and the upper one lowers, simultaneously applying pressure and heating.
Double-sided spot welding pliers.
Operating mode
The operating mode of the device can be soft or hard, which depends on the characteristics of the current. In the first case, a low current density is used, but the welding cycle is performed with an extended duration of 2-5 seconds. This allows you to use electrodes with a smaller cross-section (it can be equal to the thickness of the workpiece) and not press too hard with pliers.
In the second case, a higher density current is used, and the cycle lasts shorter - 0.2-1.5 s. This mode provides increased operating speed, but requires strong compression of the workpieces and an electrode diameter that is several times larger than the total cross-section of the parts being welded.
Maximum welding current
The capabilities of spot welding equipment depend on the maximum welding current. A value of 3000 A will allow connecting parts with a total cross-section of up to 3 mm. Devices with an indicator of 6000 A can weld steel up to 4-5 mm. Industrial machines 10000-16000 A allow you to connect workpieces up to 9 mm (in total).
Maximum thickness of welded sheets
An important parameter that shows what maximum cross-section the device can weld. If you ignore this value and use the equipment on thicker parts, the quality of the connection will decrease. The parameter can be indicated as a general one, for example “5 mm”, or divided into two parts - “2.5+2.5 mm”, which will mean the same thing. There are industrial versions that are capable of welding three sheets of steel together at once. This is then designated as “3+3+3 mm”.
Connection voltage
To connect the device to the network, a single-phase voltage of 220 V or a three-phase line of 380 V is required. This is directly indicated in the instructions for the product and determines where it can be used. Power consumption from 3 to 12 kW will tell you whether the device can be connected to a regular household network (usually it is better not to turn on more than 5 kW, so as not to melt the wiring).
Control method
The cheapest devices are controlled manually. Some models do not even have the ability to set the current strength - it always works at maximum. The operator himself squeezes the pliers with his hands and monitors the time of contact of the electrodes so that the desired penetration is formed. For a high-quality connection, you first need to test the device on rough workpieces with the same thickness as the main product. Having determined how much time it takes to press, you can proceed to welding. There are devices with adjustable current, which make working with metals of different thicknesses a little easier.
Microprocessor (synergetic) control greatly simplifies the work. The welder indicates on the panel the type of connection being made (washer welding, wire welding, overlap welding, etc.), as well as the thickness of the product. Synergic control itself selects the optimal parameters for welding, supplies current and turns it off. The operator can only bring the electrodes and place them in the right place. But such models are much more expensive.
Extra options
If you need to operate the device for a long time, pay attention to the type of cooling. Devices with a water system and radiator remove heat faster and have a longer service life.
The spotter will definitely need a gun and a reverse hammer. To perform welding, copper electrodes are used, which are consumable elements. For mobile devices weighing over 13 kg, it is practical to purchase a trolley to transport them on wheels.
Fixation
It is very inconvenient to make a weld if the part being welded is not secured. Good fixation ensures joining and the required gap between the sheets of metal.
Various fasteners used to secure parts before welding
There are many methods for securing parts before welding. The choice depends on the situation and preferences. For example, magnets are suitable for holding a patch in place before welding it, but will be useless for holding a car's rear fender in place.
Among the many fixing methods and devices, the main ones are: clamping pliers of various configurations, special magnets, welding clamps for butt joints (edge clips), clamps. Each of the listed fixation methods represents a whole class of fixation devices and exists in various shapes, sizes and configurations. There are devices specifically designed for fixing butt, lap and offset joints.
Clamping pliers can be called the main fixing devices that are used when welding in body repair. Their limitation is that they require space to install the clamping pliers. They can be used if the place that needs to be fixed is located no further than 30 - 40 cm from the place where it is possible to install clamping pliers. At the same time, the tongs are quite bulky and clumsy.
Butt welding clamps
Butt welding clamps can be used to secure repair inserts. Requires access from the back of the panels. They are easy to install and remove and do not interfere with welding.
Such clamps ensure neat joining of the edges with an even small gap. Allows you to adjust and install sheets of different thicknesses for welding. Allows you to level surfaces along one line.
They are not suitable for use on strongly curved panels, but are very convenient for fixing straight panels.
Welding with inverter
Choosing an inverter is a good answer to the question of which welding machine to weld a car with. It is not difficult to deal with, so a do-it-yourself car repair welding machine in the form of an inverter is the most suitable option. The inverter has high performance.
Welding with a car inverter has the following advantages:
- rapid heating of welded surfaces;
- independence from the power grid;
- ease of arc ignition;
- economical electricity consumption;
- a small number of defects;
- ease of use.
To use it, you will need a 220 W power connection. You can start welding with an inverter only after thoroughly cleaning the surfaces to be joined. Using an inverter, you can also apply patches to problem areas.
The ease of use of welding with a car inverter is combined with high quality results. Is it possible to weld a car using inverter welding? The answer is ambiguous. Of course, it is possible, but it is advisable to do this by welding thick parts, which, in particular, include the bottom and side members. In addition, the considerable cost of this equipment should be taken into account. You can learn how to weld a machine using inverter welding by carefully studying the operating instructions supplied with the device.
To choose the right welding machine for your car in the form of an inverter, you should consider the following points:
- Resistant to voltage surges.
- Temperature limits at which equipment welded using an inverter can be used.
- Diameters of electrodes used in the inverter.
Electrodes with a diameter of two millimeters are used for thin parts - on the wings and doors, and with a diameter of four millimeters - for work on the body.
Before starting automotive welding work, you should pay attention to the humidity of the room where the process will take place and ensure its minimum value. This will reduce the chance of water droplets getting into the seam when welding, which can cause small pits and damage to the seam. In case of significant corrosion damage, the edges of the future seam are treated with a special primer.
Welding a car with an inverter is used if it is necessary to carry out repair work in the trunk area, under the wings, as well as other hidden areas of the car.
It is advisable to choose an inverter with continuous adjustment. When welding thin-walled car parts with an inverter, the polarity should be reversed. This will help avoid burns of parts and changes in their shape.
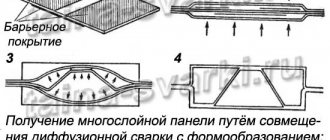
Welding small segments into a large structure
Sometimes it is necessary to make a panel or repair insert of a complex shape from several simple segments. Many metal shaping and auto body repair professionals practice this method. This may be necessary if the equipment or professional skills do not allow you to make the desired panel from a single sheet of metal.
It is interesting to note that in the past, some manufacturers made complex shaped panels from small segments welded together. This method was subsequently replaced by stamping and rolling forming techniques.
When making a repair insert of complex shape or an entire panel, this method can be used.
Electric arc welding with electrodes
This type of welding has long been used in the past to join body panels during repairs, as well as during production. Welding was carried out with small diameter electrodes, which were designed specifically for thin sheet metal. To use this type of welding required considerable skill. The welding quality was mediocre. The main problem was excessive heat, which caused the metal to deform and burn through. Compared with today's indicators, it took a lot of time to work with this type of welding. This method is now obsolete.
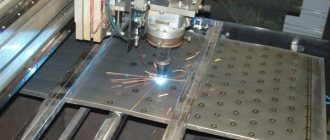
Resistance spot welding
Resistance welding has been the dominant joining method in automotive manufacturing and repair since the 1930s. Spot welding is carried out by pressing the electrodes of the machine firmly against the metal of the body and a combination of intense heat created by a very high current in a short period of time. The metal of the body panels is melted at one point and welding occurs.
The advantage of spot welding is the speed of action, the accuracy of the resulting weld points and the strength of the connection.
Modern passenger cars have from 3,000 to 4,000 weld points that connect individual body parts into one structure.
There are spot welding machines used in body repair, the electrodes of which do not need to compress the welding area. The force is applied to only one sheet of metal, and the second sheet touches the first sheet and is connected to the ground. Such a device is convenient to use when access to the reverse side of the metal to which another metal panel is welded is impossible.
Resistance welding points are often not protected from corrosion because the areas between the joined panels are susceptible to attracting moisture. This problem is aggravated by the fact that when exposed to spot welding, all metal processing elements, such as galvanized coating, evaporate at the hot spots. This problem is reduced by using a special welding primer between the panels being welded. This soil contains a high percentage of zinc. It is capable of conducting current. After exposure to spot welding, zinc ions protect the weld site.
DIY car body repair
Let's talk about problems with the car body that arise due to corrosion. Everyone understands that if you do not fight it, the process of destruction will begin in the places where the outbreaks form. There are various ways to deal with it, such as anti-corrosion treatment, but if the body is already de facto rusted, rotten and is already threatening to fall apart, only a major overhaul will help, or a partial one - replacing leaky parts.
Repairs can be done yourself in the garage if you have the necessary equipment.
Frame welding
Read the article: Welding a truck frame
Beginners in car body restoration believe that such repairs can be performed by manual arc welding. That is, you take a piece electrode with coating and cook it. This is far from true. The stick electrode is ineffective when welding thin-walled steel sheets. The thickness of the body ranges from 0.8 ... 1 mm. It is clear that it is difficult to obtain a high-quality weld without slag inclusions and burn-throughs at such thicknesses. Moreover, it is often necessary to weld such sheet material end-to-end.
Body repair equipment
It turns out that the highest quality and most efficient welding is available only with a carbon dioxide semi-automatic machine - this is what service stations most often use for body repairs. Set the current - the machine optimizes the wire feed speed. Set the speed and the current will be adjusted to the optimal value. Or simply select the sheet thickness. The likelihood of through burns and metal melting is minimized. Take the torch with both hands and you get a high-quality and durable seam. The carbon dioxide semi-automatic machine is suitable only for ferrous metals; welding of stainless steel and non-ferrous metals and alloys is carried out in an argon environment.
It should be noted that recently resistance spot welding has been used for repair and restoration work on car bodies. Some devices are specially “tailored” for such repairs - they have a user-friendly interface and a list of settings for effective work with the body. Plus, combined with special devices, such a device results in quick and high-quality repairs, which are in no way inferior to semi-automatic repairs. If the body at the factory was initially assembled by resistance spot welding, then it is recommended to use it during body restoration work.
Semi-automatic welding
An introductory briefing for beginners who want to customize their car, but don’t know where to start.
So, in detail about the minimum tool that you will need to get started:
- Welder
- Bulgarian
- Drill
- Wire
- Carbon dioxide cylinder
- Hose connecting the cylinder
- Reducer (will regulate the supply of acid).
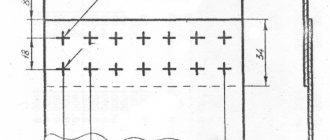
Purchase a millimeter sheet of steel measuring 2x1.2 m to organize patches. You can cut a piece from it and weld it into the “rotten” place (after first removing it). But before you start repairing the car body, practice. Cut out 2 samples measuring 100x100mm in a steel sheet. Make 10-15 holes in one of them, at least Ø5 mm, with a drill or hole punch. Add it with the second sample and start cooking. Select the wire feed and voltage level at which you will get a seam. At a low current you will under-melt the metal, at a strong current you will melt it through. Normal welding is when the semi-automatic wire melts and completely fills the hole.
Setting up a semi-automatic machine
Place the torch against the metal to which the ground terminal is attached, and adjust the wire feed on the control panel of the device by setting the speed to minimum. Press the torch trigger: if the wire feed is slow - you will understand this - it will begin to “shoot”. Increase the feed speed until the inverter starts cooking normally. If the speed is too high, the wire will “throw” the burner back due to the fact that it does not have time to melt. It is enough to select the feed speed once and do not change it during further work.
The current strength is selected depending on the thickness of the metal. Set the minimum current, if you need to add it, you will feel it intuitively by the nature of the formation of the weld pool. Excess cooled metal is cleaned off with a grinder.
After you hone your skills on samples, move on to welding the car. Start cooking on flat surfaces. Take horizontal seams when the electrode is on top (lower position). You will master the ceiling and side seams, when metal flows out of the bathtub under the force of gravity. Here you need to take gravity into account and a certain skill is required.
If, for example, your doorstep is rusty, cut it out with a grinder. Next, prepare the patch with a margin, since welding is performed with an overlap of a centimeter on each side. It is also possible to do it butt welding, but this is done in exceptional cases, since butt welding gives less strength. It is clear that the metal plate must follow the curves of the defective area.
Welding is carried out by surfacing with points, but do not place them one after the other along the perimeter of the patch, but place them in diametrically opposite places. Dots are placed alternately from one edge (top), then from the opposite (bottom), the middle of the left edge and then the right are grabbed. After tacking, welding is completed with spots in a checkerboard pattern. Places where you need to press the lining more tightly can be screwed on with self-tapping screws. It is also possible to initially attach the patch with self-tapping screws, which allows it to be correctly aligned before welding. It is enough to secure a part measuring 100x100 mm with 8 such screws.
The metal should fit snugly to the body. If there is a gap somewhere, use the wooden handle of the hammer as a clamp. The shape is given to the metal better when you heat it up: you’ve boiled a point, and immediately you need to tap with a hammer where the fit is not quite precise.
Start repairing with easy places, the rest can be mastered when you understand how to bend metal and “feel” your semi-automatic machine. It is better not to touch the repair parts of the wings, arches, engine shield, power parts of the car until you gain sufficient experience, since the consequences of inept intervention can be the most unexpected, even creating an emergency situation on the road.
Do-it-yourself threshold repair technology
The threshold is located in the most aggressive environment, and therefore is a place highly susceptible to corrosion. If your threshold is rusty, it requires immediate repair. which is quite possible to do on your own.
So, the general sequence of work to restore the threshold is as follows:
- Cleaning the problem area with a grinder and a metal brush (“hairy” circle)
Be very careful while working, use safety glasses, but preferably a mask. Anyway,
It is imperative to use protective equipment, because the elements of the brush fly out of it and can injure your face and body.
If you have earplugs, it is better to use them, the instrument produces a very strong sound. Stripping produces a lot of dust, so wear a respirator to protect your lungs.
Pay attention to one small subtlety: when you protect the surface with a “hairy” circle, the metal is polished, but at the same time you can also roll (roll) the metal onto the adjacent fragment of rust, which will certainly appear over time.
- After you have processed the metal, you need to go over it with 120th (or at least 240th) sandpaper so that risks appear. This is required so that the material that is applied in the next step sets well.
- Treat with Zinkar (there may be different options, such as Zincon, Zincor) - corrosion converters based on zinc and magnesium elements, orthophosphoric acid, etc. After it has “done its job”, you need to go through the sandpaper again until the remnants of Zincor and rust are completely removed. The operation must be completed by degreasing the surface (this can be done, as you know, with any available solvent, white spirit, nefras, acetone, etc.)
- To provide reliable protection to the threshold, epoxy primer is applied.
Why epoxy and not acrylic or acid?
Acid primer (also phosphating or reactive) is applied to remove any elements of corrosion in the pores and recesses that you could not clean out.
Epoxy primer is a primary primer and has a very dense structure, it is much denser than acrylic. It does not allow moisture or air to pass through, which is precisely what is needed for the corrosion process.
- The next stage, applying the sheepskin (anti-gravel) - it is called that because it looks like lamb’s wool after drying. After hardening, it must be painted over, because the steering wheel dries out and collapses when exposed to sunlight. It will be very difficult to wash such a threshold.
If the threshold is rotten to holes, the emergency area is cut out. The cut out part can later be used as a template, which can be attached to a sheet and the contours of the future overlay can be scratched on it. You need to cut not according to the plan, but slightly indented. The cut out parts of the threshold that have a radius can be “measured” using a sheet of paper and then the “overlay” can be sawed off along this sheet and given the desired shape using, for example, pliers and a vice. Next, the patch is attached at points to the threshold of the car with an overlap.
When welding, do not use a shield that you need to hold in your hand; it is better to get a full-fledged chameleon, which will automatically select the darkening density of the filter and protect all parts of the face from the burning (skin will simply burn) influence of infrared radiation. The shield protects from direct rays, it has no protection from the sides and reflections from the varnished surface of the car (from doors and other parts) can get into the eyes, causing damage. Think about your health!
Patch repair of thresholds is a fairly effective way to extend its life. However, this is always a temporary measure, since it is impossible to clean out the corrosion and treat the threshold with protection from the inside, which will give the owner the opportunity to drive for some more time and raise money for a replacement.
Only major repairs will give you a guarantee of quality and durability, i.e. when the threshold is completely removed and processed on all surfaces, or a new one is installed.
MIG/MAG welding
This type of welding has become the most popular in body repair. When they mention semi-automatic welding, they mean this type of welding.
MIG (metal inert gas) is translated as metal with inert gas, which does not correctly reflect the essence of welding. For example, the so-called TIG welding (tungsten inert gas), also metal with inert gas. But everyone is used to calling this type of welding that way. MAG (metal active gas) is the same type of welding, only active gas is used as a shielding gas, which protects the welding zone from air, and also chemically reacts with the metal being welded or dissolves in it. When welding steel panels using MAG (active shielding gas) welding, carbon dioxide (CO2) is most often used in body repair. Also, variations of gas mixtures consisting of argon (Ar), oxygen (O2), nitrogen (N2), hydrogen (H2) can be used. Gas is filled into cylinders and connected to welding equipment.
In the MIG/MAG welding process, welding wire is continuously fed into the welding area as the weld is formed. The wire carries current and is surrounded by an inert (or active) shielding gas that comes along with the wire. For MIG welding, a mixture of 25% CO2 and 75% argon is usually used. The gas helps cool the welding area and also protects against oxidation that would occur if welding were done without shielding gas.
The MIG/MAG welding process involves a cycle. When the welding wire touches the welding site, a short circuit is created with a metal part that is connected to ground. The heat generated by the short circuit melts the wire and the cycle is completed. However, it quickly resumes as the wire continues to flow, creating a short arc, which is the basis of MIG/MAG welding. Changing these cycles creates the well-known “crackling” sound characteristic of MIG/MAG welding.
When welding with MIG/MAG equipment, it is important to ensure the correct gap between the panels being welded. This refers to the butt jointing of metal sheets. If the sheets to be welded are located too close or closely together, then the heat will inevitably deform the sheets. The result will be an uneven surface.
It is also important to adjust the shielding gas flow and wire feed speed. The current strength is set depending on the thickness of the wire and its feed speed. You need to learn how to configure all this experimentally. You can read more about semi-automatic welding here.
Inverter welding
In recent years, an inverter is increasingly used when it is necessary to perform welding work on a body.
This is a technologically advanced, compact and lightweight welding machine that uses modern components and a special current conversion method. It is characterized by low sensitivity to low supply voltage and provides easy ignition of the arc.
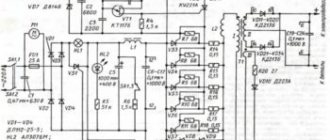
Electrical diagram of a resistance welding machine.
For an inexperienced welder, an inverter-type welding machine is a real godsend. It is really worth choosing an inverter for car repairs at home, because only a child cannot cope with such a device.
And the electrodes used in the work are no different from consumables for standard welding. But in fairness, let’s add: for all the simplicity of inverter welding, its results are rarely of the highest quality.
Often the seams turn out to be thick and not even enough; due to uneven heating of the metal, deformations appear, even if you hold and operate the device skillfully.
For this reason, the inverter is used to cook places on the car body that are invisible to the eye: surfaces in the trunk of the car, under the wings, etc. To work, you will need to adjust the current depending on the thickness of the parts and material, select an electrode and connect the ground terminal to the working surface.
TIG welding
TIG welding (tungsten inert gas - welding with a tungsten electrode in an inert gas environment), also known as GTAW (Gas tungsten arc welding - arc welding with a tungsten electrode in a shielding gas environment). This is an electric arc welding that uses a non-consumable tungsten electrode. A shielding gas (argon or helium) is supplied to the welding area, which protects it from atmospheric influences, and a filler metal is also used. This welding is the most difficult to master. In auto body repair, TIG welding is mainly used when repairing cars with aluminum bodies.