Peculiarities
When choosing a gate for a suburban area, you need to consider the following points:
- purpose - decorative fencing, protection from prying eyes, street dust, construction of an impenetrable fence, etc.;
- landscape features - flat area, hilly terrain or installation on a pre-prepared foundation. This affects the complexity of manufacturing the installation and ultimately the price of a forged gate;
- climatic conditions. Depending on the local climate, the gate must be resistant to high or low temperatures, high humidity, etc.
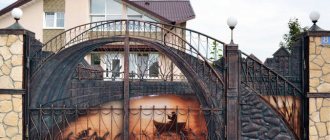
In the photo of forged gates you can clearly see the various variations of such structures and methods of their installation.
Pros and cons of forged gates
Among the advantages it is worth noting:
- Durability of raw materials. With high-quality anti-corrosion treatment, the canvas will last for decades.
- Aesthetic appeal. Original patterns on the surface will turn the fence into a garden decoration.
- Possibility of combination with other materials (wood, stone, corrugated sheet, brick, polycarbonate).
- Metal does not fade in the sun and does not burn. It is not afraid of fungus or mold.
- Increased strength provides good protection for the home from intruders.
- Resistance to external influences.
Disadvantages:
- Labor-intensive and lengthy manufacturing process.
- The large weight of the structure requires laying a reliable foundation.
- High cost of work and material costs.
It should be noted that forged fabric, like any metal product, requires mandatory protection against corrosion. If you neglect processing, the service life of the structure will be significantly reduced.
Advantages and disadvantages
The key advantage is its attractive appearance. Such gates look solid and stylish. The gate can be equipped with additional decorative elements that improve aesthetic qualities. This makes it possible to implement various design ideas.
There are various sketches of forged gates online. You can make a design based on a ready-made sketch or develop your own unique model.
With proper arrangement of rods in the structure, the gate will provide a high level of security, not inferior to blind high fences.
It is not recommended to make a large distance between the rods; this may increase the risk of unauthorized entry of unauthorized persons into the site.
Due to the manufacturing of metal, such structures are strong and durable. They can last for decades, especially with proper care.
Stores where you can buy forged gates, as a rule, additionally offer various protective coatings that can significantly extend the service life of the product and make it more aesthetically pleasing.
The main disadvantage of the designs is the relatively high cost. Such a gate will cost slightly more than a simple fence and gate made of wood or profiled sheet. But this disadvantage is compensated by the durability of the structure.
How to make a forged gate with your own hands in an amateur way
This method does not require special and serious preparation . An amateur craftsman must be able to weld with a welding machine, clean up welded areas, prepare metal for painting and perform final surface finishing. To work, it will be enough to have inverter welding and electrodes. The materials you will need are those that will be needed for welding the gate structure:
- pipe with a diameter of up to 100 mm for installing racks;
- a corner, square or pipe with a diameter of 25–40 mm for making the frame of the valves and trim with spacers;
- hinges for hanging sashes
- if the sash design is lattice, then reinforcement with a diameter of 10 mm is required, a ribbed surface is possible;
- if the sashes are blind, then corrugated sheets or sheets of metal are used for filling;
- selected forged parts purchased from the store.
To make forged gates with your own hands, use a previously drawn up drawing , according to which you can confidently cut the material, weld the structure and lay out decorative elements on the area of the doors.
The sketch for creating a masterpiece can be seen in numerous photos or an exclusive original version can be made if the owner feels the opportunity to realize some of his plans. Any gate can be blank and with decorative figures located on it. From a design point of view, gates made from a rod connected in a certain order, which serves as the basis for placing forged elements when creating the selected ensemble, look more attractive. First you need to create a composition on paper so as not to overload the surface of the gate with numerous motifs that do not fit together.
So, for those craftsmen who do not have blacksmithing skills , the easiest way would be to use ready-made motifs on the plane of a standard gate. Adding a little openwork to the faceless gate made of corrugated sheets will be just right, and the openwork gate will greet guests at home with ornate forged elements. Forge shops sell peaks, rings, scrolls, flowers, spirals and many other magnificent works of hot art.
Work order
To begin with, you can take an existing gate or weld a new one .
Old sashes must be carefully removed from their hinges and the surface must be cleaned of layers and adhesion of metal, possibly rust. The sketch of the drawing is transferred to the surface of the gate with an increase in scale and precise indication of the location. Attaching the forged parts to the surface is done by spot welding ; after the procedure, using a grinder with a mounted grinding disk, the surface of the seams is tidied up; ideally, they should not be visible. After painting, the prepared sashes can be hung on the hinges of the racks.
Painting wrought iron gates
After welding decorative ornaments, attention is paid to proper painting technology . If you do this carelessly, then within a year the corrosion that appears will negate all efforts to give the gate a respectable appearance. Painting is divided into three stages:
- preparatory work;
- priming the surface of parts and fabric;
- final painting.
Preparatory work includes grinding the forged elements and welding areas so that they have a uniform surface.
If there are gaps in the weld, then you need to go through the problem areas with electrodes again, then repeat the grinding. After grinding, decorative elements , seams and the sash area are treated with anti-corrosion compounds, wait the time indicated on the packaging and apply a metal primer. The primer usually costs less than the final finishing paint, so applying the first coat of paint with this composition will significantly save on the consumption of the base color.
Painting is carried out according to the chosen scheme; sometimes two or more colors are used in wrought iron gates to make the ensemble more effective.
Recent Entries
Chainsaw or electric saw - what to choose for the garden? 4 mistakes when growing tomatoes in pots that almost all housewives make Secrets of growing seedlings from the Japanese, who are very sensitive to the soil
Varieties
Forged gates can be made from different materials using different technologies. In particular, climatic conditions must be taken into account. As a rule, products with a height of about 2 m are installed.
The most common steel gates are the lattice configuration. They look good and reliably protect the area. Forged gates with corrugated sheets or polycarbonate are also quite popular.
A forged gate can be equipped with a roller shutter. This is a particularly convenient solution for car owners due to the possibility of automation. Such products are easy to use, quickly produced and installed.
Popular trends and styles
Artistic forged elements that are used in the manufacture of entrance gates have certain styles. They are chosen taking into account the architectural trends that are present on the territory of a private house.
Forged doors with a wicket
Today the following styles are most popular:
- Byzantine. Forged structural elements are mainly dominated by complex patterns with multiple bindings, floral patterns, and geometric elements.
- Russian. Mostly there are fairy-tale characters, animal figures, and Slavic motifs.
- Gothic. The predominance of arches with pointed tops and oblong shapes. There are also images of grape leaves, roses, and clover.
- Renaissance. Forged gates with drawings, a large number of decorative patterns, a clear geometric order of the elements, usually in the shape of a spiral.
- Loft. Rough shapes, lack of intricate pictures, decorations, and other decor.
- Modern. Graceful forms without a clutter of design elements with an ascetic frame, the presence of simple lines.
When making an entrance gate to organize a single architectural ensemble in the same style, lanterns, furniture, and canopies are installed.
Most artists and craftsmen, for whom the manufacture of forged elements for gates and gates is their main business, include photographs of various monograms in their catalogs, which can be purchased ready-made or a sample can be ordered separately.
Wicket and doors with forging elements
The more complex and smaller the pattern, the higher its cost. The price of large monograms is relatively low, but only small curls can give the fence a complex, beautiful design. The most popular are arrows, rounded spiral patterns, leaves, and flowers.
Do-it-yourself forged gates, photos of various design options can be seen below in the article.
Forged structures in the country
Drawing and preparation
Any work begins with a drawing. First you need to decide on the installation location and dimensions. The gate can be placed next to the gate or separately from it, its height can be equal to or less than the height of the fence. With a very high fence, the door can have a height of no more than 2 m (rarely 2 m 10 cm), a lintel can be made higher and sheathed in the same way as the fence. The width is 0.9-1 m (a smaller width is inconvenient when entering with cargo or bags, a larger one also creates inconvenience when opening, requires a more massive frame, and there is a possibility of distortion during operation).
Then you need to think over the design of the door and support posts and draw installation diagrams and a drawing of the door structure. This must be done in advance, think everything through, calculate the required amount of materials, purchase and bring them.
Don’t forget about PPE: for welding work, a canvas suit and gloves, a mask with tinted glass are required; boots; for other work - glasses and gloves, rubber gloves and a respirator for painting work.
What tools will you need?
List of tools and consumables:
- garden auger, bayonet shovel, crowbar;
- concrete mixer or container for mixing concrete for installing racks;
- shovel for loading sand and cement, metal buckets;
- welding machine. For a home craftsman, it is enough to have an inverter welding machine with a welding current of 160-200 A. You can invite a welder - but you can also learn how to weld simple products yourself - it will always come in handy. A welding machine in the estate will quickly pay for itself - there is always enough small welding work when arranging a garden;
- tools for drilling holes and tightening screws - drill and screwdriver;
- level, cord, plumb line, construction square;
- metal ruler 1 m long, tape measure 5 m long;
- clamps - they are used to assemble the frame during welding, and temporarily secure the frame when installing the lock and hinges;
- brushes;
- grinder, metal cutting wheels, grinding wheels.
Selection of material
To make a gate from steel profiles, the following materials are required:
READ ALSO: How to Install a Sectional Garage Door Made of Aerated Concrete
- steel pipes with dimensions of at least 80×80 mm for supporting pillars of light gates made of corrugated sheets, at least 100×100 for heavier models; wall thickness of at least 4 mm; you can use a structure of two U-shaped channels welded in the shape of a pipe. If one of the pillars also serves as a support for the gate frame, then a pipe with an even larger cross-section is used;
- steel pipes 60×40 or 40×40 mm for welding the wicket frame, 40×20, 32×32 mm for lintels;
- colored roofing screws complete with a rubber washer;
- material for covering the frame - metal sheet 2-3 mm thick; or corrugated sheeting with a plastic coating with a wave height of 10-12 mm, sheet thickness of 10-12 mm; or polycarbonate, end profiles for polycarbonate, special adhesive tapes for closing the ends of polycarbonate; if necessary, ready-made forged parts;
- small bushes of steel sheet 4-5 mm thick;
- bricks;
- roofing felt;
- loops;
- lock;
- sanding paper;
- cement, sand and crushed stone for concrete;
- gravel or crushed stone (middle fraction);
- weatherproof paint for exterior use;
- anti-corrosion primer;
- electrodes.
Installation and concreting of pillars
Based on the size of the opening, mark the installation locations of the pillars and use a hand drill to make a hole in the ground 80 mm deep. Then the profile is lowered into the holes and set in a strictly vertical position using a level or plumb line.
Special attention should be paid to this operation. The correctness of the entire installation of the gate depends on it. The pillars are fastened together with spacers and additionally each with jibs, filled with concrete, not forgetting to compact it when pouring. Now the concrete needs to be allowed to harden for 24 hours.
Hinged or sliding?
Structurally, gates are divided into two types: swing or sliding.
Their advantages and disadvantages are given in the table:
| Wicket type | Advantages | Flaws |
| Swing | ease of manufacture | In winter it is necessary to clear snow |
| light weight | There is no sound insulation at all | |
| low price | ||
| beautiful appearance | ||
| Time-tested design with hinges is trouble-free | ||
| Sliding | manufacturing is more difficult than swing | If there is a power outage, it may be difficult to enter the site |
| the price is higher (the electric motor and automation are more expensive than simple profiles and sheets of metal or corrugated sheets) | If the electric motor breaks down, it takes time to purchase and replace; during this time the gate cannot be used | |
| beautiful appearance | There is no sound insulation at all | |
| small space saving | Difficult to install on your own |
In general, the choice of the type of gate is a matter of taste, although many prefer the traditional hinged design - it’s more familiar. The main advantages of sliding work are that automation and saving space for opening are not so relevant for small gates.
We make a sketch and calculation
When drawing up a drawing, it is necessary to take into account the location. If you weld a gate next to the gate, one of the support posts will be common. A free-standing gate is made the same height as the fence (but not more than 2.1 m) or lower than it. If the fence is high, a jumper with sheathing like a fence is placed above it. The width is selected in the range of 0.9 - 1 m. With a smaller size, passage with bags is inconvenient, and with a larger size, welding of a more durable frame will be required.
You also need to consider the depth of burial of the support pillars. Its value is determined by the depth of soil freezing plus 15 - 20 cm. In addition to the main dimensions, the drawing indicates the profile section, the coordinates of the installation locations of the lock, handles, and hinges. Detailed study will allow you to accurately calculate the amount of materials and avoid errors during installation.
The amount of digging of support pillars is determined by the depth of soil freezing plus 15 - 20 cm
Manufacturing of gates
To make a gate from a profile pipe with your own hands, you need to purchase material. To do this, calculations are made based on the drawing. The structure is divided into separate components, and the values are summed up: length and width.
DIY drawing
The frame blanks must be solid. To do this, the material is purchased with a reserve so that the profile does not have to be welded. Along with the profile pipe, you also need to purchase components: a lock, latches, canopies. They also buy paint, primer and the necessary sources. This will save time so you don't have to go to the store again.
Welding work
- Before welding a gate from a profile pipe, prepare the place. A metal table with a flat surface is the best option for work. The table is set horizontally, all irregularities are smoothed out with a grinder. This is necessary to ensure that the product is level in the horizontal plane.
- The material is cleaned of rust and debris using a grinder with a grinding wheel. It is better to clean the workpieces separately, since this is more difficult to do in the finished product.
- The prepared material is cut to size. The blanks are cut at an angle of 45 degrees. Such welded seams look aesthetically pleasing, and moisture does not get inside.
- To get an evenly cut workpiece, use a stationary cutting angle grinder with a degree scale or manually mark it using a corner. When cutting, make sure that the workpiece lies flat and the grinder is perpendicular to the surface.
- Before assembly, all metal parts are primed. A gate made of a profile pipe must be treated on all sides so that rust does not appear when moisture gets in.
- The prepared frame blanks are placed on the work table, tightly joined, and the diagonals are checked.
- Make neat tacks in three places to fix the structure, check the dimensions again.
- If the dimensions and diagonals are normal, the structure is turned over to the other side and the blanks are welded together. This is done so that the structure does not go astray in the horizontal plane. Then they turn it over to its original position and finish scalding the joints. After the frame of the gate is ready, the welding areas are polished and filled with decorative elements or metal sheets.
The finished product is primed and then painted.
It is more advisable to apply primer and protective compounds in the removed position
Painting the product
Painting is an important part of the job. Paint protects the metal from corrosion and gives it an attractive appearance. Particular attention is paid to preparing the product for painting. The metal is cleaned of rust. It is better to do this at the preparatory stage of assembly, then you will not have to manually remove rust from hard-to-reach corners.
Coating metal surfaces with paint
The workpieces are wiped free of dust and degreased with a cloth soaked in solvent so that the painted surface is free of dust particles. To thin the paint and primer, use solvent 646 or 647. After dilution, begin priming the product.
This is a preliminary treatment of the metal with an alkyd primer, which smoothes the surface and ensures good adhesion to the paint. Now they produce 2 in 1 paints, which are used without a primer.
Painting with a spray gun significantly reduces the consumption of protective composition
It is better to paint the product with a spray gun, then the paint will spread evenly in a thin layer. You need to paint twice. The first layer is applied to level the surface, and then partially covers all unpainted areas. Paint the second time after the first layer has completely dried. The paint gives shine and lasting color.
The cost of the Russian primer GF-21 weighing one kg is 151 rubles. Finnish Tikkurila costs 500 rubles. per can weighing 0.9 kg. Primer consumption 70–100 g per 1 sq. m.
Appearance of the domestic primer GF-021
The cost of Russian-made paint is cheaper than its foreign counterpart. PF-115 enamel, 0.9 kg can, costs 200 rubles, and Finnish Tikkurila of the same weight costs 1100 rubles. Paint consumption 100–150 g per 1 square. m.
Return to contents