Plastic injection molding at home
This video lesson from the OchumeletsTV channel is about how to cast plastic at home.
Molten plastic is not completely liquid. This is a thick mass, so it is poured under pressure. To create it, the master made a metal syringe. I used a plumbing squeegee. Piston. Guide. Solid mold. Made from epoxy resin. Make a screw lamb. Polypropylene was used as a raw material. From an old box. At home, it is better to cast polypropylene and polyethylene, since these plastics are non-toxic.
When heated, they do not emit harmful products. Fill small pieces into a syringe. We put it in the oven at 220-240 degrees. The part is simple, so the plastic should not be overheated. While the plastic is heating up we will assemble the mold.
First, secure the bolt to the required distance. Just pull by hand, no wrench needed. The pressure is not so high. To prevent the bolts from moving back and forth, we use a cap. Chipboard material. Install the cover and tighten it with nuts. We will pour plastic into the hole.
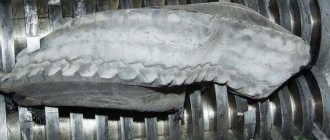
30 minutes have passed. We put on special gloves and take out the syringe. Let's quickly wind it up. Apply pressure to squeeze out the plastic. Installed on top of the mold. Let's press. We wait a certain time. It must be kept under pressure to minimize shrinkage. Let's analyze the form and see what the product turned out to be.
It's obvious that everything has spilled. Let's extract it. The detail worked. The bolt is well filled and sits firmly. The protrusions can be trimmed. This way you can do polypropylene casting, etc. at home. This is the most primitive artisanal method. So that the product can be cast quickly and easily.
Selection of mold material
When making molds for plastic injection, it is very important to understand what steel the forming parts, forming plates, guides and pushers will be made of. The quality of steel significantly affects the life of the mold, as well as the restrictions on the materials used
Sometimes mold manufacturers, realizing that the client’s need in the future will not exceed the number of closures and 100,000, are a little disingenuous by declaring that they supply equipment with a service life of more than a million, although in fact they sell molds made of softer metal with a service life of only 300,000 In Russia they especially like to sell molds made of duralumin, convincing potential customers about the long service life of this material.
Mold making
Next, watch a video on how to make a mold for pouring plastic.
Polypropylene casting machine
The author of the OumeletsTV channel showed a self-made machine for home plastic molding. It's electric. The piston is manual. Thermostat for precise temperature control. The video shows his tests. For these purposes he will cast nylon or polyamide. There is another name - nylon. Chair crosspieces are usually made from nylon. The master found just such a thing, he crushed it. Before use, the mug must be dried at a temperature of up to 100 degrees. This must be done within 2-4 hours.
Load the granules into the machine. Let's set it to 250 degrees. This is the optimal temperature for polyamide casting. Let's wait until the required degrees are reached. Then we will install the piston. The machine has reached optimal mode, the indicator light is on. Now you need to wait 5 minutes for the plastic to completely warm up from the inside.
The polyamide has warmed up. We put it on the mold. We press in. We do pressure aging. It's obvious that he's flooded. Let's let it cool a little. Now let's disassemble the mold. Studied plastic product. As you can see, there is no shrinkage.
Make your own mold
Make your own mold
#1 Post by Mikhail Ivanovich » April 29, 2013, 3:16 pm
Re: Making a mold with your own hands
#2 Post by Mikhail Ivanovich » April 29, 2013, 3:19 pm
While nothing has been changed, as past comrades promptly did, I am copying the entire article here.
“Most often, clients who want to organize the production of plastic products are concerned with one single question: how to make a mold? In fact, you can create this device with your own hands – we’ll talk about this below.
So, you decided to create a mold yourself. To do this, first of all, you need to have a complete understanding of what kind of product you will be making with its help. It is necessary to draw up a drawing of the product that could be used when designing the mold.
Further. As you know, for injection molding, the mold must be made of durable metal - for example, steel. Based on this, to create a mold of proper strength, you will need steel. Moreover, it is necessary to use 2 steel plates or bars - one will play the role of a punch (moving part), the other will become a matrix.
After selecting the material and the blanks themselves, you can proceed directly to creating the mold. Using product drawings and a lathe, you can cut the required holes and recesses in the steel plates. Be sure to take care to firmly connect the two plates and fix them in this position. The gating system must be especially carefully adjusted. For some relief details you will need a milling machine, or manual work using a file.
The fully processed mold is tested in operation by casting test parts. This will allow you to verify the quality of the gating system, as well as the compliance of the manufactured products with the desired result.
Such specific equipment as a mold finds its application in the mass production of various products. The use of molds is particularly relevant in the technology of production of plastic products. A high-quality mold allows you to effectively create various polymer structures.
It’s easy to guess that it’s acceptable to make a mold with your own hands only when you need plastic parts of a simple design. As for complex products, and even more so those with internal cavities and bends (when a mold consisting of three parts is required), it is very difficult for them to correctly produce both the drawing and the structure itself (without the appropriate capabilities and skills). In this case, you really can’t do without professional help.”
Read also: How to lubricate a Makita hammer drill video
Nowadays, plastic products have become indispensable not only in everyday life, but also in production.
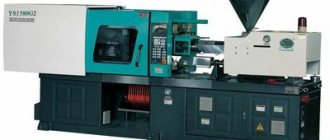
Tabletop mini injection molding machine
The production technology has aroused increased interest, since this is one of the most common methods of producing various products in demand on the farm.
Plastic injection machine at home
Below is a video explaining how to make a plastic injection molding machine. What do you need for this in a DIY home environment? Rod with piston. Three-quarter pipe as a cylinder. Half inch adapter to 3/4 pipe. Fitting cut off for convenience. Metal gasket with mica for insulation. Thermostat. It regulates temperature up to 350 degrees. 600 watt ten. Two nuts and a box for attaching the thermostat. We put on the adapter. We tighten the washer. To prevent the nichrome from sliding down.
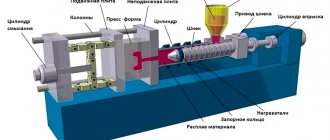
We begin to assemble the control unit. Then we attach the thermocouple from the thermostat to the cylinder body. The author did not show how he would assemble all this, but presented a diagram. The photo shows the device assembled.
We attach the control unit to the syringe. Tighten with nuts. The thermocouple is long enough. Now you need to secure it. Mica to prevent thermocouple from slipping through ceramic insulators. For rewinding, not just a thread is used, but a silica one. It is heat-resistant, that is, it does not burn or melt. You can use asbestos cord. But since the master did not have it in stock, he had to buy silica.
We wrap it with heating element. Next, you can use mineral wool or asbestos fabric. Necessary to avoid heat loss. The master used mineral wool from an old oven. Fixed it with aluminum wire. Assembly is complete. Pressure tests can be carried out.
Set the thermostat to 100 degrees. Let's see how the machine will work in this mode at home.
Plastic molding device (extruder)
In this article we will look at how to make an extruder. But first, let's understand what extruder and extrusion are. An extruder is a machine for continuously processing polymer raw materials into a homogeneous melt and giving it shape by pressing through an extrusion head and a special calibrating device.
Extrusion (technological process) is a method and process for producing products from polymer materials by pressing a melt of material through a molding hole in an extruder.
In simple terms, plastic is melted in the device’s chamber and pressed under pressure through a head nozzle into a mold.
Tools and materials: -Metal pipe with a thread at the end; -Socket head; -Extension for head; -Welding machine; - angle grinder; -Vise; -File; -Perforated corner; -Two corner brackets; -Copper tube; - Fasteners; -Metal clamp; -A heating element; -Thermoregulator with sensor; -Fiberglass; -Aluminum tape; -Fitting; -Metal strip; - Angle; -Drill;
Step one: piston The extruder chamber will be made of a 20 mm metal pipe. The inner wall of the pipe must be smooth without a seam. Plastic will be placed inside the chamber, heated and squeezed out through the nozzle. A piston is needed to extrude. The master made the piston from a socket head. I selected the head according to the diameter of the tube. I installed it on an extension cord. Welded the head to the extension cord. I welded the end hole of the head.
Step six: nozzle The role of the nozzle in the extruder is played by a brass adapter. Screws in the adapter.
Secures the corners to the frame. A transverse pipe is attached to the corners. A pipe with a slot is attached to the crossbar. Takes another piece of pipe. One end is flattened (it is attached to the slot of the previous element), the second end is connected to the piston rod. All connections are movable.
Become the author of the site, publish your own articles, descriptions of homemade products and pay for the text. Read more here.
How to make a mold
Mini-TPA does not require a full-fledged mold for casting plastic parts.
It is enough to make a form-building part that is part of any mold.
The form may consist of one, two, three, and so on parts. The main thing is that they must be tightly connected and kept assembled at the moment of plastic injection. Then, after injection, the mold should be easily disassembled into its components, and the part itself should be easily removed after casting.
Making a mold will be shown using the example of the task of casting a cord clip . This example is for a machine with an automatic clamping unit; modifications for a manual machine are also described below.
1. Draw the product.
2. Since the part is small, several such parts can be cast at a time. It was decided to cast 2 pieces at a time, since a small number of products are required.
A computer model of half the mold containing 2 parts is drawn. The injection is planned in the middle between the products. Since the requirements for the product are not high, it is customary to make the casting channels wide for easier casting.
There are threaded holes in the corners.
You can download a zip archive with files of this plate in stp and iges format from this link.
3. The front plate (the second half of the mold) is a smooth surface with a hole in the middle for the MiniTPA nozzle and also four threaded holes for fastening.
4. For ourselves, we have developed a set of frames for attaching various-sized forms with many through holes and with large holes in the corners for mounting on guides.
Subsequently, we abandoned the frames in their original form, leaving only vertical parts with bronze bushings.
Forms are attached to the holes; the hole dimensions for our case are indicated on the “Drawings” page. You have the right to choose them and arrange them as your detail requires.
5. We assemble the entire structure on the machine and make a test casting. All is ready.
6. In our case, we modified the mold, equipping it with pushers for automatic operation.
An example of work is shown in the video below:
Manual casting mold on the desktop
A mold for manual casting will have a minimum of differences: there is no need to make a hole in a flat plate - injection will occur along the line of closure of two plates (half-molds).
The form will need to be pinned to your desktop. The top lever will keep the mold from opening, the second will move the entire work table towards the injection nozzle.
We hope this information will be useful to you when designing and making your mold.
Making double dowels for installing heated floors
According to the above algorithm, a casting mold was designed and tested
double dowel for installing heated floors.
Form
The mold was made of aluminum for two reasons. The first is to test one hypothesis (technical solution), the second is to minimize risks in case of failure and at the same time save money in case of success. Everything worked out.
Prices for manufacturing a mold for plastic injection molding
The Vertical technological equipment plant has been developing and manufacturing molds for thermoplastic machines for more than 10 years, so we can provide our customers with the most competitive prices among Russian, Belarusian and Chinese manufacturers. In order to make sure that our prices are really low, you need to fill out the online calculator form on our website, and also send a 3D model of the future product
Attention, when comparing prices from several suppliers, pay special attention to the steel grade of the plates and the steel grade of the molding parts, the type of injection channel, as well as the dimensions and weight of the mold!
Making plastic products and molds with your own hands
A business idea for organizing small-scale production of products from various injection molding materials at home. Thanks to innovative technologies, today in the production of plastic products it is possible to do without expensive automatic thermoplastic machines. Moreover, you can set up small-scale mini-production right on your desktop. This business idea can be considered in two directions:
- As the main business of manufacturing finished products and molds by casting from: liquid:
- plastic;
- silicone;
- polyurethane;
- transparent resins and other materials.
- Mold making as an effective addition to other types of business in the area:
- construction;
- Food Industry;
- soap making
In the first and second cases, casting at home does not require large financial investments. You can start an injection molding business simply now.
Benefits of cooperation
The main activity of APC Group is the production of plastic products, including the production of molds for injection molding of plastics.
With our own resources, using our own equipment, we carry out the entire production cycle for the production of molds for injection molding machines: from the development of design documentation to the receipt of the entire batch of products.
Five reasons to cooperate with APC Group:
- Price from the manufacturer,
- Production in St. Petersburg, possibility of control at any stage.
- Service life guarantee, determined by the indicator: 200,000-1,000,000 closures,
- Full cycle, from design to delivery,
- Terms of only 30 days.
Manufacturing using liquid plastics
The manufacturing process is carried out using liquid plastics and silicone molds. Now it is possible to produce plastic products in small batches at home:
- souvenirs;
- toys;
- costume jewelry;
- spare parts for auto tuning;
- spare parts for various mechanical devices;
- shoes;
- dishes
There are components for the manufacture of parts from thin-walled plastic, which can significantly expand the range of products and produce parts of any complexity. For example, mixing two components of the Axson FASTCAST F32 brand from a French manufacturer makes it possible to obtain a super-liquid plastic that flows into the smallest folds of the relief of the model’s shape. In addition, it is harmless to children and has no odor.
Types of press designs
Then calculations of the bed parameters are made. This is a frame inside which a jack is installed. It produces pressing movements on the waste paper. The frame is made of thick metal. Its strength should be sufficient to withstand the pressing movement of the jack. Thick metal is used to make the frame. When moving, the press presses up and down on the frame, as if it is trying to tear it apart .
The base of the frame must also be strong. It becomes sustainable. The frame, made in the form of a platform, has good stability. The width of the frame must be calculated based on the size of the jack. It must exceed the dimensions of the equipment installed on it for pressing waste paper. The height of the product is determined depending on the size of the jack. During operation, its free movement must be ensured. When determining the height of the structure, the thickness of the working surface of the table is taken into account. It is movable and is used to process objects.
Depending on the design and operating mode, the jack is attached to the base . The top of the frame will be a stop for the parts. The force from the movement of the rod is transmitted through the work table and then to the object being processed. The work table is mounted above the jack on the bed. It should move up and down freely.
Pre-production
To organize production, you will first need a sample model. Using it, you first need to make a mold from special silicone or polyurethane components. With experience and the quality of materials, you can learn to remove molds from models at such a high level that fingerprints will even be visible on the products (if necessary). That is, the copy will be at the level of identity, which cannot be distinguished with the naked eye. Plastic products can be given complex compounds with any relief. If there is no ready-made model for a sample, but you need to make unique products, you can order it from the owners of a 3D printer. By the way, casting significantly exceeds the productivity of 3D printing from plastic.
When your product is ready, you can design it using related products that come with liquid plastics:
- paints for artistic effects;
- primers;
- glue.
Naturally, in some cases you cannot do without creativity, and you will have to manually paint the products, which may affect productivity. But creating every business is undoubtedly a creative process. After all, financial management is an art.
DIY plastic bottle press
How to drill tiles on a wall: detailed instructions and useful tips
Contents In an era when ideas for creating a business are born from scratch, working with various types of plastic waste, for example, bottles, is especially relevant.
They are processed into various products, and sometimes they are simply stopped at the stage of collecting and selling empty used containers.
But in any case, the issue of their transportation and storage remains relevant. A plastic bottle press can help facilitate various manipulations with this bulk container.
You don’t have to buy it, you can make it yourself. Before deciding on the design and, accordingly, the amount of materials needed, you need to understand where the press will stand.
The dimensions of the equipment directly depend on the height of the ceiling in the room. There is no point in making high-power plastic presses yourself, since the price of work and purchased spare parts is almost equal to the cost of an industrial machine.
Advantages of self-assembly:
- saving money: sometimes very relevant, especially in organizing a small business;
- the press is manufactured strictly for its tasks; the size and density of the bale packaging depends on the wishes.
- affordable materials that are available even in the most remote cities;
- there are no costs for transportation and installation of heavy equipment, it is assembled directly on site;
If you have no experience in working with metal and welding, it is better to contact a specialist, since professional workshops have all the necessary tools. Below we will consider the technology for assembling a press for plastic bottles with manual control, but with sufficient loading capacity of up to 30 kg. Here are the main ones:
- The area of the bed is approximately 1 to 1.5 meters.
- Bale or briquette weight. In principle, the amount of loaded material depends directly on the physical capabilities of the operator, how much weight a person can lift in constant operation. This model involves packing a stack of bottles weighing up to 25 kg.
- Electric motor power. It is advisable to install a 380 Volt engine, but 220 Volt is also possible. Power determines the speed of bringing together and spreading the press plates.
- The size of the plates and, consequently, other dimensions depends on the width of the press plates.
- Height is the determining standard size. It depends on the size of the hydraulic cylinder lever. In this version it can vary from 1.5 to 3 meters.
- The size of the bale depends on the size of the slabs. The optimal width is 300-400 mm. Thickness depends on weight. Bottles are not a very convenient material for pressing; they slip and stick out. Therefore, the briquette may look bloated and sloppy.
Here's what you can't do without when creating a press for plastic bottles with your own hands:
Hydraulics unit.
What it will consist of depends on the expected power and dimensions. If it is a mini-press, then just a hydraulic cylinder from a jack is enough. But in this case, the quality of the compressed material will depend on the strength of the operator’s hands, since it does not significantly increase the manual effort.
We make a product from liquid plastic
The technology for creating an ideal small relief when making it in a silicone mold with your own hands. First you need to prepare all the components and materials. We will need:
- Silicone Platinum.
- Liquid plastic Axson FASTCAST F18 (white color, has the consistency of water, odorless!).
- Scarlet dye for silicone.
- Polyurethane varnish.
- Scales.
- Syringe.
- File-buff.
We securely fix the sample model to the bottom of the formwork to form the mold, using neutral wax plasticine (to avoid leakage of silicone). We paint the silicone from which the finished mold will be made scarlet, so that the quality of mixing the components of the liquid, white to the color of the plastic can be clearly seen on the mold. Helpful advice: in order for the shape to be perfect, you should first coat the sample model with silicone using a wide brush. Thus, carefully fill all the depressions of the relief with compound. Only after this, fill the form completely. We fill the entire formwork with silicone. Leave it for 7-8 hours to fix the mold structure. The hardest part is over.
Congratulations. Now you have a ready-made mold for repeated production of copies of the sample model. Before starting casting, make sure the mold is completely dry to avoid bubbles. Then we very carefully mix the plastic components 1:1 by weight (for this it is better to use a pharmacy or laboratory electronic scale). Setting time is 7 minutes, but it will take another 20 minutes to fully set. This plastic is neutral to silicone and does not stick to it. But after repeated use of the compounds over time, you may need a release lubricant with the protective properties of EaseRelease. After the required time has elapsed, we take out the finished product, which is copied exactly according to the sample.
Polyurethane forms for construction
Along with plastic products, injection molds can be produced. The use of injection molds in construction is now very popular. It is possible to produce compounds for the production of building materials. They are durable and do not require treatment with special release lubricants during manufacturing. After all, concrete is absolutely neutral to polyurethane. For example, liquid polyurethane compounds make it possible to produce molds for filling:
- concrete decorative products (tiles, fences, etc.);
- plaster elements of interior decoration (balusters, stucco, etc.);
- liquid plastic when creating a wide variety of products (souvenirs, toys, figurines, etc.).
Silicone molds for confectionery and soap making
The application of mold casting technology in the food industry is quite obvious.
New innovative solutions in the field of chemistry today offer liquid: plastics, silicones, silicone masses that meet all health standards and have the appropriate certificates. Such safe components can be used to make molds for the food industry. For example, for the production of: Compounds are also in great demand among soap makers. They always need new, original molds to create sellable souvenirs made from soap. It is not at all difficult to find a customer who wants to make their products with a unique shape.
Opportunities for a small business idea
This business idea makes it easy to create popular products with your own hands. Finished works can be sold through an online store. It is also possible to provide services or sell finished compounds to other manufacturers in other industries. The most important thing is that with all these wide possibilities of home business, the cost of components is more than affordable. The range of components is wide and allows you to select the necessary materials for creating forms or filling them. All that is required is a sample model from which the mold will be removed. This business idea is very attractive for a home business. It does not require a lot of costs, allows you to produce useful goods and captivates you with the creative production process.
Modern equipment for small businesses
Russian-language websites traditionally describe the processes of processing plastic bottles using domestic equipment, which requires more than two hundred square meters to accommodate and about six hundred thousand rubles to purchase. Along with this, today there is a lot of equipment, small in size and very cheap in production cost, for processing plastic bottles at home.
Such equipment does not require a lot of space to be placed; it is easy to rebuild it to change the products being produced; you can do it yourself. Naturally, it will not provide the opportunity to earn millions every month, but it will make a startup for converting plastic raw materials accessible to almost everyone and will serve as the foundation for the further development of such a business.
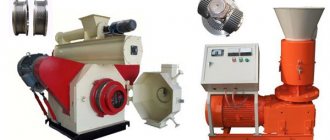
Complete plastic bottle recycling line includes:
- shredder;
- agglomerator;
- extruder
This set of units will ensure complete recycling of plastic bottles.
All about molds for injection molding of plastic products
We know everything about injection molds and their modifications, since the main direction of the MetroPlast Engineering company is injection molding, as well as the production of plastic products (Moscow and the Moscow region). In this article, we have collected data that will give you an idea of all the available technological options for creating molds.
This information will help you navigate the types of molds, as well as what influences their differences in the production of plastic products (except for the price of molds for casting).
How do injection molds work?
To understand the differences in the variations of casting molds, we suggest that you familiarize yourself with their purpose and standard structure.
Using injection molds, large-scale production of custom-made plastic products is carried out. Using the capabilities of injection molding allows us to obtain products with tolerances of up to 0.01 mm (on engineering plastics), which indicates their high level of performance and detail.
The technological process for developing molds for casting is based on milling and/or electrical erosion of metal blanks. The main structural components of casting molds are the punch and the matrix (their surface follows the shape of the part being manufactured). After closing both parts of the mold, a polymer (plastic) heated to a certain temperature is injected between them.
Types of plastic molding
The production of plastic products by injection molding can be carried out in several ways:
- Injection. One of the most common casting methods. It is characterized by a short-term injection of molten polymer. During this process, a certain pressure is created in the working chamber of the casting machine, after which the plasticized polymer is injected.
- Injection-press. This method is used in the production of products with a large surface area. It requires special molds with moving components.
- Injection-gas. During such casting, the force of compressed gas is additionally used, which compresses the plastic in the mold.
- Intrusive. The simplest casting option. Used for casting the simplest goods with a minimum number of surfaces.
Read also: Does an oil heater dry the air?
In addition to the above methods, there are more complex types of casting:
- Sandwich. During it, two types of plastics are used. This method makes it possible to produce products with an external coating.
- Co-injection. Used for the manufacture of multilayer products. To do this, you will need to install a complex nozzle design on the injection molding machine. This method makes it possible to produce products with mixed colors.
- Casting into multi-component molds. This method allows the production of products with clear color differentiation. Among its features, it should be noted that it is possible to produce products with adjacent parts of different densities.
- Casting in rotary molds. Using this method, two-component products can be produced. During it, the main blank is first cast, which is then moved to another mold, where a second layer of polymer is applied. This method is the least productive of all of the above.