Application of anodic oxidation of parts
Anodizing is used for decorative finishing of products made of aluminum and its alloys, enamel-like coatings on aluminum and some of its alloys, and is also used to protect magnesium alloys from corrosion, increase the antifriction properties of titanium alloys, and to coat electronic equipment parts made of niobium, tantalum, etc., in aircraft, rocket and instrument engineering, radio electronics.
Immediately after machining, aluminum reacts with oxygen in the air, so under normal conditions the surface is always covered with a thin oxide film. The structure of the film and its composition depend on the influence of atmospheric phenomena. But aluminum always has an oxide film 2-3 nm thick. This film protects the metal from further oxidation and has excellent electrical conductivity. The oxide film forms on pure aluminum at room temperature and has an amorphous structure (not crystalline) and is therefore not a good corrosion protection.
Thermal oxidation
According to the term, oxidation occurs at relatively high temperatures. The value of this indicator depends on the steel grade. For example, the process of thermal oxidation of ordinary steel occurs in special furnaces. A temperature close to 350 °C is created inside. A class of alloy steels undergo thermal oxidation at higher temperatures. It is necessary to heat the workpiece to 700 °C. Treatment continues for one hour. This process is called steel bluing.
Read also: Connection diagram for a CCTV camera to a computer
Aluminum anodizing process
Before starting the anodizing process, it is necessary to clean the aluminum surface from contaminants and remove the oxide film. To do this, degreasing and etching processes are carried out.
A process that results in the formation of highly porous aluminum oxide layers on the metal surface. The anodizing process is electrochemical.
There are two types of oxide films that are formed during the anodizing process:
Barrier - oxide film grows in neutral solutions in which aluminum oxide is difficult to dissolve. These are mainly ammonium borates, phosphates or tartrates.
Porous - oxide film grows in acidic electrolytes, in which the oxide can not only precipitate, but also dissolve. The most widely used is dilute sulfuric acid H2SO4. You can also use oxalic and phosphoric acids.
In the first seconds of anodization, a barrier layer forms on aluminum, first forming in the active centers on the surface of the metal. From these embryos, hemispherical lens-shaped microcells grow, which then grow together into a continuous barrier layer. When in contact with six surrounding cells, the shape of a hexagonal prism with a hemisphere at the base is formed.
Under the influence of local effects of electrolyte ions, pores appear in the barrier layer (in the center of the cells), the number of which is inversely proportional to the voltage. In the pore, the thickness of the barrier layer decreases and, as a result, the electric field strength increases, while the ion current density increases along with the oxidation rate. But, since the temperature in the pore channel also increases, which promotes etching of the pore, dynamic equilibrium sets in, and the thickness of the barrier layer remains practically unchanged.
This completes the anodizing process, and we obtain a coating with remarkable optical and technological properties.
DIY oxidation
You can organize the process of oxidation of small metal products in your home laboratory. By strictly following the sequence of technological operations, high-quality oxidation is achieved.
The whole process should be divided into three stages:
- Preparatory stage (includes preparation of the necessary equipment, reagents, and the part itself).
- Direct oxidation stage.
- The final stage (removing harmful traces of the chemical process).
At the preparatory stage the following work is carried out:
- Rough cleaning of the surface (use a metal brush, sandpaper, polishing machine with appropriate discs).
- Final mechanical polishing of the surface.
- Removing grease and polishing residues. It's called decopying. It is carried out in a five percent solution of sulfuric acid. The residence time of the workpiece in the solution is one minute.
- Washing the part. This procedure is carried out in warm boiled water. It is advisable to carry it out several times.
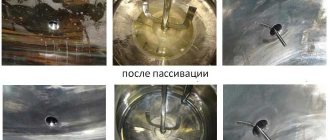
- The final operation is the so-called passaging. After washing the part after processing, place clean boiled water in which laundry soap is first dissolved. This solution, together with the part, is heated and brought to a boil. The boiling procedure is continued for several minutes.
This concludes the preliminary stage.
The main stage of oxidation consists of the following operations:
- Water is poured into a neutral bowl (preferably with an enamel coating). About caustic soda is dissolved in it. The volume of a substance depends on the amount of water. It is advisable to obtain a solution of about 5 percent.
- The workpiece is completely immersed in the resulting solution.
- The solution with the immersed part is heated to 150 degrees. This is practically a boiling process. It lasts approximately two hours. Using the tool, the quality of the process is checked. If necessary, the time can be increased.
At the final stage, the following operations are performed on the part:
- The part is removed from the reagent bath.
- Place it on a flat surface and allow it to cool naturally (without forced cooling). It is advisable to create conditions that limit contact with ambient air.
- Visually check the quality of the resulting oxidation. The absence of uncovered areas, the density of the formed film, the final color.
Thus, oxidation can be carried out at home. The main thing is to follow these recommendations.
If you find an error, please select a piece of text and press Ctrl+Enter.
Anodizing a metal is a process of electrochemical growth of an oxide film by anodic oxidation.
The oxide film obtained by anodizing adheres firmly to the surface of its metal. It is possible to form an oxide film on the metal surface in another way - by increasing the temperature. But this process is only possible up to a certain thickness, above which the oxide film cracks, breaks and peels off. By anodizing, it is possible to obtain thicker oxide films that retain protective properties and excellent adhesion to the substrate.
Anodizing is possible for almost any metal. However, anodizing has a number of requirements for film growth and adhesion. First, the metal being anodized must form only one stable oxide. The formation of two different oxides impairs adhesion and increases the likelihood of film cracking. For this reason, anodizing iron and copper is extremely difficult. Secondly, with good adhesion to the metal, the oxide film must at the same time remain porous in order to ensure unhindered access of the electrolyte to the metal surface for better oxidation and faster growth. Very few metals satisfy this requirement. In fact, only aluminum, titanium and tantalum are anodized. Aluminum anodization is the most widely used.
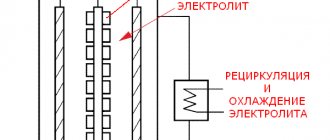
Oxidation of aluminum at the anode is accompanied by the release of oxygen. The most common are sulfuric acid baths. In special cases, baths with chromic or oxalic acid are used. The discharged oxygen partially reacts with the aluminum of the anode, and partially is lost in the form of gas. For this reason, the resulting oxide film contains a mass of microchannels through which electrolyte can flow to the metal surface. As a result, the thickness of the oxide film can reach quite large values. This mechanism is illustrated in Fig. 1.
Read also: Service life of a flexible gas hose
1 – hydrated Al 2 O 3; 2.- Al 2 O 3 ; 3 – base metal aluminum; 4 – microchannels inside the film; 5 – electrolyte (also present inside microchannels)
Rice. 1. Mechanism of growth of aluminum oxide film.
At the beginning of anodizing, the film thickness is small, its resistance is low, and a small voltage is required to maintain the required current density. As the film thickness increases and its resistance increases, the current decreases. If the film thickness is too thick, it may even begin to dissolve. According to Faraday's law, the rate of film formation depends on the current. Therefore, it is necessary to maintain the required current density throughout the anodizing process. This can be achieved by gradually increasing the applied voltage as anodization progresses.
Another way is to use a less strong acid. However, below a certain value, the acid strength cannot be reduced. Since the acid is consumed during the anodizing process, it must have sufficient electrical conductivity, otherwise an increase in the applied voltage will cause it to heat up.
The operating parameters of the metal anodizing process are given in table. 1.
Table 1. Operating parameters of the metal anodizing process.
All anodizing work is carried out using protective equipment, a respirator, goggles and protective gloves, because we work with diluted acid and alkali! Ideally in a ventilated area. We comply with TB!
Initially, we prepare the part itself, mechanical polishing, the “cleaner” the surface, the more glossy the part will be, you can also use chemical polishing, but this process is even more harmful to health than anodizing itself, so we polish the part on a polishing wheel and other means.
To hang a part in a working bath, you need to use aluminum current leads, no foreign metals, ideally you can leave a structural protrusion on the part for connection, but when cutting it down there will be an uncovered area, I used constructive threaded holes, cut a thread on a piece of aluminum wire and just Screwed into these holes, a good, tight contact is obtained.
The thickness of the current lead must be selected taking into account the current strength required for anodizing, otherwise the conductor will begin to heat up at the point of contact, and as a result, a violent reaction will take place on it and it will begin to be etched and its cross-section will be reduced, and so on in geometric progression, until complete dissolution :)) (in one of the attempts this happened due to poor contact)
Before immersing in the electrolyte, the part must be degreased, in a variety of ways, from Pemolux and other powders, to the KROT product, which we wash the KROT look at, the closest to what is needed is a weak solution of NaOH alkali with the addition of a surfactant. I degreased in a pure NaOH + water solution, I didn’t measure the concentration exactly, but the more saturated the solution, the faster the process will be. Essentially, the solution dissolves a thin layer of aluminum oxide, so to speak, “natural” anodizing, oxidation of the surface layer in air, so you shouldn’t delay the etching too much, otherwise it will begin to etch the part itself))
During the etching process, there is a rapid release of gases (hydrogen, it seems); work only in a protective mask and be careful not to get the solution on the skin, because the burn will be no worse than from acid.
After etching, you can no longer touch the part, otherwise the touch will leave greasy marks and, as a result, an uneven coating, stains and other joys. After rinsing the alkali solution under running water, I put the part in a cup of water, ideally distilled, so that nothing would fall on it it's terrible, while we're preparing for the next stage.
Regarding the work bath
you can use an enameled (without chips) or plastic vessel, but then the bottom and walls will have to be “lined” with lead or other electrolyte-resistant material; these plates act as a cathode. It is also necessary to take care of cooling the working bath; during the chemical reaction, the electrolyte will heat up. I used 2 titanium corrugations (a square can); it turns out that the entire area of the corrugation is a cathode, which has a very positive effect on the uniformity of application, the current is more uniform over the surface of the part, and the acid is not a hindrance to titanium. There was also an organized Water Bath, only in the opposite direction, for cooling, running water from a well.
The electrolyte used is Electrolyte for batteries, diluted in a 1:1 ratio with distilled water. When preparing an electrolyte solution, follow the safety rules and pour undiluted electrolyte into distilled water.
(Following the rule of Acid in Water to avoid boiling)
After mixing, the electrolyte will heat up, cool it to 15-20 degrees, and basically maintain this temperature, from 10 to 25 degrees, this will be “Warm anodizing”, which will allow you to subsequently color the part with fabric dye and the like. If the temperature is lower, close to 0, then we will get “cold” anodizing, the layer will be denser and stronger, but you won’t be able to color it with a dye, the pores will be too dense, it may be possible to paint using a chemical method, but I haven’t mastered this yet, so in It’s easier to achieve warm anodizing at home. While the part is floating in the water, we connect the current lead to the current source. As a current source, it is better to use blocks with current stabilization, so as not to run around and monitor the current; the larger the area of the part, the more powerful you will have to look for a block. The area of this part was approximately 490 cm2, the current density should be 15-20 mA per cm2, in total we get a current of 7.3-9.7 A at a voltage of 12 V, although during the growth of the oxide film the voltage may increase, I took a source with parameters of 20 A and 30 V maximum values. When cold anodizing, maintaining a given current may require a voltage much greater than 12V, because the denser the layer, the greater its electrical resistance.
Read also: Multifunctional woodworking machines for home with thickness planer
At the next stages, we follow the main rule: “Immersion in the solution and removal from the solution of the part ONLY when the current source is turned on!”
Otherwise, the acid will begin to corrode the part and contaminate the solution... We immerse the part in the solution, with the current source turned on, the very minimum value is enough, just so that there is voltage between the anode and the cathode! Again, don’t forget about the mask, glasses and gloves!
Why place the part at an angle, with a strictly horizontal position of the washer, it was noticed that the ends are covered with a denser layer than the planes, plus if there are holes that are not through, the part must be placed so that a) the electrolyte completely fills them and b) so that it can come out of them gas accumulates during the process, otherwise a gas bubble may form, which will squeeze out the electrolyte, and accordingly, the part in this place will not be covered with an oxide layer. Well, if possible, the part should be equidistant from the cathode, that is, the walls of the bath.
An active release of gas and oxygen bubbles will begin around the part; in itself it is not particularly harmful, but the acid aerosol formed when the bubbles burst when they reach the surface is very harmful to inhale, so we cover the whole thing.
As soon as we cover it with a lid, we set the required current on the power supply and time it for 40-60 minutes
While we wait, we begin to prepare the dye solution. As a dye, you can use aniline dyes diluted in water or paint for refilling cartridges for ink jets. I used in particular Coloring for Canon/Epson/HP/Lexmark devices, it is sold in the CSN for 200-300 rubles per 100 ml, there is Cyan, Purple (gives color from red to violet) (Magenta), Yellow and Black, there is also Light -cyan and light magenta. I succeeded with blue, I didn’t try yellow and black, but for some reason Magenta didn’t want to color the sampler.
I opened 2 bubbles with about 3 liters of water, then heat this solution to 60 degrees. It is better to carry out all work with rubber gloves; this rubbish is very difficult to wash off your hands!
We periodically check how the process is progressing, the solution becomes cloudy due to the abundance of bubbles, but there should not be large bubbles!
When anodizing large parts (or a large number of small