Carburetor inspection
The device is responsible for creating a certain mixture of air and fuel, which is then supplied to the cylinder.
The design of carburetors is different, therefore, if possible, you should find documentation for a specific model. If this is not possible, then you need to:
- Disconnect the tubes and wires, remove all interfering elements.
- Clean the carburetor without removing it. Blow with compressed air.
- Unscrew the device - it can be secured with two or four bolts.
- Rinse again and blow from the outside.
- Carefully disassemble, simultaneously drawing up a diagram of the device (if there is no documentation).
- Wash the parts in clean gasoline and blow out the channels with air.
- Assemble the carburetor according to the drawing.
- Install back onto the engine.
Independent repair of equipment that is under warranty entails termination of the manufacturer’s obligations.
Have you ever had to repair a chainsaw?
It happened! It didn’t happen
Other reasons
How do you diagnose a saw?
On your own From a master
The reasons why a chainsaw turns off are not always obvious. If all the above methods do not help, there are other possible problems.
The following elements are subject to diagnostics:
Compression in the cylinder.
Compression in the crankcase.
Carburetor operation.
Expert opinion
Kulikov Vladimir Sergeevich
Users who are not well versed in the structure of the saw are not recommended to carry out an in-depth inspection on their own. Careless actions can lead to serious damage to the tool.
There are different reasons for carburetor failure:
- Loosening of the fastening screw.
- Gasoline leaks.
Air being sucked into the cylinder.
To assess the condition of the carburetor, it is recommended to show the tool to a service center. Preference is given to branded centers whose specialists know about the operating features of the unit of a particular manufacturer.
Despite its impressive appearance, a chainsaw is a fragile tool to which it is important to find the right approach. For proper operation of the saw, it is important to supply it with high-quality fuel and not allow it to stagnate in the tank.
In order not to be left in a hopeless situation, it is advisable for the owner of a chainsaw to become thoroughly familiar with the structure of the unit and its internal elements.
Burnt out piston: reasons and what to do
A study of various piston damage shows that all causes of defects and breakdowns are divided into 4 groups:
- cooling interruptions
- imperfection of lubrication
- excessively large thermal influence from gases in the combustion chamber
- mechanical problems.
However, many of the causes of piston defects are interrelated, as are the functions performed by its various elements. In particular, defects in the sealing belt cause overheating of the piston, damage to the fire and guide belts, and scuffing on the guide belt leads to disruption of the sealing and heat transfer properties of the piston rings.
Ultimately, this will most likely cause the fire belt to burn out.
Why did the piston burn out?
Lean mixture
1 liter of gasoline contains more than 16 kg of oxygen. It does not burn very quickly, the motor overheats, the energy drops, and as a result the entire engine overheats. The piston is key in this list, because it is aluminum (if you do not take into account tuned pistons) and is located directly in the fuel combustion zone. As is well known, aluminum melts at about 660 °C, and when you consider that the maximum permissible engine temperature is only 150 degrees, and then no oil can lubricate 200 °C, it doesn’t take long to calculate that a lean mixture can still heat up the parts in the middle of the engine more than rather than 4 times more.
Bad gasoline
Fresh gasoline burns the piston for the same reason - as a result of overheating. Because the gasoline that we pour into our gas tank often cannot be called gasoline. Proper gasoline burns at a fairly low temperature, while expanding very intensely, because the essence of any gas driven to the top dead center (TDC) is that it expands to the maximum relative to its original volume, thereby pushing the piston downwards with the utmost convincing force, and combustion and the generated temperature are all side effects, without which the engine would do just fine. Bad gasoline, like normal gasoline, contains components such as benzene, gasoline and other bad substances. The fact is that they are contained in low-quality “gasolines” in completely different proportions, and in fact in larger proportions than the standards allow.
Burnt out piston signs and symptoms
These two marvelous components burn, releasing more heat and at the same time have a low expansion coefficient during combustion, and at the same time, being part of gasoline, they slow down the combustion rate, reducing power. Consequently, when driving on such fuel, in order to achieve proper traction, it is necessary to twist the throttle more than when driving on normal gasoline, but here’s the misfortune: we get the necessary traction complete with a much higher combustion temperature and excessive fuel consumption, and the result of this is a hole in piston
The operation of the piston is affected by many factors and it is impossible to give an unambiguous answer as to whether a specific piston will burn out or some other defect will occur. You can estimate the probability of a particular event occurring. And in order to prevent the occurrence of such an unpleasant event as piston burnout, it is necessary to follow the rules written in the manual. After all, piston burnout is a purely operational defect.
skuterov.ru
How to repair a chainsaw with your own hands
Repair of cylinder-piston group (CPG)
If the chainsaw engine does not start or cannot develop normal power, it is likely that there is not enough pressure in the engine cylinder to burn the fuel mixture.
The reason for this may be wear of the elements of the cylinder-piston group - piston, rings, bearings, etc.
In order to assess the condition of this unit, you should carry out a visual inspection after removing the muffler.
For a more complete diagnosis, a compression gauge is placed in the spark plug hole of a two-stroke chainsaw engine. It is used to measure compression in the engine. Based on the test results, one can judge the condition of the CPG, but accurate facts can only be obtained by completely disassembling the unit.
If the piston is chipped or scratched, it will obviously have to be replaced. The same applies to deformed or broken piston rings - for normal engine operation they must be fully functional and free of carbon deposits.
Fuel system
Malfunctions of the fuel system are also quite often the main reason that prevents a chainsaw from working as efficiently as possible. First of all, you need to check the quality of the fuel mixture.
Some owners prefer to use alcohol-containing solutions rather than the recommended brand of gasoline, or add more oil than required.
READ How to Assemble a Clutch on a Chinese Chainsaw
Chainsaw starter repair
Every 10-year-old boy knows what a starter is intended for, so it makes no sense to consider the purpose of this device.
It must be said that chainsaws use the simplest type of manual starter, which allows you to start a two-stroke engine by pulling the handle, which is connected via a cable to the clutch drum. A number of starter malfunctions include:
- pulley damage;
- spring damage;
- cable break.
If the pulley is damaged, it should be replaced with a new one.
If the spring is damaged where it engages with the groove of the drum, then you can try to repair it, although in most cases it is not worth it, it is only relevant if you are far from civilization.
If the cable breaks, it must be replaced, which will require removing the starter cover and carefully replacing it. It is not advisable to take a chainsaw in for repair if the starter is faulty, since it will be much cheaper to carry out independent repairs or replacement.
Failures of the cylinder-piston group
The reason for the inability to start the chainsaw or to reach sufficient power for operation may be the reduced pressure of the mixture in the cylinder (working pressure is not lower than 8 atmospheres). This is due to the wear and tear of the CPG elements - bearings, rings, piston or cylinder.
A preliminary inspection is carried out through the exhaust hole; to gain access to it, you will have to dismantle the muffler. For a more complete picture, it is necessary to use a compression meter. It is inserted into the hole for the spark plug, after which you need to turn the crankshaft using a starter or drill.
Only disassembling the engine will help you fully understand the problems of the CPG. After removing the crankcase from the cylinder, inspect the piston . If it is covered with chips and deep scratches, it should be replaced. When the surface of the cylinder is worked out, it is bored.
Wear of the piston ring is determined by carbon deposits and loose contact with the cylinder.
What repairs are required?
Having determined the presence and degree of engine wear, we begin to eliminate the causes.
If engine oil consumption is high, the compression is measured; if it is low, the valves are changed. If bubbles are found when checking the condition of the coolant, change the cylinder head gaskets immediately. Carbon deposits on spark plugs require replacement of piston rings and valve stem seals. Blue smoke and drops of oil from the exhaust pipe indicate the need to replace the piston rings.
The engine needs repair if extraneous noises, knocks are heard, and increased fuel and oil consumption is observed. Overheating, a drop in engine power, and interruptions in operation are reasons to work on the engine. Especially when there are several of the above reasons at the same time.
Related Posts
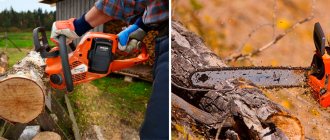
Do-it-yourself chainsaw repair: analysis of the main breakdowns and how to fix them
It would seem, why does a summer resident who grows vegetables and fruits, or the owner of a suburban house with a small garden and several flower beds, need a chainsaw? The question disappears when there is a desire to build a bathhouse, update a greenhouse, knock down an old business, or simply make a bench for relaxation. Unfortunately, any mechanism from time to time needs maintenance and replacement of spare parts, and for this you need to have a good understanding of the structure of the product, and besides, repairing a chainsaw with your own hands will save time and money.
Content
Structural components of a chainsaw
All chainsaws are similar in their structure, regardless of whether they are made in Europe (ECHO, Stihl, Husqvarna) or Russian (Kedr, Ural). Failure of the cylinder-piston group. The most serious malfunctions are considered to be scratches on the surface of the piston and cylinder, their damage, and piston rings sticking into the grooves. The main elements are located inside the body - the fuel tank and the engine, and on the outside there is a starter, a handle, a saw part (tire) with a chain. A sharp tug of the cable starts the engine, and it starts the saw blade.
To begin with, we suggest you familiarize yourself with videos that show how a chainsaw works and how it works:
From time to time, malfunctions occur in the operation of the saw, which require disassembly to eliminate. What can happen to such a lightweight mechanism as a chainsaw? At least the following:
- Stops starting;
- It starts, but soon stops;
- Stops working when cutting;
- Loses its power;
Most of the problems are associated either with interruptions in engine operation (fuel supply system, exhaust system, ignition, cylinder-piston part), or with defects in other systems and components (clutch, chain brake, tire, lubrication system). Let's look at more common breakdowns and methods for eliminating them.
A serviceable chainsaw starts on the first pull and does not fail to cut
Checking the ignition system
The first thing you need to do if your chainsaw breaks down is to inspect the spark plug, disconnecting the wire and carefully unscrewing it with a special wrench.
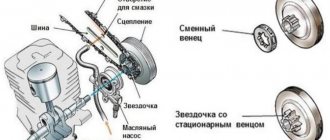
Components of the chainsaw ignition system: 1 - flywheel with magnets, 2 - ignition module, 3 - spark plug, 4 - high voltage wire
The spark plug is turned out to check its condition.
Her appearance speaks volumes:
- Dry. Most likely, the fuel mixture is not getting into the cylinder. Replacing piston rings? Piston disassembly? Motorcycle piston replacement on a chainsaw. The problem is not in the ignition system, so the spark plug is screwed back.
- Heavily splashed with fuel. The reason for the excess fuel consistency lies either in violation of the starting rules, or in incorrect carburetor adjustment. The spark plug is carefully wiped, the fuel supply is turned off and the starter is turned on to remove excess fuel and ventilate the combustion chamber. Then the candle is placed in place and the mechanism is started again.
- Covered with black soot. This may indicate the use of bad oil, an incorrectly adjusted carburetor, or an incorrectly calculated ratio of gasoline to oil. The candle should be washed, removed from carbon deposits with a sharp object (an awl or a needle), the electrodes should be wiped with sandpaper and placed in place.
Chainsaw design
Basically, all chainsaws are equipped with a two-stroke carburetor engine with one cylinder and air cooling. Stability of operation directly depends on the carburetor, which prepares the fuel-air mixture. The air entering the engine should not contain dust or other impurities that clog it, otherwise the piston group will wear out quite quickly.
To avoid this, the air filter in your chainsaw should be cleaned regularly. To make it less likely to become clogged, it has an air pre-cleaning mechanism.
The engine is started by a starter (a cable with a handle wound around a pulley). Modern saws, even low-power ones, are equipped with mechanisms that make starting easier. These include:
- primer - a pump that reduces the number of empty revolutions and pre-pumps fuel;
- a spring starter, which allows you to slowly pull out the cable, the engine does not turn over, but only a special spring is charged, at some point it overpowers the compression and sharply turns the crankshaft;
- The decompression valve connects the cylinder to the atmosphere, while reducing the pressure in it, which allows you to start the engine without much effort; the valve closes after start under the pressure of the exhaust gases.
During operation, the chainsaw can vibrate strongly, so it is equipped with an anti-vibration vibration damping system. The saw handles are connected to the engine by means of a damper (rubber gasket or steel spring).
The sawing part of the chain consists of a cutting chain located at the edges of the bar, sprocket and sprocket.
Description of the piston group of the Stihl 180 chainsaw
On the Stihl 180 chainsaw, the diameter of the piston group is 38 mm. The size of a chainsaw CNG is determined by the diameter of the piston, the cylinder is slightly larger. The MS 180 CPG is equipped as standard with a piston pin, two piston rings and two clamps.
The great thing about the CPG on the Stihl MS 180 is that it has two compression rings, while almost all of its main competitors only have one. According to the manufacturer, installing a pair of rings allows you to better stabilize the piston during operation, increase its cooling and increase compression in the engine, thereby improving starting.
Engine
In most cases, the following problems occur in engine operation:
- the engine stopped starting;
- the engine starts, but after a while it stalls;
- the engine is not able to develop the required power;
- The engine is extremely unstable.
How to check crankshaft seals
The presence of oil seal leaks can only be checked by getting to the crankshaft itself and carefully examining it for leaks. You can see how to do this correctly in the video:
How to check compression on a chainsaw
At a compression level below 8 atmospheres, the engine will not have enough power, which means the chainsaw will not be able to fully function.
To measure compression you need:
- Remove the protective cover and unscrew the spark plug.
- Insert the tip of the compression gauge into the hole where the spark plug should be located.
- Using the starting cord, rotate the piston and remember the maximum readings of the measuring device.
How to properly install a piston on a chainsaw
The work of replacing the piston for most models of modern chainsaws is carried out according to the following algorithm:
- The top and side covers are removed.
- The candle is unscrewed.
- The stoppers are removed from the shock absorbers and the handle is disconnected from the body.
- The drive sprocket and starter are removed.
- A piston stopper is installed in the spark plug hole and the nut securing the flywheel and clutch is unscrewed.
- The flywheel, clutch, and worm drive of the oil pump, located immediately behind the clutch mechanism, are removed.
- The screws securing the carburetor and air filter are unscrewed, after which these components are removed along with the engine control lever.
- The ignition coil is removed, as well as the muffler.
- The saw is turned upside down and, by unscrewing the screws securing it to the body, the engine is disconnected.
- The pan is unscrewed and the piston is removed.
- Since the piston is removed only together with the crankshaft, to disconnect it it is necessary to remove the retaining rings.
- The old piston is replaced with a new one, but as carefully as possible. This is caused by the high fragility of compression rings.
- The crankcase is put in place, and sealant is used instead of a gasket.
All subsequent actions are carried out according to the reverse algorithm of disassembly.
Algorithm for replacing a piston chainsaw
If the time has come to replace the chainsaw’s CPG, you need to know that for each specific model there is an individual algorithm of actions. To facilitate disassembly/assembly work, it is necessary to prepare a spark plug wrench, a large flat-head screwdriver, a hammer, a compressor for cleaning unit parts, and a set of open-end and socket wrenches. Regardless of the manufacturer and design features of the model, before removing the chainsaw cylinder, the following work must be done:
- Removing the top protective cover;
- Unscrewing the spark plug;
- Removing the side cover;
- Using a large flat-head screwdriver, remove the stoppers from the shock absorbers;
- We place a cord in the spark plug channel to secure the crankshaft and unscrew the clutch and flywheel nut;
- Removing the chain drive sprocket;
- We remove the carburetor with the air filter;
- Remove the ignition module and exhaust system.
After removing the power unit from the base, unscrew the pan and remove the crankshaft with the piston from the cylinder. Using tweezers or a screwdriver, remove the piston pin stoppers.
Before dismantling the piston, it is necessary to remember its location in the cylinder, so that in the future you do not waste time re-disassembling and reassembling the power unit.
Sealant for fixing the chainsaw tray
Before starting assembly, it is necessary to clean the parts and components of the unit from dirt, sawdust residues, and dust using compressed air, rags and other means. The first stage of replacing a piston chainsaw is to install a piston on the crankshaft. We fix it on the connecting rod with a steel pin included in the delivery set of the CPG. In order to prevent the locking rings from accidentally falling out, it is recommended to install them with the cut down. Next, we install the compression rings on the piston, but due to their fragility and fragility, this operation must be approached with the utmost care. To prevent scratches, the piston must be lubricated with oil before installing the piston into the cylinder. Before installing the crankcase (pan), you will need to degrease its mounting surface and apply a layer of heat-resistant sealant. We assemble the chainsaw in the reverse manner to the algorithm described above.
Often, replacing the chainsaw piston, crankshaft and compression rings solves problems with idling and problematic starting of the internal combustion engine.
source
How to determine the degree of engine wear: basic rules and techniques
Why do you need to know the degree of engine wear? In order not to get into trouble when buying a used car or used engine and to be able to identify some malfunctions of your engine. In this article we will look at several ways to measure engine wear that can be used at home, without special equipment.
First of all, you need to note a couple of important nuances. First, the total mileage of a car does not always show the real condition of its components. Secondly, a heavily worn internal combustion engine will not necessarily fail the first time. Those. It is quite possible that you will start the engine without any problems, will not hear knocking or noise, will notice normal traction and smooth operation of the unit, and after driving a couple of thousand kilometers, you will be forced to have the engine repaired, paying a lot of money for it.
What should you pay attention to when checking a used engine and how can you find out the degree of wear without disassembling the unit?
- The simplest thing you can do is analyze the operation of the engine. Normally, there should be no difficulty starting, tripping, any extraneous sounds, vibration, etc. However, you should not limit yourself to this method only, because... The absence of failures does not mean low wear, just as their presence does not mean high wear.
- Next, you can evaluate the condition of the engine oil, or rather the lubricant consumption. If the internal combustion engine is dry, there are no seals or gaskets leaking, and the engine eats oil so much that you have to add a liter every thousand kilometers, then most likely we are dealing with severe wear of the cylinder-piston group (CPG). It doesn't hurt to check the exhaust either: if blue or gray smoke comes out of the pipe, plus you see smoke when you unscrew the oil filler cap while the engine is running, these are all signs of problems.
- Serious problems with the CPG are also indicated by black carbon deposits on the electrodes, traces of oil and other anomalies that can be detected by unscrewing the spark plugs.
Next we move on to evaluating the engine elements. No special Equipment can be taken into account in two groups: piston and connecting rod.
Many people believe that the condition of the piston system can be assessed by the amount of compression. But this is not so, because this value is influenced by many factors not related to the condition of the engine. Therefore, instead of measuring compression, it is worth measuring the exhaust gas pressure
To do this, we connect a pressure gauge in the exhaust pipe in the sump, and it is important to hermetically seal all other cracks in both the engine and the sump. We will also need a special calibration attachment for the pressure gauge and a calculation table from detailed technical documentation for a specific car model
If you decide to limit yourself to measuring compression in the cylinders, do it with a cold engine, unscrewed spark plugs and without an air filter and take into account the error, which can reach 25%.
- To assess the condition of the connecting rod group, you can measure the oil pressure in the engine. To do this, first fill in new oil, install a clean oil filter and warm up the engine to operating temperature. After this, unscrew the oil pressure sensor and connect a pressure gauge to this place. We compare the results obtained with the pressure specified in the technical characteristics of this internal combustion engine. Small errors can be neglected, but if the measurements showed a level 15-20% lower than in the instructions, it means that the wear is already serious and the engine will soon need a thorough repair.
Of course, the methods listed above will not give you accurate indicators; an accurate assessment can only be made using special equipment and by disassembling the engine. However, these methods give a good approximate idea of the state of the motor, especially if you use not one, but several methods at once.
How to Put Rings on a Chainsaw
Content
How to correctly install a piston on a chainsaw
BenzoTool. LIKBEZ
Blog search (non-strict match):
Documents that satisfy your request: nine [5 shown]
What remains for our client to do? My attempts to find out what kind of model this is, and in what years similar oil was produced, have ended. to no avail (I will be VERY grateful to you if you help me in any way here). But I can roughly imagine that this is somewhere in the 60s and 70s of the last century. The chainsaw uses CONTACT ignition from the BOSCH office.
There is a number stamped on the crankcase. 21554. What kind of number is this anyway? a mystery for me.
On the left side of the saw is the nameplate.
What kind of information does he have for me as well. Black forest :-))).
Chainsaw
I partially disassembled it (for cleaning and to assess the condition of the parts). I also replaced the tip of the spark plug (it was all cracked) and did not install the ignition switch (it was missing when I purchased the saw). These details, as everyone understands, are not unique :-))). This is not an additional minus. The oil reservoir cap is missing. (Everything is indicated by arrows in the photo).
Carburetor air damper drive.
There is a chain on the saw. TAKASAGO (I never knew about such a book, but the inscription on the cutting tooth testifies to this decision).
Tire length. 600 20 mm.
Finally, a short video: the saw starts normally and responds perfectly to pressing the throttle control button.
chainsaw . About three or four months ago, this mythical copy chainsaw .
Disassembly. STIHL chainsaw assembly
MS180.
Request compliance rate: 21.43% Pieces of post text. Disassembly. assembly the STIHL MS180
chainsaw .
Disassembling the STIHL MS180
chainsaw .
Assembly chainsaw .
Chainsaw PARTNER 352.
Replacing the piston group in a chainsaw or trimmer
Repairs of this level should always be considered carefully. In such small engines operating at high speeds, replacing one piston that is burned out or jammed does not give long-term results and, if necessary, the entire piston group must be replaced. Therefore, you need to consider whether to continue to use this saw or purchase a new saw.
READ Chainsaw Champion 137 Replacement Fuel Pump
If it is a professional model, then such repairs are worth carrying out, but if it is an old household model like a Husqvarna forty and it has worked for more than ten or twelve years, it is not profitable to repair it. Because repairing it will cost so much. the same as purchasing a new saw, albeit not a Husqvarna, but a PARTNER P350XT CHROME, costing one hundred and sixty-five, will definitely be enough. Moreover, such saws are sold by Husqvarna, since PARTNER is its subsidiary.
But if you still decide to repair a chainsaw or trimmer, then you need original spare parts, which are not cheap. If the engine is used correctly, the first repair may not occur soon and only the piston ring
or rings, depending on the model. But if the saw jams, then it is necessary to change the entire piston group - the cylinder, piston and rings.
It should be noted that Husqvarna 136/141 chainsaws have approximately a service life of 500-600 hours, Husqvarna 340/350. 1000-1200 operating hours, professional chainsaws at least 2000-2500 operating hours, subject to strict adherence to the operating instructions. In fact, you cannot rely on these figures, since the actual resource may differ significantly, both up and down. But roughly we can say that semi-professional saws work 3-4 times longer than amateur saws, and professional ones up to ten times or more.
REPLACEMENT piston group of chainsaw 4500
The video discusses a detailed replacement of the piston group of a chainsaw
, How to do it correctly, step by step and without.
Of course, nothing lasts forever, but it’s one thing if you change the piston group after many years of operation and it has worked its hours and has fully paid for itself, but another thing is that this saw was filled with, for example, only gasoline, without oil, and it jammed. This saw has to be repaired, since all other parts are normal.
Many companies deliberately inflate the cost of spare parts so that new models can be purchased. For chainsaws and trimmers, for example, from Stihl, spare parts are available in a larger range than for Husqvarna. Therefore, when choosing a specific model, find out how things are with spare parts. RVT
READ How to Sawing on a Panel Saw
How to properly install rings on a two-stroke scooter piston
Published 08/25 | Author: scooter.rv.ua
There is nothing complicated about installing rings on the piston of a two-stroke scooter, as well as a four-stroke scooter, and many people know this. But most scooter riders who have only recently acquired such equipment have no idea how to replace the piston on a scooter, how to correctly install the rings on the piston, where the arrow on the piston should point, and much more. In this lesson, I will tell you how to properly put the rings on the piston and assemble the piston in place. Since we have already talked about four-stroke engines before, here we will talk only about two-stroke engines. So, our piston is worn out and requires replacement.
The rings and piston wear out first, and usually only those need to be replaced. If the piston is severely worn, it is necessary to bore the cylinder. It is also bored when the piston jams in the cylinder, forming deep scratches on the walls of the latter. There is nothing wrong with this, and if your new cylinder has been properly bored (which will only cost about 10), it will need a repair set of rings with a new piston. Such rings are marked 0.25. The second boring is 0.5, respectively, etc. to one.
After purchasing a piston, it needs to be assembled. In the kit, as a rule, you will find the piston itself, two compression rings, a third thin corrugated ring (more on its purpose later), a piston pin and two piston pin retaining rings.
Now about the third ring in the set. Its purpose is to spring the lower compression ring. It installs it directly under it, and usually does not provide any benefit during operation. You can throw this ring away or you can put it in , it makes no difference. Many piston manufacturers do not include it at all.
It's time to put everything back in place. Depending on the scooter model, compression rings may be the same or vary in thickness and cross-section. Most pistons for Honda scooters, for example, have different rings, where the upper one is thinner than the lower one and has a different cross-section.
READ Adjusting the Carburetor of the Hooter 52 Chainsaw
You should definitely pay attention to this when installing; the top one is thinner and ground at an angle.
Also pay attention to the inscription on the ring (usually the letter T or repair size); the inscription should always be on top, that is, opposite to the finger. First you need to put on the bottom, then the top. There is no need to stretch or bend them. These manipulations must be carried out carefully.
There are locks in the grooves for the rings that prevent the rings from turning during operation, so the ring gap must be in these locks, otherwise you will not stick the piston into the cylinder.
And the last important point is the arrow (1) on the bottom of the piston or the inscription EX. Both the arrow and the inscription must be directed towards the exhaust (2). In this case, the ring locks will be located on the side of the reed valve. If the locks are placed towards the exhaust, the piston will not last long, the rings will be pulled into the exhaust port and gradually grind it down.
During all manipulations with the piston, it is imperative to put a rag in the crankcase window so that nothing inadvertently gets in there; we still need a crankshaft with bearings.
When installing the piston pin, pay attention to the condition of the separator (bearing); it may need to be replaced. Before installing the piston pin, install the snap ring on one side before installing the piston (usually on the side where you won't be able to fit the pin and the second snap ring in). Then place the pin with the bearing and the second retaining ring; when fixed in the groove, it will make a certain click.
That's all, now put on the cylinder, not the piston (remembering to check the condition of the gaskets and lubricate the piston and cylinder walls with engine oil), the cylinder head and tighten the bolts one by one in a cross pattern.
If you have any questions during the piston replacement process, you can ask them in the comments field or on the forum of our website. Good luck with the repair.
Source
What is it made from?
Let's consider the materials of the CPG parts. All materials for CPG must have high strength, excellent thermal conductivity, slightly expand when heated and have anti-friction properties. Have increased resistance to rust.
The sleeves are made of cast iron or special steel with additives so that the part can withstand high loads.
Pistons were initially made of cast iron, but with the development of technology, aluminum began to be produced. Modern engines use prefabricated steel pistons, especially diesel engines. In experimental engines, ceramic pistons are being tested, but so far in production, ceramics are used only as a coating on pistons.
Piston rings are made of high-strength gray cast iron with the addition of molybdenum, chromium, tungsten or nickel. Additives provide better “break-in” of parts, increasing their wear resistance and resistance to high heat.
The piston pins are made of alloy or carbon steel, carburized and hardened. If the file leaves scratches on the finger, these are defective (not hardened) fingers, they cannot be installed, this will lead to failure of the CPG.
Causes of scuffing on pistons
If the temperature load on the piston part begins to exceed permissible limits, then you need to prepare for the worst. In this case, the gap between the cylinder walls and the piston will significantly decrease, which will cause additional friction and, as a result, heating of the piston with its subsequent increase. Even a special anti-friction coating, which is applied to the surface of the piston and cylinder wall, does not always protect against overheating. As a result, scratches form on the surfaces of interacting elements. It is also possible that the piston may jam. By the nature and position of the scuffs, you can determine the reasons for their occurrence. For example, general overheating of the power unit is indicated by the appearance of scuffs over the entire surface of the skirt.
When is a piston replacement necessary?
There can be quite a lot of reasons why a piston needs to be replaced, as well as a complete piston system, but all of them can be divided into natural ones and those resulting from improper operation. Natural, this is wear and tear formed due to prolonged use of the Shtil 180 chainsaw. There are much more artificial ones, for example:
- overheating of the engine and the appearance of thermal seizures;
- entry of a foreign body into the cylinder and the appearance of mechanical scoring;
- piston ring breakage as a result of exceeding maximum engine speed;
- piston skirt failure due to over-revving;
- the use of low-quality fuel, as a result of which the piston group of the chainsaw wears out on the side of the inlet channel in the cylinder;
- operating a Shtil chainsaw with a dirty fuel filter, resulting in a decrease in the percentage of oil in the fuel mixture;
It is necessary to diagnose the CPG if the Shtil ms 180 suddenly loses power or does not start, while the starter of the tool does not turn over. If the starter turns, but the saw does not start, there is a spark and fuel flows into the cylinder properly, it is necessary to measure the compression in the engine.
Problems with the chain lubrication system
If the chain is not supplied with lubricant, the following events may occur:
- Rapid chain wear (blunting of teeth, stretching, tire abrasion)
- Engine wear due to heavy loads placed on the tool
- Worn drive sprocket, which also needs lubrication
Malfunctions of the chain lubrication system and how to fix them yourself
If the chain does not receive oil, the reason may be an insufficient amount of lubricant in the tank, a malfunction of the oil pump, or damage to the channels. The breakdown can be repaired only after determining the exact cause of the chainsaw malfunction.
Chainsaw muffler malfunction
It often happens that during prolonged operation, the walls of the exhaust pipe become covered with soot, which prevents the free exit of exhaust gases. In this case, you should remove the muffler (if possible) and wash it with detergent, then dry it thoroughly with a hairdryer
ATTENTION! Carbon deposits contain carcinogens. During dry brushing, it can enter your lungs, which poses a threat to your health.
The cause of carbon deposits, as a rule, is an incorrect gasoline-oil ratio or the use of low-quality and incompatible oil. Carefully read the operating instructions for the chainsaw to prevent this from happening in the future.
When is a piston replacement necessary?
There can be quite a lot of reasons why a piston needs to be replaced, as well as a complete piston system, but all of them can be divided into natural ones and those resulting from improper operation. Natural, this is wear and tear formed due to prolonged use of the Shtil 180 chainsaw. There are much more artificial ones, for example:
- overheating of the engine and the appearance of thermal seizures;
- entry of a foreign body into the cylinder and the appearance of mechanical scoring;
- piston ring breakage as a result of exceeding maximum engine speed;
- piston skirt failure due to over-revving;
- the use of low-quality fuel, as a result of which the piston group of the chainsaw wears out on the side of the inlet channel in the cylinder;
- operating a Shtil chainsaw with a dirty fuel filter, resulting in a decrease in the percentage of oil in the fuel mixture;
It is necessary to diagnose the CPG if the Shtil ms 180 suddenly loses power or does not start, while the starter of the tool does not turn over. If the starter turns, but the saw does not start, there is a spark and fuel flows into the cylinder properly, it is necessary to measure the compression in the engine.
Basic malfunctions and ways to eliminate them
When starting to repair a chainsaw, you need to have an idea of what malfunctions it may have, as well as how these malfunctions are eliminated. So, let's look at the signs of malfunctions and how to fix them.
Husqvarna chainsaw does not start
If the Husqvarna does not start, the first thing you need to make sure is that you follow the algorithm for starting the saw, as well as the presence of fuel in the tank. Detailed instructions on how to start a cold chainsaw and refuel it are available in the saw manual that comes with all Husqvarna chainsaws.
If you do everything correctly, but the saw does not respond, the reason may be a malfunction of the ignition system or lack of fuel supply.
To more accurately determine the reasons for this behavior of the chainsaw, it is necessary to inspect the spark plug, and then check it for the presence of a spark.
If the spark plug is wet and no spark is detected when checking, you should try replacing the spark plug itself. The replacement did not produce results, which means the problem may be hidden in the ignition coil, which is quite difficult to check on your own.
If there is a spark, but the spark plug is dry, there is a problem in the fuel system. To eliminate it, you need to carry out a full diagnosis. The fuel system consists of a carburetor and a fuel line. Without any specific experience, you can check the fuel line for ruptures, as well as the cleanliness of the fuel filter installed in the tank. It is better to entrust complete carburetor diagnostics and repairs to professionals.
If the saw starts, but poorly
The cause of difficulty starting the saw may be a malfunction or incorrect adjustment of the carburetor. If the carburetor overflows, the chainsaw will be easy to start when hot, but quite difficult when cold, especially after a long period of inactivity.
An indirect sign of an excessive amount of fuel mixture entering the cylinder when the chainsaw is operating is the exhaust. If a lot of white smoke is emitted when the chainsaw is running, it is worth checking the proportions of the fuel mixture and carburetor adjustments.
Chainsaw chain spins at idle speed
If the Husqvarna chain rotates at idle, then we can conclude that there is a malfunction in the clutch mechanism or the idle speed is not adjusted. To eliminate the malfunction, it is necessary to remove the saw chain brake cover and inspect the integrity of the clutch spring. Replace defective clutch.
If the clutch is working properly, to eliminate chain spinning, it is necessary to adjust the idle speed using the adjusting screw marked with the letter (T) or carry out a full carburetor adjustment.
Important: a possible reason for an independent increase in idle speed is the appearance of air leaks into the engine crankcase or carburetor, which can lead to serious damage to the CPG
Why does the Husqvarna chainsaw stall when you press the gas?
If the saw stalls immediately after pressing the gas, it is necessary to inspect the spark plug, which will help more accurately diagnose the problem. A wet spark plug indicates a malfunction or incorrect adjustment of the carburetor; in this case, the situation can be corrected by carrying out a complete diagnosis, repair and adjustment of this unit. If repairs and adjustments do not help, you need to replace the carburetor with a new one.
Another reason why a Husqvarna may stall when you press the gas is a malfunction in the fuel system, or more precisely, difficulty in supplying fuel to the carburetor. It is necessary to check the cleanliness of the fuel filter, as well as the integrity of the fuel hoses.
Why is the chain on the Husqvarna chainsaw not lubricated?
If your chainsaw has completely stopped supplying saw chain lubrication, then you need to check the entire oil system.
There may be several reasons:
- Oil pump malfunction;
- Clogged filter element installed in the tank;
- Oil tank breather malfunction;
- Oil hose rupture;
- Mismatches in the oil hole on the bar and on the saw body (if the supply stopped after installing a new saw bar);
- Clogged oil channel in the saw body;
- Clogged oil supply channel in the tire;
- Oil pump drive gear malfunction.
How to Check Compression in a Chainsaw
DIY chainsaw repair
All malfunctions of chainsaws can be divided into two main groups: engine problems with all its components and systems (ignition, fuel supply system, cylinder-piston group, exhaust system) and malfunctions of other components (chain brake, lubrication system, clutch, tire, etc. .).
Engine malfunctions
- the engine does not start;
- starts but stalls;
- works unstably;
- does not develop power, i.e. It runs fine at idle, but stalls under load.
When repairing a chainsaw with your own hands, you must use the method of elimination.
inspect alternately all the probable causes of a malfunction, starting with those that take the least time to check and eliminate (see here about the structure and operation of a two-stroke engine).
Ignition system
. Almost all types of engine problems listed above can be caused by ignition system failures.
Therefore, when they occur, it makes sense to start troubleshooting with a spark plug. This is all the more justified since the state of the latter can provide useful information about the operation of the fuel system.
So, if a problem occurs, you need to unscrew the spark plug and inspect it.
The wire is disconnected and the spark plug is unscrewed with a special wrench.
If the spark plug is dry, this means that the problem is most likely not in the ignition system, but in the fuel mixture not entering the cylinder. You can wrap the spark plug back and get to work on the fuel system. If the spark plug is heavily splashed with fuel mixture, it means there is an excess of it.
This may occur due to carburetor misadjustment or violation of starting rules. How to measure compression in a scooter correctly. The spark plug is wiped and dried, the cylinder is dried by turning off the fuel supply and operating the starter. to ventilate the combustion chamber and remove excess fuel.
Then install the spark plug in place and repeat the start.
The presence of a large amount of black carbon also indicates a malfunction in the fuel system.
The ratio between oil and gasoline in the mixture may be incorrect, the carburetor may not be adjusted, or low-quality oil may be used. The spark plug is washed in gasoline, cleaned of carbon deposits with a needle or awl, the electrodes are cleaned with fine sandpaper and replaced.
In all these cases, it would be a good idea to check the gap between the spark plug electrodes. Depending on its brand, it should be in the range of 0.5-0.65 mm. You also need to check the spark plug seal. If it is worn out or damaged, the tightness of the combustion chamber may not be ensured, which leads to a decrease in compression in the cylinder and problems in engine operation.
Even if, when checking the spark plug, there is good reason to believe that the fault is in the fuel system, you need to check the spark plug for the presence of a spark. At least to be sure that everything is in order. For this:
- put the ignition cable on the spark plug;
- using pliers with insulated handles, apply the thread or nut of the spark plug to the cylinder;
- pull the starter handle and watch. whether there is a spark or not.
If there is no spark, you just need to replace the spark plug. If the new spark plug does not have a spark, you need to check the condition of the high-voltage wire for a break and contact with the spark plug.
READ How to Check Compression on a Trimmer
The reason for the lack of a spark may also be a faulty ignition module or a violation of the gap between it and the flywheel magnetic circuit. It should be 0.2 mm.
Violation of the gap becomes especially likely if the saw was previously disassembled and the flywheel and ignition module were removed. What malfunctions are possible with a chainsaw and how compression is done in a chainsaw. The gap is set using a gasket of thickness 0.
2 mm, placed between the flywheel boss and the ignition module. A faulty ignition module must be replaced.
Having checked the ignition system in this way and not finding a malfunction, you can move on to the fuel mixture supply system.
Fuel supply system
. If by inspection of the spark plug it is determined that fuel is not entering the cylinder, all possible reasons for this need to be considered. It could be:
- failure of fuel to flow from the tank due to a clogged hole in its lid (breather), while a vacuum is created in the tank, preventing fuel from leaking out;
- contamination of the fuel filter installed in the tank;
- no or insufficient supply of fuel mixture from the carburetor to the cylinder.
To diagnose the first two reasons, it is enough to disconnect the fuel hose from the carburetor and see whether fuel flows out of it or not. If it flows in full stream, the breather and filter do not need to be checked; if it does not flow or flows weakly, we can assume that the cause of the malfunction has been found.
The breather is cleaned with a needle. The fuel filter is removed through the filler hole of the empty fuel tank using a wire hook, along with a suction hose, from which the filter is disconnected and cleaned or replaced with a new one.
Chainsaw manufacturers recommend changing the fuel filter every 3 months.
How to determine a faulty piston on a chainsaw
Compression check
on
a chainsaw
Video “Checking the gap in the piston ring lock”
By studying the notes, you will learn how to select piston rings.
Sooner or later, your engine will wear out and require replacement of the piston rings or the entire piston.
It seems that replacing piston rings is a common task, accessible to anyone who is more or less familiar with the structure and principle of operation of a primitive four-stroke engine. But unfortunately, people are afraid to spend 15 minutes of their incredibly expensive time reading literature and charging everything in the engine according to the principle (as it was. It will probably work). Well, the flag is in your hands and contact the service as soon as possible.
So, we take the piston and see 3 grooves for installing piston rings. On 4-stroke engines, such as 2-stroke engines, there are no restriction plugs.
There are two types of piston rings on 4-stroke engines. The first two, which are installed in the two upper grooves, are compressive. As the name suggests, they are responsible for the presence of compression in your engine and must contain the gases produced during the flash due to the combustion of fuel in the combustion chamber.
Next three rings. These are oil scrapers. And here their goal is clear. They are responsible for removing the oil that coats the cylinder walls when the piston returns down. If these rings are missed, the oil will remain on the cylinder walls, threatening the engine to start eating oil and, of course, smoking.
How to install first? Yes, in principle, as they were from the factory, in the same order, but to avoid mistakes, we will show them again.
First we install the main oil scraper ring: the one that has a wavy structure. It is the easiest to install because it is the most flexible of all.
Then place the top and bottom rings of the SHADOW scraper. They are a little more complicated, but installing them doesn't have to happen either.
Now put the piston compression rings: those that are thicker and “firm”, Install the lower one first, then the upper one. They are a little more difficult to put on as they are less elastic and stronger. You're unlikely to break them, but don't bend them with perfectly crooked hands.
Do you think that's all? No!
The fact is that the rings still need to be positioned correctly on the piston so that the retaining rings (cutting points) do not fall on top of each other. Simply put, you need to cut the bottom ring that is not directly above the cut top ring.
Let's start with the upper piston rings.
The lower locking ring is located in the middle above the valve cavity, for example, at the inlet (can also be removed, there is no difference).
The lock of the upper ring is located strictly in the opposite direction to the lower ring. Accordingly, if the lock of the lower ring is above the cavity under the intake valve, the lock of the upper ring is above the cavity under the exhaust valve.
Now let's move on to the oil scraper rings. These rings should also be positioned in the same way so that there is no overlap with the lock. Therefore, the top ring is located above the piston pin hole on the right side.
The second (lower) is located on the opposite side, also approximately in the middle of the piston pin hole.
The last wavy oil scraper ring fits into any of the four sections created between the pin hole and the cavity under the valve.
And now to your question: what the hell is the author losing here? And why are the positions of all 5 rings so carefully established?
We explain. We did all this so that it would not turn out that when one lock is located above another, gases do not pass through these locks (in the case of piston rings) and no oil remains on the walls (in the case of an oil scraper). Ring).
If you take into account the piston rings, there is a loss of compression and the passage of hot operating gases to the oil control rings, which are not designed to withstand such sudden high operating temperatures. As a result, the rings may burn out after some time.
If we turn the oil scrapers towards the rings and the locks on them coincide, the oil will not be completely removed: it will reach the piston rings, which will cause the ring grooves to coke, and as a result they will shake and then burn.
As a result, you end up with burnt rings and a worn piston.
Bottom line: Pre-installation of ring locks takes only 2 minutes, and engine life can be extended by tens of hours.
Why does the Stihl chainsaw not start after replacing the piston?
If the saw does not start after replacing the piston, it is necessary to check the fuel supply to the chamber and also diagnose the ignition system. Very often, when installing the control lever on a chainsaw, craftsmen forget to connect the wires coming from the ignition coil, as a result of which the spark disappears and the saw does not start.
The problem may also be hidden in a pinched fuel supply hose or if it is not connected at all. Of course, there can be many reasons, but it is worth remembering that if all the work to replace the piston is carried out correctly, the tool should start and work normally without any problems.