Installing the disc on the grinder is not difficult if you follow fairly simple instructions. This information is extremely important for craftsmen, since it is the disk that determines the functionality of the tool. Using the disc, you can use an angle grinder (angle grinder) to grind, cut or polish various types of materials. Read on in the article about how to properly install a disc on an angle grinder.
Disc on an angle grinder
What you need to use to install the disk
The operation is quite simple and will not take more than a few minutes if you choose the right guide. But to carry out this type of work, you must adhere to the basic rules and use a special tool.
For installation you will need:
- A special wrench with which you can unscrew the nut, which presses it to the angle grinder. It comes complete with the equipment, and if lost, the key can be purchased at a hardware store.
- Directly the abrasive itself to replace the old one.
- In some cases it is necessary to use a chisel or other similar hard object. This tool will be needed if the cutting disc was jammed during operation. In such a situation, there is nothing left but to crumble it in order to replace it. Residues of abrasive may get into the gap, so it is necessary to remove them so that the new disk does not get in the way of fragments. In most cases there is no need to use these devices, but it is advisable to always have them nearby.
Having decided on the tools that will be needed for replacement, you can proceed directly to the installation:
- There is a metal ring on top of the abrasive to secure it. There are two holes on the ring and two pins on the key that match the dimensions.
- The key must be put on top, into the holes of the ring, and turned counterclockwise. If the disc has not been changed for a long time, the ring may become stuck (not move due to the operator’s efforts). In this case, you will have to lengthen the key with any tube and try to unscrew the ring again.
- After removing the old abrasive, you need to put a new one in the socket. Place a metal ring on top and tighten it clockwise with a key. It is advisable to press the wrench again to check whether the abrasive is fixed.
Important! Do not use much force when tightening, otherwise there is a risk of damaging the disk.
How to remove it?
Discs, especially those created for cutting, quickly “burn out” and have to be replaced.
It would be useful to once again remind you of the need to disconnect the grinder from the network. You will be working with rapidly rotating parts and it is better to protect yourself.
If you need to replace a worn-out disk, you need to perform a number of normal operations.
- The disk is secured to the rod spindle with a threaded nut. Every angle grinder comes with a special wrench, the arms of which have pins attached to them that cling to the holes in the flange.
- The spindle is fixed with a special button, the cotter pin of which, when pressed, enters the hole in the gearbox, thus fixing it. Having pressed the button with your right hand, immediately use your left hand to unscrew the fastening nut with a wrench. If the nut moves, unscrew it by hand. That's it, now the disk can be removed.
- There are times when for some reason the key is not at hand. What to do? The most common way out is to finish the job. But, as they say, this is not our way. It is also possible to unscrew the clamping nut of the “grinder” without a key. Often a pipe (gas) wrench is used for this. This key has a device that opens it. It is necessary to tighten the nut and, having fixed the grinder gearbox with a button, move it from place. Then you can unscrew it by hand.
- The nut has holes for fixing it with pins on the arms of the key; you can unscrew it by tapping with a hammer on a chisel or rod resting in the hole.
- The nut can be loosened from time to time by simply tapping its edge with a hammer in the direction of twisting. But in this case, damage to the flange may appear, first, to the holes for the key pins; in the future, it may be impossible to apply the key to such a nut.
- A very good result comes from using a nail to produce a key. It is better to choose a large nail, from 100 mm. Using a hammer and pliers, the nail is given a U-shape. Use a hacksaw or chisel to cut off the tip and head of the nail. You can try to remove the nut with this improvised wrench. You can bend the ends of such a key, then it will turn into something like an open-end wrench, but this will require enormous labor costs. You can also stick some kind of gate, for example, a hammer or another nail, into the arc formed by a bent nail.
Which side should you put the disc on the grinder?
In most cases, the abrasive for an angle grinder is installed in only one direction, but in a situation when working with stone or concrete, the process changes. Therefore, these cases need to be considered separately.
Depending on the situation, the disk is placed differently
For metal
How to correctly place a circle on an angle grinder is influenced by two factors:
- Any abrasive has a special label attached to it, which shows the side on which it needs to be attached to the angle grinder. If the grinder works away from the control, as it should be in most cases, then the disc must be installed with the label facing inward. When the grinder works in the opposite direction, the label is located on the outside.
- Of course, you can put the abrasive on any side without paying attention to the label. But in this case, you should expect unpredictable results, for example, disk failure.
Important! Experts assure that if you do not follow the requirements for installing the disk, the angle grinder will one day jam, and the disk may fly apart, damaging the operator working with the tool.
For other materials
When working with concrete or wood, the angle grinder must rotate the disk towards the person holding the angle grinder. In this case, the label must be directed outward. These are isolated cases, and in most other options, the grinding machine works away from the control.
How to change a disk if it is jammed?
What to do if the wheel on the grinder is jammed? This can happen, for example, when, as a result of work, pieces of the workpiece being cut sharply clamp the rotating disk. This often leads to its destruction.
Unscrew the nut tightened as a result of rotation, if the circle
bitten, it can be very difficult.
- One such method would be to use two gas keys at once. The remainder of the disk must be broken off with pliers. With one key you need to clamp the part of the rod located under the disk, and with the other you need to unscrew the flange.
- Sometimes, to gain access to the gas key to the grinder rod, you have to disassemble the gearbox.
- A simple device - cardboard or tin washers - can save you from the problem of a jammed nut. They are often sold with a grinder. But over time they can be lost or become completely unusable. Making homemade washers is not at all difficult. However, it is better not to neglect them.
The main difference between the two sides of a circle
On any grinder disc you can easily notice the differences in the two sides of the circle. One side is plain, it is covered with abrasive materials (for working with different types of metals). The front side has a special label on which information about the characteristics of the cutter is written.
But the main difference between the two sides of the circle is the presence of a metal ring. This is an important design element that affects the safety of use and therefore deserves special mention.
How to remove and change a jammed disc from an angle grinder?
How to remove a disc from an angle grinder. An angle grinder (hereinafter referred to as an angle grinder), popularly called an angle grinder, is probably the most popular equipment that is present in the arsenal of almost every craftsman, regardless of his qualifications.
This is a tool that is actively used in abrasive processing: cutting, grinding, cleaning workpieces made of stone, metal and many others. It is widely used in areas such as construction, woodworking and other similar types of work. Like any other tool, grinders are also divided into several classes.
We mean the following: household, semi-professional and pro-class tools. This classification is determined by the power resource of the tool, its performance, the presence of certain additional options, material and build quality, etc.
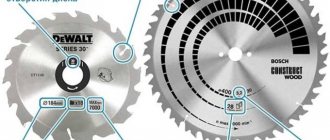
Consumables for angle grinders, in addition to various types of cleaning brushes, are cutting wheels and various grinding discs. Types of equipment for an angle grinder: how to make the right one
choice?
remove the disc from the grinder
This method is used in extreme cases.
Why do you need a metal ring?
A washer or simply a metal ring is necessary to protect the abrasive from over-tightening, since many users tend to tighten the stopper more tightly, fearing that the wheel will fly off while working with the tool.
The ring is also installed on the angle grinder disc to significantly increase the supporting surface area. In addition, the washer is designed to prevent the abrasive from “sticking” to the nut, which simplifies the removal process.
Ring on the disk
Advantages of installing a disc with a ring to an angle grinder
There is no exact direction that must be followed when installing the wheel on the sander. But, as already described above, if you place the cutter “face” outward, the removal process will be simplified, since it is more difficult to cling to the surface on the abrasive side.
In addition to this, there are several other benefits that will be useful to know about.
Guaranteed smooth installation on the shaft
The metal ring installed on the disc increases the support area, and therefore the pressure when tightening becomes uniform. This way, the disc will sit as evenly as possible on the desired surface. The possibility of distortion will be excluded. This directly affects not only the evenness of the cut, but also the safety of the user - the abrasive will not fly into pieces if it does not catch the angle grinder.
Ease of installation
Another advantage of installing the disk with the front side out is that the user will always see which attachment is installed on the grinder. To work with stone or metal, you need to use different discs, and if you make a mistake, you can get serious injuries due to rupture of the cutting part.
For example, if you use a metal disc to cut concrete, the abrasive simply will not withstand the load and will fly apart into pieces in different directions. Therefore, the installation option under consideration provides not only convenience, but also safety.
Prescription instructions
On some models of grinders, for example, Metabo, it is indicated that the metal flange of the abrasive must be adjacent to the supported flange of the angle grinder. It’s not for nothing that manufacturers recommend installing the disc in this way, since they count on safety when working with the tool.
Important! Incorrect installation is life-threatening.
How to install correctly?
Installing a disk on a UMS is not that difficult. You can change it simply by following the instructions, although there are some nuances here.
First of all, you need to install the disk with the correct side. This is especially important if it is cut-off. Typically, the side of the disc with the label, which indicates the marking and, accordingly, the area of its application, is slightly different from the opposite side. This may not be apparent immediately, but with prolonged intensive work the difference will not only be noticeable - it will be obvious.
On the side on which the label is glued, a wide pressure washer is placed, and the moving nut acts on it when tightening (installing the disk). The nut slides along the polished surface of the washer; without it, tightening or unscrewing will become more difficult, since the abrasive will firmly hold the nut and more force will be required. This is especially important if a quick replacement of the disk is required or if it breaks (jammed).
With circular saws or other products that have teeth or a significant difference between the two sides, problems with installation usually do not arise. For example, attaching a grinding disc in reverse will not work: it will simply be impossible for it to work.
Stone discs, including diamond ones, have a special rotation indicator in the form of an arrow: when installing them, you need to fasten them taking into account where the rod will rotate.
It is also important to consider the size of the drive during installation. In no case should you neglect safety and remove the protective casing - it is better to choose a disk of the appropriate diameter. Sometimes a worn-out disc from a large unit is installed on a smaller grinder. However, a worn-out disk, as a rule, cuts worse, the working surface is limited to approximately half the radius of the disk, and the structure is slightly different. The disk burns faster and produces less work. This operation may be justified if the rod diameter matches. But you won’t be able to change it back.
READ Turn on the angle grinder without speed control
When installing, no debris should get under the disk. Of course, the clamping nut can easily squeeze small objects, and some will be pressed into the surface of the circle. But a distortion invisible to the eye will cause a displacement of the plane of rotation and, as a result, strong vibration of the entire mechanism; it can cause destruction of the disk and, of course, you should not hope for an accurate cut in this case.
The clamping nut must be unscrewed with the wrench supplied with the tool. To prevent the rod from turning, it must be locked by pressing a special button. You need to unscrew the nut while simultaneously holding the button pressed.
After twisting the nut, a disk is put on the freed rod, face outward, and you need to make sure that it is installed exactly in the seat.
The kit for a new grinder always includes a certain number of cardboard spacers - when installing the disk, they need to be laid so that they are between the disk and the clamping elements. Such gaskets will help unscrew a broken or jammed disk.
Next, the nut is manually tightened until it stops and tightened with a special wrench. That's it, the grinder is ready for work.
Is there a significant difference depending on the direction of rotation?
The direction of rotation can be changed both from yourself and towards you. These options have advantages and disadvantages. If the abrasive is placed away from you, then sparks and dust fly towards the operator, which creates inconvenience in work. There is also a risk of eye burns and clothing catching fire.
Sparks when working with an angle grinder
If the disk rotates towards itself, then these shortcomings can be eliminated. But in this option there is a risk of serious injury. If the abrasive is caught during operation, the tool will hit the operator’s hands or face hard.
There is no single rule for setting rotation, and if this is important, then the information should be indicated on the tool itself. In any case, the direction of movement of the device must be chosen by the operator himself, depending on the material being processed, as well as for his convenience.
The information provided is enough to understand which side to place the disc on the grinder and why it is important to install the abrasive correctly.