Making a miracle shovel for the lazy with your own hands
How can you dig up a garden without getting overtired? So that your back doesn't hurt and your hands don't shake after work? Is there a shovel for the lazy? Yes, such a miracle shovel was designed a long time ago and is hard at work at the dachas of folk craftsmen. Of course, at the behest of a pike, it will not turn over the earth; you will still have to apply force, but on a much smaller scale. So that the reader can build this marvelous equipment with his own hands, we offer photos, videos and drawings.
The design and principle of operation of the miracle shovel
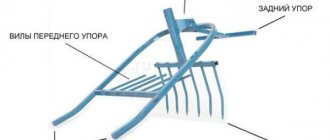
The design is based on a support frame to which two rippers are attached: the main and auxiliary. The main ripper is similar to a fork; it is hinged to the frame using steel lugs.
The rods of the auxiliary, or counter-ripper, are mounted rigidly on the frame and at such a distance that they fit exactly in the middle of the gap between the fork teeth.
At the rear of the device there is a stop that allows you to transfer part of the effort to lift the soil onto the soil itself.
The miracle shovel is a supporting frame on which two rippers are attached
When working, place the support frame on the ground and fix the stop with your foot so that the miracle shovel does not move to the side.
The forks are driven into the ground and, pressing on the handle, they are raised. The soil breaks into large clods and is smashed against the teeth of the auxiliary ripper.
Then a step is taken back, the frame is pulled closer, and the operation is repeated.
The forks are driven into the ground and, pressing on the handle, they are lifted
Why you should use a miracle shovel
This simple device allows you to quickly, efficiently, and without overwhelming fatigue, cultivate an area that is significant by the standards of private gardening. Here is a partial list of miracle inventory achievements:
- a person does not have to bend, as when working with a regular shovel, which is very useful for those suffering from spinal diseases;
- there is no need to lift heavy wet earth on the bayonet of a shovel, so your hands don’t get tired either;
- the width of the processed strip is up to 40 cm, which means that the beds will be dug up 2 times faster;
- if there are a lot of malicious weeds on the site, then the fight against them will become more effective due to the fact that the teeth do not cut the rhizomes, but take them to the surface;
- if the humus layer is small, then it will not be buried deep, but will all remain on the surface.
Attention! Do not try to dig up heavy soil with a miracle shovel during a drought. The tool will be broken, but the earth will remain unloosened
The ingenuity of people's inventors knows no bounds, so it is possible that this list will be replenished in the near future.
How to make a miracle shovel for your garden
In the store, a miracle shovel costs several times more than its bayonet sister, so if you have a little experience working with welding equipment, you can make this advanced tool yourself.
To work you will need:
- saw and drill for metal;
- welding machine;
- measuring instrument (square, tape measure, ruler);
- steel angle or pipe for the support frame;
- tooth fittings;
- a handle from an entrenching tool, preferably metal.
Advice. Since a zealous owner puts everything into use, here too you can use old things: the back of a Soviet metal bed can easily become a frame, and an unnecessary fishing spear can become a pitchfork. Do-it-yourself miracle shovel
- We bend the corner or pipe for the support frame with the letter “P”. The length of the legs is 80 cm, the length of the crossbar is 35-40 cm.
- We make a cross bar. To do this, we drill holes in it every 50 mm into which we insert pieces of reinforcement of 200 mm each. We weld it. When using a corner instead of a pipe, weld it without drilling. Then we weld the cross member and T-shaped stop to the frame.
- We cut a piece of pipe 50 mm shorter than the cross member and weld the teeth of the main ripper to it in the same way.
- We make a swivel joint from a piece of pipe and steel ears.
- We insert the cutting into this segment and secure it.
Advice. To make your shovel perform even better, sharpen the main ripper rods before welding.
When is a miracle shovel useful?
In order for your new tool to delight you with its productivity, you should remember that it is not omnipotent, and give it only the work that it really can do. The miracle shovel is not capable of digging a hole.
You should not entrust her with figure digging around flower beds or other curved elements of country house arrangement. Since to lift the fork you need to press down on the handle with your weight, such a shovel is not suitable for a fragile teenager.
But if we are talking about quickly, “with a twinkle,” digging up 10-20 acres for potatoes, then the miracle shovel has no equal. And most importantly, the gardener won’t even remember about his lower back.
Do-it-yourself miracle shovel - video
Cutting
It is worth paying attention to which cuttings are preferable in the work. There are several options for selecting handles:
- Wood. This is the most common and familiar version of the cutting. A wooden handle is durable and will last a long time, but only if it is made of durable wood. When choosing a wooden handle, give preference to smooth models, without knots, the fibers should be located along the handle . Before work, the shovel handle can be treated with sandpaper and varnished. This way it will last longer. It is better to store a shovel with a wooden handle in a dry place, otherwise it will begin to rot;
- Aluminum. Aluminum cuttings are also popular due to their lightness. But they are not always strong, they are easy to bend, and as a result it is better to give preference to composite materials. The lightness of such an aluminum handle is achieved due to the fact that it is empty inside. Therefore, a shovel with such a handle should not be left outside if you want it to last for a long time - water can accumulate inside, which, when frozen, will tear the aluminum.
Advantages and disadvantages of the tool
There are devices that, although constructed in a similar way, have important differences in design. Below they are described in more detail.
In this type of design there is no front stop. The lattice for breaking clods is made without a front bar. This reduces the weight of the mole ripper shovel slightly. However, since there is no need to lift the shovel off the ground when working, this does not provide a significant advantage.
Digger
The digger consists of the following parts:
- A handle made in the shape of the letter “T” is used here. Therefore, during work, the shovel is held differently than usual. Hands hold the instrument by the horizontal bars. This helps to increase the force of pressure on the soil when working. In addition, such a handle is usually made of metal. It can move up or down. Once a comfortable position has been found, the handle is secured with bolts.
- The forks are attached to the handle at two ends, and not at the central part, as in the classic version.
- The stop attached to the back of the tool is more powerful than in the usual case.
The disadvantage of this design is that there is no provision for crushing the soil.
Digger
Lightcop
This option can be considered the simplest design. For it, it was necessary to invent a rectangular metal frame to which forks were attached, looking down. The emphasis, made rectangular, is attached horizontally. The front grille is missing.
On a note. Despite its simple design, this type of miracle shovel is an effective digging tool.
Archimedes spade
It bears little resemblance to the classic version. The difference, in particular, is that here it is not a pitchfork that is used for digging, but a bayonet shovel. However, the inventor applied a similar principle here: the rule of leverage. This is the invention of Vladimir Kolybelin from the city of Kovrov, Vladimir region.
The Archimedes shovel is designed in this way:
- It has two shafts: long and short.
- The blade of the instrument is attached to a short shaft.
- All parts are connected into one whole by a bracket. With its help, a short shaft with a shovel in the middle is connected to a long handle and can rotate.
Important! Although the arhimedova shovel saves effort compared to conventional tools, it is difficult to use on heavy clay soils
Archimedes spade
They call it a miracle shovel: a miracle pitchfork, a miracle ripper, and a shovel for the lazy
But one thing is important: the design of the unit has many different functions. Therefore, it will take much less time and effort to dig up an area than when using conventional tools. They bury the equipment in the ground, leaning on the comfortable handle with their whole body, and not with just one leg.
And by controlling a special lever, you can easily turn over a heavy layer of soil
They bury the equipment in the ground, leaning on the comfortable handle with the whole body, and not with one leg. And by controlling a special lever, you can easily turn over a heavy layer of soil.
While working with the tool, a person does not feel tired, performing not only digging, but also harrowing the garden, turning roots and stones upward. Of course, unlike a simple shovel, such a miracle tool is less maneuverable, it cannot dig up trees, shrubs, prepare holes for tomatoes, holes for planting apple trees, but for spring work in the garden it is simply irreplaceable. Enough models of miracle shovels have been created, but you can design the unit yourself.
Rating of the best models
Recently, a wide range has appeared, in which it is not difficult to get confused. Our experts have compiled a rating of the most popular manufacturers that have won a positive reputation and a lot of good feedback from customers.
Woodland Survival Kit
An indispensable tool for gardening, as well as for trips out of town and fishing. The folding design ensures ease of transportation, and the use of high-strength materials ensures the durability of the equipment.
Characteristics:
Length – 72.8 cm, blade 170x134. The equipment is designed for use in extreme conditions and is part of a set of survival tools. Includes flashlight, extension cord, knife, screwdriver, flint, glass breaker, axe, wrench and more.
Pros:
This is a universal tool that includes almost all possible devices needed outside the city. This includes a hoe, a knife with a powerful blade, a flashlight with a signal mode, and a chisel. The tool can be used as a means of self-defense.
Minuses:
Not found.
Cost: 4130 rub.
Adimanti AD105
Perfect for gardeners, motorists, travelers who prefer extreme recreation.
Replaces many devices that become necessary in nature. Characteristics:
Length = 53.8 cm, width – 12.8 cm. The fasteners are fixed very tightly, which guarantees high reliability of the tool. The materials from which the equipment is made are high-carbon steel and aluminum alloy (for the handle).
Pros:
High performance indicators are one of the main advantages of this model. Along with the basic bayonet, the model includes a number of additional options, such as a compass, flint, saw, knife.
A positive point is the warranty period is 1 year. In addition to everything listed above, the package includes a bag for convenient transportation of the tool.
Minuses:
A small number of options compared to models in the more expensive segment.
Cost: 6090 rub.
ACE A1-12
This is an excellent choice for gardeners, motorists and tourists. Combines a set of the most necessary equipment for all occasions. Easy to use, highly reliable and durable.
Characteristics:
Length – 53.8 cm, width – 12.8 cm. The handle is made of aluminum alloy, the body is made of high-carbon steel. Includes hoe, hook, axe, oar, ruler and compass, bottle opener, saw knife, wire cutters, can opener.
Pros:
The owners note, along with multifunctionality, the excellent quality of components. Such a shovel is difficult to break. It will really help out in any situation, be it garden work or the need to build a shelter on a tourist route.
Minuses:
Not found.
Cost: 7470 rub.
Zune Lotoo Smilоdon Camper
A universal option for all types of work, but most suitable for wildlife lovers. Taking such a shovel with you on a tourist route, you can be sure that it will not let you down.
Characteristics:
Weight = 1.34 kg, length 91 cm, blade 190x135. Includes 10 survival tools. The bayonet has 6 positions.
Pros:
In one compact tool you also get a knife, paracord, chain saw, knife and whistle. The components are highly durable and ready for flexibility testing.
Flaws:
There could be more functionality.
Cost : 14693 rub.
Brandcamp XL5
In terms of popularity, this is perhaps number one in this segment. Great for both gardeners and tourists. Incredible but true, one tool includes as many as 25 attachments!
Characteristics:
Instrument length is 91.5 cm, width = 16 cm; The body is made of carbon steel, the handle is aluminum. Weight 1.8 kg.
The package includes a bag, five sets of handles, a screwdriver, an ice ax, an extension cord, a knife, a socket, a whistle, a flashlight, a flint, a saw, and paracord. The flashlight has two functions: red emergency light and white light. In addition, the package includes covers and cases for attachments, as well as a medical tourniquet
Pros:
With the help of such universal equipment, you can not only dig, but also stab, chop, dismantle fasteners, cut wire, cut meat or bread, open bottles, and start a fire. In addition, the scope of functionality includes additional options - a built-in flashlight and a sound signal sensor, which is a very important device when traveling through extreme, abandoned places among forests and mountains.
Minuses:
The only downside is the high price.
Cost: 17,500 rub.
Kinds
The classic version is a device in which “forks” are located on a metal panel, attached to it using hinged joints. Translational and rotational movements are performed: pointed rods plunge into the ground, digging it up. When the “forks” are pulled out of the soil, lumps remain, which additionally have to be broken up with a rake.
Improved ripper shovels are models that have an auxiliary element in the form of a crossbar, onto which the same pointed pins are welded as on the main part. The “forks” plunge into and out of the ground, passing through the gaps between the crossbar bars, crushing large lumps into small fractions. The roots of the grass cling to the pins; all that remains is to pull them to the surface.
In addition to the “Mole” and “Plowman”, the “Vyatka Plowman” model is known, the drawing of which was developed by the monk Father Gennady. Due to his state of health, the clergyman found it very difficult to work on his personal plot. He came up with a convenient and simple miracle shovel. Its manufacture requires a minimum of parts, and the performance of the tool exceeds all expectations. An arched steel plate is attached to the metal pipe on the left or right (depending on whether it is made for left- or right-handed people) (in homemade devices, the main part of a bayonet shovel can be used instead).
At the end of the pipe there is a pin that immerses the plate to the depth of the soil being excavated. Then a rotational movement is made, the clod of earth is easily thrown to the side with a shovel. If you dig up an area, taking steps backwards in a straight line, a smooth furrow will remain. Potato tubers and root crop seeds are left in it. When the gardener begins to cultivate the next row, the fresh soil will lie evenly in the furrow dug earlier. The homemade shovel of Gennady’s father was taken as the basis for similar models that are now produced by well-known manufacturers. Taking into account the physical characteristics of a person and his state of health, it is not difficult to choose the appropriate version of the miracle shovel.
How to choose a shovel and not regret it
When choosing a bayonet shovel for a garden, you need to take into account many parameters, first of all, the gender and age of the worker and the type of soil in the garden or summer cottage. It’s good if the following rules are followed:
A good shovel can be identified by a simple sign. If you place it on the ground at a slight slope and stand on the working part, the canvas should not bend. A good tool bends only slightly and quickly regains its shape.
If the shovel has a wooden holder, there should be no knots or cracks.
Instructions for making a miracle shovel with drawings
Before you start making your own miracle shovel, you need to pay attention to the main design features of such a tool. In most models, the forks are movably mounted on a forward, horizontal frame, complemented by a stop at the rear (in some cases, the frame is replaced with a slightly curved slide)
Between the teeth there are counter-directed rods, which are more reminiscent of a rake.
The tool may have two handles, but in most cases it is a regular handle, like a shovel or the same fork. However, not in all cases a wooden handle is used, since such a lever can easily break (the teeth often catch on roots). Instead of a handle, a metal pipe (for example, aluminum) can be installed. If a wooden handle breaks in the socket of a garden tool, at its very base, then removing the fragment will be quite difficult, and the only way out is to try to drill it out.
There are also more simplified models, the design of which includes only a frame, which is also a support (placed behind the working part). The teeth are fixed directly to the front rod, at the ends of which there are fasteners for the other two handles. This version of the miracle shovel is most often made at home.
Did you know? In the old days, a standard wooden shovel (or, as it was also called, a “blade”) had a width of 6-14 inches and a length of 8-16 inches, and this with a total length with a handle of 1½-1¾ arshins. In Rus', all shovels and blades were hewn primarily from aspen, sometimes from linden or birch, and even less often from oak or maple.
When making a miracle shovel yourself, first of all, you need to create bayonets, for which the pre-prepared reinforcement is cut into pieces of the required length. The ends of these sections are sharpened on one side at an angle of 30°, although if the soil on your site is soft, then the bevel angle can be reduced to 15° (however, this will often lead to dulling of the cutting part).
Having the required bayonets in hand, you can proceed to creating a supporting bar, for which part of a square pipe is cut off. It is also worth preparing a round hollow pipe, which in the future will play the role of a handle. All elements are welded according to the drawings presented below.
Basic criteria for choosing a shovel for digging soil
When choosing a garden tool for digging soil, you need to be guided by the following points:
The shovel with the handle should not reach about 10 cm to the shoulder
A good shovel will not bend, even if you run over it with a car wheel.
At the point where the handle is attached to the bayonet, a wave-like reinforcement is made
An important selection criterion when purchasing a shovel is the optimal and acceptable price-quality ratio of the product.
The principle of operation of a digger for the lazy
After digging up a garden or planting potatoes over large areas, a person suffers from severe back pain, aches in the arms and legs. The shovel, which was invented by the monk Father Gennady, allows not only to reduce physical stress when digging up the earth, but also to ease the work of planting potatoes.
When digging, the difficulty of the work lies in the fact that you have to exert effort when pressing the shovel into the ground, then, in addition to the weight of the shovel, you also have to lift the mass of the earth being turned over. The lazy man's shovel, invented by a monk, avoids such heavy loads. With its help, even a weak person, for whom this kind of physical activity was unbearable, can dig up the ground without much effort.
Photo of a digger for the lazy
Such a digger is usually adapted to work with the left leg, but if desired, you can make the equipment for the right one. The load on the hands is reduced by using a bicycle handlebar, which is located at chest level and is held with both hands, equally distributing the forces. But the main advantage of the miracle shovel is that there is no need to lift the earth, it turns over itself by turning the shovel.
When using Gennady’s father’s shovel, labor productivity increases significantly, the time spent on cultivating the land is reduced, and physical activity is reduced. The miracle shovel will help you dig up a garden, plant potatoes, and, if necessary, dig a trench.
The principle of how an Orthodox monk works with a shovel is to deepen the shovel into the ground by pressing with the foot and, turning the handles of the shovel with both hands, turn over the layer of earth. Pressing the shovel into the ground is made easier by a pin protruding beyond the blade of the shovel. Due to the fact that the height of the shovel can be adjusted, the back does not bend during work, which significantly lightens the load on it. All you need to do is rotate the shovel with your hands, which is where the hardest work happens: removing and turning over a layer of earth.
It is very convenient to plant potatoes using a miracle shovel. Using it, you get even and neat rows. If the blade of the shovel is 30 cm wide, then the distance between the rows will be 0.6 m. Like every device, the Vyatka Plowman shovel has its own advantages and disadvantages. The advantages include:
- Increased labor productivity.
- The spine does not strain during work.
- Suitable for both digging up soil and digging trenches.
- When used on sandy soil, no loosening is required.
How to choose the right shovel for the garden?
Today, old tools have been replaced by new, modernized types of shovels that differ in quality. In order for the version of the tool you purchased to be able to cope with any type of soil, be suitable for replanting plants, digging soil, and help you cope with the task as quickly as possible and with minimal effort on your part, you must choose it responsibly before purchasing. The right shovel, whether bayonet or shovel, will help you get a lot of work done without putting unnecessary strain on your back and arms – it’s a good buy.
There are several types of garden shovels for summer residents, which are ideally designed to perform certain jobs.
The most common type of garden tool for summer residents is a bayonet shovel. The bayonet one is perfect for digging up soil of different types, replanting plants, digging holes and trenches. Due to the fact that this type of tool has a sharpened blade, you can use a bayonet shovel to dig even hard soil in a garden or on a plot.
Bayonet
The second option for a garden tool for summer residents is a wide shovel with a rectangular blade structure. It is convenient to work on soft soil.
Wide
The shovel is in demand. It is not suitable for digging soil, like a bayonet shovel, but due to the fact that it has a wide working part with a recess, it is quite convenient to scoop up bulk materials with a shovel: sand, earth. What is it like in practice? The shovel copes with its main difficult task - shoveling - very effectively.
Sovkovaya
Another garden tool is called American. An American is a shovel, which in its external structure resembles a spoon. This is achieved due to the curved handle and blade. Thanks to this structure of the handle, the back is relieved - you don’t have to bend over when working with the American one. But working with a shovel of this structure is distinguished by its specificity.
American
These are the most popular and sought-after models of shovels, which differ in quality, although there are models of tools with a special structure for digging trenches, for snow work, folding or sapper models for soil.
Shovel baking powder
To create such a shovel you will need to have the following materials on hand:
- two ten bolts;
- metal rod with a cross-section of at least 10 mm;
- iron pipe 15 mm;
- corner 45 mm.
The rod must be cut into pieces of 30 centimeters. A shovel will require 15 segments, 8 of which must be made sharp on one side.
Now on a corner 60 cm long you need to make 8 notches at equal distances from each other. The rods will be located here. The second corner should be 50 cm long and must be marked for the remaining seven rods at the same distance.
Next, according to the markings, you need to weld the rods, and weld corners 35 cm long at both ends to the 50-centimeter corner.
You need to make holes in the corners so that bolts can be inserted into them. Exactly the same holes are made in the hinges, bolts are inserted into them, welded and inserted into the holes in the corners.
The pipe must be cut 2 times 125 centimeters each and slightly bent for convenience and to create a semblance of a lever.
The pipes must be welded along the edges of the upper corner and additionally reinforced with rods. Now all that remains is to weld a comfortable handle to the rods and you can get to work.
Thus, we managed to make a simple but effective miracle shovel from available materials, which will help you quickly dig up a vegetable garden or garden.
How to work?
Despite the fact that the design of the shovel is as simplified as possible, there are some nuances when working with it.
It is very important to start working from the farthest edge of the bed, moving backward and gradually moving the shovel behind you. The general operating algorithm is as follows:
The general operating algorithm is as follows:
- Firmly grasp the handle and place the shovel in the required place, resting it on the front ripper.
- Push the shovel into the ground until the back stop touches the ground. If the soil is dense, then you will have to put in a little effort; to do this, you need to press down on the crossbar of the lower part of the structure.
- Pull the stalk towards you. At this time, the forks will begin to move upward, due to which the soil is plowed.
- Now you need to move the shovel a little back and repeat all the steps again.
There are several design options for such a shovel, but they are all similar, and the materials are approximately the same. The frame is often made from a profiled pipe with a cross-section of 30*30 mm or approximately this size
It is very important to take into account the fact that the wall thickness should not be less than 3 mm
The handle can also be made from the same pipe. Some people make a clamp and use a wooden shovel holder. As for purchased options, they often include a wooden holder.
What should you pay attention to?
It is very important to pay attention to the material that will be used for the teeth. The steel must be strong, at least 8-10 mm in diameter. To do this you can do the following:
To do this you can do the following:
- cut the car springs into small strips;
- straighten the car suspension springs;
- cut off from ordinary willows and welded onto a shovel.
If you have high-quality pitchforks on hand, then you need to calculate the number of rods. It will likely take several forks to cut the pins off. In principle, nothing is easier than finding a good rod, regardless of what it is: round, square, rebar, etc.
Dimensions
Naturally, all people have different physical fitness and sizes, so when creating a miracle shovel or purchasing it, it is very important to take into account its parameters. For strong men, you can make more massive options, and for pensioners or girls it is recommended to make smaller or lighter options
The average sizes look like this:
- The length of the handle should be measured based on height; it is best that it ends at the shoulder;
- the width of the working part should be 45-60 cm. If you do more, then digging will be harder;
- the distance between the pins is recommended to be 7-8 cm;
- the length of the working pins should be in the region of 22-30 cm.
Constructions
In addition to the option shown above (called “Tornado”, “Digger” or “Plowman”), there are several more variants of miracle shovel designs under different names.
Assembly drawing of a miracle shovel
Soil ripper without front support
This design also has working and support forks, but does not have a front stop. Because it is less bulky and weighs a little less. But the front stop gives increased stability during operation. And the weight when dragging is not so important.
The handle is attached to the working forks, the back stop is welded to the comb of the second forks. Both of these structures are movably connected to each other (even door hinges can be used).
Ripper miracle shovel for easy tillage
The photo shows one of the implementations, which is made on the basis of a corner and a round pipe. When working, the pins are driven into the ground by pressing on the crossbar, and not on the stop, as in most models.
Digger
An option called “Digger” is essentially a wide fork with a stop for easier turning and a high, powerful handle.
Miracle shovel "Digger"
The peculiarity of this design is the stop and the adjustable handle. It is fixed with two bolts and adjusted to the height of the working person.
The emphasis is not stationary, but movable. It is fixed to the frame. When plunging the pins into the ground, press on it with your foot, then, without removing your foot, turn it out by pressing the handle of the fork out of the ground.
Digger in action
The physical load during work is low, the work progresses quickly. But this miracle shovel will not work for hard and lumpy soils: it does not crush the soil. She collapses through the pitchfork under her own weight. But this is only possible on loose soils. On clay or black soil it is better to have a second comb with pins.
How to make a miracle digger, see the following video.
Lightcop
This miracle shovel design is slightly different from the previous one. The stops in it are rounded, the handle is arched, but the basic structure is the same. There is some drawback - there is no way to adjust the handle, but otherwise everything is the same - a movable stop and working forks.
Two options called "Lightcop". The simplest ripper for the vegetable garden, garden and cottage
It’s hard to say whether this variation is better or worse. It would be possible to evaluate only by comparing the performance of both copies on the same site.
If you watch the following video, you will see that with such a miracle shovel you can dig not only loose soils, but also heavy ones. And the second thing you can pay attention to is that for such soil it is better to have a second comb of pins, against which you can crush the inverted lumps.
Miracle shovel: what is it?
The classic version of the miracle shovel is the bayonet shovel, which allows you to efficiently process soil of any complexity. Such a tool is a combination of a fork and a sleigh, which makes plowing the soil much easier. Of course, it is much easier to use walk-behind tractors, electric cultivators, or ask for help from a tractor driver whose machine is equipped with a plow. However, all these actions will require quite significant material costs from you, which is why most gardeners still prefer to work with their hands.
What is so remarkable about the miracle shovel? The sharp teeth of the super-shovel easily penetrate the soil, and thanks to the lever (presented in the form of a long handle), you can lift large pieces of soil, which will be loosened against the second part of the fork located on the surface.
Based on the depth of loosening and the presence of additional elements, all such devices can be divided into three types: conventional, “plowman” type and “mole” type.
Conventional shovels are in most cases made at home and consist of a fork and a back stop. When using such a tool, you can really reduce the load and increase the speed of work, but such a shovel will not solve the problem with large blocks of earth. It is only suitable for working on regularly cultivated black soils.
The miracle shovel of the “plowman” type is intended not only for digging the earth, but also for better loosening the soil. The length of its bayonet is usually 10-15 cm, which makes it easy to cut up any type of soil, and the bayonet easily enters the ground even if the worker weighs no more than 60 kg.
The depth of the bayonet of a mole-type shovel is at least 25 cm and is intended for deep digging. The pothole is immediately used for planting vegetable crops. If this particular tool is used, the digger will require a certain effort, especially if he has to work on compressed soil or alumina.
Important! In addition to the described options for miracle shovels, there are also universal options, the length of which is from 15 to 20 cm. They are excellent for regions where the soil can freeze to 5-10 cm, and the main type of soil is chernozem (brown soil)
If the climatic conditions of the region turn out to be even more severe, then even this depth of shovel bayonets will not be enough, and you will not be able to qualitatively renew the soil.
How to dig correctly with a miracle shovel? Let us note the ease of use: you will not need to bend over, and the risk of back injury is minimized (this is especially true for people with radiculitis). The required physical effort also decreases, and the speed of work, on the contrary, increases. The procedure for working with the improved shovel is as follows.
By pressing your foot on a special platform, you need to bury the shovel into the ground. Without removing your foot from the platform, take a step back with your other foot, while simultaneously tilting the shovel towards you - the soil will be on the teeth. Lightly shake the soil with your left and right hands, thus loosening it. You can turn the soil over with one sharp upward movement of your hand, moving the shovel 10-15 cm back. After completing several approaches, you need to walk through the area with a rake and break up the clods.
Did you know? The outdated name for a modern shovel is “spade.” It comes from the definition of the type of action “to step in, to step with one’s foot,” that is, to press on a metal bayonet.
In factory models of shovels, the moving parts are often clogged with earth, which is why they begin to work worse. In addition, sometimes the wooden handles that are inserted into special sockets break. In homemade tools, all parts are connected quite rigidly, so that breakage and jamming are almost completely eliminated. However, this does not mean at all that the miracle shovel for the garden, which was made with your own hands, is completely devoid of shortcomings. There is a serious possibility of deformation of solder or weld seams and breakage of plastic parts (if any), although such malfunctions only appear after many years of active use.
How to choose a shovel for the garden
A shovel is a tool that every owner of a summer cottage or vegetable garden has in their arsenal. A shovel helps to perform many jobs on the ground, and its quality and convenience directly determine not only how much time and effort we spend cultivating our plot, but also the state of our health. Therefore, it is always important to know what rules to use when choosing an ergonomic and reliable tool.
Which shovel is better to choose for working in the country house/garden?
First, the main rule: there are no universal shovels!
For each type of gardening work it is necessary to use a special tool. This, firstly, is convenient, and secondly, it is less labor-intensive, and, therefore, you will cope with the process faster and get less tired.
For digging up soil, arranging beds, planting potatoes and most other gardening work, a bayonet shovel is needed. Now there are several types of bayonet shovels on sale, let's figure out how they differ and what work they are intended for.
How to choose a convenient shovel for working in the country house/garden
Ergonomics - the convenience and adaptability of a tool for various jobs - is ensured by its shape, weight and the material from which the tool is made.
The blade of the shovels is made of steel and titanium alloy.
Shovel handle:
Before the first use, treat the handle with fine sandpaper, but painting or varnishing it is not recommended - the handle will be slippery. Store a shovel with a wooden handle only in a dry place.
An ergonomically curved handle reduces strain on the muscles of the arms and back.
For some gardeners, the handle on the top of the handle makes the shovel more convenient, but this varies from person to person.
How to choose a shovel size
The standard size of a bayonet shovel blade is: length 28.5 cm, width 21 cm. In order to reduce the load, choose a shovel with a smaller blade size.
The height of the shovel is selected individually according to height. To determine the optimal shovel height for you, place it on the ground next to you. The top of the cutting should be 10-12 cm below your shoulder.
Source
The principle of operation of the miracle shovel, features of operation
This unit is based on the use of human physical strength, but thanks to a special device it uses it much more economically, which leads to less fatigue and high productivity. The average width of the processing zone of the device is 40 cm, the plowing depth is about 20 cm. The operating principle is based on the counter-operation of two forks, one of which penetrates the ground and pushes it towards the other. Loosening occurs by breaking clods of soil between the steel rods of the miracle shovel.
Miracle-lopata-20
Miracle-lopata-19
Miracle-lopata-22
Miracle-lopata-23
Miracle-lopata-21
This assistant has a number of advantages and compares favorably with both of its predecessors - a shovel and a fork. In contrast to the first, the load on the worker is reduced several times due to the absence of the need to lift the cut-off layer and turn it over. Unlike the latter, the quality of loosening is much higher and the area processed in one pass is increased. In addition, the absence of a cutting edge makes it possible to increase the effectiveness of weed control, since the rhizomes are not cut, which prevents the proliferation of weeds.
Which shovel to choose for the garden
It is rare that an owner does not have such a tool as a shovel in his garden arsenal. It is used to dig beds, remove manure, and spread humus around the garden. But the tool is not always convenient to use - it often causes back pain, calluses rub, and all the pleasure of being at the dacha disappears.
We'll tell you how to choose a shovel for your garden so that you can use it to effectively dig up beds, clean ditches, and cultivate areas of virgin soil. We will also tell you about the types of this simple tool.
Summarizing
All these tools are easy to make with your own hands. They make the toughest jobs easier and increase productivity. Flat cutters and miracle shovels should be in the arsenal of every cultivated summer resident. But they are only suitable for land that has already been cultivated - they cannot raise virgin soil. True, most gardeners do not face such a task.
On FORUMHOUSE you can find more smart tools for cultivating land, learn how to make a homemade tractor, watch a video that shows in detail the device of the “Mower” flat cutter, and videos that talk about life hacks that improve the life of a summer resident.
How to properly care for garden tools
Gardening tools are a constant companion in a gardener's life. It makes planting, weeding, harvesting, and landscaping easier. However, the instrument requires certain care, knowledge and compliance with special storage rules. Caring for a shovel is not difficult, but it is not recommended to neglect it.
By performing these simple but necessary procedures, you will extend the life of your shovel and other garden tools, maintaining their appearance and functionality at maximum. A tool that is well and promptly looked after will serve you for a really long time and will save your budget from unnecessary expenses on purchasing a new one.
Variety of gardening tools
Working with soil is not an easy task. For this reason, it is extremely important to choose the most convenient equipment possible, which is capable of not only to some extent independently performing the required amount of work, but also significantly facilitating its implementation. There are many modern solutions for more comfortable farming. The main ones include:
- shovel with oval holes;
- forks with a shovel tip;
- a shovel equipped with a steering wheel;
- "tornado";
- electric shovel, etc.
Below we will look at just some types of devices for gardening and land work.